
Home ▸ STM32 Tutorials ▸ USB Tutorials ▸
Updated On: August 15, 2026
STM32 USB Host Audio Class: Play WAV Files from an SD Card
This is Part 10 of the STM32 USB series. In Part 9, we used the STM32 as a USB host to read data from a keyboard and mouse. Like the previous tutorials, we will continue with the USB host mode but switch to the Audio class, and we build a small standalone audio player.
I am going to connect an SD card to the STM32 over SPI and store WAV tracks on it. The STM32 will read these tracks and send the audio data out through a USB speaker or USB headphones, using the USB Host Audio Class. No external codec or audio peripheral is needed for this. We will also wire up three buttons for playback control, so we can skip tracks and pause playback.
I am using the Nucleo L496 board for this project. If you are using a different board, the steps stay the same, but check your own schematic for the USB power pin, VBUS pin, and UART pins.
You can follow the other parts of the USB series here:
- Part 1: STM32 USB CDC: Virtual COM Port
- Part 2: STM32 USB HID Gamepad
- Part 3: STM32 USB HID Mouse and Keyboard
- Part 4: STM32 USB MSC SD Card as External Drive
- Part 5: STM32 USB MSC with W25Q NOR Flash
- Part 6: STM32 USB Composite Device (CDC+HID)
- Part 7: STM32 USB HID Mouse and Keyboard Combined
- Part 8: STM32 USB Host MSC: Read & Write USB Flash Drive
- Part 9: STM32 USB Host HID: Read Keyboard and Mouse Data
- Part11: STM32 USB DFU Bootloader
STM32 USB Host Audio Class: Play WAV Files from SD Card — Video Tutorial
This video walks through using the STM32 USB Host Audio Class to play WAV files stored on an SD card. We wire up an SD card over SPI, configure the USB Host Audio Class in CubeMX, and stream audio to a USB sound card — with buttons to skip tracks and pause playback.
How the STM32 USB Host Audio Class Works
The USB Audio Class lets the STM32 send digital audio directly to a USB sound card or speaker. The USB Host middleware takes care of the audio streaming protocol, so we do not need a DAC, codec, or any dedicated audio peripheral on our end. Our job is only to read the WAV file from storage and feed the raw audio bytes into the class.
To make this work, we need three pieces working together: the USB host state machine that tracks the connected device, an audio playback state machine that tracks what the player is doing, and the SD card layer that reads the actual WAV data.
USB Host States
The USB host middleware calls USBH_UserProcess() in usb_host.c whenever the connection state changes. We use this to know when the USB speaker is plugged in and ready.
static void USBH_UserProcess(USBH_HandleTypeDef *phost, uint8_t id)
{
  switch (id)
  {
  case HOST_USER_SELECT_CONFIGURATION:
    break;
  case HOST_USER_DISCONNECTION:
    Appli_state = APPLICATION_DISCONNECT;
    printf("Device DISCONNECTED\r\n");
    break;
  case HOST_USER_CLASS_ACTIVE:
    Appli_state = APPLICATION_READY;
    printf("Device READY\r\n");
    break;
  case HOST_USER_CONNECTION:
    Appli_state = APPLICATION_START;
    printf("Device CONNECTED\r\n");
    break;
  default:
    break;
  }
}We check Appli_state and hUsbHostFS.gState later in the main loop before we start reading the SD card or playing any audio. This way, we never try to stream audio to a device that is not ready yet.
Audio Playback State Machine
The player itself runs on a state machine, defined in audio.c. Every state handles one part of playback:
AUDIO_STATE_CONFIGsets the sample rate on the USB device and configures the first read.AUDIO_STATE_PLAYkeeps the ring buffer filled and prints the elapsed time.AUDIO_STATE_NEXTandAUDIO_STATE_PREVIOUSmove the file pointer and restart playback.AUDIO_STATE_PAUSEandAUDIO_STATE_RESUMEsuspend and resume the USB audio stream.AUDIO_STATE_ERRORhandles WAV files that are not in a supported format.
This state machine runs inside AUDIO_Process(), which we call continuously in the main loop, right next to MX_USB_HOST_Process().
How the SD Card and FatFs Fit in
We use FatFs in user-defined mode, which means we write our own disk I/O driver instead of relying on the one CubeMX generates. This driver talks to the SD card over SPI and exposes read and write functions that FatFs calls internally.
Once the card is mounted, we scan it for .wav files and store their names in a file list. The audio code then opens files from this list by index, so moving to the next or previous track is just a matter of changing that index.
STM32 USB Audio Wiring and Connections
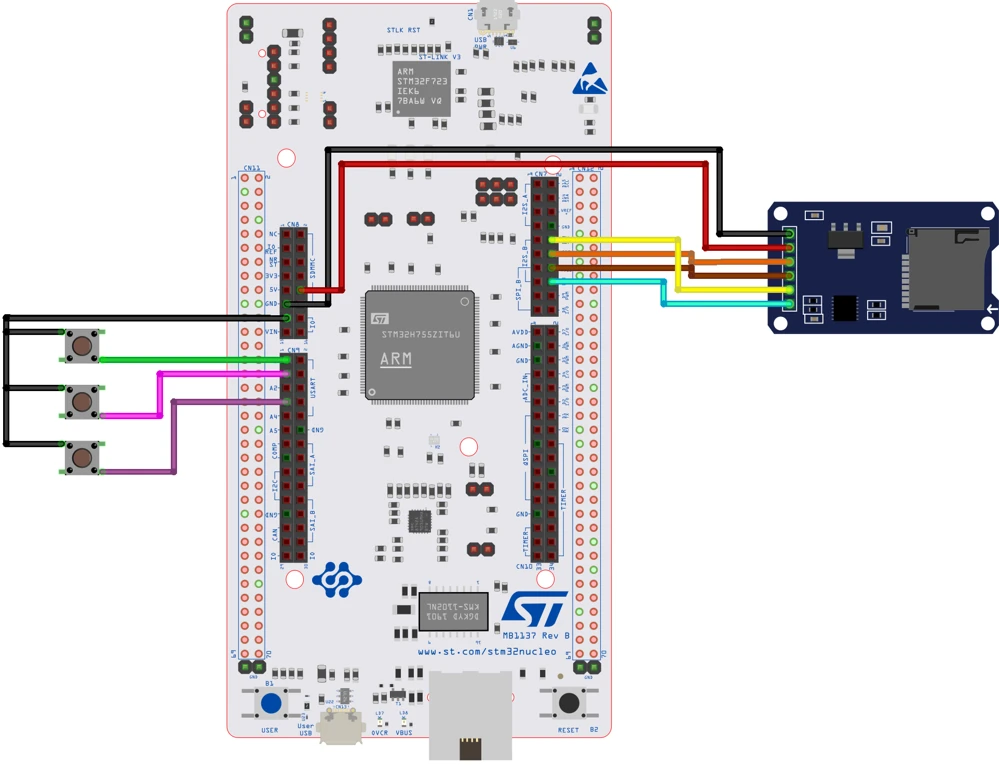
Three things need to be wired for this project: the SD card over SPI, three playback buttons, and the USB port for the sound card. The image below shows the full wiring between the Nucleo board, the SD card module, the playback buttons, and the USB sound card.
SD Card SPI Wiring
The SD card connects to SPI1. Pins PA5, PA6, and PA7 carry the clock, MISO, and MOSI lines, and PD14 is used as the chip-select pin.
| Pin | SD Card Line | Function |
|---|---|---|
| PA5 | SCK | SPI1 clock |
| PA6 | MISO | SPI1 data in |
| PA7 | MOSI | SPI1 data out |
| PD14 | CS | Chip select (SD_CS) |
| 5V | VCC | Power (module has built-in voltage shifter) |
| GND | GND | Ground |
I am powering the SD card module with 5V from the Nucleo board. The module I am using has a built-in voltage shifter that brings this down to 3.3V for the card itself, so there is no risk of damaging it.
Playback Control Buttons
Three buttons handle track control: Next, Previous, and Play/Pause. They connect to PA3, PC0, and PC1, with the other end of each button tied to ground.
| Button | Pin | Function |
|---|---|---|
| Next | PA3 | Skip to next track |
| Previous | PC0 | Go back to previous track |
| Play/Pause | PC1 | Toggle playback |
Each pin uses an internal pull-up and is configured for falling-edge interrupt detection. This means the pin reads high by default, and drops low the moment the button is pressed.
USB Power and Audio Output
The USB port on the Nucleo board connects to the USB sound card, which in turn connects to a speaker or headphones. This port needs power, which comes from a separate power switch IC on the board, controlled through GPIO.
USB Host Audio Class: CubeMX Configuration
We need to configure the USB peripheral, a GPIO pin to enable USB power, UART for serial logging, SPI and FAT FS for SD Card and 3 GPIOs for the playback control.
USB Host Configuration
Go to Connectivity section and enable USB OTG FS in host-only mode. Pins PA11 and PA12 will be assigned as the USB D+ and D- pins. Enable VBUS sensing as well and the pin PA9 will be assigned as the VBUS Pin.
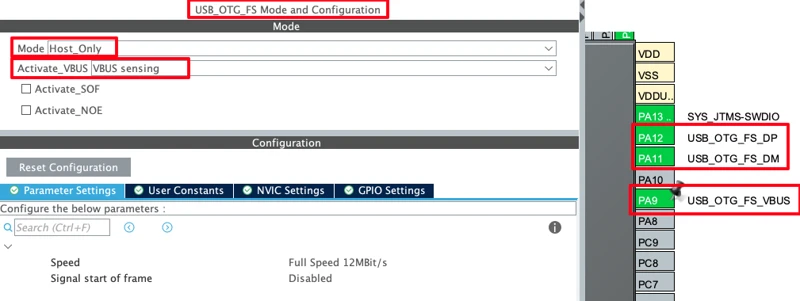
The VBUS sensing on PA9 tells the STM32 to monitor the VBUS line and manage power automatically. If the connected device has no self-power, the STM32 enables the supply.
Next, go to Middleware -> USB Host and enable the Audio Host Class. Leave parameters at default configuration.
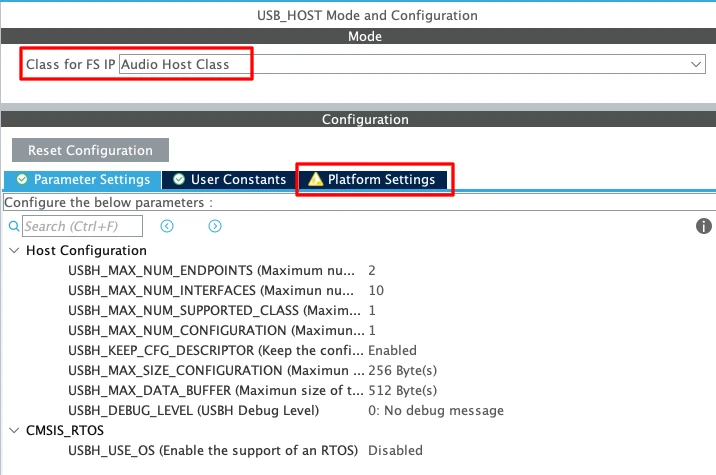
Note that there is a warning showing in the Platform Settings. This is because the USB host middleware wants us to assign the VBUS pin in the platform settings for manual VBUS control. Since PA9 is already used for VBUS sensing, we cannot also assign it here in the Platform Settings. Hence we can ignore this warning. The sensing is already handling what the manual setting would otherwise do.
UART Configuration for Serial Logging
Now we will configure the LPUART1 for serial logging. I am choosing LPUART1 because on this Nucleo L496 board, the ST-Link Virtual Com Port pins are connected to LPUART1. This is shown in the image below.
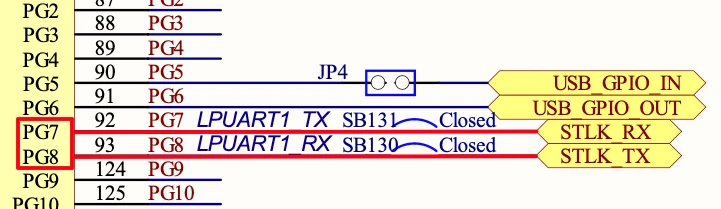
Go to Connectivity -> LPUART1 and enable it in the asynchronous mode. We also need to reassign the UART pins to PG7 (TX) and PG8 (RX), as according to the schematics, this is where the STLK_RX and STLK_TX pins are connected to.
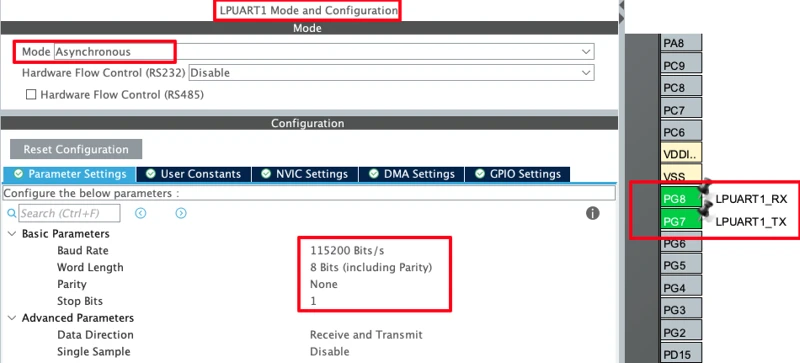
Also make sure the UART configured to baud rate of 115200, 8 bits, no parity and 1 stop bit.
USB PowerSwitchOn Pin
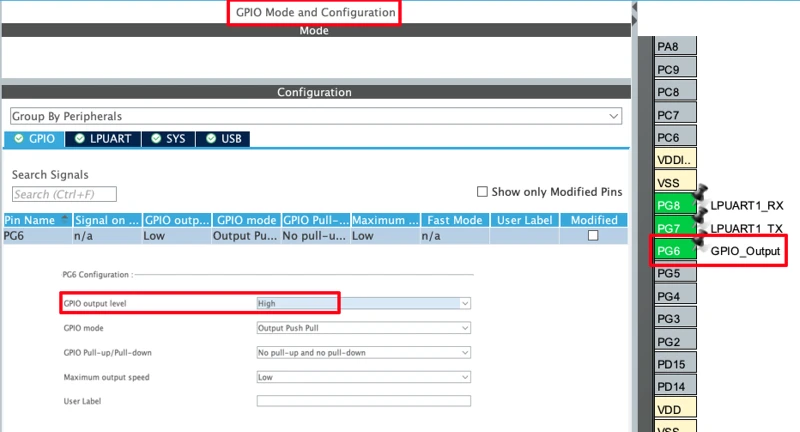
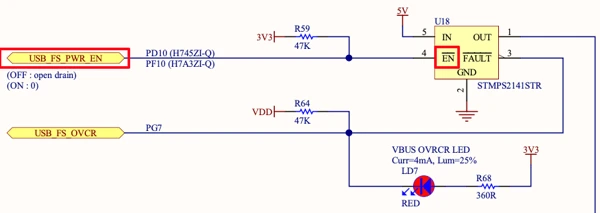
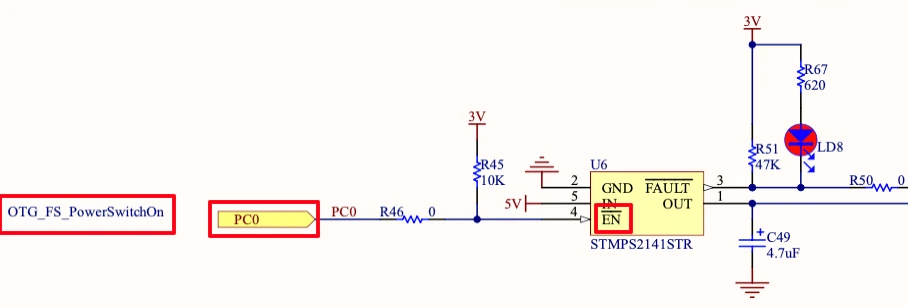
The power switch IC is responsible for providing the power supply to the USB device. On Nulceo L496, the Power IC can be controlled by the pin PG6. Since PG6 is connected to the Enable pin (EN) of the power IC, we need to pull the PG6 High in order to activate the power supply to the USB device. If we do not do this, the USB host will not be enabled, and the connected USB device will not receive power or be detected.
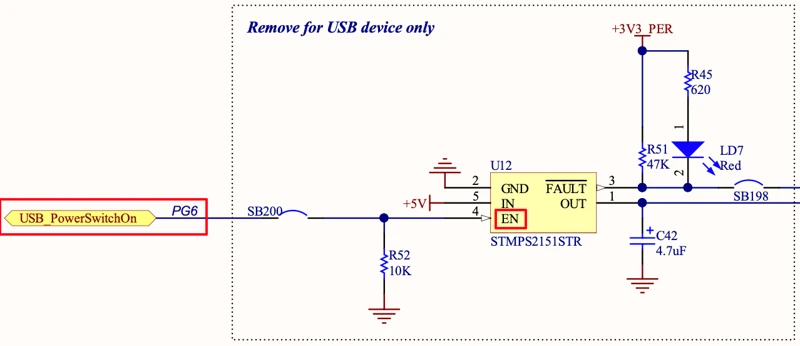
Configure PG6 as a GPIO output pin. In the GPIO settings for PG6, set the default output level to High.
On some Development boards like STM32F407 Discovery or Nucleo H755ZI, the PowerSwitchOn pin is connected to the Enable Pin (), which is Active Low. So in these boards, after configuring the pin as output, it must be pulled Low to activate the Power Supply.
SPI1 for SD Card
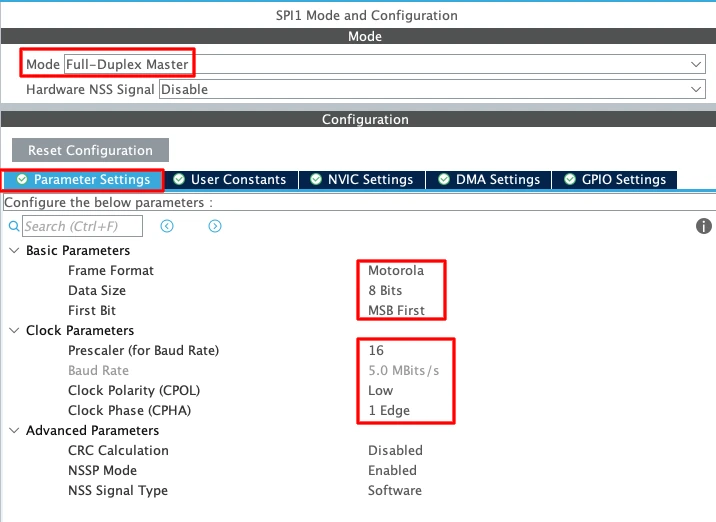
Enable SPI1 in Full-Duplex Master mode with 8-bit data size, MSB first, and a prescaler that keeps the baud rate close to 5 Mbps. I have already covered a separate tutorial on interfacing SD Card with STM32 using SPI, you can check it for more details.
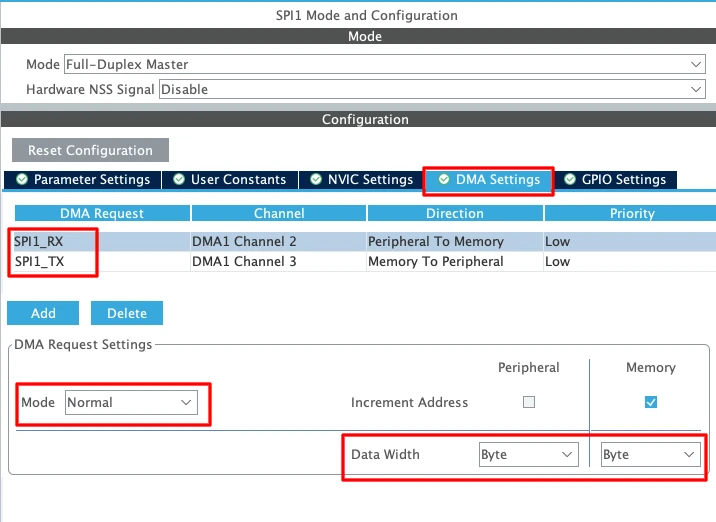
Enable DMA for both TX and RX in Normal mode with Byte data width. The TX DMA is not strictly needed for audio, but the SD card library expects it, so it is enabled to avoid build errors.
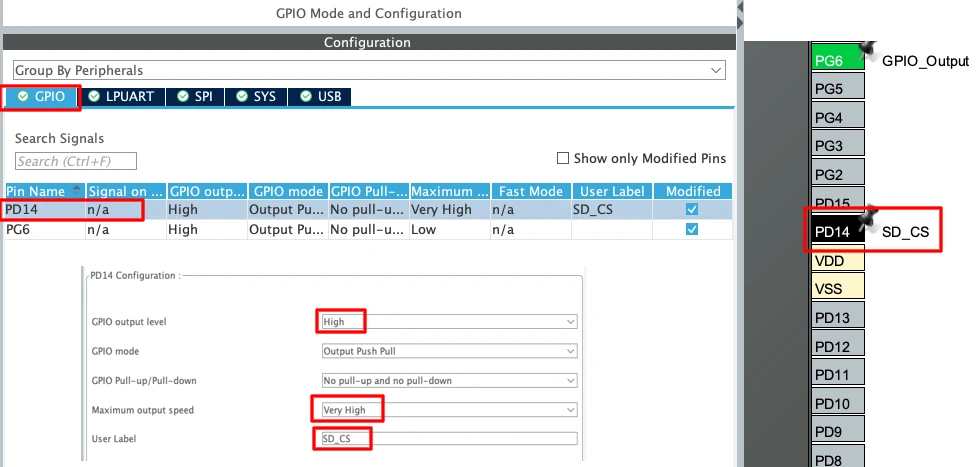
We also need to enable the CS pin for the SD Card. I have connected the Sd Card CS with the PD14 and therefore I will configure it as an output pin.
FATFS Configuration
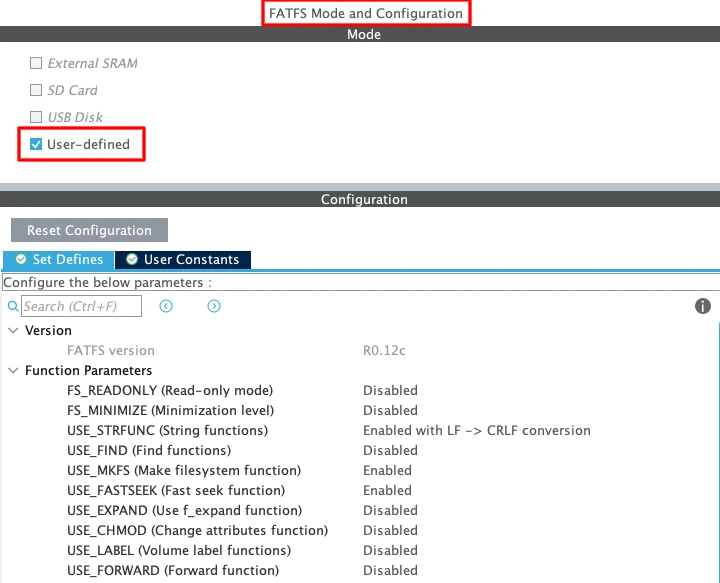
Enable FatFs in User-Defined mode, since we will be supplying our own disk I/O driver. You can leave the rest of the configuration to the default state.
GPIO Configuration for the Playback
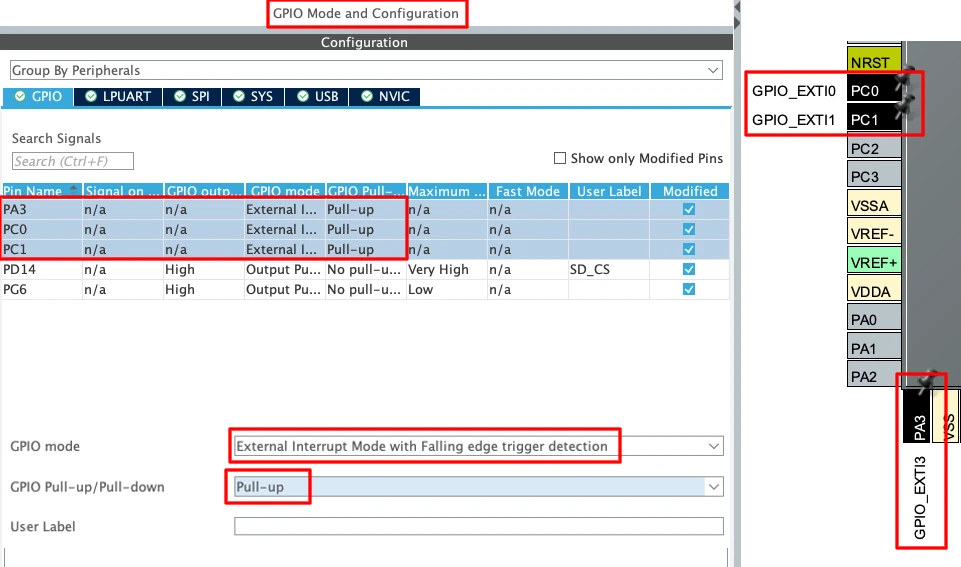
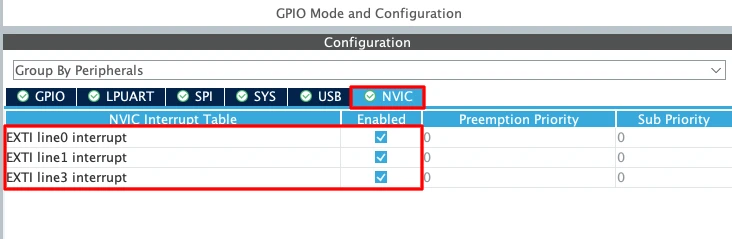
Configure PA3, PC0, and PC1 as external interrupts with Falling Edge trigger detection and Pull-Up enabled. Enable their interrupts in the NVIC tab.
Clock Configuration
I am going to use the internal HSI as the clock source and configure the PLL to reach 80 MHz.
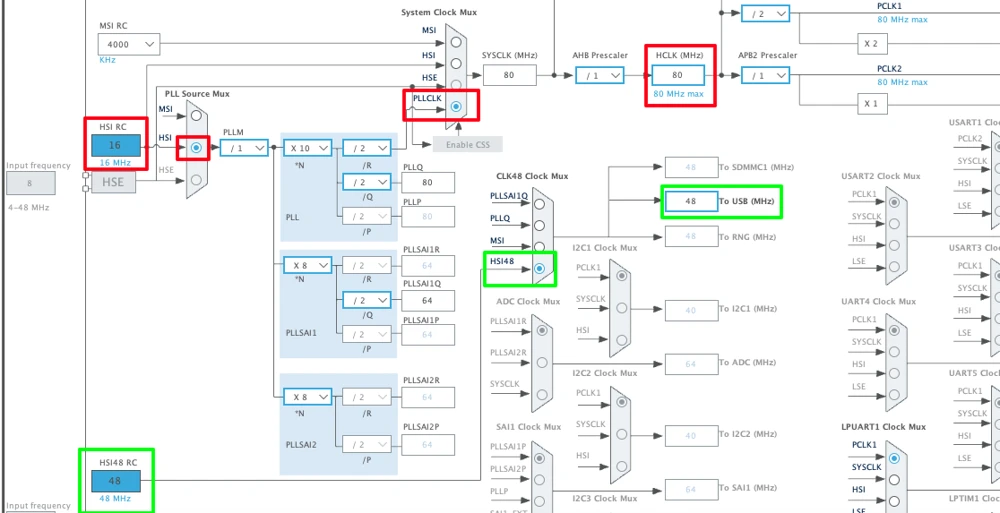
Under the clock tree, the USB peripheral requires exactly 48 MHz. On this board, we can use the dedicated HSI48 oscillator (48 MHz internal oscillator) specifically for USB.
STM32 USB Audio Class Code and Result
printf Routing via UART
Add this function in main.c to redirect all printf output through LPUART1:
int _write(int fd, unsigned char *buf, int len) {
  if (fd == 1 || fd == 2) {
    HAL_UART_Transmit(&hlpuart1, buf, len, 999);
  }
  return len;
}Since LPUART1 is wired to the ST-Link virtual COM port, you can view all logs directly through the ST-Link USB cable without needing any external USB-to-UART adapter.
SD Card Driver Files
The SD card driver is split across three files, reused from an earlier SD card tutorial:
sd_spi.chandles the low-level SPI communication with the card — sending commands, reading and writing 512-byte blocks, and initializing the card.sd_diskio_spi.cconnectssd_spi.cto FatFs, implementing thedisk_initialize,disk_read,disk_write, anddisk_ioctlfunctions FatFs expects.explorer.cmounts the SD card and scans it for WAV files, storing each one in a file list.
Here are the macros from sd_spi.c file. If you use a different SPI instance or CS pin, update these macros.
#define USE_DMA 1
extern SPI_HandleTypeDef hspi1;
#define SD_SPI_HANDLE hspi1
#define SD_CS_LOW() HAL_GPIO_WritePin(SD_CS_GPIO_Port, SD_CS_Pin, GPIO_PIN_RESET)
#define SD_CS_HIGH() HAL_GPIO_WritePin(SD_CS_GPIO_Port, SD_CS_Pin, GPIO_PIN_SET)Make sure DMA is enabled for SPI. Without it, the SPI data rate is not fast enough to keep the audio buffer filled in time, and playback will glitch or stall.
The disk I/O driver in sd_diskio_spi.c links these functions to FatFs:
DSTATUS SD_disk_initialize(BYTE drv) {
if (drv != 0)
return STA_NOINIT;
return (SD_SPI_Init() == SD_OK) ? 0 : STA_NOINIT;
}
DRESULT SD_disk_read(BYTE pdrv, BYTE *buff, DWORD sector, UINT count) {
if (pdrv != 0 || count == 0)
return RES_PARERR;
if (!card_initialized) return RES_NOTRDY;
return (SD_ReadBlocks(buff, sector, count) == SD_OK) ? RES_OK : RES_ERROR;
}sd_spi.c and sd_diskio_spi.c do not need to change beyond the CS pin and SPI instance macros, so we will not repeat their full listing here. The complete files are included in the project download at the bottom of this post.
Reading WAV Files and Building the Playlist
explorer.c mounts the SD card and links the FatFs driver:
uint8_t SD_StorageInit(void)
{
FRESULT res;
if (FATFS_LinkDriver(&SD_Driver, sd_path) != 0) {
return FR_DISK_ERR;
}
DSTATUS stat = disk_initialize(0);
if (stat != 0) {
return FR_NOT_READY;
}
res = f_mount(&fs, sd_path, 1);
if (res != FR_OK)
{
return res;
}
return FR_OK;
}Once mounted, SD_StorageParse() walks through every file on the card and adds each .wav file to FileList:
FRESULT SD_StorageParse(void)
{
FRESULT res;
FILINFO fno;
DIR dir;
char *fn;
FileList.ptr = 0;
res = f_opendir(&dir, sd_path);
if (res != FR_OK) return res;
while (1)
{
res = f_readdir(&dir, &fno);
if ((res != FR_OK) || (fno.fname[0] == 0)) break;
if (fno.fattrib & (AM_DIR | AM_HID | AM_SYS)) continue;
fn = fno.fname;
if ((strstr(fn, ".wav") != NULL) || (strstr(fn, ".WAV") != NULL))
{
if (FileList.ptr < FILEMGR_LIST_DEPDTH)
{
strncpy((char *)FileList.file[FileList.ptr].name, fn, FILEMGR_FILE_NAME_SIZE);
FileList.file[FileList.ptr].type = FILETYPE_FILE;
FileList.ptr++;
}
}
}
f_closedir(&dir);
return FR_OK;
}FileList.ptr ends up holding the total number of tracks found, and each file name sits at a known index. The audio code uses this index to open, skip, or replay tracks. Make sure the WAV files on the card are stereo with a 44.1 kHz sample rate, since the audio class in this project is built around that rate.
Also make sure MX_FATFS_Init() is commented out in main.c. This function links FatFs to the default CubeMX drivers, and we want it linked to our own SD card driver instead.
// MX_FATFS_Init();Audio Playback and Button Control
audio.c handles the actual streaming. AUDIO_Start() opens a track, reads its WAV header, sets the sample rate on the USB device, and fills the buffer for the first time:
AUDIO_ErrorTypeDef AUDIO_Start(uint8_t idx)
{
uint32_t bytesread;
AUDIO_Handle = hUsbHostFS.pActiveClass->pData;
if (FileList.ptr > idx)
{
f_close(&WavFile);
AUDIO_GetFileInfo(idx, &WavInfo);
if (WavInfo.AudioFormat != 0x01)
{
audio_state = AUDIO_STATE_ERROR;
return AUDIO_ERROR_NONE;
}
audio_state = AUDIO_STATE_CONFIG;
AUDIO_ResetPlaybackContext();
USBH_AUDIO_SetFrequency(&hUsbHostFS, WavInfo.SampleRate, WavInfo.NbrChannels, WavInfo.BitPerSample);
if (f_read(&WavFile, &BufferCtl.buff[0], AUDIO_BLOCK_SIZE * AUDIO_BLOCK_NBR, (void *)&bytesread) == FR_OK)
{
if (bytesread != 0) return AUDIO_ERROR_NONE;
}
}
return AUDIO_ERROR_IO;
}AUDIO_Process() is called on every loop iteration. In the AUDIO_STATE_PLAY case, it checks how far the USB device has consumed the buffer and refills it once it drops below half full:
case AUDIO_STATE_PLAY:
BufferCtl.out_ptr = USBH_AUDIO_GetOutOffset(&hUsbHostFS);
if (BufferCtl.out_ptr >= (AUDIO_BLOCK_SIZE * AUDIO_BLOCK_NBR))
{
USBH_AUDIO_ChangeOutBuffer(&hUsbHostFS, &BufferCtl.buff[0]);
}
else
{
diff = BufferCtl.out_ptr - BufferCtl.in_ptr;
if (diff < 0) diff = AUDIO_BLOCK_SIZE * AUDIO_BLOCK_NBR + diff;
if (diff >= (AUDIO_BLOCK_SIZE * AUDIO_BLOCK_NBR / 2))
{
BufferCtl.in_ptr += AUDIO_BLOCK_SIZE;
if (BufferCtl.in_ptr >= (AUDIO_BLOCK_SIZE * AUDIO_BLOCK_NBR)) BufferCtl.in_ptr = 0;
if (f_read(&WavFile, &BufferCtl.buff[BufferCtl.in_ptr], AUDIO_BLOCK_SIZE, (void *)&bytesread) != FR_OK)
{
f_close(&WavFile);
}
}
}
break;Button presses are captured in the EXTI callback and stored in a variable, which the main loop checks and clears on every pass:
void HAL_GPIO_EXTI_Callback(uint16_t GPIO_Pin)
{
key_pressed = GPIO_Pin;
}The main loop converts the pin number into a playback key and calls AUDIO_PlaybackKeys(), with a 250 ms delay to avoid button bounce skipping multiple tracks at once:
if (key_pressed != 0)
{
HAL_Delay(250);
if (key_pressed == GPIO_PIN_3) AUDIO_PlaybackKeys(AUDIO_KEY_NEXT);
else if (key_pressed == GPIO_PIN_0) AUDIO_PlaybackKeys(AUDIO_KEY_PREVIOUS);
else if (key_pressed == GPIO_PIN_1) AUDIO_PlaybackKeys(AUDIO_KEY_PLAY_PAUSE);
key_pressed = 0;
}Inside AUDIO_PlaybackKeys(), each key maps to a state change, and the state machine in AUDIO_Process() takes care of the rest:
void AUDIO_PlaybackKeys(AUDIO_Playback_KeysTypeDef key)
{
if (key == AUDIO_KEY_NEXT)
audio_state = AUDIO_STATE_NEXT;
else if (key == AUDIO_KEY_PREVIOUS)
audio_state = AUDIO_STATE_PREVIOUS;
else if (key == AUDIO_KEY_PLAY_PAUSE)
{
if (audio_state == AUDIO_STATE_WAIT) audio_state = AUDIO_STATE_RESUME;
if (audio_state == AUDIO_STATE_PLAY) audio_state = AUDIO_STATE_PAUSE;
}
else if (key == AUDIO_KEY_STOP)
{
audio_state = AUDIO_STATE_IDLE;
AUDIO_Stop();
}
}When the last track finishes, AUDIO_STATE_NEXT wraps the file pointer back to zero, so the player loops by default:
case AUDIO_STATE_NEXT:
if (++FilePos >= FileList.ptr) FilePos = 0;
AUDIO_Start(FilePos);
break;If you do not want this loop behavior, replace the wrap-around with a call to AUDIO_Stop() once FilePos reaches the last track.
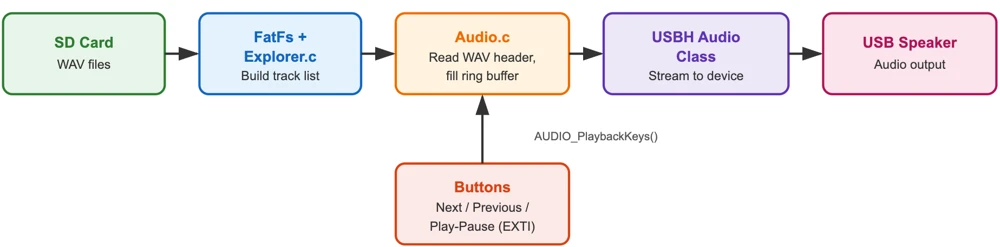
The diagram below shows how audio data moves from the SD card through FatFs and the audio buffer, out to the USB speaker, along with how the buttons feed into the playback state machine.
Full Code — main.c
#include "main.h"
#include "fatfs.h"
#include "usb_host.h"
#include "explorer.h"
#include "usbh_core.h"
#include "audio.h"
UART_HandleTypeDef hlpuart1;
SPI_HandleTypeDef hspi1;
DMA_HandleTypeDef hdma_spi1_rx;
DMA_HandleTypeDef hdma_spi1_tx;
int _write(int fd, unsigned char *buf, int len) {
  if (fd == 1 || fd == 2) {
    HAL_UART_Transmit(&hlpuart1, buf, len, 999);
  }
  return len;
}
extern USBH_HandleTypeDef hUsbHostFS;
extern ApplicationTypeDef Appli_state;
int audio_started = 0;
uint16_t key_pressed = 0;
void HAL_GPIO_EXTI_Callback(uint16_t GPIO_Pin)
{
	key_pressed = GPIO_Pin;
}
void USB_AppProcess(void)
{
if ((Appli_state == APPLICATION_READY) && (hUsbHostFS.gState == HOST_CLASS) && (audio_started == 0))
{
if (SD_StorageInit() == 0)
{
audio_started = 1;
SD_StorageParse();
AUDIO_Start(0);
}
}
if (key_pressed != 0)
{
    HAL_Delay(250);
    if (key_pressed == GPIO_PIN_3)       AUDIO_PlaybackKeys(AUDIO_KEY_NEXT);
    else if (key_pressed == GPIO_PIN_0)  AUDIO_PlaybackKeys(AUDIO_KEY_PREVIOUS);
    else if (key_pressed == GPIO_PIN_1)  AUDIO_PlaybackKeys(AUDIO_KEY_PLAY_PAUSE);
    key_pressed = 0;
}
}
int main(void)
{
HAL_Init();
SystemClock_Config();
MX_GPIO_Init();
MX_DMA_Init();
MX_SPI1_Init();
MX_LPUART1_UART_Init();
// MX_FATFS_Init();
MX_USB_HOST_Init();
while (1)
{
MX_USB_HOST_Process();
USB_AppProcess();
AUDIO_Process();
}
}Output
The GIF below shows the serial monitor logging the connected USB sound card, the mounted SD card with the number of WAV tracks found, and the elapsed playback time updating every second as a track plays.

The GIF below shows the player skipping tracks with the Next and Previous buttons, and pausing and resuming playback with the Play/Pause button.

You can check out the video in the beginning of this post to see the complete working of this project.
STM32 USB Audio Class — FAQs
Conclusion
In this tutorial, we used the STM32 USB Host Audio Class to build a standalone WAV player. We read tracks off an SD card over SPI using a custom FatFs driver, parsed the card for WAV files, and streamed the audio out through a USB sound card. We also wired up three buttons to move between tracks and to pause and resume playback.
The audio state machine in audio.c handles most of the heavy lifting — reading the WAV header, keeping the buffer filled, and reacting to button presses through AUDIO_PlaybackKeys(). The SD card side stays mostly unchanged from the earlier SD card tutorial, so if you already have that driver working, adding audio playback on top of it is a fairly small step.
Download STM32 USB Host Audio Class Project
Open source CubeMX project files and HAL source code, tested on real hardware. Free to use — support the work if it helped you.
Browse More STM32 USB Tutorials
STM32 USB Composite Class: CDC + HID Gamepad on One USB Port
STM32 USB HID Device: Combine Mouse and Keyboard on One Port
STM32 USB Host MSC: Read & Write USB Flash Drive with FatFs and FreeRTOS
STM32 USB Host HID: Read Keyboard and Mouse Data with STM32
STM32 USB DFU Bootloader: Flash Firmware Over USB Without ST-Link

Subscribe
Login
0 Comments
Newest

