
Home ▸ STM32 Tutorials ▸
Updated On: March 23, 2026
How to send data to UI || sample from GUI task
This is the 3rd tutorial in the STM32 Touch GFX series, and today we will see how to send the data from the MCU to the UI. As per the ST’s guidelines, there are 2 ways to do it. Either we can sample the data from the GUI task itself, or create another task to do the sampling.
This tutorial will cover the first method, where we will sample the data from the GUI task. To do that I am going to use a physical button, and the potentiometer connected through the ADC.
Whenever the button will be pressed, there will be an indication on the UI. Also I will display the ADC values in a separate text area on the UI.
We will use the 2 important points of information provided in the TouchGFX documentation.

We will see them in this tutorial.
VIDEO TUTORIAL
You can check the video to see the complete explanation and working of this project.
TouchGFX Setup

As shown above, I have added an image icon to show the light is OFF. The image name is also changed to lightOFF. Also note that the visibility is enabled for this image.
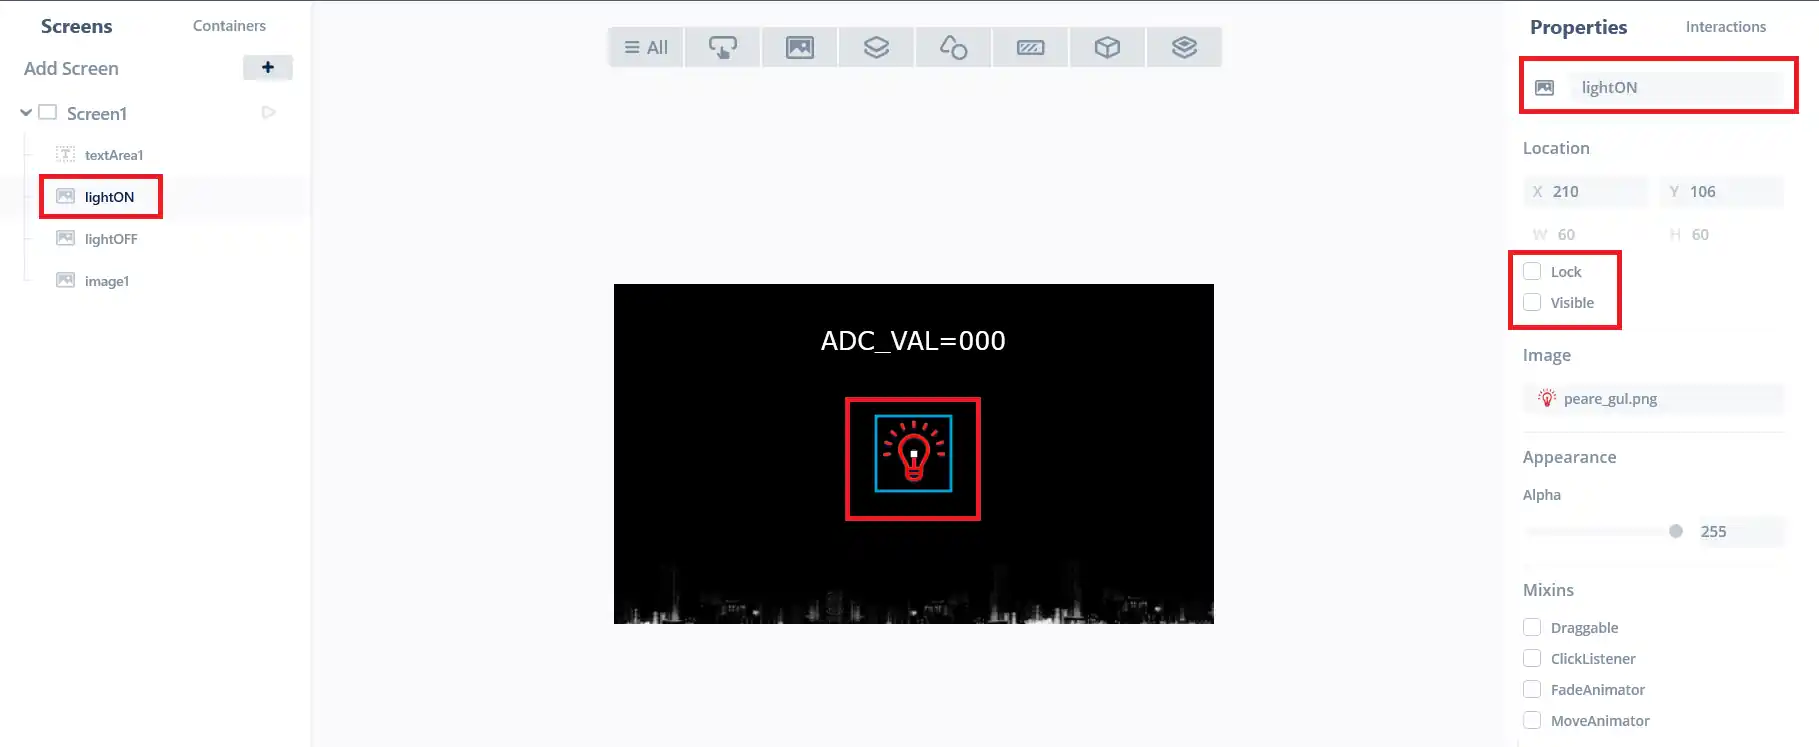
There is one more image indicating the light is on. This image is superimposed on the first one to give an effect of the light being turned on. Note that the visibility of this image has been disabled.
This is what we will control using the button. When the button will be pressed, this image will be set to visible indicating the light has been turned on. Similarly, when the button is released, the image will become non visible, and we will see the light OFF image.
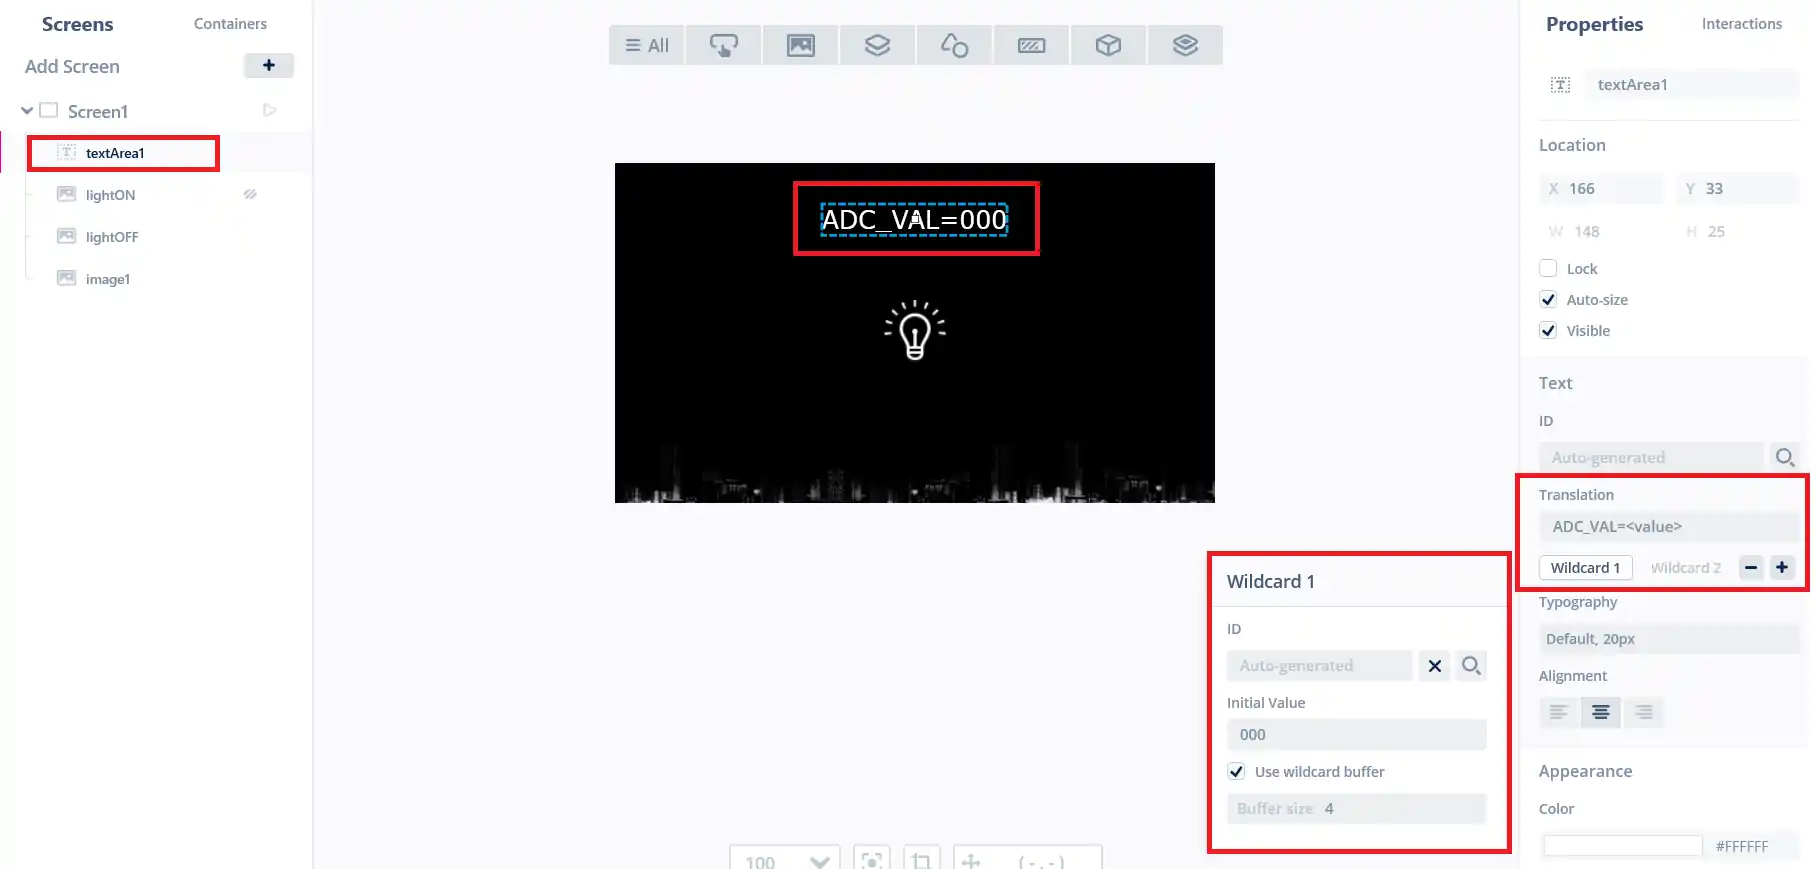
I have also added a text area to see the ADC values. The text area is set up with a wildcard. Since I want to display the values between 0 to 100, 3 bytes are enough to store these values (1 bye per character). The wildcard buffer must be assigned with 1 extra bytes, that is 4 bytes.
We also need to set the wildcard range for these values. The wildcard range is set below.
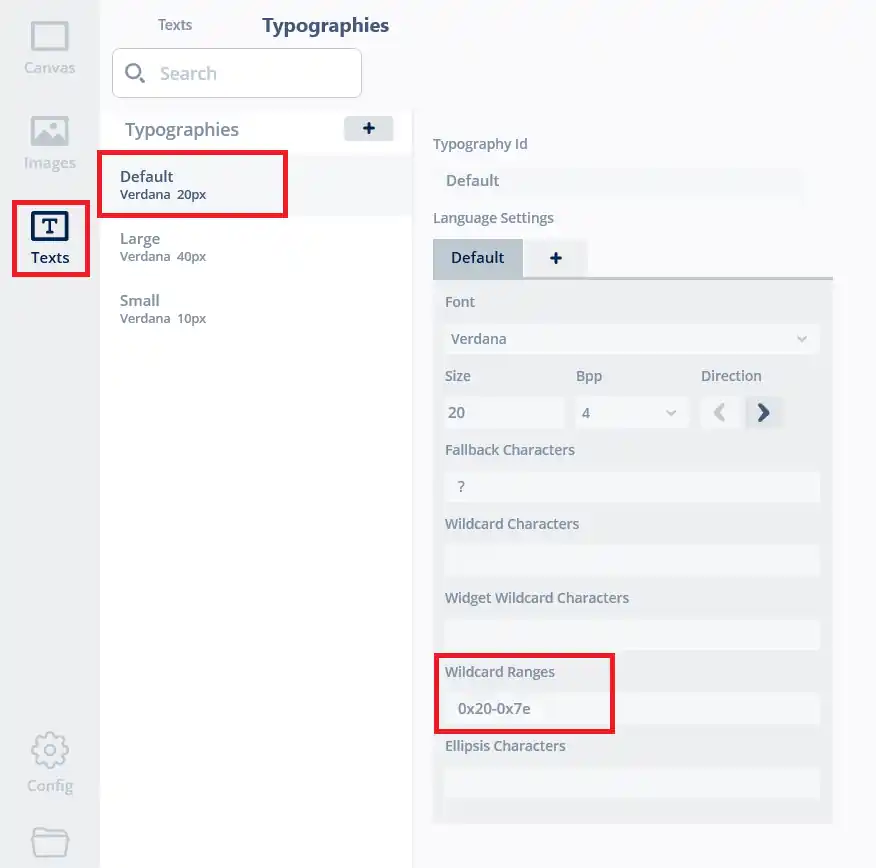
I have set the range from 0x20 to 0x7E as this includes all the useful characters in the ascii table.
CubeMX Setup
The F750 discovery board has a user button, which is connected to the pin PI11. I have enabled the pin PI11 as the input pin.

The pin has been configured in the input mode along with the pull down. When the button is pressed this pin will be pulled high.
I am going to display the potentiometer values on the UI. This potentiometer is connected via the ADC.
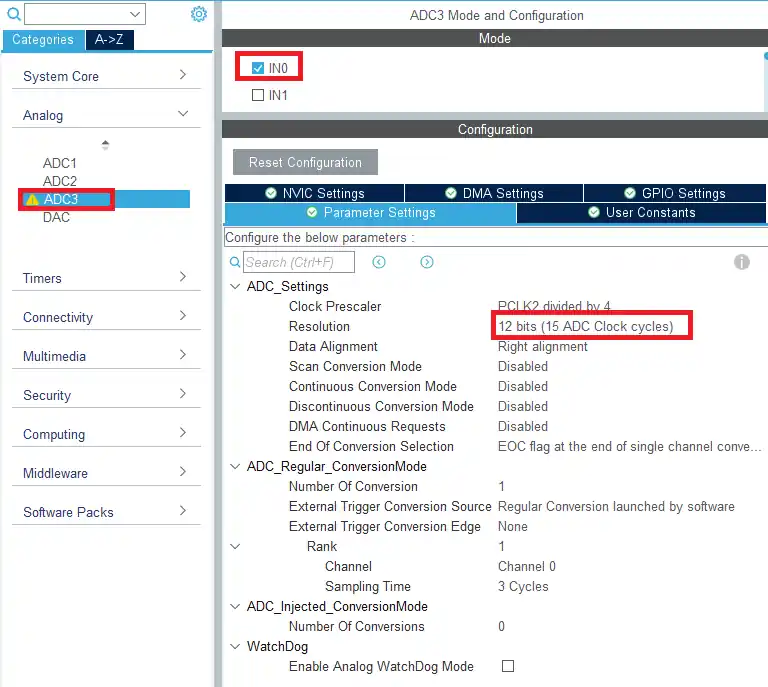
The ADC3 channel 0 is configured with 12 bit Resolution. Everything else is kept default in the ADC configuration. We will use the poll method to read the ADC values.
Some Insight into the code
As I mentioned in this tutorial we will be sampling from the GUI task itself, i.e. sampling inside the Model::tick() function. The model source file is shown below.
#ifndef SIMULATOR
#include "main.h"
extern "C"
{
	extern ADC_HandleTypeDef hadc3;
	long map(long x, long in_min, long in_max, long out_min, long out_max)
	{
	  return (x - in_min) * (out_max - out_min + 1) / (in_max - in_min + 1) + out_min;
	}
}
#endif

Model::Model() : modelListener(0), Button_State (false), ADC_VAL(50)
{

}

void Model::tick()
{
#ifndef SIMULATOR
	if (HAL_GPIO_ReadPin(GPIOI, GPIO_PIN_11))
	{
		Button_State = true;
	}
	else Button_State = false;

	HAL_ADC_Start (&hadc3);
	HAL_ADC_PollForConversion (&hadc3, 10);
	uint16_t value = HAL_ADC_GetValue (&hadc3);
	HAL_ADC_Stop (&hadc3);
	ADC_VAL = map(value, 0, 4095, 0, 100);
#endif

	modelListener->setLight (Button_State);
	modelListener->setADC (ADC_VAL);
}- I have included some definition from line 2-11.
- The main.h contains all the necessary headers for he components we are using in this project.
- I have defined the ADC handler, ADC_HandleTypeDef hadc3, for the ADC to work.
- Also there is a map function (from Arduino source code), so to map the ADC values within certain range.
- Line no 13 initializes the variables Button_State and ADC_VAL, which are declared in the model header file.
- Lines 21-25 are used to read the button state.
- If the button is pressed, this variable will be set true and if the button is released, the variable will be set to false.
- Lines 27-31 are used to read the ADC values from the potentiometer.
- Here I am using the Poll method to read the values.
- The 12 bit ADC values are then mapped to 0 to 100 range. These converted values are stored in the ADC_VAL variable.
- Lines 34 and 35 are used to send the button state and the ADC values to the presenter.
- The modelListener is the pointer to the active presenter and is used to send the data to the presenter.
We will use the MVP design pattern to send the data to the UI. The design is shown below.

- The model either samples the data from the backend module, or receives this data via another task.
- The model send send the data to the presenter.
- The presenter further send this data to the view.
- The view updates the data on the UI.
Below is the presenter source file, which receives the data from the model.
void Screen1Presenter::setLight (bool state)
{
	view.setLight (state);
}

void Screen1Presenter::setADC (int val)
{
	view.setADC (val);
}Here the functions setLight and setADC are called by the modelListener. The presenter calls the same functions in the view and pass the data received from the model to the view.
Note that these function must be defined in the presenter header files also.
Below is the view source file.
void Screen1View::setLight (bool state)
{
	lightON.setVisible(state);
	lightON.invalidate();
}

void Screen1View::setADC (int val)
{
	Unicode::snprintf(textArea1Buffer, TEXTAREA1_SIZE, "%d", val);
	textArea1.invalidate();
}- The setLight function will set the visibility of the lightON image. The visibility will change based on the data received from the presenter.
- After changing the visibility, we must invalidate the image for the changes to take effect.
- The setADC function will first convert the value, received from the presenter, into the characters.
- We will again invalidate the textArea for these values to be displayed on the UI.
Note that these functions must be first defined in the Screen1View header file.
Result
Below are the gifs showing the results.

You can see the UI showing the Light is turned on whenever the button is pressed.
Also the ADC values are updating as the potentiometer is rotated.
STM32 TouchGFX Tutorial Series

TouchGFX #2. How to use TextArea and Wildcards

TouchGFX#4. Sending data from another task || Gauge || Animation

TouchGFX #5. Data from UART to UI
TouchGFX #6. How to Build a Multiscreen Project

TouchGFX #7. How to implement on screen keyboard

TouchGFX #8. Send data from GUI to MCU


I followed every process. But Unicode::snprintf(textArea1Buffer, TEXTAREA1_SIZE, “%d“, this line is not generated on Screen1ViewBase.cpp file. If I put the line on Screen1View.cpp, it shows error.
Please guide.
Hi!
I’m learning a lot with your tutorials!!
you are best in this job
Hi. I’m Choi.
I am your YouTube subscriber.
I was following ‘Touch GFX #3. Send data to UI || Sampling from the GUI task || MVP’
during one of your videos.
However, the problem is that the function that changes the LED display on the screen when I press the button during the video does not work.
I did the same coding as in the video, but it doesn’t work. For reference, I use STM32F746G-DISCO.
I was wondering if you have any advice or issues regarding this.
I look forward to your reply.
Thanks for the giving us good contents.
“does not work” does not have a specific reason. You have to find the error. If you have followed everything properly, it will work. But since it doesn’t work that means you have missed something. So debug the code, put breakpoint in the setlight function in the view file and see if it gets hit. If it doesn’t then put breakpoint in the button callback and follow the execution to see why it doesn’t reach there.