
Home ▸ STM32 Tutorials ▸
Updated On: March 23, 2026
How to implement on screen keyboard
This is the 7th tutorial in the STM32 touchGFX series, and today we will see how to implement on screen keyboard in any application. Keyboard is not provided as an element in the touchGFX but there is an example provided in the touchGFX which shows its implementation. I have extracted some files from that example and today I will show how to implement the keyboard using a step by step guide.
VIDEO TUTORIAL
You can check the video to see the complete explanation and working of this project.
TouchGFX Setup
Design
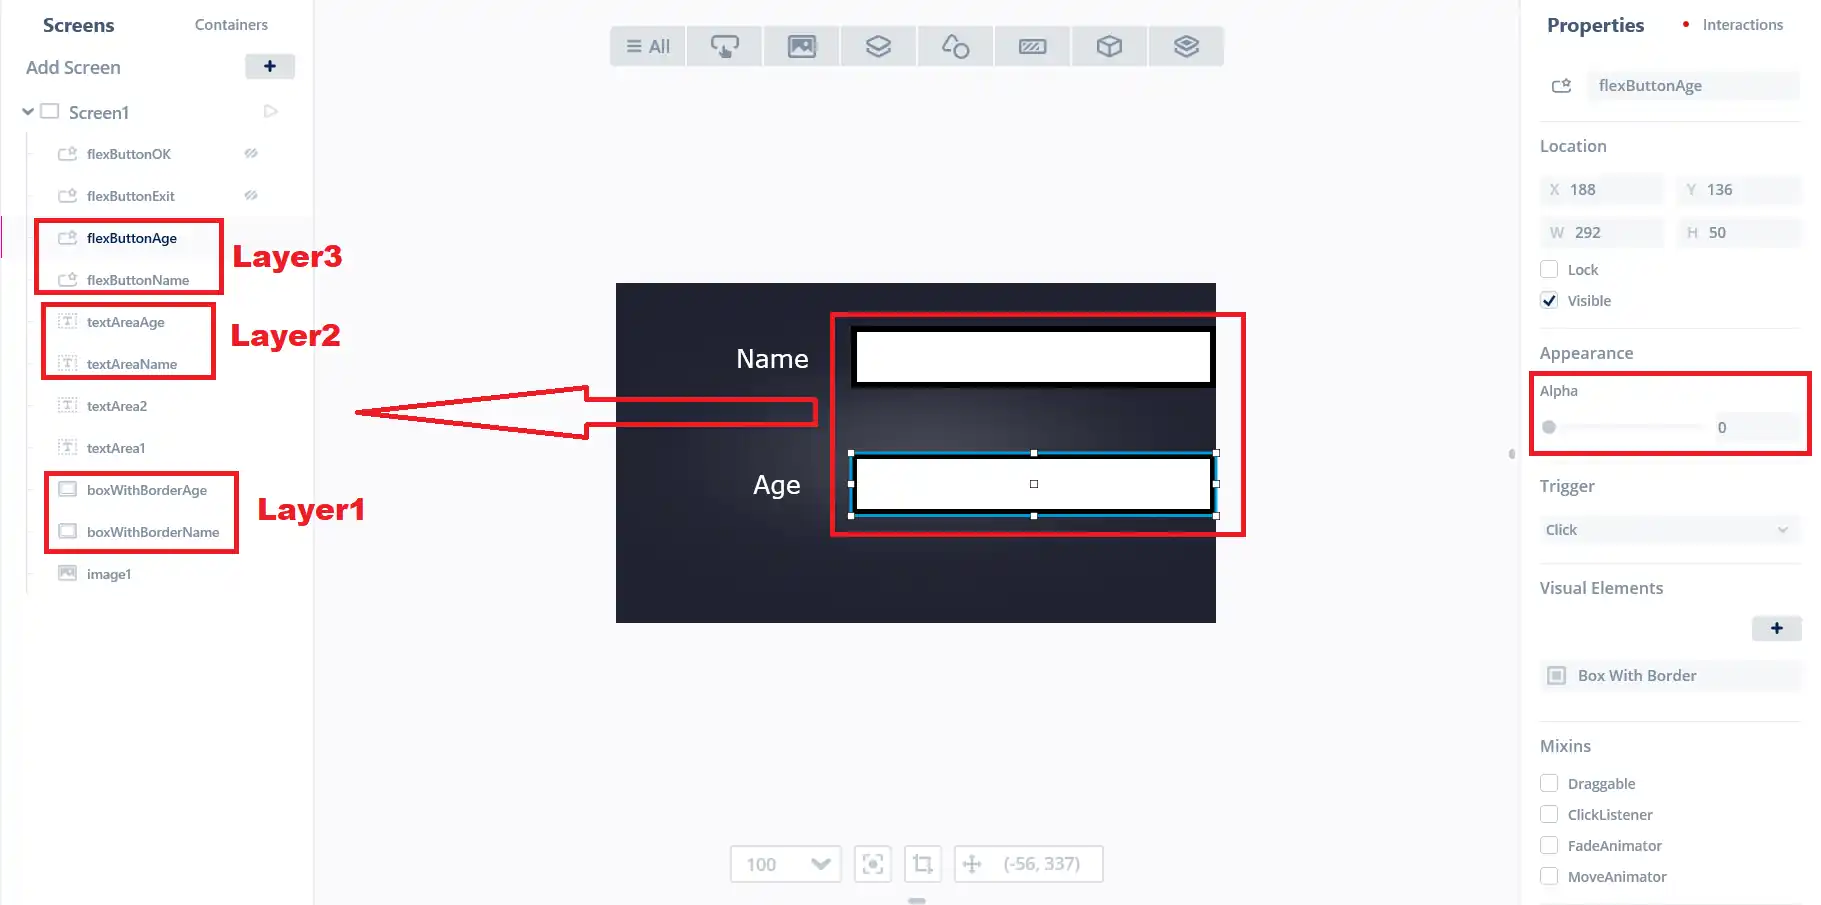
Here I have designed the UI to display the name and age. The detail is shown on the left.
- We have the Layer 1 which consists of 2 border with boxes.
- On top of boxes, we have the text areas (Layer 2) where the keyboard data will be shown.
- Then finally the top layer contains the 2 flex buttons (Layer 3), which when clicked, will show up the keyboard.
- The Alpha for the buttons is reduced to 0 making the buttons invisible.
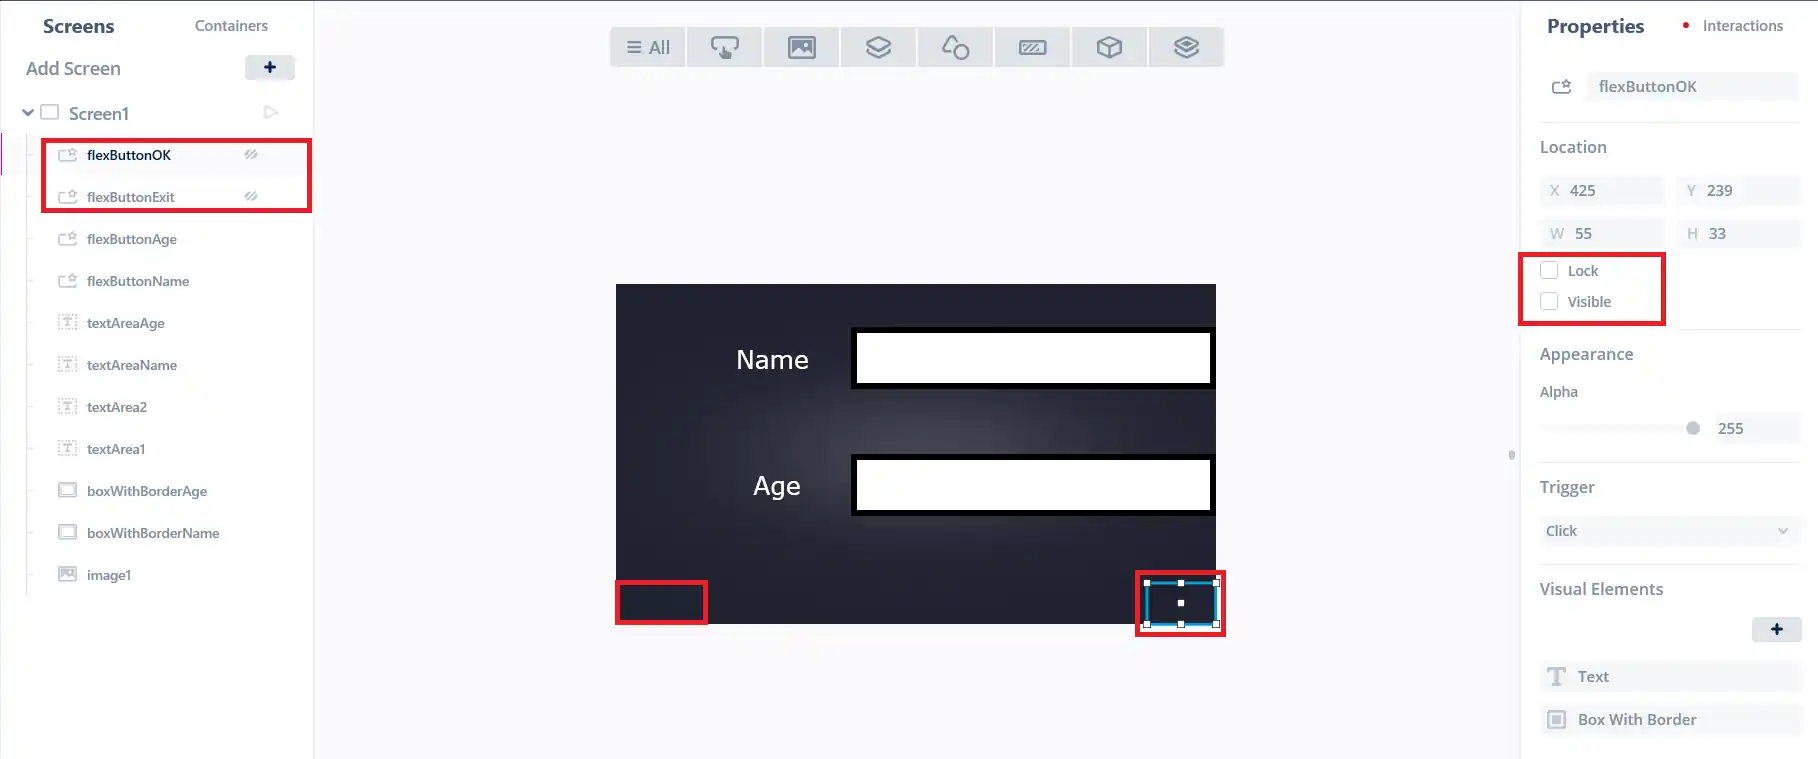
I have also added 2 flex buttons (OK and EXIT). They are set to invisible at the beginning and when the keyboard shows up, we will also show these buttons.
The difference between “setting Alpha to 0” and making “invisible” is that, when we set the the Alpha to 0, the button will still remain at that position and it can be clicked. But when we set them invisible, the buttons can’t be clicked.
Now we will add some typographies and texts to our project which will be used by the keyboard.
Texts
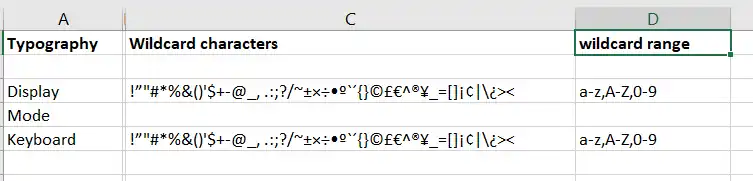
I have prepared an excel sheet which contains the typographies we need to add to our project. The excel sheet is in the folder “keyboard Things” which you can get inside the zip file at the end of this post.
You can simply copy the details (like name, wildcard chars, ranges) from the sheet and create new typographies.
The image from the sheet along with the image from the project is shown below.
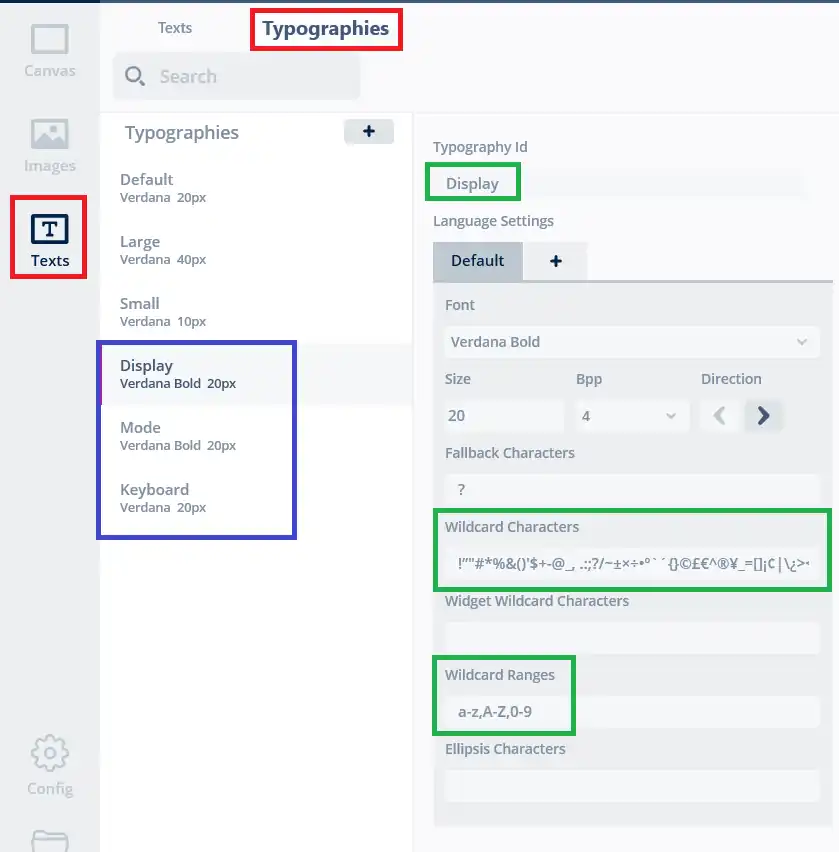
In the picture above, you can see I have created 3 new typographies in the texts section of the project. The Typography name, wildcard characters and wildcard range has been updated as per the details provided in the excel sheet.

In the texts tab, we have to add 3 new texts. I have provided a picture in the folder “keyboard Things”, which shows these settings.
The name, typography and GB has to be exactly same as shown in the picture.
Images and files
Now generate the project once and go to Project folder -> TouchGFX -> assets -> images
Here we will copy the images from the folder “keyboard Things”. These are the images of the keyboard itself

Along with images we also need to copy certain header and source files. These files contain the keyboard code, button mapping etc.
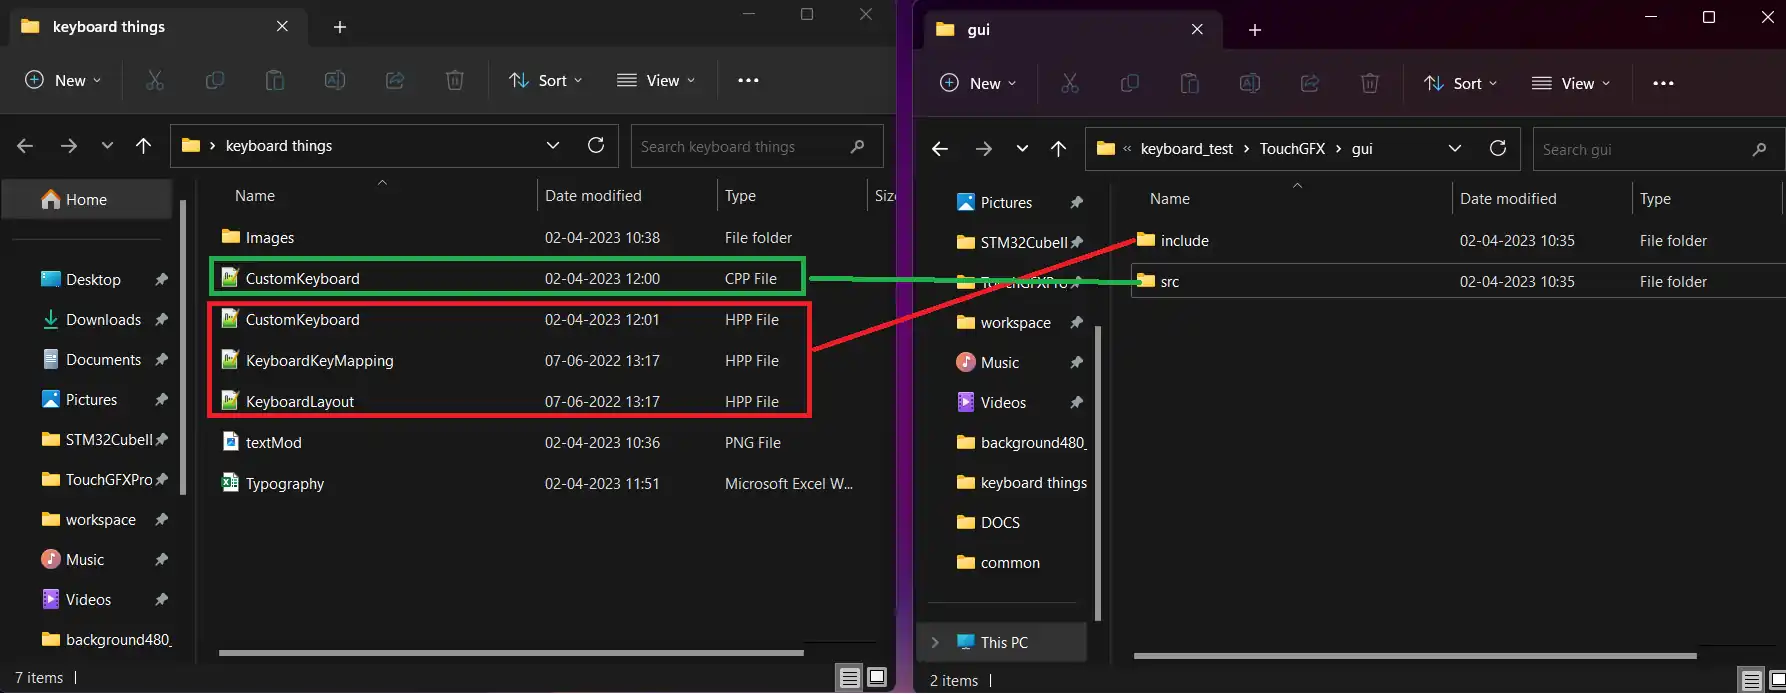
Copy the header files from the “keyboard Things” to the project->TouchGFX->gui->include folder and the source file into the src folder.
Once all the copying is finished, generate the project from the touch GFX.
Some Insight into the code
We will be working mainly in the Screen1view source file.
public:

.............
.............
    virtual void nameClicked();
    virtual void ageClicked();
    virtual void okClicked();
    virtual void exitClicked();
protected:

    CustomKeyboard keyboard;
    int nameMod;
int ageMod;I have added the functions we defined in the interaction. Along with those functions, I have created few variables i.e.
- A custom keyboard class for the keyboard.
- And variables namemod and agemod to determine which field we are editing.
Screen1View::Screen1View()
{
    keyboard.setPosition(80, 16, 320, 240);
 // startx, starty, width, height
    add(keyboard);  // add keyboard to the UI
    keyboard.setVisible(false);  // hide keyboard
}- In the screen1view source file, we will first set the position of the keyboard. The keyboard is 320 x 240 in dimension.
- The add function will add the keyboard to the UI.
- Now we will set the keyboard visibility to false, so that it should not be visible by its own.
Now we will write the code for the interactions we defined in the GUI.
void Screen1View::nameClicked()
{
	keyboard.setVisible(true);  // show keyboard
	keyboard.invalidate();
	flexButtonExit.setVisible(true);  // show exit button
	flexButtonExit.invalidate();
	flexButtonOK.setVisible(true);  // show ok button
	flexButtonOK.invalidate();

	nameMod = 1;
	ageMod = 0;
}
void Screen1View::ageClicked()
{
keyboard.setVisible(true); // show keyboard
keyboard.invalidate();
flexButtonExit.setVisible(true); // show exit button
flexButtonExit.invalidate();
flexButtonOK.setVisible(true); // show ok button
flexButtonOK.invalidate();
nameMod = 0;
ageMod = 1;
}When the name flex button is clicked or the age flex button is clicked, we will perform the following operations.
- We will set the keyboard visibility to true, hence the keyboard will show up.
- The exit button and the OK button is set set to visible, so they will also show up at their respective positions.
- In the nameClicked function, we will set the namemod variable to 1 indicating that the keyboard is open by the name button and hence the keyboard data will be the name data.
- Similarly in the ageClicked function, the agemod variable will be set to 1, indicating that the keyboard buffer now contains the age data.
void Screen1View::exitClicked()
{
	keyboard.setVisible(false);  // hide keyboard
	keyboard.invalidate();
	flexButtonExit.setVisible(false);  // hide exit button
	flexButtonExit.invalidate();
	flexButtonOK.setVisible(false);  // hide ok button
	flexButtonOK.invalidate();
        nameMod = ageMod = 0;
}When the exit button is clicked, we will hide everything, i.e. the keyboard, the exit button and the ok button. Along with it we will also clear the namemod and agemod variables.
void Screen1View::okClicked()
{
	keyboard.setVisible(false);  // hide keyboard
	keyboard.invalidate();
	flexButtonExit.setVisible(false);  // hide exit button
	flexButtonExit.invalidate();
	flexButtonOK.setVisible(false);  // hide ok button
	flexButtonOK.invalidate();
	if (nameMod)
	{
		Unicode::strncpy(textAreaNameBuffer, keyboard.getBuffer(), TEXTAREANAME_SIZE);
		textAreaName.invalidate();
	}

	if (ageMod)
	{
		Unicode::strncpy(textAreaAgeBuffer, keyboard.getBuffer(), TEXTAREAAGE_SIZE);
		textAreaAge.invalidate();
	}
	// once the data is copied, clear the keyboard buffer
	keyboard.clearBuffer();
}Similar to exit button when the ok button is clicked, we will hide all the buttons along with the keyboard.
If the namemod is still 1, indicating that the OK was clicked after we typed the name, we have to display the name data in the name text field. To do so, we will simply copy the data from the keyboard buffer into the text area buffer and invalidate the text area.
Similarly if the agemod variable is set to 1 and the OK button was clicked, we will copy the keyboard data into the age text area field.
After copying the data, we will clear the keyboard buffer.
Result
You can see the working in the gif shown above. Clicking the name button shows the keyboard and the data is also shown on the name text field. Similarly the age button also pulls the keyboard and its data is shown on the age text field.
STM32 TouchGFX Tutorial Series

TouchGFX #2. How to use TextArea and Wildcards

TouchGFX #3. Sending data to UI || MVP

TouchGFX#4. Sending data from another task || Gauge || Animation

TouchGFX #5. Data from UART to UI
TouchGFX #6. How to Build a Multiscreen Project

TouchGFX #8. Send data from GUI to MCU

Subscribe
Login
0 Comments
Newest
