
Home ▸ STM32 Tutorials ▸
Updated On: March 23, 2026
How to build a Multiscreen Project using TouchGFX
In this tutorial we will see how to build a multiple screen project using the TouchGFX.
A multiple screen project has some issues of it’s own. Today we will see what those issues are and how to resolve them.
I will be using the STM32F750 discovery board for the project.
Let’s start with the TouchGFX setup.
VIDEO TUTORIAL
You can check the video to see the complete explanation and working of this project.
TouchGFX Setup
As I mentioned this project will involve multiple screens. For the simple example, I am going to create 2 screens.
Screen 1
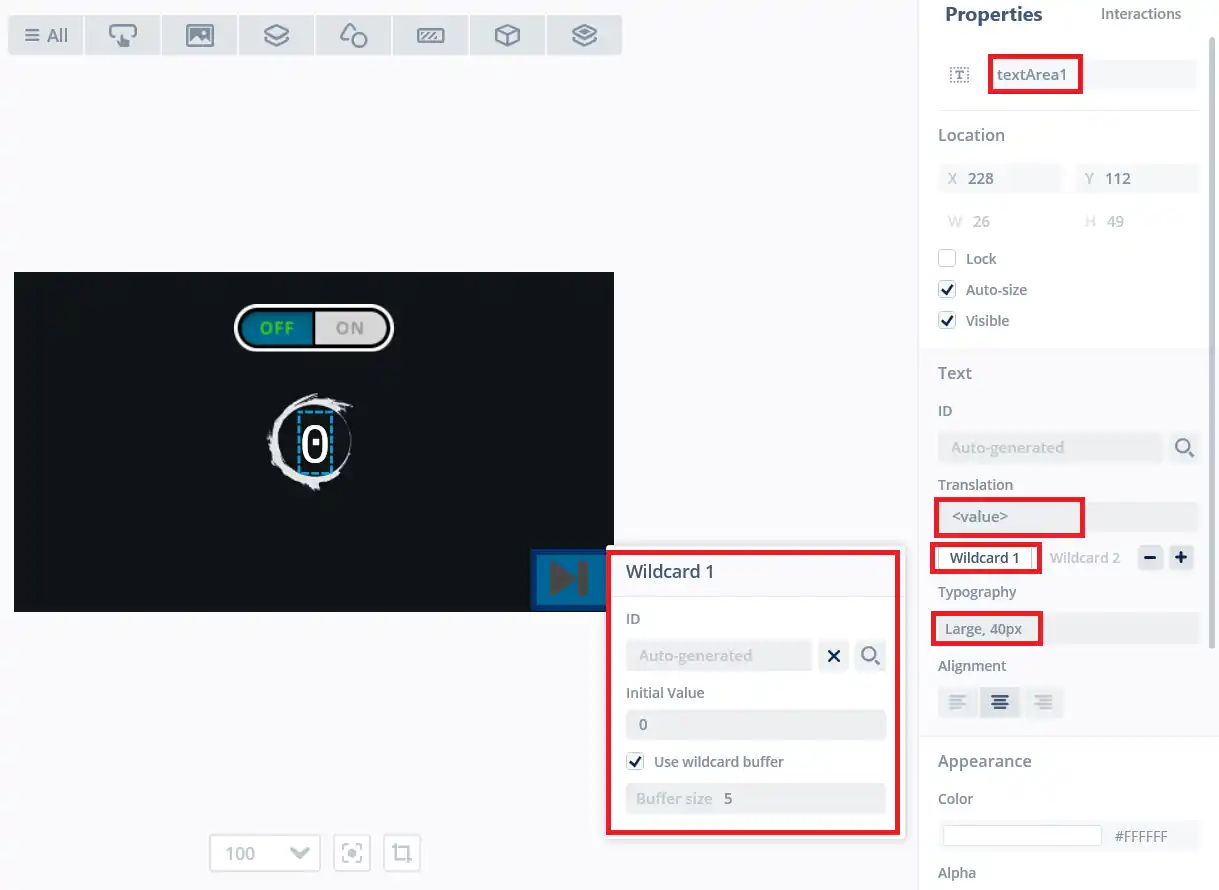
The Screen 1 will contain a toggle button and a text area. The state (0 or 1) of the Toggle button will be shown on the text area.
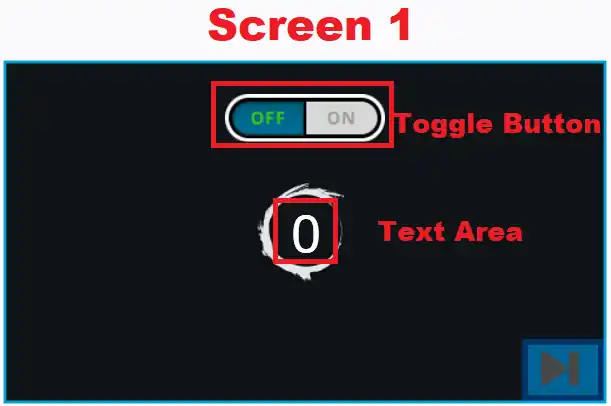
We need to add a wildcard for the value in the Text Area. Also I am using the wildcard buffer so that we can set up to 5 bytes for the text Area.
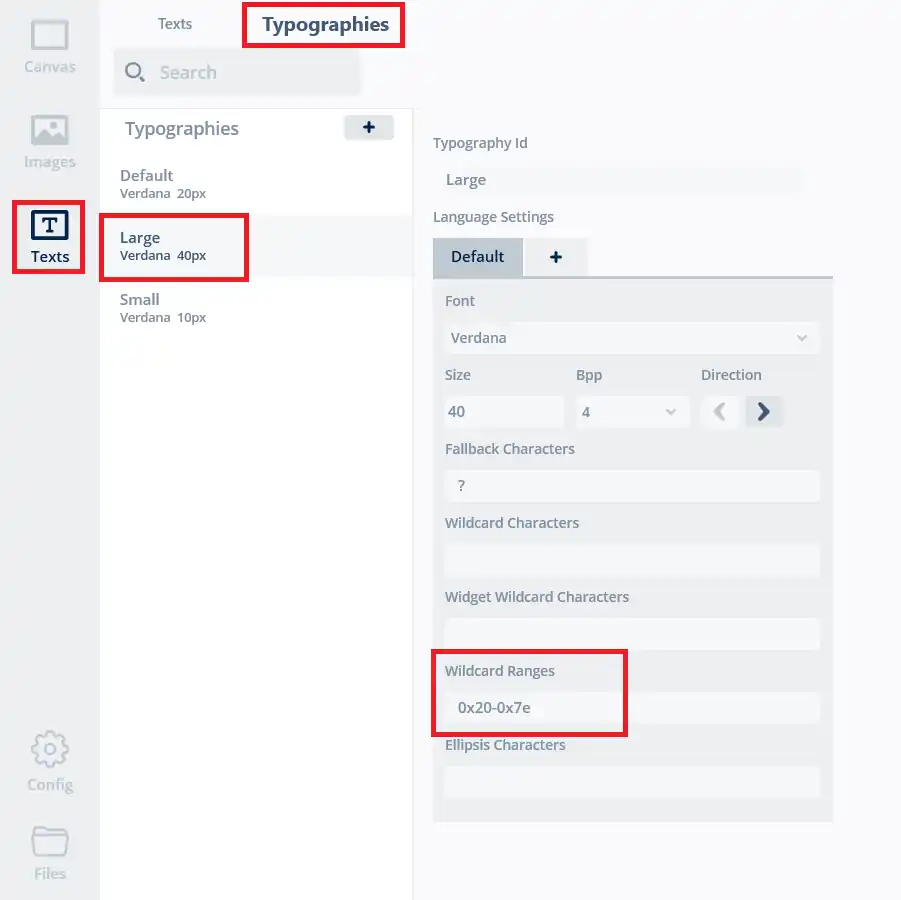
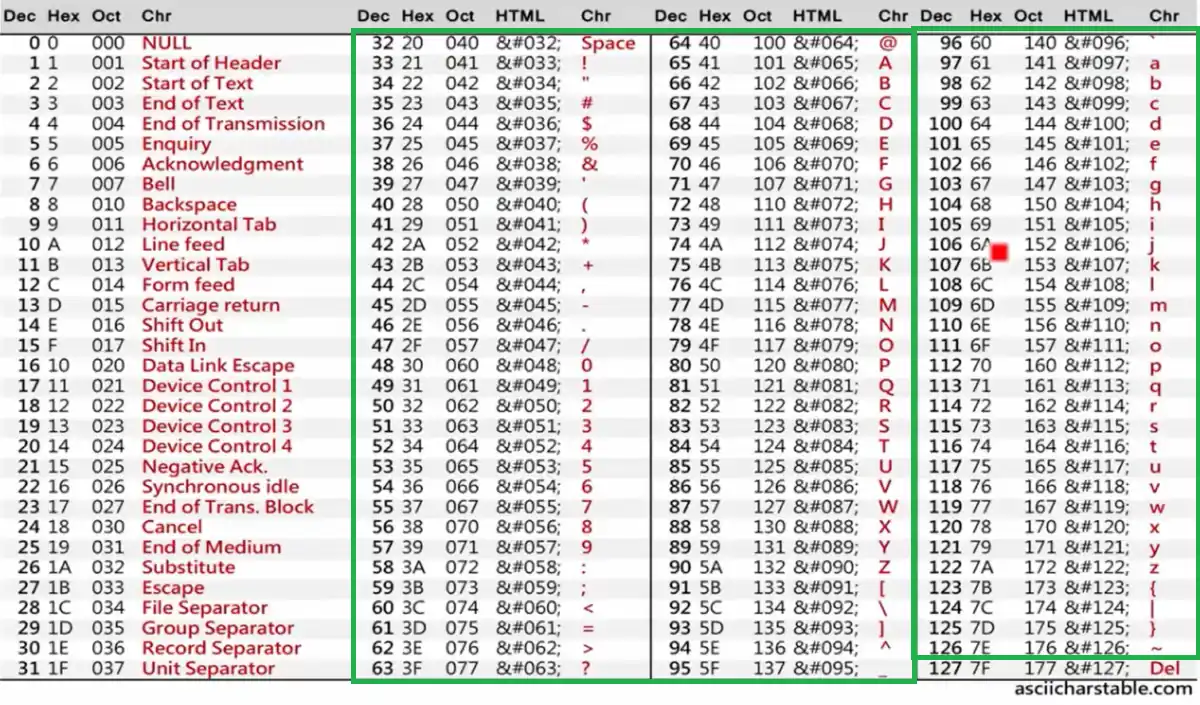
I am setting the maximum range for the wildcard characters (0x20 – 0x7E). This includes all the useful characters in the ascii table.
I have added 2 interactions for the screen 1.

The first will be called when the Flex button (Next button) will be clicked and the second will be called when the Toggle button is clicked.
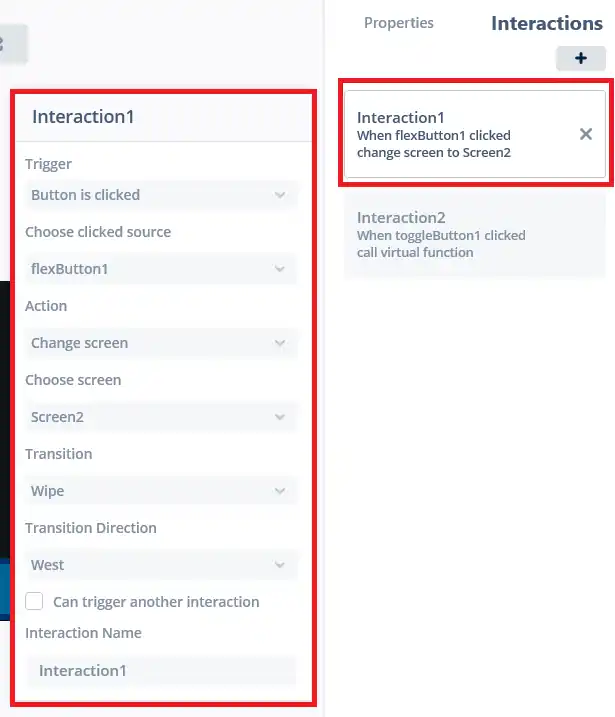

- When the flex button is clicked, there will be transition to screen 2.
- The transition animation will be wipe in the west direction.
- When the toggle button is clicked, it will call a new virtual function.
- This function, togglePressed, will be later defined in the IDE.
Screen 2
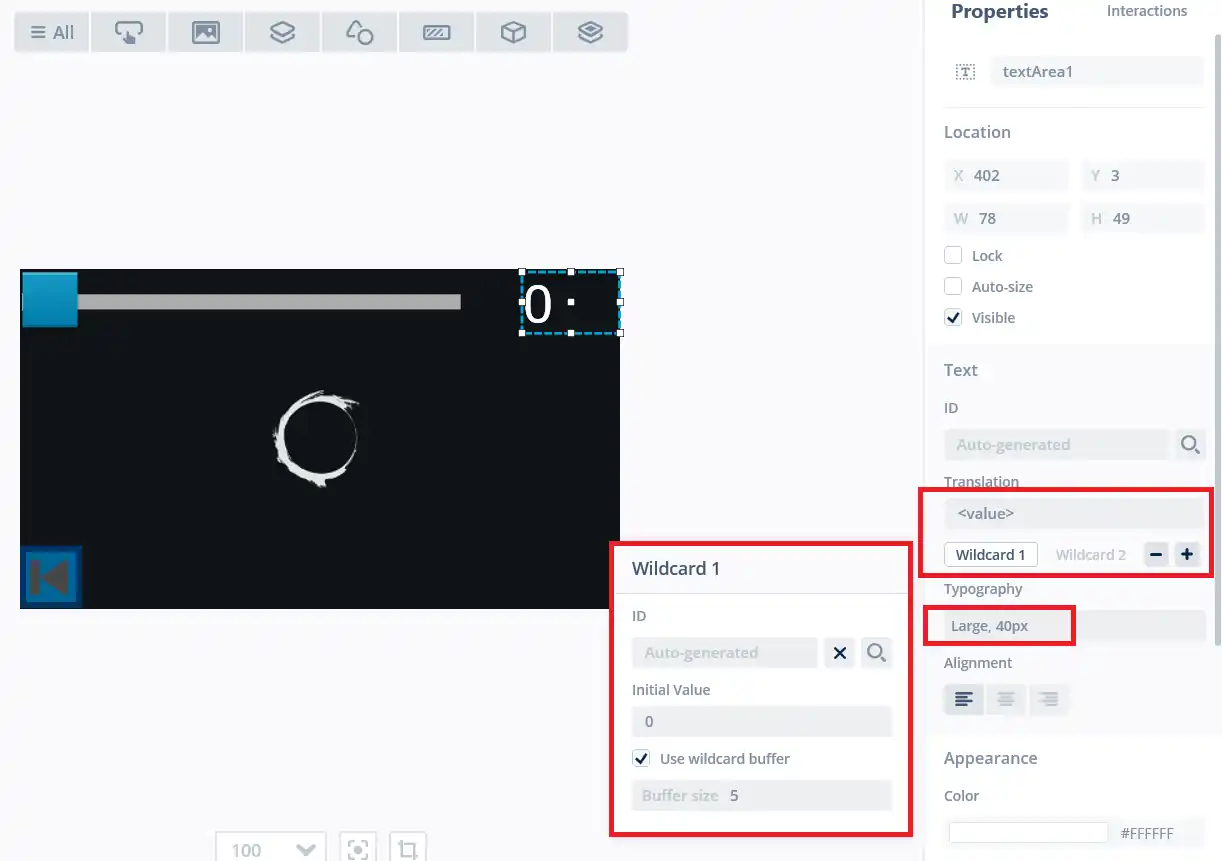
The Screen 2 contains a Slider and a Text area. The value (0 or 100) of the Slider will be shown on the text area.

We need to define the wildcard for the value in the Text area. Here I am using the same Typography (Large), so I don’t need to define the wildcard range again.
I have added another 2 interactions for the screen 2.
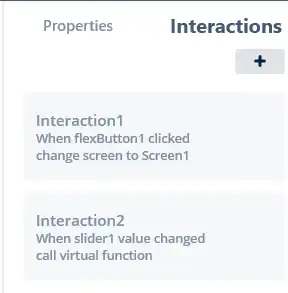
The first will be called when the Flex button (Previous button) will be clicked and the second will be called when the Slider reports a new value.
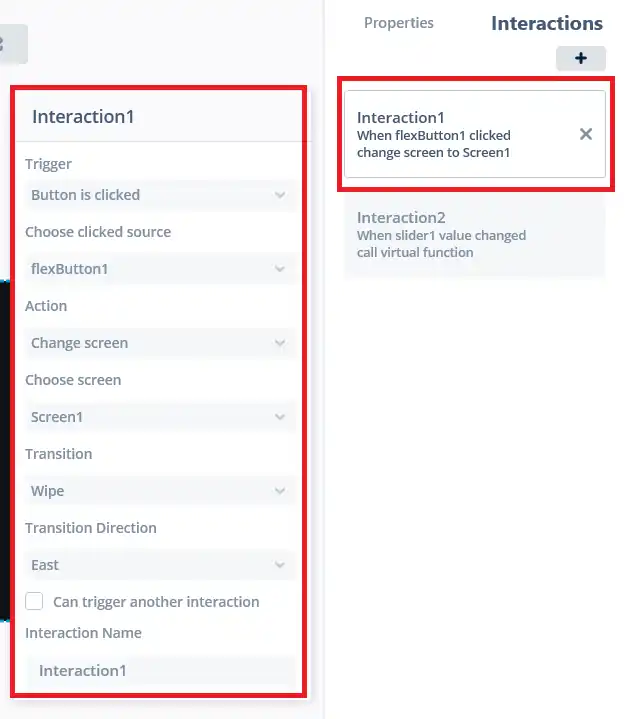

- When the flex button is clicked, there will be transition to screen 1.
- The transition animation will be wipe in the East direction.
- When the slider’s value is changed, it will call a new virtual function.
- This function, sliderUpdated, will be later defined in the IDE.
This is all the setup I have done in the TouchGFX. We will now generate the code and open it in the cubeIDE.
The issue with the Multiple Screens
The gif below shows what happens when we change the screen
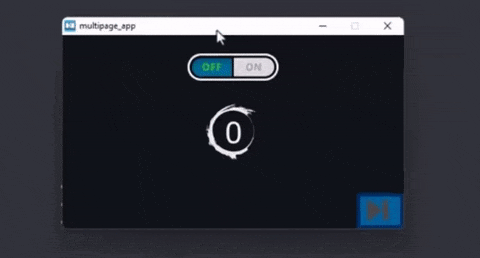
As you can see above, after we change the screen the state of the component is not retained.
If I toggle the button to ON state, after switching it resets back to OFF state. Similarly the slider also resets back to 0 after the screen 2 is switched out.
In order to solve this, we have to use the MVP (Model View Presenter) design pattern. Below is the image showing the MVP.
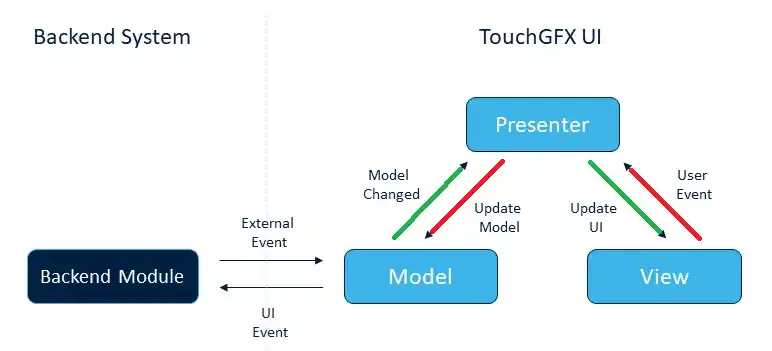
Here the state of the button (or slider) will be passed to the presenter from the view, which will be then stored in the Model.
When the screen switches in, the Presenter will fetch the stored state from the Model, and pass it to the view. The view will then update the button (or slider) with its stored state.
We will see how to write the code for this design pattern.
The CODE
Screen 1
In the touchGFX we defined an interaction, which calls the function togglePressed whenever the Toggle button is clicked. First we will write the code for this function in the Screen1View.cpp file.
void Screen1View::togglePressed()
{
	Unicode::snprintf(textArea1Buffer, TEXTAREA1_SIZE, "%d", toggleButton1.getState() ? 1:0);
	textArea1.invalidate();
	presenter->saveToggleButton (toggleButton1.getState());
}- Here we will first set the value of the toggle button in the text area.
- sprintf function is used to convert the integers (1 or 0) to the character format, which is then stored in the text area buffer.
- textArea1.invalidate() function will update the text area with the value.
- Then we will call the saveToggleButton function, which is defined in the Screen1Presenter, to save the state of the toggle button.
- We will pass the current state of the Toggle button as the parameter to this function.
In the presenter, we will call the saveToggleButton in the Model to save the state of the button.
void Screen1Presenter::saveToggleButton (bool state)
{
	model->saveToggleButton (state);
}We need to first define a variable to store the button state in the model.
public:
    Model();

    void bind(ModelListener* listener)
    {
        modelListener = listener;
    }

    void tick();

    void saveToggleButton (bool state);  // To save the button state
    bool getToggleButton ();  // To retrieve the button state

protected:
    ModelListener* modelListener;
    bool toggleButtonState;  // Variable to store the button state
};Here I have defined the function saveToggleButton to save the button state, and the function getToggleButton to retrieve the button state when requested by the Presenter.
The Boolean variable toggleButtonState will store the current state of the button.
The above function are written in the Model Source file as shown below
Model::Model() : modelListener(0), toggleButtonState(false)
{

}

void Model::tick()
{

}

void Model::saveToggleButton (bool state)
{
	toggleButtonState = state;
}

bool Model::getToggleButton()
{
	return toggleButtonState;
}We first need to initialize the variable toggleButtonState. I am initializing it with the false state.
The function saveToggleButton will simply update the Boolean variable with the current state of the toggle button.
When the function getToggleButton will be called by the presenter, it will return the stored state of the button.
When the screen 1 switches in, the function activate() is called in the Presenter. Inside this function, we will call another function is view, setToggleState, and pass the value returned by the function getToggleButton from the Model.
void Screen1Presenter::activate()
{
	view.setToggleState (model->getToggleButton());
}In the Screen1View file, we will write the function setToggleState to set the stored value of button. We also need to update the text area since it’s value depends on the state of the button.
void Screen1View::setToggleState (bool state)
{
	toggleButton1.forceState(state);
	Unicode::snprintf(textArea1Buffer, TEXTAREA1_SIZE, "%d", toggleButton1.getState() ? 1:0);
	textArea1.invalidate();
}This is the entire process of storing and retrieving the state of the component when the screen is switched out and switched in.
Let’s quickly see the code for screen 2.
Screen 2
void Screen2View::sliderUpdated(int value)
{
	Unicode::snprintf(textArea1Buffer, TEXTAREA1_SIZE, "%d",value);
	textArea1.invalidate();
	presenter->saveSlider(value);
}

void Screen2View::setSlider(int value)
{
	slider1.setValue(value);
	Unicode::snprintf(textArea1Buffer, TEXTAREA1_SIZE, "%d",value);
	textArea1.invalidate();
	slider1.invalidate();
}Screen2View source file have the function sliderUpdated, which we defined in the interaction and will be called whenever the slider has the new value.
Here we will update the text area and call the presenter to save the value.
The function setSlider will be called by the activate function of the Presenter when this screen switches in. Here we will set the stored value in the slider and update the text area.
void Screen2Presenter::activate()
{
	view.setSlider (model->getSlider());
}

void Screen2Presenter::deactivate()
{

}

void Screen2Presenter::saveSlider(int value)
{
	model->saveSlider(value);
}The saveSlider function will call the same function in the model and pass the slider’s value to it.
When the Screen 2 switches in, the activate function in the presenter will be called. Here we will call the setSlider function in the view and pass the value returned by the function getSlider, which is defined in the Model.
The Model is common to both the screens. So it contains the functions used in both screens.
class Model
{
public:
    Model();

    void bind(ModelListener* listener)
    {
        modelListener = listener;
    }

    void tick();

    void saveToggleButton (bool state);
    bool getToggleButton ();

    void saveSlider (int value);
    int getSlider();

protected:
    ModelListener* modelListener;
    bool toggleButtonState;
    int sliderValue;
};In the Model header file, we have to define the functions along with the variable to store the slider’s value.
Model::Model() : modelListener(0), toggleButtonState(false), sliderValue(10)
{

}

void Model::tick()
{

}

void Model::saveToggleButton (bool state)
{
	toggleButtonState = state;
}

bool Model::getToggleButton()
{
	return toggleButtonState;
}

void Model::saveSlider(int value)
{
	sliderValue = value;
}

int Model::getSlider()
{
	return sliderValue;
}In the Model source file we will first initialize the integer variable sliderValue. I am initializing it with the value 10.
The function saveSlider will simply update the variable with the current value of the slider. And the function getSlider will return the stored value of the slider.
This is all we need. Let’s see the working now.
Result
Below is the gif showing the simulator after the code has been uploaded to the board.

As you can see, now the screens are able to retain the last state of their components before they were switched out. Also the text areas are updating as per the values of the components.
STM32 TouchGFX Tutorial Series

TouchGFX #2. How to use TextArea and Wildcards

TouchGFX #3. Sending data to UI || MVP

TouchGFX#4. Sending data from another task || Gauge || Animation

TouchGFX #5. Data from UART to UI

TouchGFX #7. How to implement on screen keyboard

TouchGFX #8. Send data from GUI to MCU


for low power application creating screens or custom containers and making hide and hide is the best way to navigate between the screens on button press, screens or custom containers are best to implement more than 300 screens