
Home ▸ STM32 Tutorials ▸
Updated On: March 23, 2026
UDP Client using LWIP NETCONN (RTOS)
This is another tutorial in the STM32 Ethernet series and today will cover the STM32 as a UDP client using the LWIP with NETCONN and FREE RTOS. We have already covered the RAW UDP Client few months ago, but today we will simply add the FREE RTOS and NETCONN with it.
NOTE: I am using STM32F750 Discovery Board, which have the RMII connection type and the CubeMX does not allow memory configuration for the Ethernet.
VIDEO TUTORIAL
You can check the video to see the complete explanation and working of this project.
CubeMX Setup
Let’s start with CubeMX Setup, which is pretty much the same as the last tutorial.
Let’s start with enabling the ethernet itself :
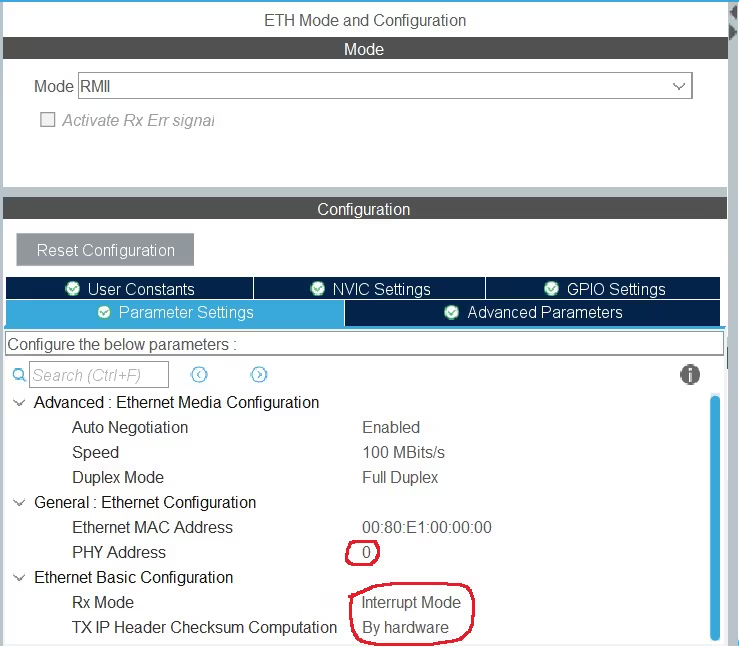
- I have chosen the RMII connection type for the ethernet.
- The PHY Address is set to 0, because I am using the on board Ethernet module.
- The Rx Mode is set to Interrupt mode.
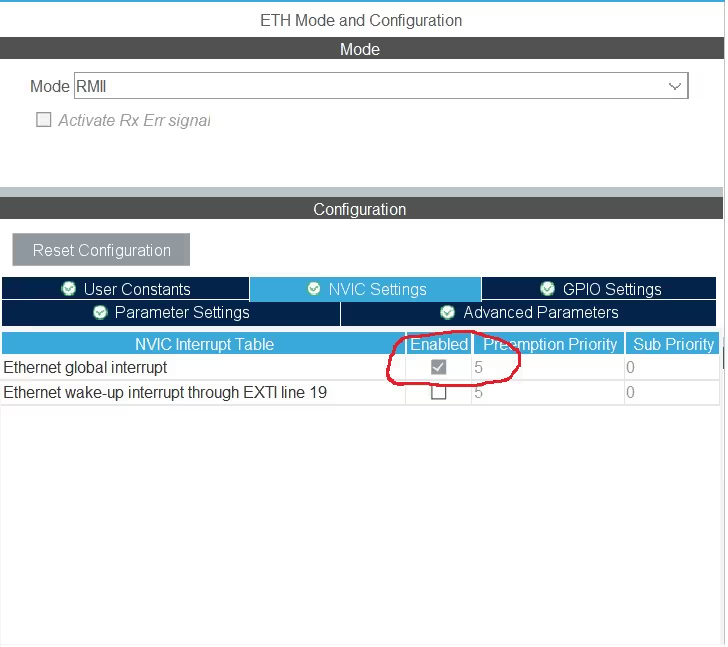
Since I have selected the Rx mode as the interrupt mode, the Ethernet global interrupt gets turned on automatically.
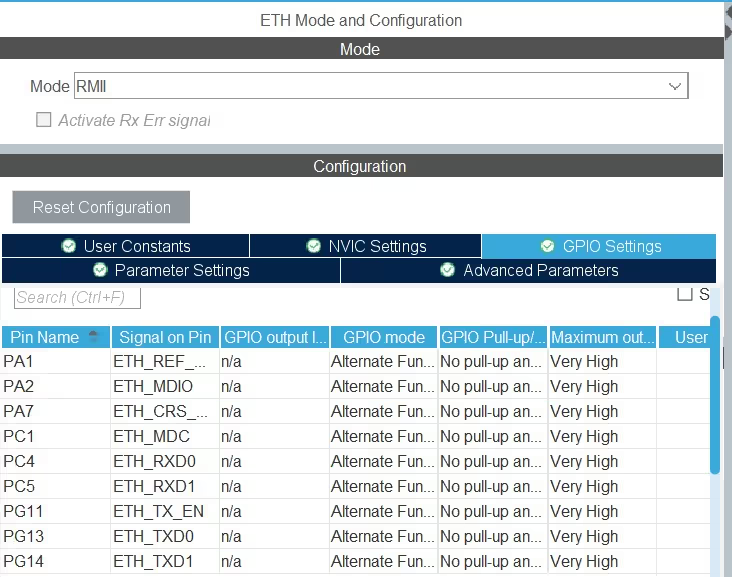
Picture above shows the Pins used for the Ethernet. Note that all the Pins are set to “Very High” Speed.
Now let’s take a look at the Free RTOS Settings
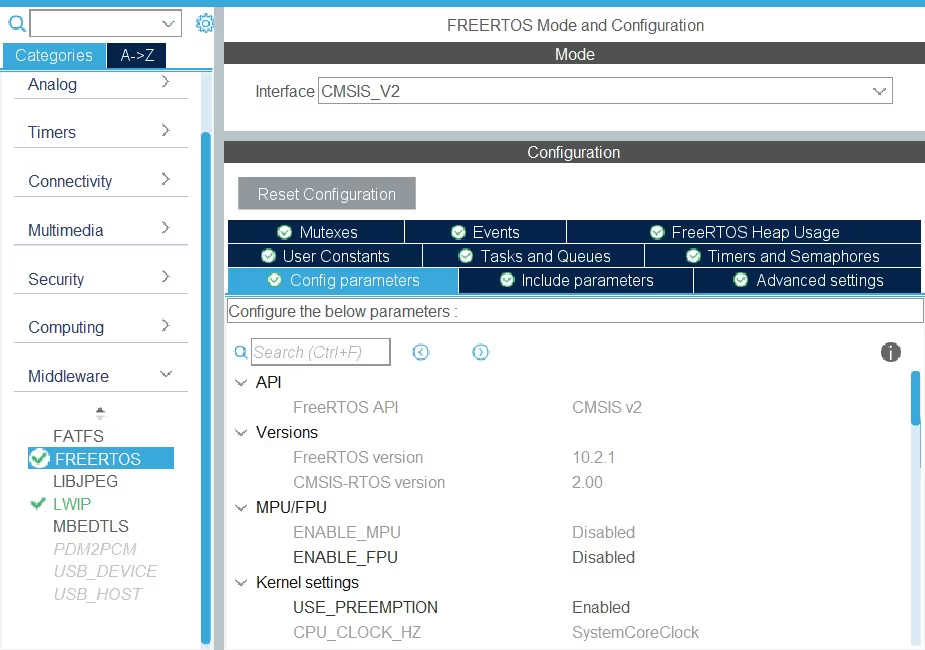
- As shown above, I have enabled the FreeRTOS and I am using the CMSIS_V2. If you are not comfortable with V2, you can use V1 also.
- Everything else is set to default, and I haven’t made any changes in RTOS settings.
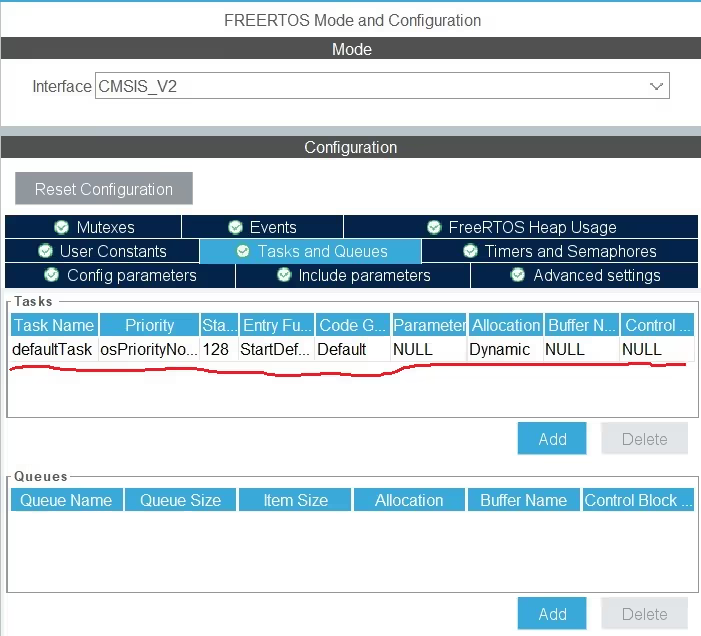
As I mentioned, everything is set to default and you can see there is a default Task which gets created automatically. I am leaving this as it is and we will make the use of it later in our code.
Let’s see the LWIP Configuration
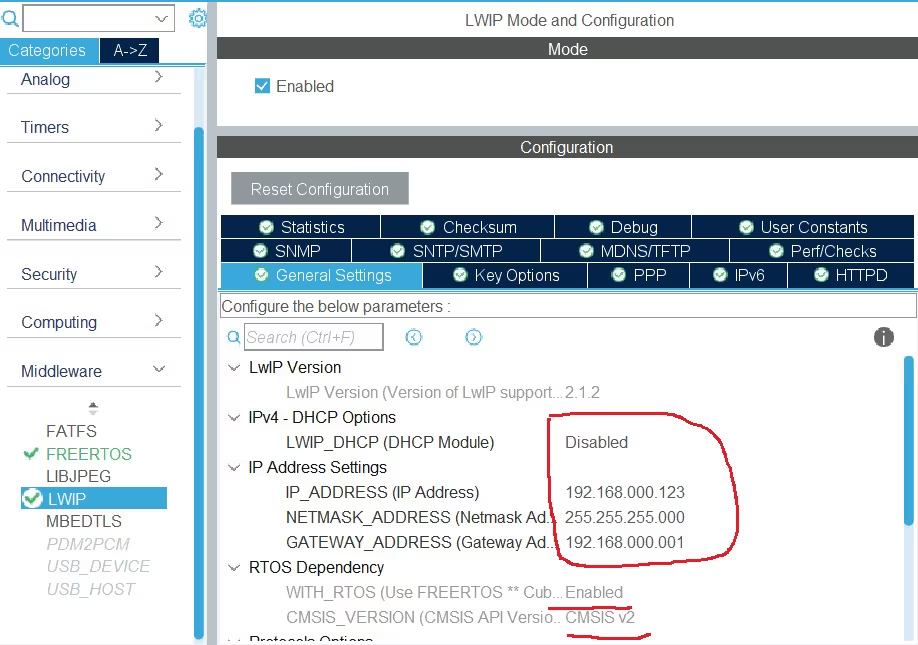
- As shown in the picture above, I have disabled the DHCP and manually entered the addresses. This will help us getting the static IP also.
- Since we are using the RTOS, you can see it’s enabled in the “RTOS Dependency” section.
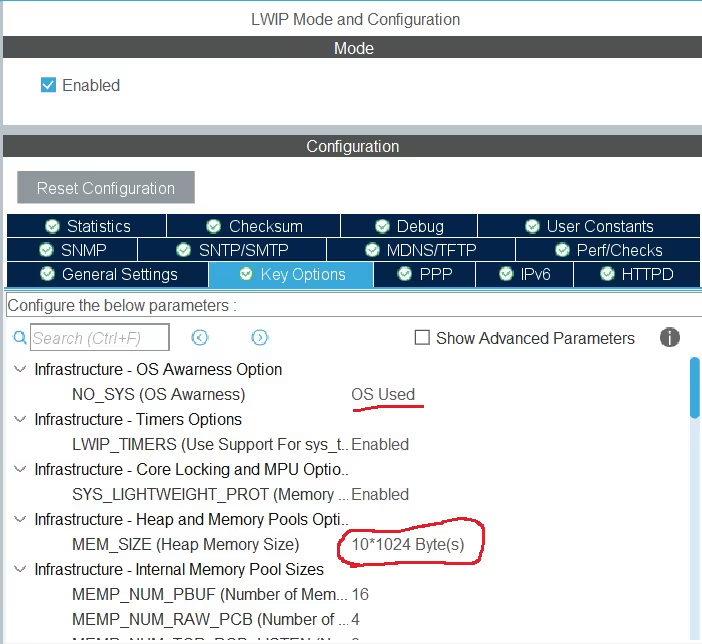
- In the “Key Options” Tab I have increased the heap to 10 KiloBytes.
- Other than this, everything is still set to default.
The following Configuration is only for the Cortex M7 series MCUs
Now since I am using a cortex M7 based MCU, which don’t have enough Flash memory. I have to use the external flash and need to configure the MPU for the same. The following part of the configuration is only valid for the same.
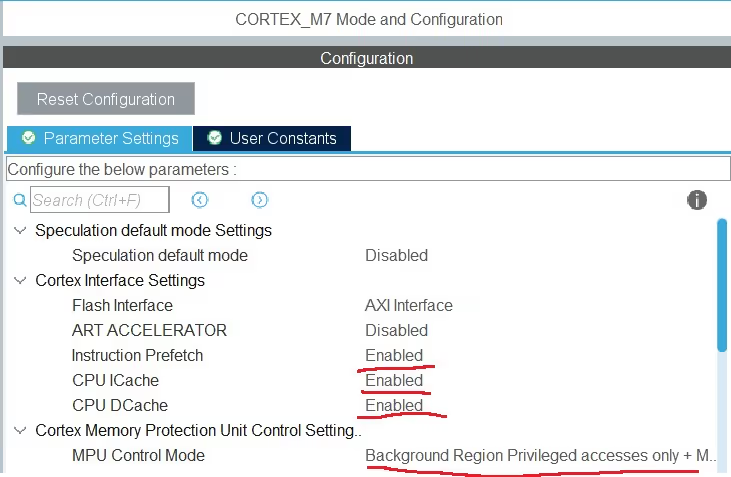
- The MPU Control mode is set to “Background Region Privileged access only + MPU disabled during hardfault”
- I have enabled the Instruction prefetch, CPU ICache and DCache.
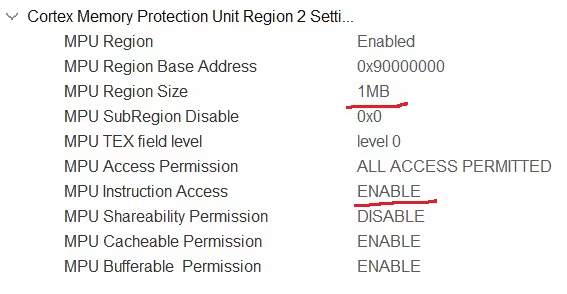
Following is the MPU Configuration for the external Flash, which is located at the memory address 0x90000000 and have the size of 16 MB.
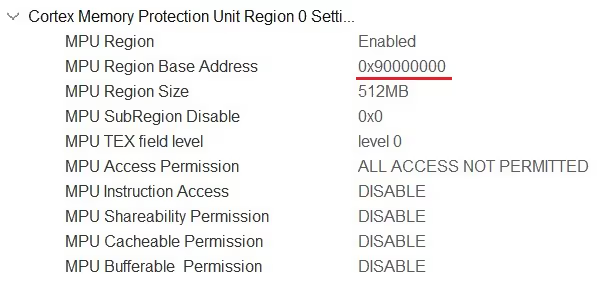
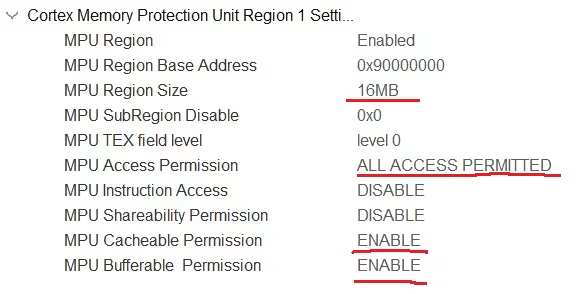
- Basically I have set the 16 MB Region (external flash) as the cacheable and bufferable region. This will configure the memory region as the Normal memory type with write back attribute.
- The 1 MB in the beginning will also allow the instructions to be executed from this region.
If you want to learn more about MPU configuration and memory types, I would recommend you to watch STM32 MPU Config playlist on the topic https://www.youtube.com/playlist?list=PLfIJKC1ud8gjoY2McCCqkxXWuwiC2iSap
Some Insight into the code
The main function:
int main(void)
{
  /* Only related to cortex M7--------------------------------------------------------*/
  MPU_Config();

  SCB_EnableICache();

  SCB_EnableDCache();
  /*--------------------------------------------------------*/

  HAL_Init();

  SystemClock_Config();

  MX_GPIO_Init();

  osKernelInitialize();

  defaultTaskHandle = osThreadNew(StartDefaultTask, NULL, &defaultTask_attributes);

  osKernelStart();

  while (1)
  {

  }
}- Nothing special is happening in the Main function. The default task gets created, and the kernel is started.
- The MPU configuration part is related to cortex M7 based MCUs
The default Task:
void StartDefaultTask(void *argument)
{
  /* init code for LWIP */
  MX_LWIP_Init();
  /* USER CODE BEGIN 5 */

  udpclient_init();

  /* Infinite loop */
  for(;;)
  {
    osDelay(1);
  }
  /* USER CODE END 5 */
}- In the default task, we will call the
udpclient_init()function to initialize the UDP client. - The
MX_LWIP_Init()function initializes the LWIP and it is present in the default Task by default.
The udpclient_init Function:
void udpclient_init(void)
{
	sys_thread_new("udpsend_thread", udpsend_thread, NULL, DEFAULT_THREAD_STACKSIZE,osPriorityNormal);
	sys_thread_new("udpinit_thread", udpinit_thread, NULL, DEFAULT_THREAD_STACKSIZE,osPriorityNormal);
}Here we will create 2 new threads:
- udpinit_thread will be used for initializing the NETCONN UDP
- Once the initialization is done, it will wait for the data to be received by the server, and then handle that data in a forever running loop.
- udpsend_thread will be used for sending the data to the server periodically.
- This way, whether the server sends the data or not, the client will always send some data to the server.
- The parameters are NULL
- The Stack Size is set to Default i.e. 1024 Bytes
- And the priority is set to Normal
The udpinit_thread:
static void udpinit_thread(void *arg)
{
	err_t err, recv_err;
	ip_addr_t dest_addr;
	/* Create a new connection identifier */
	conn = netconn_new(NETCONN_UDP);

	if (conn!= NULL)
	{
		/* Bind connection to the port 7 */
		err = netconn_bind(conn, IP_ADDR_ANY, 7);
		if (err == ERR_OK)
		{
			/* The desination IP adress of the computer */
			IP_ADDR4(&dest_addr, 192, 168, 0, 2);
			/* connect to the destination (server) at port 8 */
			err = netconn_connect(conn, &dest_addr, 8);
			if (err == ERR_OK)
			{
				/* Got into infinite loop after initialisation */
				for (;;)
				{
						/* Receive data from the server */
						recv_err = netconn_recv(conn, &rxbuf);
						if (recv_err == ERR_OK)
						{
							/* copy the data into our buffer (smsg) */
							sprintf (smsg, "\"%s\" was sent by the Server\n", (char *) rxbuf->p->payload);
							udpsend(smsg);  // send the message to the server
							netbuf_delete(rxbuf);  // delete the netbuf
						}
				}
			}
		}
	}

	else
	{
		netconn_delete(conn);
	}
}- Here first of all we will create a new netconn connection. NETCONN_UDP argument will create a UDP connection.
- Next we will bind the connection to any available IP address (The one you set up in the cubeMX) and the Port 7. This will act as the IP and port of the Client.
- If the bind is successful, we will connect to the server. Here the destination IP is the IP of the server (computer), and the port is port of the server.
- Then we will receive the data from the server. The netconn_recv function waits until the data is received.
- Since this is only a testing tutorial, we will modify this message, and store it in the smgs, so that we can send it back to server.
- Next we will call the udpsend function to send the data back to the server.
- Finally delete the netbuf.
The udpsend_thread:
/* UDP send Thread will send data every 500ms */
static void udpsend_thread(void *arg)
{
	for (;;)
	{
		sprintf (smsg, "index value = %d\n", indx++);
		udpsend(smsg);
		osDelay(500);
	}
}The udpsend_thread will send the data every 500ms, irrespective of whether the server have sent any response or not.
- Here I am storing the value of the index variable in smsg array.
- Then send data to the server using the function udpsend.
- This process repeats every 500ms.
The udpsend function:
/*-------UDP Send function to send the data to the server-------------*/
void udpsend (char *data)
{
	buf = netbuf_new();   // Create a new netbuf
	netbuf_ref(buf, data, strlen(data));  // refer the netbuf to the data to be sent
	netconn_send(conn,buf);  // send the netbuf to the client
	netbuf_delete(buf);  // delete the netbuf
}The udpsend function sends the data to the server.
- Here first we will Allocate a netbuf structure, whose pointer will be stored in buf.
- In order to copy the data into the pbuf of the netbuf, we use the nebuf_ref to Associate the data pointer with a netbuf.
- netcon_send will send the buf to the connected destination (server in this case)
- Finallly deallocate the netbuf structure.
Result
Below is the screenshot of the data sent by the client and the response sent by the server.
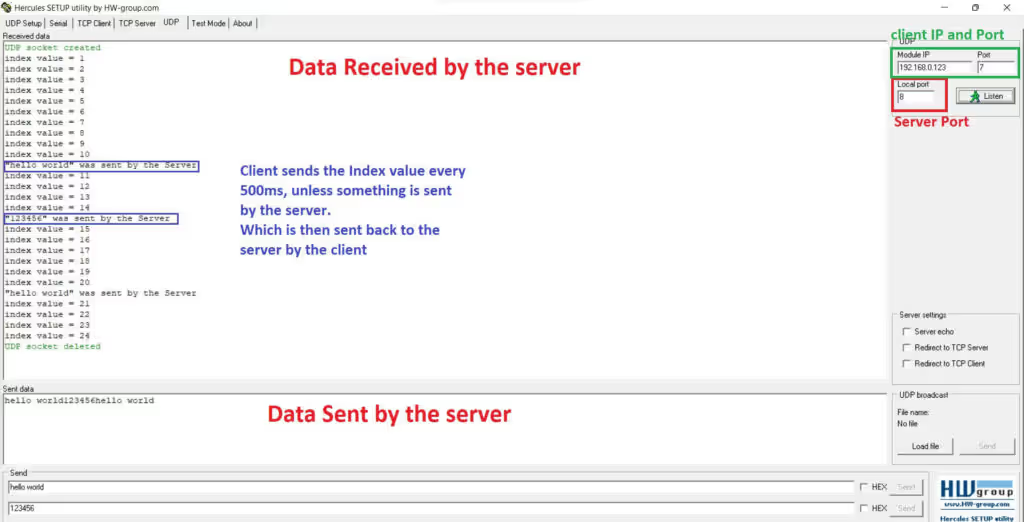
- As shown above, the client keep sending the value of the index variable every 500ms.
- Whenever the server send some data to the client, it modifies the data and send it back to the client.
- And again it start sending the updated value of the index variable.
Next Tutorials in the STM32 Ethernet Series
STM32 Ethernet PART 6.1 – Configure HTTP Webserver using SSI

STM32 Ethernet PART 6.2 – Configure HTTP Webserver using CGI

STM32 Ethernet PART 7 – UDP Server using LWIP NETCONN (RTOS)

STM32 Ethernet PART 9 – TCP Server and Client using LWIP NETCONN (RTOS)

STM32 Ethernet PART 10 – HTTP Server (Basic) using LWIP NETCONN (RTOS)

STM32 Ethernet PART 11 – HTTP Server using AJAX PART1

STM32 Ethernet PART 12 – HTTP Server using AJAX PART2


Hello sir, thank you for this great tutoriel,
it works for me using stm32h755zit6 nucleo 144 board, but the delay between sending an receiving data between the PC and the board, take from 1 to 2 ms, and in my application I need at least 0.1ms (10KHz of speed response), I can’t found the function making all this delay, can you help me please?
Hello,
Thank you very much, Sir.
Great tutorials! I’ve followed your STM32 series, and I’m hoping that you may be able to cover the use of AJAX to allow your STM32/LWIP webserver to access data without refresh. There is minimal info around about using this with LWIP. I hope the are the first to show us how.
Yes it’s in my to do list.