Home ▸ STM32 Tutorials ▸
Updated On: March 23, 2026
How to Configure HTTP Webserver using CGI
This is another tutorial in the STM32 ETHERNET series, and today we will see how to use the CGI (Common Gateway Interface) to receive the data from the HTTP webserver.
This tutorial is in continuation from the previous one, so check out the HTTP webserver Simple before going any forward. This is because I will make the only few changes in the previous code instead of creating a new project here.
Considering that you already got the previous project as working, I will go ahead with CGI.
CGI (Common Gateway Interface) is commonly used to receive some data from the webserver. For example, we can receive the information entered in a form, or use the button on the server to control the LED on the MCU. This is exactly what we will see in today’s tutorial.
Let’s start with the cube MX changes that we need to make.
VIDEO TUTORIAL
You can check the video to see the complete explanation and working of this project.
CubeMX Configuration
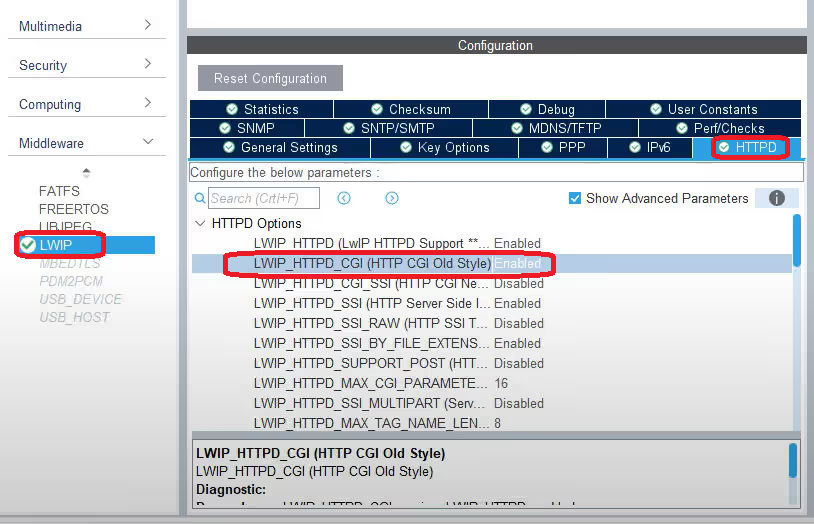
In the setup above, I have just enabled the CGI (old style) in the HTTPD setup. The rest of the configuration is same as the previous tutorial.
Now we have to follow the same steps as motioned in the previous tutorial, just with few modifications.
The additional Setup
After creating the project, if you build it for the first time, you are going to get errors. So this section will cover the additional setup we need to do, to remove those errors.
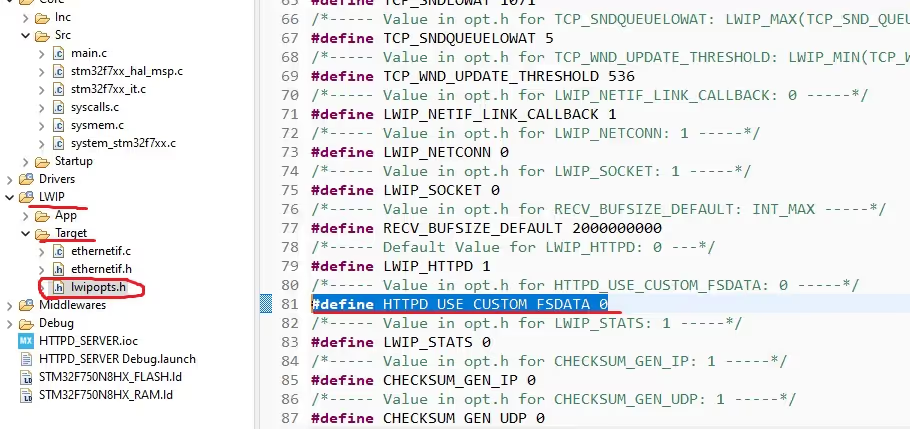
First of all goto LWIP->Target->lwipopts.h and change the #define HTTPD_USE_CUSTOM_FSDATA 0
Now we need to include the “FsData.c” file along with the resources that we are going to use for the webserver.
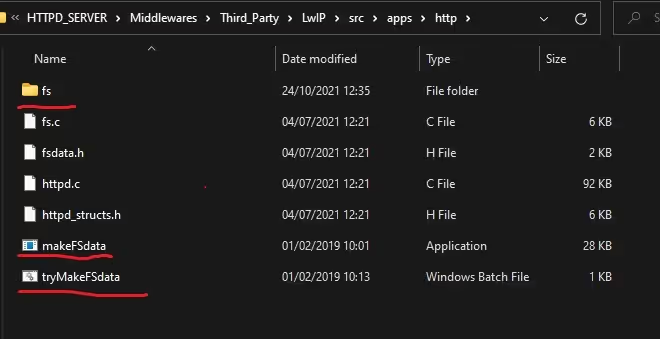
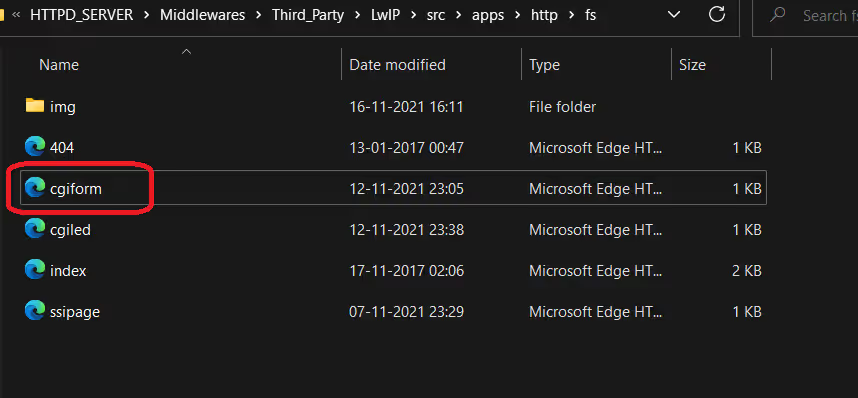
We have already covered this last time, and inside the Project\Middlewares\Third_Party\LwIP\src\apps\http folder, you already have the files shown below.
Before we go ahead and create the fsdata.c file, we need to create a new webpage for the CGI.
In this tutorial I will use the form to collect the first and last name of a person. Later this information will be passed to the MCU, where we will be able to use it.
<!DOCTYPE html>
<html>
<body>

<h2>CGI Forms</h2>

<form action="/form.cgi">
  <label for="fname">First name:</label><br>
  <input type="text" id="fname" name="fname" value="John"><br>
  <label for="lname">Last name:</label><br>
  <input type="text" id="lname" name="lname" value="Doe"><br><br>
  <input type="submit" value="Submit">
</form>

</body>
</html>- Here I have created a form, which have 2 parameters i.e fname and lname.
- Whatever data we enter in these parameters will be passed as their value.
- Once we receive data in the MCU, we can simply check for the parameter and fetch it’s value for the further processing.
- Note here that the action is set to call the form.cgi
After saving the file in .html format, we need to copy it to the fs folder.
Now it’s time to generate the fsdata.c, and to do that we will double click the makeFSdata, just like we did in the previous tutorial.
This is it for the setup. If you build the code now, all the errors should be gone.
Now we will write the code for the initialization of the webserver.
Some Insight into the CODE
Initialization Function
const tCGI FORM_CGI = {"/form.cgi", CGIForm_Handler};

void http_server_init (void)
{
	httpd_init();

	http_set_ssi_handler(ssi_handler, (char const**) TAGS, 3);

	http_set_cgi_handlers (&FORM_CGI, 1);
}Here we will initialize the HTTPD first, just like we did in the previous tutorials. The SSI initialization is also included from the previous tutorial, but it’s not needed for CGI.
CGI Handler Takes 2 parameters:
- The first parameter is the pointer to the tCGI Structure defining the base filename (URL) of a CGI and the associated function which is to be called when that URL is requested
- The second parameter is the number of CGI handler we are using in our code.
CGI HANDLER
const char *CGIForm_Handler(int iIndex, int iNumParams, char *pcParam[], char *pcValue[])
{
	if (iIndex == 0)
	{
		for (int i=0; i<iNumParams; i++)
		{
			if (strcmp(pcParam[i], "fname") == 0)  // if the fname string is found
			{
				memset(name, '\0', 30);
				strcpy(name, pcValue[i]);
			}

			else if (strcmp(pcParam[i], "lname") == 0)  // if the fname string is found
			{
				strcat(name, " ");
				strcat(name, pcValue[i]);
			}
		}
	}

	return "/cgiform.html";
}CGI handler takes 4 parameters
- iIndex provides the index of the CGI within the cgis array passed to http_set_cgi_handlers. This parameter will be useful if you are using more than 1 CGI handlers.
- iNumParams gives the index of the parameter within one handler. For example, this parameter will be 0 for fname, and 1 for lname
- pcParam contains the name of the parameter and pcValue contains the value of that parameter
- The function should return a pointer to a character string which is the path and filename of the response that is to be sent to the connected browser, for example “/cgiform.html” or “/response/error.ssi”.
- After we receive the data from the server, we will just store it in our buffer (name). The data will be stored as “fname lname”.
The Main Function
  /* USER CODE BEGIN 2 */

  http_server_init();

  /* USER CODE END 2 */

  /* Infinite loop */
  /* USER CODE BEGIN WHILE */
  while (1)
  {
    /* USER CODE END WHILE */

    /* USER CODE BEGIN 3 */

	  ethernetif_input(&gnetif);

	  sys_check_timeouts();
  }
/* USER CODE END 3 */In the main function, we simply call the server init function, which will initialize the rest of the things.
The while loop is as usual.
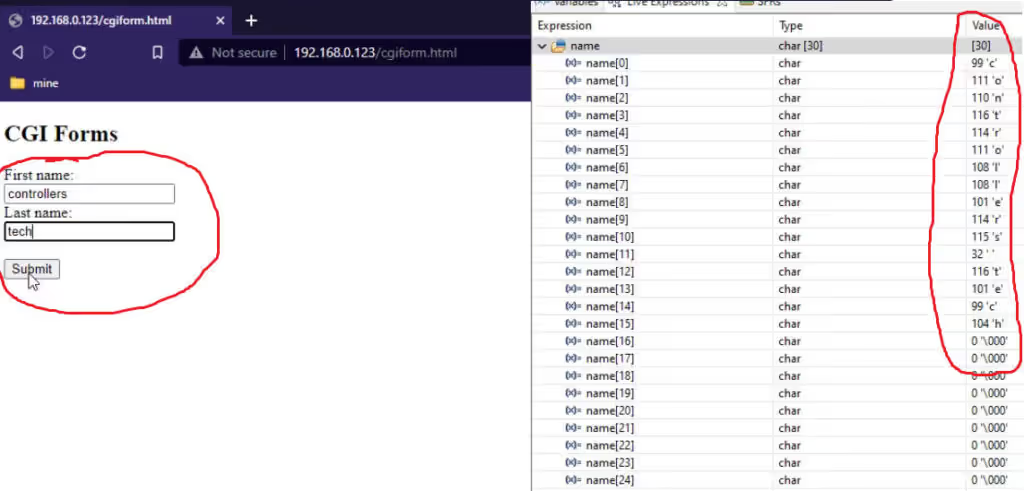
Result
The CGI Page and the Data stored in the MCU is shown below
Next Tutorials in the STM32 Ethernet Series
STM32 Ethernet Tutorial (PART 2): UDP Server with lwIP (Raw API)
STM32 Ethernet Tutorial (PART 3): UDP Client Tutorial with lwIP (Raw API)
STM32 Ethernet Tutorial (PART 4): TCP Server with lwIP Raw API

STM32 Ethernet Tutorial (PART 5): TCP Client with lwIP Raw API

STM32 Ethernet PART 6 – How to Configure Simple HTTP Webserver
STM32 Ethernet PART 6.1 – Configure HTTP Webserver using SSI

STM32 Ethernet PART 7 – UDP Server using LWIP NETCONN (RTOS)


Dude, check your background. Are you a child?
Great work! Try to implement pictures as well!