
Home ▸ STM32 Tutorials ▸
Updated On: March 23, 2026
Send data from GUI to MCU
This is the 8th tutorial in the STM32 touchGFX series, and today we will see how to send the data from GUI to the MCU. I have already covered how to send data from UART to GUI and how to implement the keyboard to the application.
This tutorial will be a combination of these 2 previous tutorials, but instead we will send the data from GUI to UART.
UART is being used just to see the data received from the GUI. You can use the data in your main file in any way you want. This tutorial is a continuation from the keyboard project, so I will only focus on the additional setup that is being exclusive to this tutorial.
VIDEO TUTORIAL
You can check the video to see the complete explanation and working of this project.
TouchGFX Setup Contd..
In addition to previous project about implementing keyboard, I have added a new button to send the data.
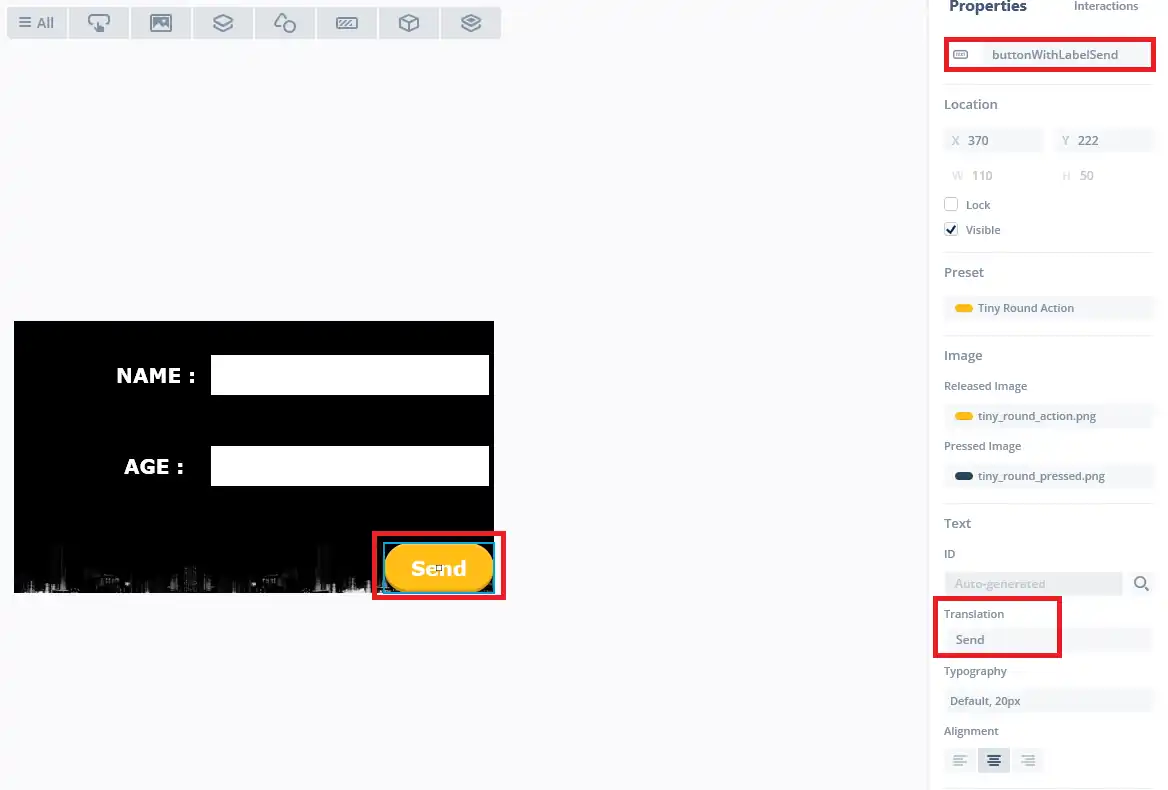
I have renamed the text being displayed on the button along with the button name.
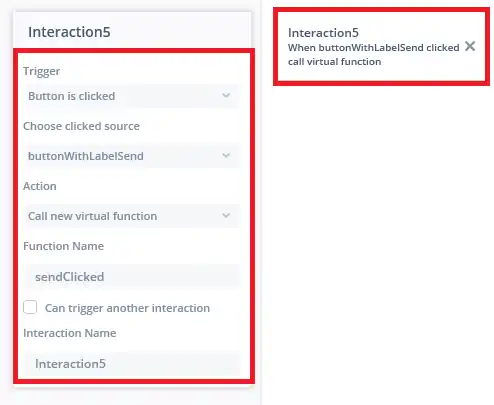
I have also added an interaction for this button. When clicked, a new virtual function (sendClicked) will be called, which we will define in the code.
CubeMX Setup
We will be adding a queue to send the data from the GUI to the MCU and a new task to send the data to the UART. The cubeMX setup for the same is shown below.

Here I have added a new task (uartTask) with normal priority. The sole purpose of this task will be to send the data received from the queue to the UART.
I have also added a queue (uartQueue), which will be used to send the data from the GUI to the uartTask. The queue size is set to 2 but the item size will be modified later in the code.
Actually we will be using a structured queue, so the item size will be updated after defining the structure.
The CODE
typedef struct{
	char data[50];
	int len;
}uartdata_t;First of all I have defined the structure in the main header file. This structure contains 2 elements, an array of 50 bytes to store the characters, and a length variable to store the length of the buffer.
  /* creation of uartQueue */
uartQueueHandle = osMessageQueueNew (2, sizeof(uartdata_t), &uartQueue_attributes);Now as described earlier, we need to update the element size of the queue. I have updated the queue to use the size of uartdata_t struct.
    virtual void sendClicked();
protected:
    char dataBuf[50];
    char namebuf[TEXTAREANAME_SIZE];
char agebuf[TEXTAREAAGE_SIZE];- In the Screen1View header file, we have to define the function sendClicked().
- This function was declared in the interaction of the send button and will be called when the send button is clicked.
- Along with that I have also defined an array(dataBuf) to store the data to be sent to the MCU.
- The arrays, namebuf and agebuf will be used to store the respective data converted from unicode character format to the character format.
- Transferring data in the unicode character format is hard, so we will first convert the data to regular character format and then transfer it to the MCU.
Now when the sendClicked() function is called, we will first do this conversion from unicode to the regular character format.
void Screen1View::sendClicked()
{
	// convert the unicode chars to chars
	int i=0;
	do
	{
		namebuf[i] = (char) textAreaNameBuffer[i];
		i++;
	}while (textAreaNameBuffer[i]!=0);

	i=0;
	do
	{
		agebuf[i] = (char) textAreaAgeBuffer[i];
		i++;
}while (textAreaAgeBuffer[i]!=0);- The NAME and AGE data retrieved from the keyboard is displayed on the respective text areas and hence the textArea buffers contain the data.
- The Unicode char contains the data in the integer format, so we will simply typecast it to the char format.
- The conversion will continue till we hot a 0 in the name or age buffer. The 0 indicates the NULL, hence no useful data is present after that.
#ifndef SIMULATOR
	// store the data in a presentable format
	sprintf (dataBuf, "Name:%s, Age:%s\r\n", namebuf, agebuf);

	// send the data to the presenter
	presenter->sendData(dataBuf);

	//clear the buffers
	memset (namebuf, '\0', TEXTAREANAME_SIZE);
	memset (agebuf, '\0', TEXTAREAAGE_SIZE);
#endif
}- After the conversion is over, we will prepare the data in a presentable format.
- This data will be finally stored in the dataBuf array.
- Then we will call the function, sendData in the presenter, and pass the buffer as the argument to this function.
- After sending the data, we will clear the namebuf and agebuf arrays.
In the presenter, we will call the similar function(sendData) in the model.
void Screen1Presenter::sendData (char *data)
{
	model->sendData (data);
}Now we will finally send the data to the queue from the model.
#ifndef SIMULATOR
#include "main.h"
#include "string.h"
#include "cmsis_os2.h"
extern "C"
{

	extern osMessageQueueId_t uartQueueHandle;
	uartdata_t uartdata_q;
}
#endifHere we need to include certain header files first. Also the uart queue handler is defined as an extern.
I have defined the uartdata_q as a struct variable, and this will be passed to the queue.
void Model::sendData (char *data)
{
#ifndef SIMULATOR
	strcpy (uartdata_q.data, data);
	uartdata_q.len = strlen (data);
	if (osMessageQueueGetSpace(uartQueueHandle)>0)  // if there is some space in the queue
	{
		osMessageQueuePut(uartQueueHandle, &uartdata_q, 0, 0);  // send the structure to the queue
	}
#endif
}Finally we will send the data to the queue.
- We will copy the data from the argument of the function to the data element of the struct variable.
- Then update the length element of the variable as according the length of the data in the buffer.
- Now we will check if there is some space available in the queue using the function osMessageQueueGetSpace.
- If the space is available, we will send the data to the queue using the function osMessageQueuePut
- Here we will pass the address of the struct variable as the data parameter to the queue.
Now the data is sent, so we have to receive it in the main file. The uartTask was created to send the data to the UART, so we will do the receiving inside the uartTask itself.
void StartuartTask(void *argument)
{
  for(;;)
  {
	  if (osMessageQueueGetCount(uartQueueHandle)>0)  //  if there is some msg in the queue
	  {
		  if (osMessageQueueGet(uartQueueHandle, &uartdata_r, 0, 0)== osOK)
		  {
			  HAL_UART_Transmit(&huart1, (uint8_t *)uartdata_r.data, uartdata_r.len, 100);
		  }
	  }
    osDelay(1);
  }
}- Here we will first check if there is some message pending in the queue using the function osMessageQueueGetCount
- If the queue contains the data, we will receive the data using the function osMessageQueueGet
- The uartdata_r is a struct variable, and the data will be stored in this variable itself.
- If the data is received successfully, we will transmit the data to the UART using the function HAL_UART_Transmit
- Here we will pass the data element of the struct variable as the data, and the length parameter as the size of the data to be transsmitted.
Result
Below is the GIF showing how the data from the keyboard is being displayed on the serial monitor. To see the full working and setup, check out the video below the GIF.
STM32 TouchGFX Tutorial Series

TouchGFX #2. How to use TextArea and Wildcards

TouchGFX #3. Sending data to UI || MVP

TouchGFX#4. Sending data from another task || Gauge || Animation

TouchGFX #5. Data from UART to UI
TouchGFX #6. How to Build a Multiscreen Project

TouchGFX #7. How to implement on screen keyboard

Subscribe
Login
0 Comments
Newest
