Home ▸ STM32 Tutorials ▸
Updated On: March 23, 2026
TCP Server and Client using LWIP NETCONN (RTOS)
This is the 9th tutorial in the STM32 Ethernet Series.
We have already covered the UDP Server and UDP client using the NETCONN in STM32. In this tutorial, we will cover the TCP Server and TCP client, both using the NETCONN and LWIP.
The CubeMX Configuration will remain same as used in the UDP tutorials and is shown below
NOTE: I am using STM32F750 Discovery Board, which have the RMII connection type and the CubeMX does not allow memory configuration for the Ethernet.
VIDEO TUTORIAL
You can check the video to see the complete explanation and working of this project.
CubeMX Setup
Let’s start with CubeMX Setup, which is pretty much the same as the last tutorial.
Let’s start with enabling the ethernet itself :
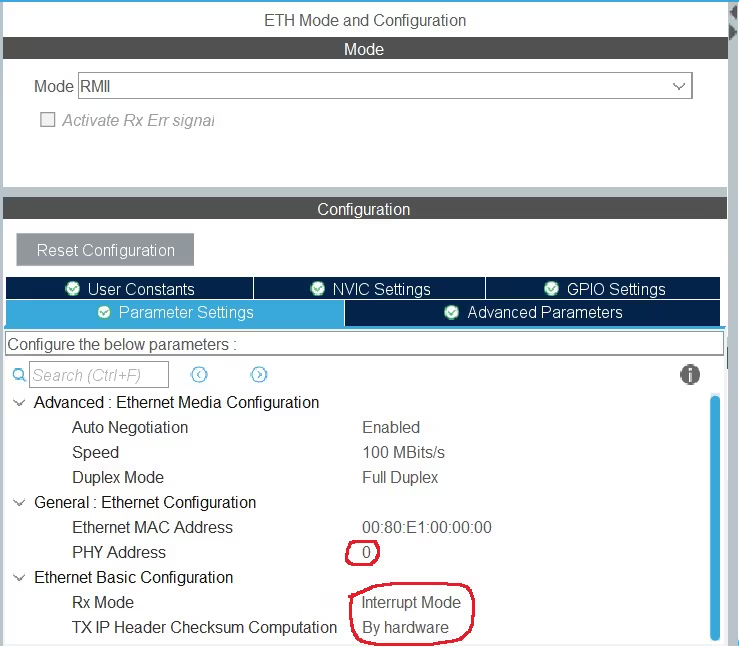
- I have chosen the RMII connection type for the ethernet.
- The PHY Address is set to 0, because I am using the on board Ethernet module.
- The Rx Mode is set to Interrupt mode.
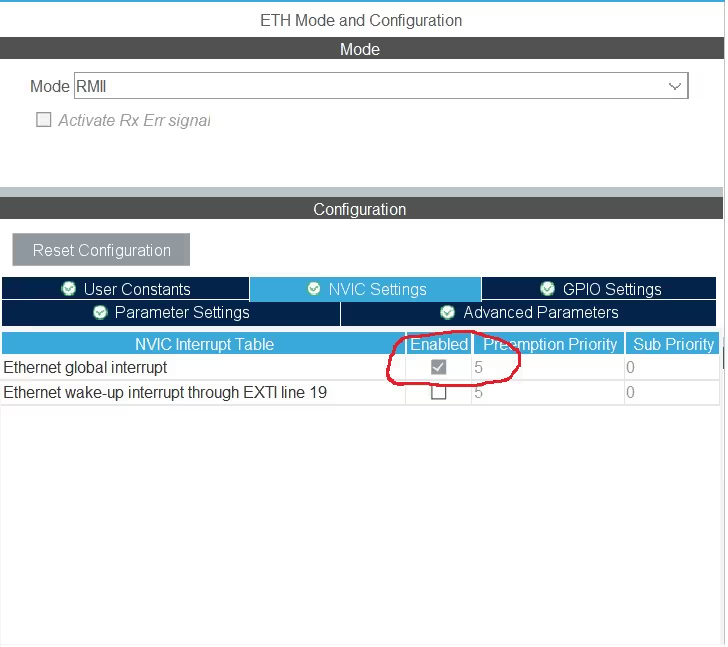
Since I have selected the Rx mode as the interrupt mode, the Ethernet global interrupt gets turned on automatically.
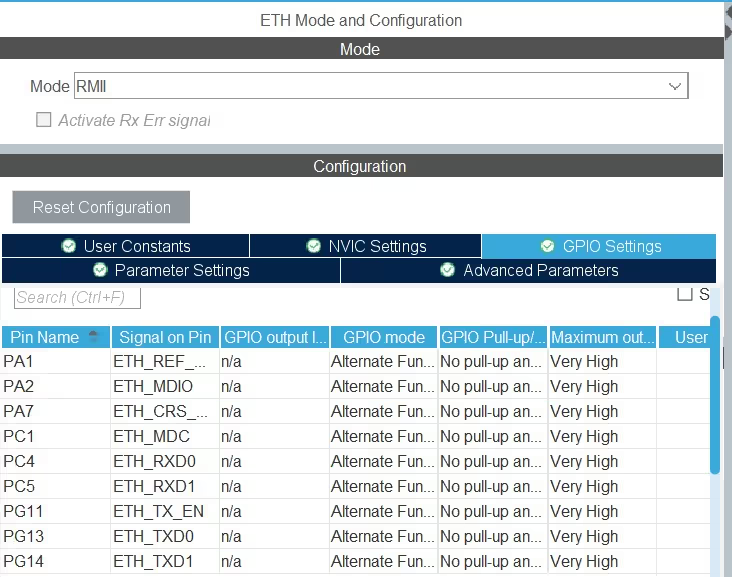
Picture above shows the Pins used for the Ethernet. Note that all the Pins are set to “Very High” Speed.
Now let’s take a look at the Free RTOS Settings
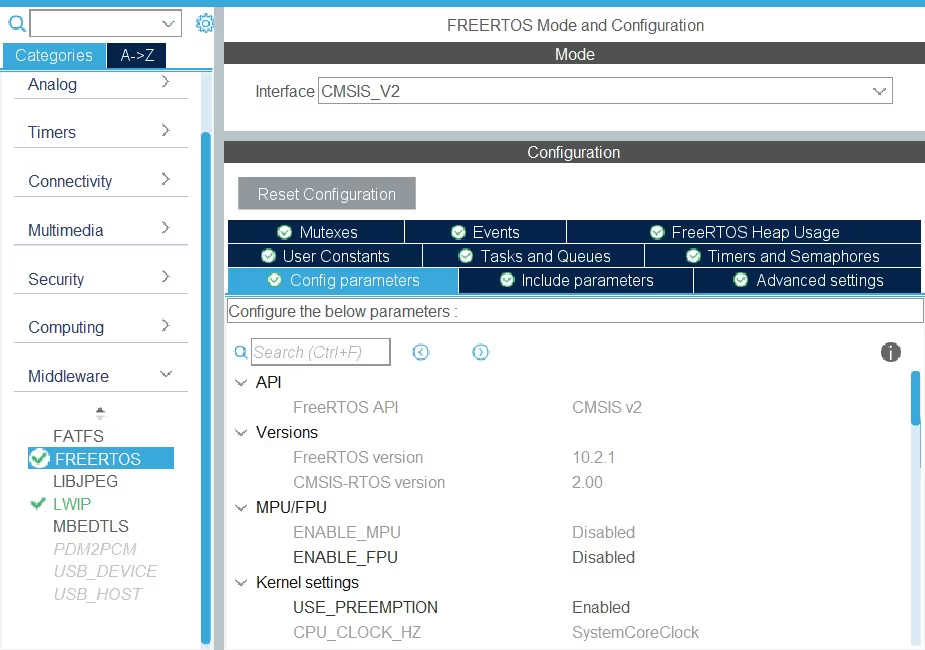
- As shown above, I have enabled the FreeRTOS and I am using the CMSIS_V2. If you are not comfortable with V2, you can use V1 also.
- Everything else is set to default, and I haven’t made any changes in RTOS settings.
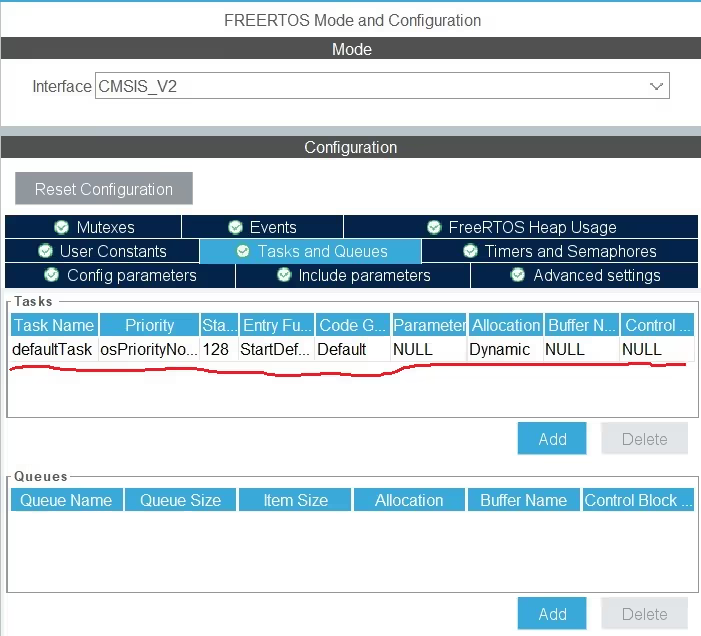
As I mentioned, everything is set to default and you can see there is a default Task which gets created automatically. I am leaving this as it is and we will make the use of it later in our code.
Let’s see the LWIP Configuration
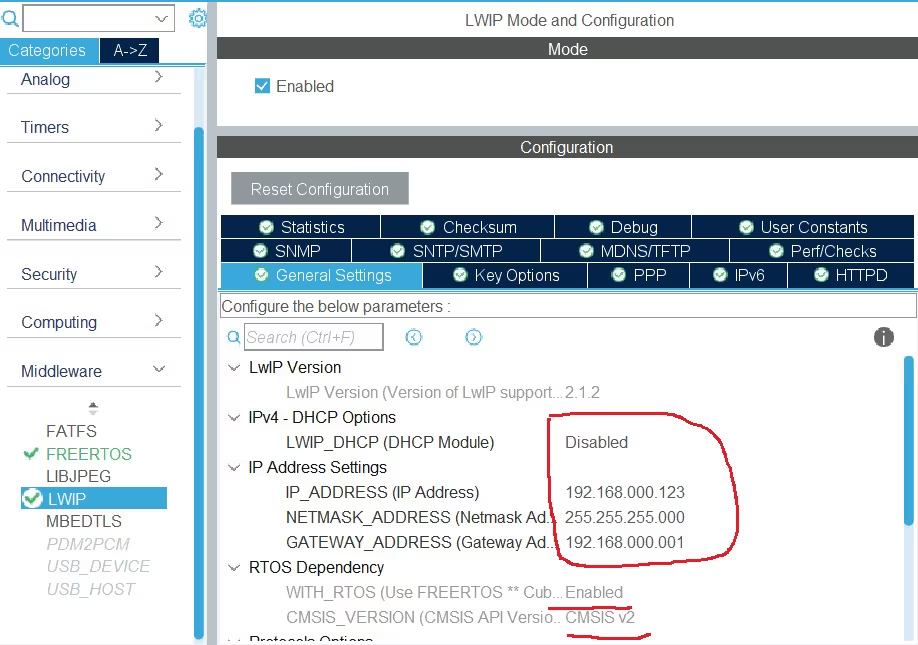
- As shown in the picture above, I have disabled the DHCP and manually entered the addresses. This will help us getting the static IP also.
- Since we are using the RTOS, you can see it’s enabled in the “RTOS Dependency” section.
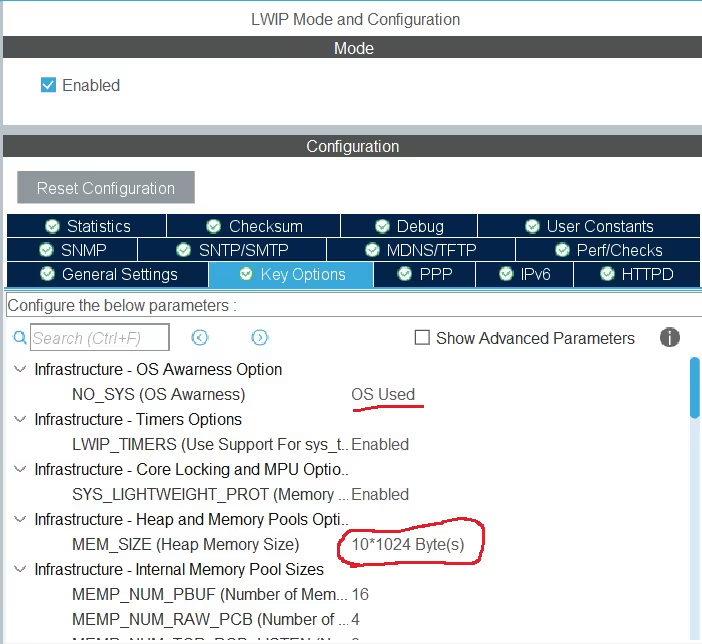
- In the “Key Options” Tab I have increased the heap to 10 KiloBytes.
- Other than this, everything is still set to default.
The following Configuration is only for the Cortex M7 series MCUs
Now since I am using a cortex M7 based MCU, which don’t have enough Flash memory. I have to use the external flash and need to configure the MPU for the same. The following part of the configuration is only valid for the same.
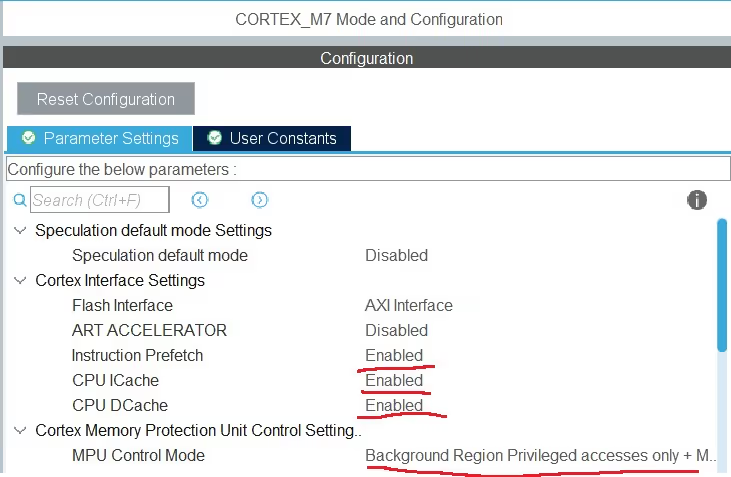
- The MPU Control mode is set to “Background Region Privileged access only + MPU disabled during hardfault”
- I have enabled the Instruction prefetch, CPU ICache and DCache.
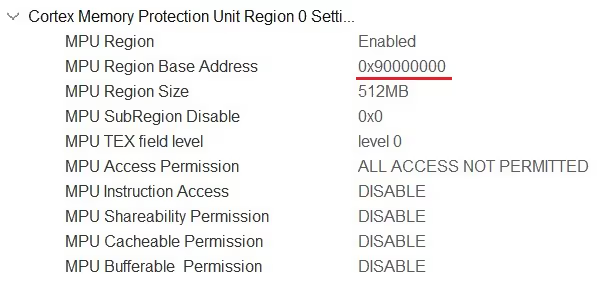
Following is the MPU Configuration for the external Flash, which is located at the memory address 0x90000000 and have the size of 16 MB.
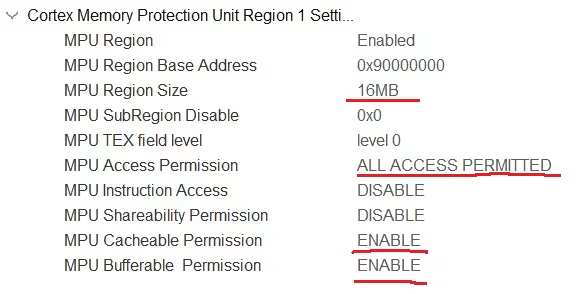
- Basically I have set the 16 MB Region (external flash) as the cacheable and bufferable region. This will configure the memory region as the Normal memory type with write back attribute.
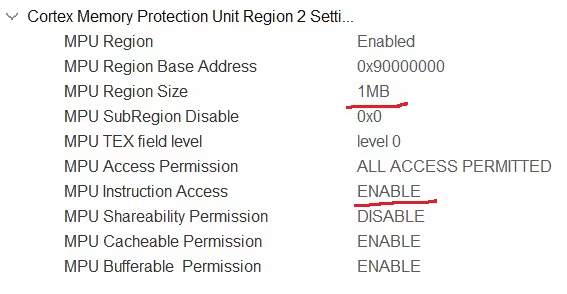
- The 1 MB in the beginning will also allow the instructions to be executed from this region.
If you want to learn more about MPU configuration and memory types, I would recommend you to watch STM32 MPU Config playlist on the topic https://www.youtube.com/playlist?list=PLfIJKC1ud8gjoY2McCCqkxXWuwiC2iSap
The main function:
int main(void)
{
  /* Only related to cortex M7--------------------------------------------------------*/
  MPU_Config();

  SCB_EnableICache();

  SCB_EnableDCache();
  /*--------------------------------------------------------*/

  HAL_Init();

  SystemClock_Config();

  MX_GPIO_Init();

  osKernelInitialize();

  defaultTaskHandle = osThreadNew(StartDefaultTask, NULL, &defaultTask_attributes);

  osKernelStart();

  while (1)
  {

  }
}- Nothing special is happening in the Main function. The default task gets created, and the kernel is started.
- The MPU configuration part is related to cortex M7 based MCUs
TCP SERVER
The default Task:
void StartDefaultTask(void *argument)
{
  /* init code for LWIP */
  MX_LWIP_Init();
  /* USER CODE BEGIN 5 */

  tcpserver_init();

  /* Infinite loop */
  for(;;)
  {
    osDelay(1);
  }
  /* USER CODE END 5 */
}- In the default task, we will call the
tcpserver_init()function to initialize the TCP Server. - The
MX_LWIP_Init()function initializes the LWIP and it is present in the default Task by default.
The tcpserver_init function :-
void tcpserver_init(void)
{
  sys_thread_new("tcp_thread", tcp_thread, NULL, DEFAULT_THREAD_STACKSIZE,osPriorityNormal);
}- Here we will create a new thread, tcp_thread, with default stack size (1KB) and normal priority.
- The Thread will basically initialize the STM32 as the TCP server and will be responsible for the handling the response for the client.
The tcp_thread is shown below
The tcp_thread :-
static struct netconn *conn, *newconn;
static struct netbuf *buf;
static ip_addr_t *addr;
static unsigned short port;
char msg[100];
char smsg[200];


/**** Send RESPONSE every time the client sends some data ******/
static void tcp_thread(void *arg)
{
	err_t err, accept_err, recv_error;

	/* Create a new connection identifier. */
	conn = netconn_new(NETCONN_TCP);

	if (conn!=NULL)
	{
		/* Bind connection to the port number 7. */
		err = netconn_bind(conn, IP_ADDR_ANY, 7);

		if (err == ERR_OK)
		{
			/* Tell connection to go into listening mode. */
			netconn_listen(conn);

			while (1)
			{
				/* Grab new connection. */
				accept_err = netconn_accept(conn, &newconn);

				/* Process the new connection. */
				if (accept_err == ERR_OK)
				{

					/* receive the data from the client */
					while (netconn_recv(newconn, &buf) == ERR_OK)
					{
						/* Extrct the address and port in case they are required */
						addr = netbuf_fromaddr(buf);  // get the address of the client
						port = netbuf_fromport(buf);  // get the Port of the client

						/* If there is some data remaining to be sent, the following process will continue */
						do
						{

							strncpy (msg, buf->p->payload, buf->p->len);   // get the message from the client

							// Or modify the message received, so that we can send it back to the client
							int len = sprintf (smsg, "\"%s\" was sent by the Server\n", msg);

							netconn_write(newconn, smsg, len, NETCONN_COPY);  // send the message back to the client
							memset (msg, '\0', 100);  // clear the buffer
						}
						while (netbuf_next(buf) >0);

						netbuf_delete(buf);
					}

					/* Close connection and discard connection identifier. */
					netconn_close(newconn);
					netconn_delete(newconn);
				}
			}
		}
		else
		{
			netconn_delete(conn);
		}
	}
}- Here First of all we will create a new netconn identifier. The NETCON_TCP argument will create a TCP Identifier.
- Next we will bind the Connection to the Local IP (configured in cube) and local port (7 in this case). These will act as the IP and Port of the server
- Next we will Put the Server in the Listen Mode, where it will listen for any incoming connection from the client.
- If any client tries to connect to the server,
netconn_acceptwill be used to accept the connection. - Note that while accepting the connection, we save the connection parameter in a new netconn identifier, i.e. newconn.
- At this point, the Client is connected to the Server.
- The server can only respond to the requests sent by the client, so it will wait for some data to be received by the client.
netconn_recvfunction will wait for the client to send some data to the server.- If the data is received, we will extract the address and port of the client. This is just in case if you need this information.
- Then we will copy the data from the Payload of the netbuf, into our msg array that we created earlier.
- This data can be used by the MCU for different purpose. But since here we are just testing the server, we will modify this data and send it back to the client.
- Then
netconn_writeis used to send the data back to the client. The netconn_write will send the data to the client/server whatever is connected at the moment. - here @newconn is the connection identifier, which in our case is the client
- @smsg and @len are the message and it’s length
- @NETCONN_COPY is the Netconn flag, which indicates that the data will be copied into memory belonging to the stack
- After sending the data, we will clear the msg array, so that we can receive new data into it.
- And finally delete the netbuf.
Result
I used the Hercules to act as the TCP Client, and below is the image of the output I got.
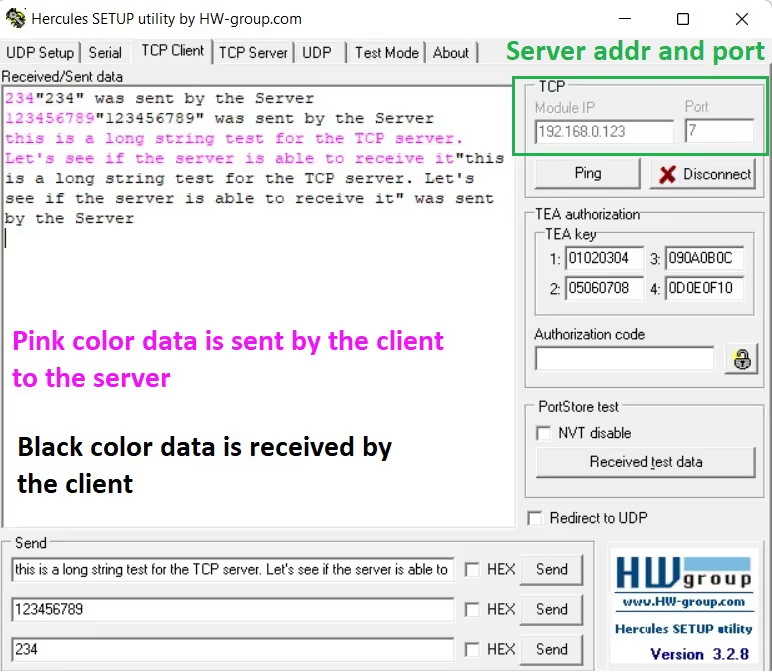
As shown in the picture above, the Client is connected to the IP 192.168.0.123 and Port 7. The IP address is same as we configured in the CubeMX and this is the IP of the server.
Whenever the Client send some data to the server, the server sends a response back to client, which consists of the same data, with a little modification.
TCP CLIENT
The default Task :-
void StartDefaultTask(void *argument)
{
  /* init code for LWIP */
  MX_LWIP_Init();
  /* USER CODE BEGIN 5 */

  tcpclient_init();

  /* Infinite loop */
  for(;;)
  {
    osDelay(1);
  }
  /* USER CODE END 5 */
}- In the default task, we will call the
tcpclient_init()function to initialize the TCP Client. - The
MX_LWIP_Init()function initializes the LWIP and it is present in the default Task by default.
The tcpclient_init function :-
void tcpclient_init (void)
{
	sys_sem_new(tcpsem, 0);  // the semaphore would prevent simultaneous access to tcpsend
	sys_thread_new("tcpinit_thread", tcpinit_thread, NULL, DEFAULT_THREAD_STACKSIZE,osPriorityNormal);
	sys_thread_new("tcpsend_thread", tcpsend_thread, NULL, DEFAULT_THREAD_STACKSIZE,osPriorityNormal);
}- Here I have created a semaphore (tcpsem). The initial count is 0, means the semaphore must be first given (count 1) before taking it.
- This semaphore will be used to prevent the simultaneous access to the function
tcpsend. You will see the use of it in a while. - Other than this we will also create a new thread,
tcpinit_thread, with default stack size (1KB) and normal priority. - The Thread will basically initialize the STM32 as the TCP client and will also be responsible for the handling the response for the server.
tcpsend_threadwill send the data to the server periodically.
The tcpinit_thread :-
static struct netconn *conn;
static struct netbuf *buf;
static ip_addr_t *addr, dest_addr;
static unsigned short port, dest_port;
char msgc[100];
char smsgc[200];
int indx = 0;

// Function to send the data to the server
void tcpsend (char *data);

// tcpsem is the binary semaphore to prevent the access to tcpsend
sys_sem_t tcpsem;

static void tcpinit_thread(void *arg)
{
	err_t err, connect_error;

	/* Create a new connection identifier. */
	conn = netconn_new(NETCONN_TCP);

	if (conn!=NULL)
	{
		/* Bind connection to the port number 7 (port of the Client). */
		err = netconn_bind(conn, IP_ADDR_ANY, 7);

		if (err == ERR_OK)
		{
			/* The desination IP adress of the computer */
			IP_ADDR4(&dest_addr, 192, 168, 0, 2);
			dest_port = 10;  // server port

			/* Connect to the TCP Server */
			connect_error = netconn_connect(conn, &dest_addr, dest_port);

			// If the connection to the server is established, the following will continue, else delete the connection
			if (connect_error == ERR_OK)
			{
				// Release the semaphore once the connection is successful
				sys_sem_signal(&tcpsem);
				while (1)
				{
					/* wait until the data is sent by the server */
					if (netconn_recv(conn, &buf) == ERR_OK)
					{
						/* Extract the address and port in case they are required */
						addr = netbuf_fromaddr(buf);  // get the address of the client
						port = netbuf_fromport(buf);  // get the Port of the client

						/* If there is some data remaining to be sent, the following process will continue */
						do
						{

							strncpy (msgc, buf->p->payload, buf->p->len);   // get the message from the server

							// Or modify the message received, so that we can send it back to the server
							sprintf (smsgc, "\"%s\" was sent by the Server\n", msgc);

							// semaphore must be taken before accessing the tcpsend function
							sys_arch_sem_wait(&tcpsem, 500);

							// send the data to the TCP Server
							tcpsend (smsgc);

							memset (msgc, '\0', 100);  // clear the buffer
						}
						while (netbuf_next(buf) >0);

						netbuf_delete(buf);
					}
				}
			}

			else
			{
				/* Close connection and discard connection identifier. */
				netconn_close(conn);
				netconn_delete(conn);
			}
		}
		else
		{
			// if the binding wasn't successful, delete the netconn connection
			netconn_delete(conn);
		}
	}
}- Here First of all we will create a new netconn identifier. The NETCON_TCP argument will create a TCP Identifier.
- Next we will bind the Connection to the Local IP (configured in cube) and local port (7 in this case). These will act as the IP and Port of the Client.
- Next we will connect the client to the server, whose IP address is 192.168.0.2 (IP of the computer) and port is set to 10.
- If the connection is successful, we will release the semaphore, so that the
tcpsendfunction can work. - Now put the client in the receive mode, where it will wait for the data to be received by the server.
netconn_recvfunction will wait for the server to send some data to the client.- If the data is received, we will extract the address and port of the server. This is just in case if you need this information.
- Then we will copy the data from the Payload of the netbuf, into our msgc array that we created earlier.
- This data can be used by the MCU for different purpose. But since here we are just testing the client, we will modify this data and send it back to the server.
- Before sending the data back to the server, we will wait for the semaphore to become available, so as to prevent the simultaneous access to the
tcpsendfunction.
- After sending the data, we will clear the msgc array, so that we can receive new data into it.
- And finally delete the netbuf.
tcpsend_thread :-
static void tcpsend_thread (void *arg)
{
	for (;;)
	{
		sprintf (smsgc, "index value = %d\n", indx++);
		// semaphore must be taken before accessing the tcpsend function
		sys_arch_sem_wait(&tcpsem, 500);
		// send the data to the server
		tcpsend(smsgc);
		osDelay(500);
	}
}tcpsend_threadwill be used to send the data to the server periodically.- Here we will copy the value of the index variable into the smgc buffer, which will be then sent to the server.
- Before calling the
tcpsendfunction, we must acquire the semaphore. This is to make sure thetcpsend_threadandtcpinit_threadare not calling thetcpsendfunction simultaneously.
tcpsend function :-
void tcpsend (char *data)
{
	// send the data to the connected connection
	netconn_write(conn, data, strlen(data), NETCONN_COPY);
	// relaese the semaphore
	sys_sem_signal(&tcpsem);
}- The
tcpsendfunction is used to send the data to the server. It is called by both,tcpinit_threadandtcpsend_thread, whenever they wants to send the data to the server. - Here we will call the
netconn_writefunction, which will send the data to the client/server whatever is connected at the moment.
here @conn is the connection identifier, which in our case is the server
@data and @len are the message and it’s length
@NETCONN_COPY is the Netconn flag, which indicates that the data will be copied into memory belonging to the stack - After sending the data we will release the semaphore, so that the waiting task can acquire it.
Result
I used the Hercules to act as the TCP Server, and below is the image of the output.
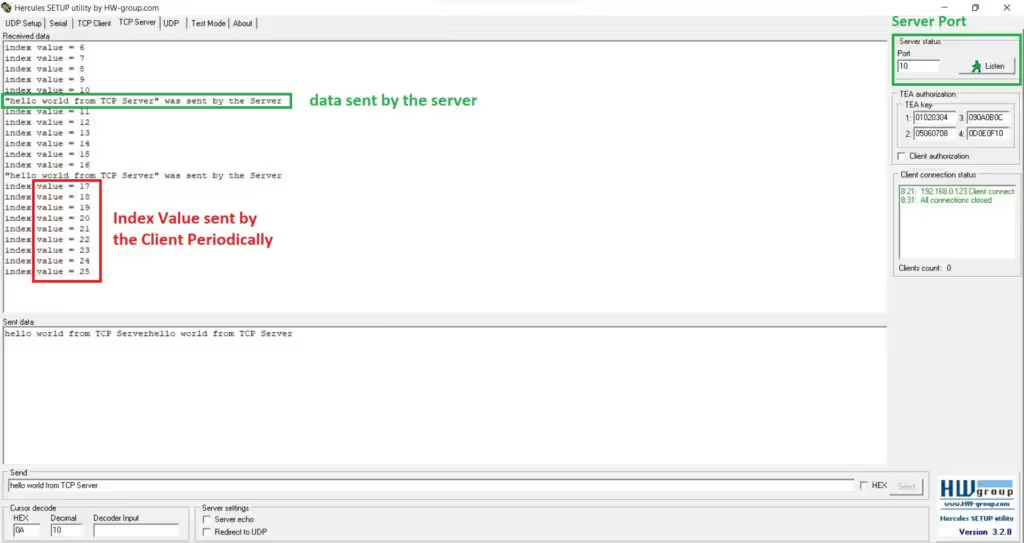
As shown in the picture above, the Server is open at Port 7. The IP address is same as that of the computer (192.168.0.2) and this is the IP of the server.
The Client (STM32) Sends the value of the index variable every 500ms. And whenever the server (hercules) send some data to the client, the data is modified and sent back to the server.
Next Tutorials in the STM32 Ethernet Series
STM32 Ethernet Tutorial (PART 2): UDP Server with lwIP (Raw API)

STM32 Ethernet Tutorial (PART 3): UDP Client Tutorial with lwIP (Raw API)
STM32 Ethernet Tutorial (PART 4): TCP Server with lwIP Raw API

STM32 Ethernet Tutorial (PART 5): TCP Client with lwIP Raw API

STM32 Ethernet PART 6 – How to Configure Simple HTTP Webserver

STM32 Ethernet PART 6.1 – Configure HTTP Webserver using SSI

STM32 Ethernet PART 6.2 – Configure HTTP Webserver using CGI


Everything works in client mode. However, if you press the “Close” button in the Hercules program and then “Listen” again, the data transfer from the client is not restored. This is logical. I tried wrapping the contents of the tcpinit_thread() function in while(1){…}, but it still didn’t work. How to programmatically restore communication in the client when restarting the server on a PC.
Hi, I am trying connecting my board STM32H735 to my PC computer with IP: 192.168.1.141, I changed the line: IP_ADDR4(&dest_addr, 192, 168, 1, 141); dest_port = 10; // server port and Hercules is running in my computer. The port in Hercules is 10 so this is correct. My IP in the smt32 is the same as the example (192.168.0.123) with Mask 255.255.255.0 and Gateway 192.168.0.1. any help?¿
Hello, thank you very much for your great tutorial, I have no problem in server mode but I can’t get ping in client mode, please guide me, thank you.
In the tcp thread would be nice to have a memcpy instead of “strncpy (msg, buf->p->payload, buf->p->len);”
I was runing a ModbusTCP layer on top of TCP server and for some reason my message was being cutted after de some bytes, after this fix the problem was over.
How can we connect two clients to STM configured as server and work with them?
I’m applying the following logic but server is not connecting to the second client:
1. netconn_accept(client_1) -> wait till a new connection takes place from client_1 (SUCCESS)
2. osThreadNew(client_1_thread) -> start a new thread to tx/rx messages from client_1 – netconn_recv() & netconn_write() (SUCCESS)
3. netconn_accept(client_2) -> wait till a new connection takes place from client_2 (BLOCKED HERE and not going ahead) -> hercules says “server is refusing connection”
4. osThreadNew(client_2_thread) -> start a new thread to tx/rx messages from client_1 – netconn_recv() & netconn_write() (CODE DOES NOT EVEN REACH HERE)
How can we connect two clients to STM configured as server and work with them?
I’m applying the following logic but server is not connecting to the second client:
1. netconn_accept(client_1) -> wait till a new connection takes place from client_1 (SUCCESS)
2. osThreadNew(client_1_thread) -> start a new thread to tx/rx messages from client_1 –
netconn_recv() & netconn_write() (SUCCESS)
3. netconn_accept(client_2) -> wait till a new connection takes place from client_2 (BLOCKED HERE and not going ahead) -> hercules says “server is refusing connection”
4. osThreadNew(client_2_thread) -> start a new thread to tx/rx messages from client_1 –
netconn_recv() & netconn_write() (CODE DOES NOT EVEN REACH HERE)
Connecting to 192.168.000.111 …
TCP connection error :11001
here i use only tcp server code but when i open hercules and try to connect so that time it will give this type of error message.. pls help for solve this error
Solve it by your own loser
Connecting to 192.168.000.111 …
TCP connection error :11001
when i generate tcp server code when in hercules tcp client portal give this type of message
i don’t know what is the problem
If you copy paste the code directly than it will give error of host is not found, do research of some api and then copy paste the code
Hello i am new to stm and when i am trying to do this with a stm32f746g-disco
I keep running into this error “configASSERT( ( xWantedSize & portBYTE_ALIGNMENT_MASK ) == 0 );” inside of the heap_4 void *pvPortMalloc( size_t xWantedSize ) function.
Can we have multiple ports on tcp server (e.g. 80 & 502). I need to make use of two different ports, one for diagnostics and other for regular Modbus tcp. How can I achieve this ?
just open 2 ports on the server. Then once the data is received, check the port and proceed accordingly.
Just wanna add something
Please pay attention of the laptop firewall configuration when using STM32 in client mode !
(When STM32 in server mode no need to change firewall config)
I lost my day looking for why netconn_connect returns me (-13).
It was the firewall of my laptop… I needed to turn it off.
Because he considers the connection by Ethernet as a public network !
Hope this comment will save time of another person 🙂
How can we reconstruct the connection once the connection to TCP client is lost..
netconn_connect(struct netconn *conn, const ip_addr_t *addr, u16_t port); this is not returning 0 value….so connection cannot be established…Please provide some solutions to resolve this…..Thanks in advance
make sure the server is running before the client tries to connect to it. Also check if the server address and port is correct
ok…it worked..Thank you…
Thanks for the great explanations and videos.Could you make a video modbus tcp/ip communication with stm32h7xx?
very nice, a lot of thanks 👍