HTTP WEBSERVER using SSI
This is another tutorial in the STM32 ETHERNET series, and today we will see how to use the SSI (Server Side Include) to send the data from the controller to the HTTP webserver.
This tutorial is in continuation from the previous one, so check out the HTTP webserver Simple before going any forward. This is because I will make the only few changes in the previous code instead of creating a new project here.
Considering that you already got the previous project as working, I will go ahead with SSI.
SSI (Server Side Include) can be used to send the data from the controller to the webserver. For example, we can send any sensor’s data and refresh the page in a regular interval to show the updated data. This is exactly what we will see in today’s tutorial.
Let’s start with the cube MX changes that we need to make.
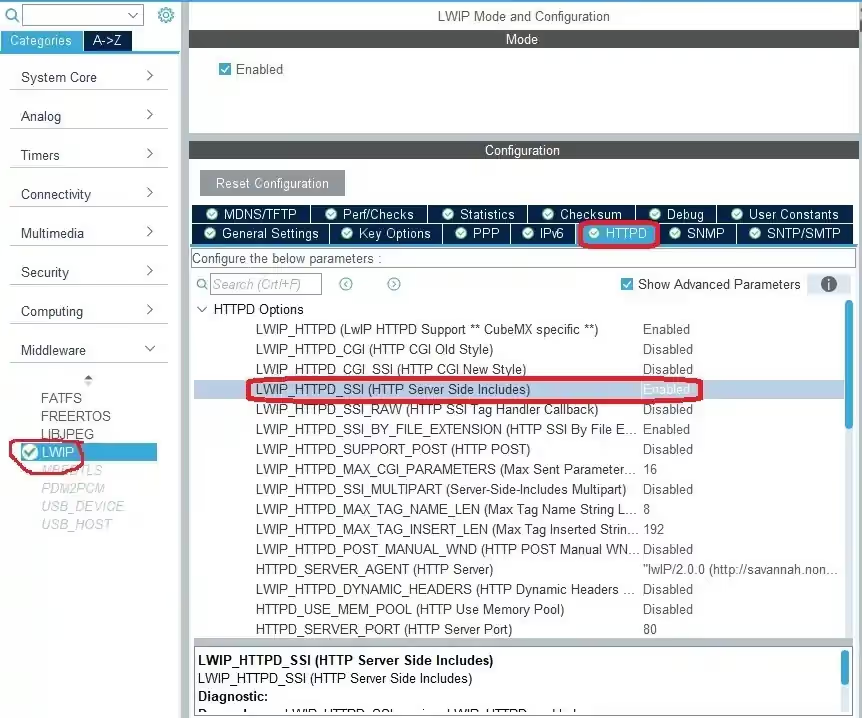
CubeMX configuration
In the setup above, I have just enabled the SSI in the HTTPD setup. The rest of the configuration is same as the previous tutorial.
Now we have to follow the same steps as motioned in the previous tutorial, just with few modifications.
The additional Setup
After creating the project, if you build it for the first time, you are going to get errors. So this section will cover the additional setup we need to do, to remove those errors.
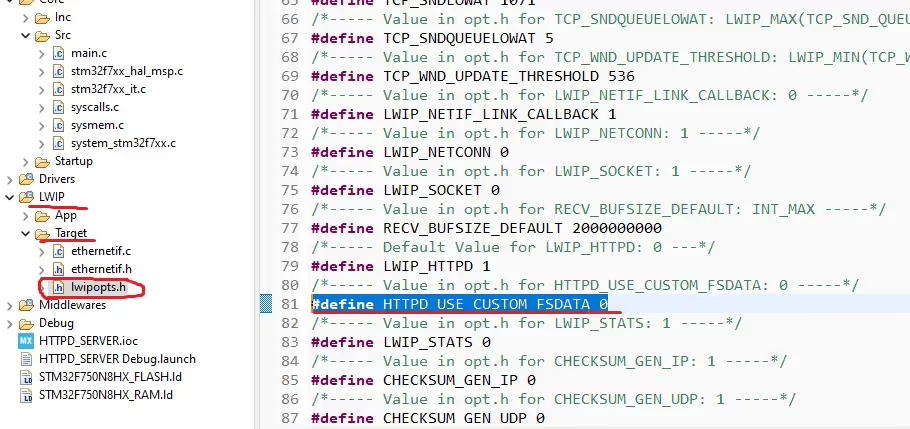
First of all goto LWIP->Target->lwipopts.h and change the #define HTTPD_USE_CUSTOM_FSDATA 0
Now we need to include the “FsData.c” file along with the resources that we are going to use for the webserver.
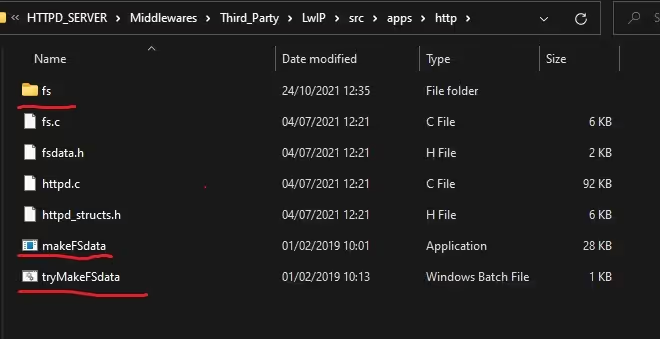
We have already covered this last time, and inside the Project\Middlewares\Third_Party\LwIP\src\apps\http folder, you already have the files shown below.
Before we go ahead and create the fsdata.c file, we need to create a webpage for displaying the values. This webpage must be in the .shtml format.
<!DOCTYPE html>
<html>
<head>
<title> SSI TEST </title>
<meta http-equiv="refresh" content ="1">
</head>
<style>
table, th, td {
  border:1px solid black;
}
</style>
<body>

<h2>TEST PAGE FOR SSI</h2>

<table style="width:100%">
  <tr>
    <td>V1</td>
    <td>V2</td>
    <td>V3</td>
  </tr>
  <tr>
    <td><!--#x--></td>
    <td><!--#y--></td>
    <td><!--#z--></td>
  </tr>
</table>

<p>This page refreshes every 1 second.</p>

</body>
</html>
Here I have created 3 columns and the value for each column will be updated from the controller.
<!--#x--> is the tag used here and we will write a program to update the value with respect to this tag. The same goes for the other 2 tags (y and z).
After saving the file in .shtml format, we need to copy it to the fs folder.
Now it’s time to generate the fsdata.c, and to do that we will double click the makeFSdata, just like we did in the previous tutorial.
This is it for the setup. If you build the code now, all the errors should be gone.
Now we will write the code for the initialization of the webserver.
Some Insight into the CODE
Initialization Function
void http_server_init (void)
{
	httpd_init();

	http_set_ssi_handler(ssi_handler, (char const**) TAGS, 3);
}- Here I am initializing the httpd first, and then setting the SSI handler.
- The TAGS (x, y, z) are used the webpage. 3 is the number of tags.
SSI Handler
uint16_t ssi_handler (int iIndex, char *pcInsert, int iInsertLen)
{
	switch (iIndex) {
		case 0:
			indx+=1;
			sprintf(pcInsert, "%d", indx);
			return strlen(pcInsert);
			break;
		case 1:
			indx+=1;
			sprintf(pcInsert, "%d", indx);
			return strlen(pcInsert);
			break;
		case 2:
			indx+=1;
			sprintf(pcInsert, "%d", indx);
			return strlen(pcInsert);
			break;
		default :
			break;
	}

	return 0;
}
SSI Handler Takes 3 parameters:
- iIndex provides the index of the TAG within the array passed to the
http_set_ssi_handler - pcInsert is the pointer to the data, that is to be send to the TAG
- iInsertLen contains the size of the buffer pointed to by pcInsert
For each time the TAG is encountered in the webpage, the ssi_handler function will be called. We will increment the value of the indx variable (we have created) and send this value to the TAG.
You can also send the data of some sensor, or any string in place of this value.
The Main Function
  /* USER CODE BEGIN 2 */

  http_server_init();

  /* USER CODE END 2 */

  /* Infinite loop */
  /* USER CODE BEGIN WHILE */
  while (1)
  {
    /* USER CODE END WHILE */

    /* USER CODE BEGIN 3 */

	  ethernetif_input(&gnetif);

	  sys_check_timeouts();
  }
  /* USER CODE END 3 */
In the main function, we simply call the server init function, which will initialize the rest of the things.
The while loop is as usual.
Result
The SSI Page looks as shown below.
The values are each 1 apart and the page refreshes every 1 second.
You can check out the detailed working in the video.



HI!
Thank you very much for your tutorials.
I am modifying to send ADC. Great!
Hi – great tutorial! – can you tell me how to update the webserver from the web page?
i.e. for setpoints etc. for a controller running on the webserver. Thanks.
https://controllerstech.com/stm32-ethernet-6-2-http-webserver-cgi/