
Home ▸ Arduino ▸ Sensors Interfacing ▸
Updated On: May 21, 2026
BMP180 Arduino Tutorial: I2C Wiring, Temperature, Pressure, Altitude & LCD1602 Display
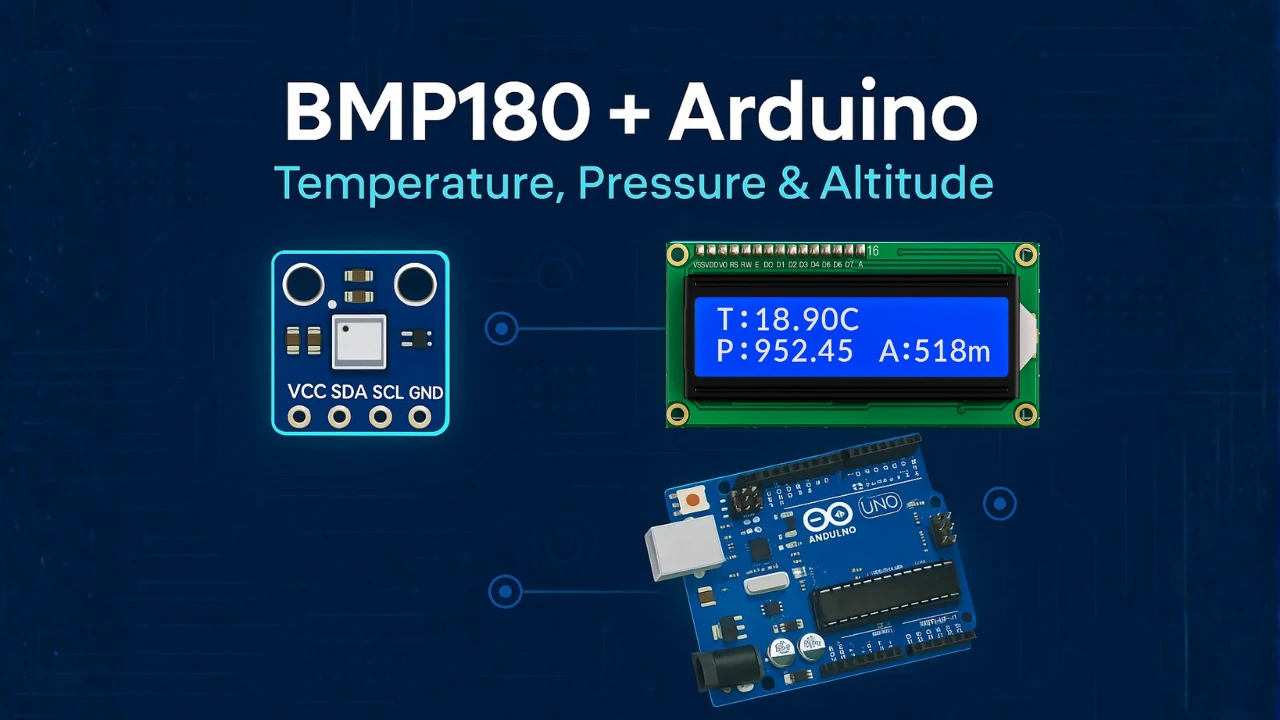
The BMP180 is a compact barometric pressure sensor from Bosch, one of the few sensors that measures three environmental values from a single I2C connection: temperature, atmospheric pressure, and altitude. Two wires, one library, and you have all three readings printed to the Serial Monitor in under 20 lines of code.
In this tutorial you will learn how to wire the BMP180 to Arduino Uno, Nano, and Mega over I2C, install the Adafruit BMP085 Unified library (which supports BMP180 out of the box), and read temperature, pressure, and altitude on the Serial Monitor. You will then add an I2C LCD1602 to the same bus — sharing SDA and SCL with no conflict — to build a standalone barometric weather station that displays all three values without a computer. A troubleshooting section covers every common failure mode including the 241-minute reading time metadata error, blank LCD, and wrong altitude baseline.
For a refresher on I2C, the Arduino I2C Tutorial covers bus scanning and multi-device wiring. For the LCD1602 display itself, the I2C LCD1602 Arduino Tutorial covers address finding, custom characters, and scrolling.
Working with other environmental sensors on Arduino? Check out these related guides:
- BME280 Environmental Sensor — Pressure, Humidity & Temperature
- SHT21 Temperature & Humidity Sensor with Arduino
- AHT20 Temperature & Humidity Sensor with Arduino
- SHT3X (SHT30 / SHT31 / SHT35) with Arduino
- DS18B20 Temperature Sensor — Single & Multiple on One Wire
- DHT11 & DHT22 Temperature & Humidity with Arduino
Browse the full Arduino Sensor Interfacing tutorial collection for more.
BMP180 Sensor Overview
What Is the BMP180?
The BMP180 is a compact digital sensor used to measure temperature and atmospheric pressure. It works on the I2C communication protocol, which makes it easy to interface with Arduino and other microcontrollers. The sensor is highly accurate and stable, even though it comes in a small package.
You can use the BMP180 in many weather-related and altitude-based projects. It gives fast readings and requires very little power, which makes it ideal for battery-powered systems. This is why the BMP180 is still one of the most popular sensors for beginners and hobbyists.
BMP180 Key Features & Specifications
- It measures temperature and atmospheric pressure.
- Uses I2C communication, so only two data pins are needed.
- Offers high accuracy with low noise output.
- Works on a 3.3V supply but many breakout boards include a 5V regulator.
- Very low power consumption, suitable for portable devices.
- Comes factory-calibrated, so you get reliable readings out of the box.
Applications of BMP180 in Projects
- Building simple weather stations.
- Creating altitude tracking systems for drones and RC planes.
- Logging environmental data for IoT projects.
- Designing barometric pressure-based alarms or alerts.
- Educational and academic projects to learn sensors and I2C communication.
BMP180 Arduino Wiring & Pinout
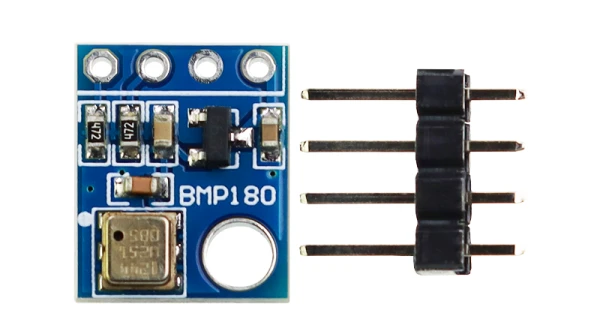
Let’s start by taking a look at the pinout of the BMP180 sensor to understand its available connections and functions. Once we are familiar with the pins, we’ll move on to the wiring part, where we’ll see how to properly connect the BMP180 to an Arduino board for data communication.
BMP180 4-Pin Pinout: VCC, GND, SDA, SCL
The BMP180 comes with only four pins, which makes the wiring simple and clean. These pins handle power and I2C communication. Before connecting the sensor to Arduino, it is important to understand what each pin does. This helps avoid wiring mistakes and ensures stable readings.
The BMP180 uses four pins for power and I2C communication. The image below shows the pinout of BMP180 sensor breakout board.
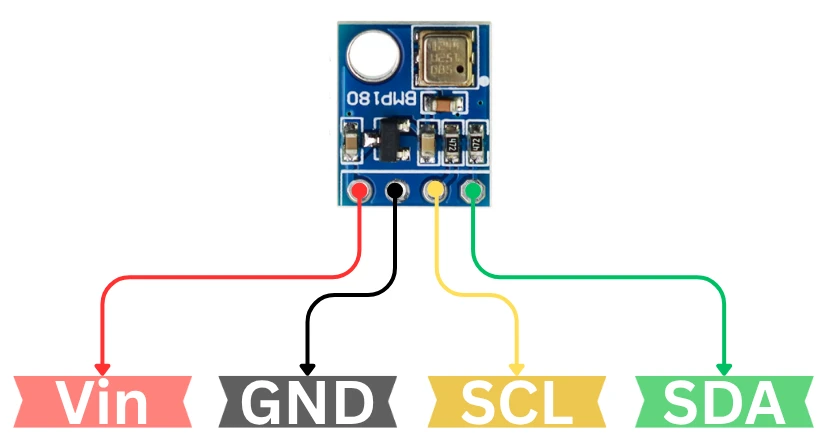
The table below explains each pin and its purpose.
| Pin Name | Function | Description |
|---|---|---|
| VCC | Power Supply | Connect to 3.3V or 5V (depending on module). Powers the BMP180 sensor. |
| GND | Ground | Connect to Arduino GND for a common ground reference. |
| SDA | Data Line | I2C data pin. Connect to Arduino A4 on UNO. |
| SCL | Clock Line | I2C clock pin. Connect to Arduino A5 on UNO. |
Wiring Diagram: BMP180 to Arduino Uno
The circuit diagram for connecting the BMP180 sensor to Arduino is very straightforward. The image below shows how to connect the BMP180 sensor with Arduino UNO.
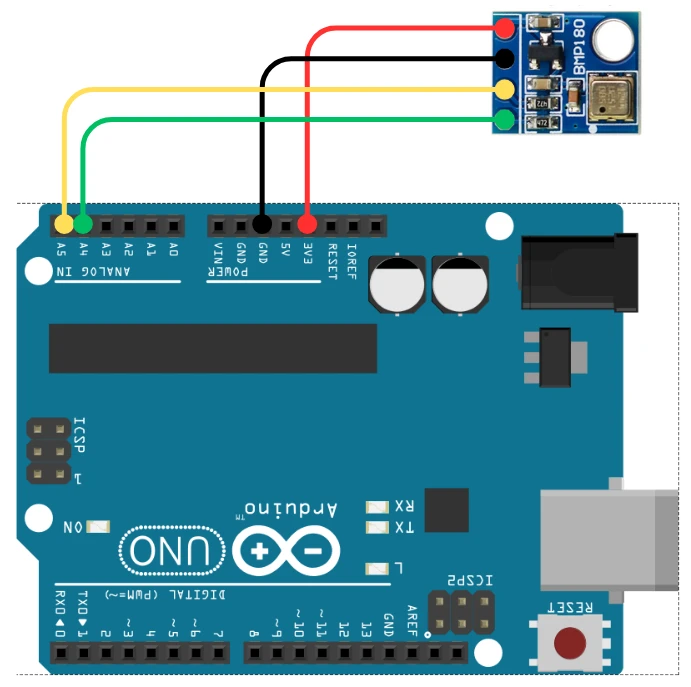
The BMP180 sensor uses the I2C bus, which means it requires only two data lines, SDA and SCL, along with power. The sensor connects easily to any Arduino.
Below is a typical connection setup using the Arduino UNO:
| BMP180 Pin | Arduino UNO Pin |
|---|---|
| VCC | 3.3V |
| GND | GND |
| SDA | A4 |
| SCL | A5 |
If you are using another board such as Arduino Mega or Arduino Nano, the I2C pins might be different. For example:
- On Arduino Mega, SDA = Pin 20, SCL = Pin 21
- On Arduino Leonardo, SDA = Pin 2, SCL = Pin 3
Install Adafruit BMP085 Library
To read data from the BMP180 sensor, we need Adafruit BMP085 Unified library. This library gives easy functions to read temperature, pressure, and calculate altitude.
Follow these steps to install the library:
- Open your Arduino IDE.
- Go to Sketch → Include Library → Manage Libraries…
- In the search bar, type “Adafruit BMP085 Unified”.
- Install the library named “Adafruit BMP085 Unified by Adafruit.”
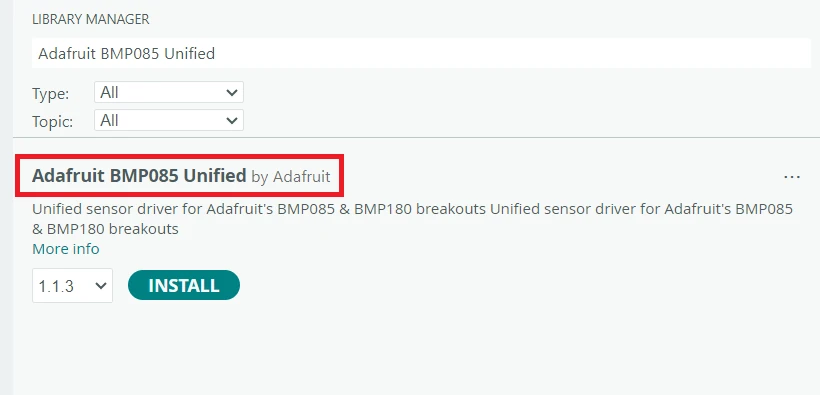
Once the libraries are installed, we can directly use simple functions to read temperature and pressure from the sensor.
BMP180 Arduino Code — Serial Monitor Output
Complete Sketch — Temperature, Pressure & Altitude
Here’s the tested and working Arduino code to read data from the BMP180 sensor periodically and display it on the Serial Monitor. This code uses the Adafruit BMP085 Unified Driver, which also works for BMP180.
#include <Wire.h>
#include <Adafruit_Sensor.h>
#include <Adafruit_BMP085_U.h>

Adafruit_BMP085_Unified bmp = Adafruit_BMP085_Unified();

void setup() {
  Serial.begin(9600);

  if (!bmp.begin()) {
    Serial.println("Could not find BMP180 sensor!");
    while (1);
  }

  Serial.println("BMP180 Sensor Initialized");
}

void loop() {
  sensors_event_t event;
  bmp.getEvent(&event);

  if (event.pressure) {
    float temperature;
    bmp.getTemperature(&temperature);

    // Calculate altitude (based on standard sea-level pressure 1013.25 hPa)
    float altitude = bmp.pressureToAltitude(1013.25, event.pressure);

    Serial.print("Temperature: ");
    Serial.print(temperature);
    Serial.println(" *C");

    Serial.print("Pressure: ");
    Serial.print(event.pressure);
    Serial.println(" hPa");

    Serial.print("Altitude: ");
    Serial.print(altitude);
    Serial.println(" m");

    Serial.println("-------------------------");
  } else {
    Serial.println("Sensor error!");
  }

  delay(1000);
}Code Explanation
1. Including the Required Libraries
#include <Wire.h>
#include <Adafruit_Sensor.h>
#include <Adafruit_BMP085_U.h>These libraries allow the Arduino to communicate with the BMP180 sensor using the I2C interface and use Adafruit’s unified sensor functions.
2. Creating the Sensor Object
Adafruit_BMP085_Unified bmp = Adafruit_BMP085_Unified();This creates a BMP180 sensor object, which we use to read temperature, pressure, and later calculate altitude.
3. Setup Function
Serial.begin(9600);
if (!bmp.begin()) {
Serial.println("Could not find BMP180 sensor!");
while (1);
}- Starts the serial communication at 9600 baud.
- Initializes the BMP180 sensor.
- If the sensor is not detected, it prints an error and stops the program.
4. Reading Pressure Data
sensors_event_t event;
bmp.getEvent(&event);This retrieves the latest sensor event, which includes the pressure value measured in hPa (hectopascals).
5. Reading Temperature
float temperature;
bmp.getTemperature(&temperature);Reads the BMP180’s built-in temperature sensor and stores the value in Celsius.
6. Calculating Altitude
float altitude = bmp.pressureToAltitude(1013.25, event.pressure);- Uses the pressure reading to compute the approximate altitude.
1013.25hPa is the standard sea-level pressure.- The BMP180 library uses the barometric formula to estimate height above sea level.
7. Printing the Sensor Data
Serial.print("Temperature: ");
Serial.print(temperature);
Serial.println(" *C");
Serial.print("Pressure: ");
Serial.print(event.pressure);
Serial.println(" hPa");
Serial.print("Altitude: ");
Serial.print(altitude);
Serial.println(" m");This prints all three sensor values, temperature, pressure, and altitude in a clear format on the Serial Monitor.
8. Delay Between Readings
delay(1000);Adds a 1-second pause before the next measurement cycle to avoid spamming the Serial Monitor.
Output: Serial Monitor at 9600 Baud
Once the code is uploaded successfully, open the Serial Monitor from the Arduino IDE (Tools → Serial Monitor) and set the baud rate to 9600.
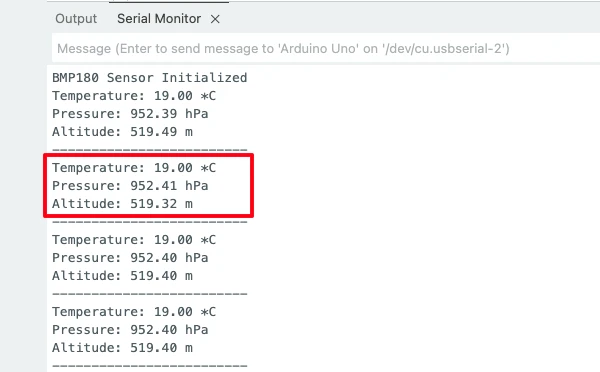
The image above demonstrates continuous measurements of pressure (in hPa), temperature (°C), and calculated altitude (m) by BMP180 sensor, printed on the Arduino serial console. The data is updated every second.
BMP180 with I2C LCD1602 — Standalone Display
Now that we have successfully displayed temperature and pressure readings from the BMP180 sensor on the Serial Monitor, let’s take the project one step further.
In this section, we’ll learn how to show the same readings on a 16×2 I2C LCD display. This makes the project more practical, allowing you to view real-time sensor data without needing to connect your Arduino to a computer.
Wiring Diagram: BMP180 + LCD1602 to Arduino Uno
The LCD1602 with an I2C module is very easy to connect because it uses only two communication pins, SDA and SCL.
This reduces the wiring and leaves more pins free on the Arduino. The same SDA and SCL pins are also used by the BMP180 sensor, so both devices can share the I2C bus without any issues.
The Image below shows how SHT21 sensor module and LCD1602 are connected to the Arduino UNO using the same I2C pins.
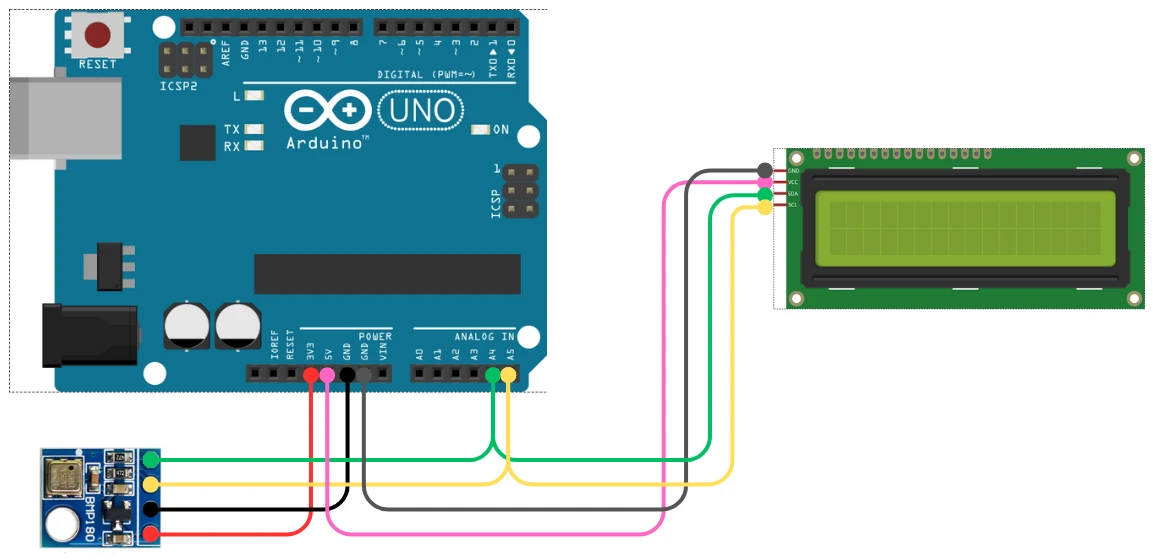
Here’s how to connect the I2C LCD1602 to your Arduino UNO:
| LCD1602 I2C Pin | Arduino UNO Pin | Description |
|---|---|---|
| VCC | 5V | Powers the LCD module |
| GND | GND | Common ground |
| SDA | A4 | I2C data line |
| SCL | A5 | I2C clock line |
Tip: Both the BMP180 and the LCD use I2C, so you can connect their SDA lines together and SCL lines together. Just ensure each device has a unique I2C address.
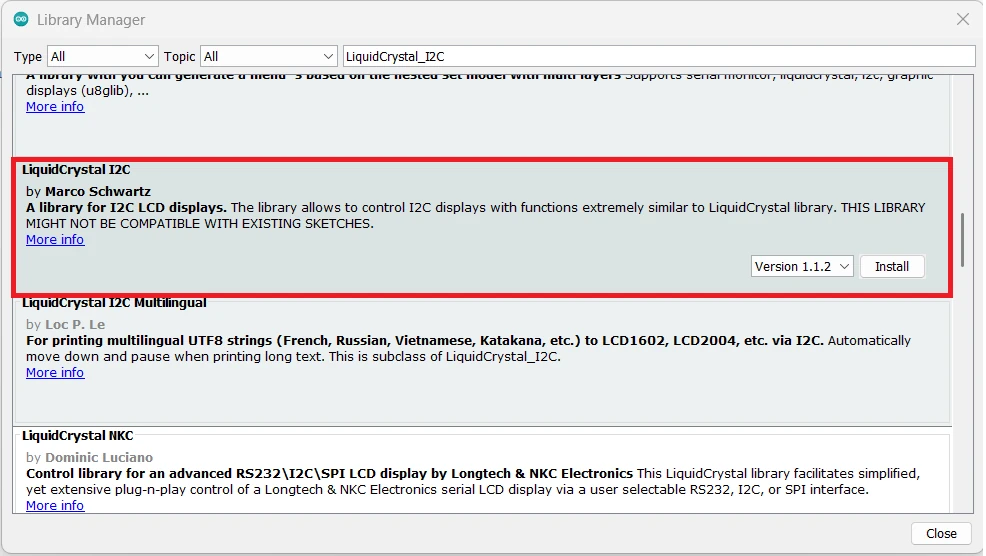
Install LiquidCrystal_I2C Library
Before running the code, make sure you have installed the LiquidCrystal_I2C library. You can do this by:
- Opening the Arduino IDE
- Going to Sketch → Include Library → Manage Libraries…
- Searching for “LiquidCrystal I2C”
- Installing the library by Frank de Brabander
Complete Code: BMP180 + LCD1602
Here’s the complete and tested Arduino code that displays BMP180 sensor data on the Serial Monitor and I2C LCD1602 display:
#include <Wire.h>
#include <Adafruit_Sensor.h>
#include <Adafruit_BMP085_U.h>
#include <LiquidCrystal_I2C.h>
// Create BMP180 object
Adafruit_BMP085_Unified bmp = Adafruit_BMP085_Unified();
// Create LCD object (change 0x27 to 0x3F if needed)
LiquidCrystal_I2C lcd(0x27, 16, 2);
void setup() {
Serial.begin(9600);
// Initialize LCD
lcd.init();
lcd.backlight();
lcd.setCursor(0, 0);
lcd.print("BMP180 Reading");
// Initialize BMP180 sensor
if (!bmp.begin()) {
lcd.clear();
lcd.setCursor(0, 0);
lcd.print("Sensor Error!");
Serial.println("Could not find BMP180 sensor!");
while (1);
}
delay(1500);
lcd.clear();
}
void loop() {
sensors_event_t event;
bmp.getEvent(&event);
if (event.pressure) {
// Read temperature
float temperature;
bmp.getTemperature(&temperature);
// Calculate altitude
float altitude = bmp.pressureToAltitude(1013.25, event.pressure);
// --- Serial Monitor Output ---
Serial.print("Temperature: ");
Serial.print(temperature);
Serial.println(" *C");
Serial.print("Pressure: ");
Serial.print(event.pressure);
Serial.println(" hPa");
Serial.print("Altitude: ");
Serial.print(altitude);
Serial.println(" m");
Serial.println("-----------------------");
// --- LCD Output ---
lcd.setCursor(0, 0);
lcd.print("T:");
lcd.print(temperature);
lcd.print("C "); // Spaces to clear old digits
lcd.setCursor(0, 1);
lcd.print("P:");
lcd.print(event.pressure);
lcd.print(" A:"); // Show altitude on same line (compact)
// If altitude fits, show it
lcd.print((int)altitude);
lcd.print("m "); // Clear trailing characters
} else {
Serial.println("Sensor Error!");
lcd.setCursor(0, 0);
lcd.print("Sensor Error! ");
lcd.setCursor(0, 1);
lcd.print(" "); // Clear 2nd line
}
delay(1000);
}Code Explained: LCD Layout and Compact Display
1. Including Required Libraries
#include <Wire.h>
#include <Adafruit_Sensor.h>
#include <Adafruit_BMP085_U.h>
#include <LiquidCrystal_I2C.h>These libraries allow:
- Wire.h → I2C communication
- Adafruit_Sensor.h / Adafruit_BMP085_U.h → Reading temperature, pressure, and calculating altitude
- LiquidCrystal_I2C.h → Displaying values on a 16×2 LCD
2. Creating Sensor and LCD Objects
Adafruit_BMP085_Unified bmp = Adafruit_BMP085_Unified();
LiquidCrystal_I2C lcd(0x27, 16, 2);bmpis the BMP180 sensor object.lcdinitializes the LCD at address 0x27 with 16×2 size.
(Address may be 0x3F depending on the module.)
3. Setup Function
Serial.begin(9600);
lcd.init();
lcd.backlight();- Starts serial communication.
- Initializes and lights up the LCD.
if (!bmp.begin()) {
lcd.print("Sensor Error!");
Serial.println("Could not find BMP180 sensor!");
while (1);
}This checks whether the BMP180 sensor is connected.
If not found, it displays an error message and stops the program.
4. Reading Sensor Data
sensors_event_t event;
bmp.getEvent(&event);
This retrieves the latest pressure reading from the sensor.
5. Reading Temperature
float temperature;
bmp.getTemperature(&temperature);Fetches the current temperature in Celsius from the BMP180’s internal sensor.
6. Calculating Altitude
float altitude = bmp.pressureToAltitude(1013.25, event.pressure);- Uses the standard sea-level pressure (1013.25 hPa).
- Converts the pressure reading into an estimated altitude in meters.
- The BMP180 internally uses the barometric formula to compute height.
7. Printing Data to Serial Monitor
Serial.print("Temperature: ");
Serial.print(temperature);
Serial.println(" *C");

Serial.print("Pressure: ");
Serial.print(event.pressure);
Serial.println(" hPa");

Serial.print("Altitude: ");
Serial.print(altitude);
Serial.println(" m");Shows all sensor readings clearly on the Serial Monitor.
8. Displaying Data on the LCD
lcd.setCursor(0, 0);
lcd.print("T:");
lcd.print(temperature);
lcd.print("C ");- Shows temperature on the first line.
- Extra spaces clear old characters.
lcd.setCursor(0, 1);
lcd.print("P:");
lcd.print(event.pressure);
lcd.print(" A:");
lcd.print((int)altitude);
lcd.print("m ");- Displays pressure and altitude on the second line.
- Altitude is cast to
intto fit on the LCD. - Extra spaces ensure clean updates.
9. Handling Sensor Errors
lcd.print("Sensor Error!");
Serial.println("Sensor Error!");If the sensor fails, both LCD and Serial give an alert.
10. Delay Before Next Reading
delay(1000);Waits 1 second before taking the next measurement.
Output: Temperature, Pressure & Altitude on LCD
Once the code is uploaded successfully, the LCD should print the Temperature, Pressure and Altitude values as shown in the image below.
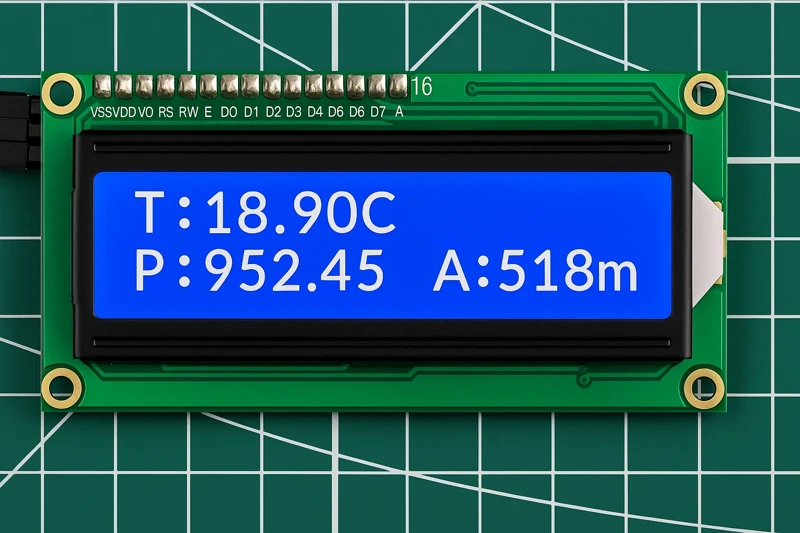
These values on the LCD display will update every second.
Troubleshooting BMP180 with Arduino
Working with the BMP180 sensor and the LCD1602 I2C display is usually straightforward, but a few common issues may appear during testing. This section will help you quickly find and fix the most frequent problems.
BMP180 Not Detected on I2C Bus
If the Serial Monitor shows: “Could not find BMP180 sensor!”
Possible reasons:
- Loose SDA or SCL wires
- Wrong wiring (SDA – A4, SCL – A5)
- Sensor not powered properly
- Damaged BMP180 module
Fix: Check the wiring again and make sure the sensor gets 3.3V and GND. Ensure SDA and SCL are firmly connected.
LCD1602 Display Showing Blank Screen
If the LCD does not show any characters:
- Contrast may be too low
- Wrong I2C address used
- VCC or GND not connected
- SDA/SCL loose
Fix:
Adjust the contrast screw on the LCD module.
Use an I2C scanner to find the correct LCD address.
Garbage or Random Characters on LCD
If the LCD shows broken text:
- Wrong initialization code
- Incorrect library version
- Timing issues
Fix:
Use a stable library such as LiquidCrystal_I2C and reinitialize the LCD with:
lcd.init();
lcd.backlight();Incorrect Temperature or Pressure Values
If readings look unrealistic:
- Sensor may not be stable after power-up
- Strong airflow affecting readings
- Faulty sensor module
Fix:
Allow the sensor a few seconds after startup.
Place it away from heat sources like voltage regulators.
Both Devices Not Working Together
Because both BMP180 and LCD1602 share SDA and SCL, conflicts may occur.
Possible issues:
- One device pulling the bus low
- Different I2C addresses not handled
Fix:
Check each device separately first.
Then reconnect both and confirm their addresses using the I2C scanner.
Arduino BMP180 — Frequently Asked Questions
Conclusion
The BMP180 gives you three environmental measurements for the price of one sensor and two wires. Temperature at ±0.5°C, pressure at ±0.12 hPa (≈ ±1 metre of altitude resolution), and altitude derived from the barometric formula — all factory-calibrated and accessible through the Adafruit BMP085 library with two function calls.
In this tutorial you wired the BMP180 to Arduino Uno over I2C (SDA to A4, SCL to A5 at the fixed address 0x77), installed the Adafruit BMP085 Unified library, and read all three values on the Serial Monitor. You then added an LCD1602 to the same two-wire bus at 0x27 — no address conflict with 0x77 — and built a standalone barometric station that compactly fits temperature, pressure, and altitude on two LCD lines, updating every second.
The most important tuning parameter for this sensor is the 1013.25 hPa sea-level baseline in pressureToAltitude(). At sea level this gives accurate absolute altitude. At your actual location, replace it with your local QNH (current sea-level pressure available from any weather service) for a more accurate relative reading — the difference at 500 metres altitude can be 40–50 metres if the baseline is wrong.
From here you can log timestamped readings to an SD card with a DS3231 RTC for barometric trend logging, combine the BMP180 with an AHT20 or SHT3X on the same I2C bus for full weather station data (no humidity from BMP180 alone), or upgrade to the BME280 if you also need humidity in a single package. Download the full project above and explore the Arduino Sensor Interfacing collection for more.
Download BMP180 Arduino Project Files
Complete Arduino project with two sketches: BMP180 Serial Monitor output — temperature, pressure in hPa, and altitude using Adafruit BMP085 Unified library with 1013.25 hPa baseline (adjustable); and the full BMP180 + I2C LCD1602 standalone display with compact line 1 (temperature) and line 2 (pressure + altitude) layout. Requires Adafruit BMP085 Unified, Adafruit Unified Sensor, and LiquidCrystal_I2C libraries. Compatible with Arduino Uno, Nano, and Mega. Free to download — support the work if it helped you.
Browse More Arduino Sensors Tutorials
SHT21 Arduino Tutorial: I2C Wiring, SHT2x Library, Serial & LCD Output
AHT20 Arduino Tutorial: I2C Wiring, Adafruit AHTX0 & OLED Display

SHT30 / SHT31 / SHT35 Arduino Tutorial: I2C Wiring, Code & LCD1602 Display
DS18B20 Arduino Tutorial: Single & Multiple Sensors, Serial & OLED Output
Arduino BME280 Tutorial: Wiring, Pinout, Code and LCD1602 Display Output

Subscribe
Login
0 Comments
Newest

