

Home ▸ Arduino ▸ Modules Interfacing ▸
Updated On: May 3, 2026
WS2812 Arduino Tutorial: NeoPixel Ring Wiring, Functions & Animations
WS2812 LEDs are individually addressable RGB LEDs — each one has a built-in controller chip, so you can set any color and brightness on any LED in the chain using just a single data wire from Arduino. One pin, one library, and you can drive an entire ring of LEDs with smooth color effects and animations that would take dozens of wires on a traditional RGB LED setup.
In this tutorial you’ll learn how WS2812 data signalling works, how to wire an 8-LED NeoPixel ring to Arduino safely (including the recommended 470 Ω resistor and decoupling capacitor), how to install and use the Adafruit NeoPixel library, and how to write code for every core function — setPixelColor(), fill(), setBrightness(), clear(), and ColorHSV(). You’ll then build nine complete animation effects: breathing, color wipe, clockwise rotation, counter-clockwise rotation, fire flicker, dual-color opposite spin, sparkle, rotating rainbow, and rainbow breathing pulse. All code is tested on Arduino Uno and works on Nano and Mega without changes. A full project download is at the end.
Looking for other output and lighting modules for Arduino? Check out these related guides:
- Passive Buzzer with Arduino — tone(), Alarm & Music Codes
- DS3231 RTC Module with Arduino
- DS1307 RTC Module with Arduino
- SD Card Interface with Arduino (SPI)
- AT25C256 EEPROM with Arduino (I2C)
- W25Q Flash Memory with Arduino
Browse the full Arduino Modules Interfacing tutorial collection for more.
WS2812 LED Overview & How It Works
What Are WS2812 LEDs?
WS2812 LEDs are smart RGB LEDs with a built-in controller. This means each LED can show any color, brightness, or animation you want. They use a single data line, so you can control many LEDs using just one Arduino pin.
These LEDs need precise timing, so we usually use a library like Adafruit NeoPixel to make control easy and reliable.
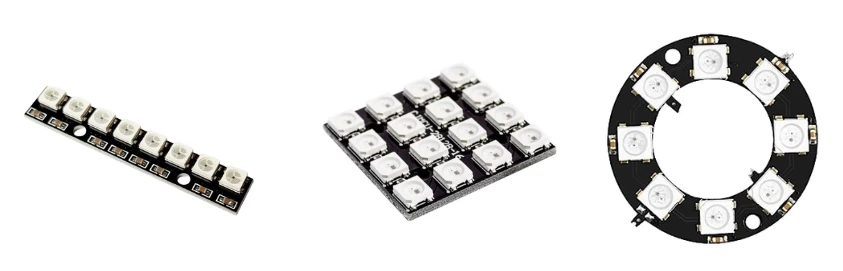
WS2812 LED Features & Specifications
WS2812 LEDs come with several powerful features:
- Individually addressable: control every LED separately
- Single-wire communication: only one data pin needed
- Built-in driver: no external IC required
- Full 24-bit color: 8-bit Red, Green, and Blue
- Daisy-chain support: connect many LEDs in a series
- High brightness despite low power consumption
These features make WS2812 perfect for rings, strips, matrices, clocks, and wearable LED projects.
How WS2812 Data Signalling Works
WS2812 LEDs communicate using a special timing-based protocol:
- Arduino sends a fast stream of 1s and 0s
- Each bit has a different pulse width
- The LED interprets those bits as color values
- After receiving 24 bits (RGB), the LED updates itself
- Then it passes the remaining data to the next LED in the chain
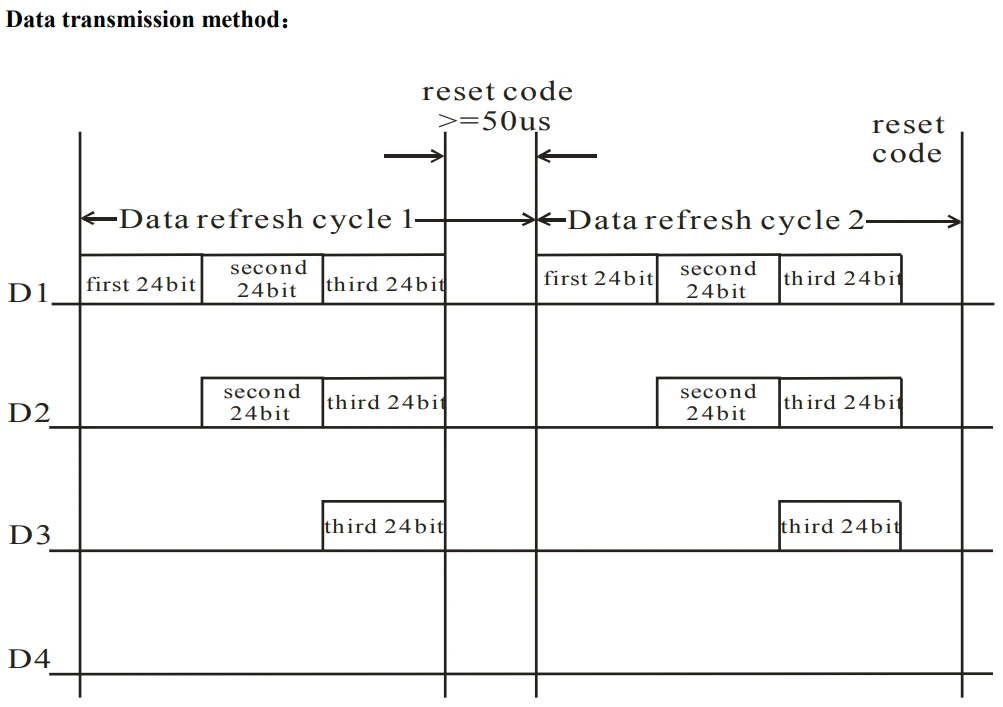
Because the timing is very strict, writing code manually is difficult. This is why we use the NeoPixel library, it handles all timing and color data automatically.
WS2812 NeoPixel Arduino Wiring & Setup
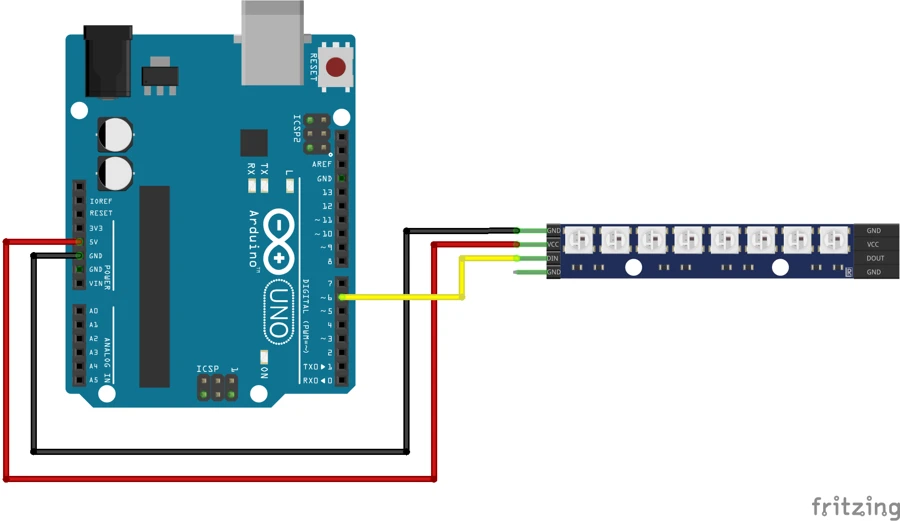
Wiring Diagram — NeoPixel Ring to Arduino
The wiring is very simple. The 8-LED NeoPixel ring has three pins:
- 5V -> Arduino 5V
- GND -> Arduino GND
- DIN -> Arduino Digital Pin 6
Recommended Safety Components:
- A 470 Ω resistor between Arduino pin 6 and DIN
- A 1000 µF capacitor across 5V and GND
- Use an external 5V supply for long strips (not required for 8 LEDs)
Install Adafruit NeoPixel Library
To control WS2812 LEDs easily, we will use the Adafruit NeoPixel library. This library handles all the complex timing and data signals automatically. It lets us set colors, brightness, and animations with simple functions.
Follow these steps to install the library in Arduino IDE:
- Open Arduino IDE
- Go to Sketch → Include Library → Manage Libraries
- In the search box, type “NeoPixel”
- Select Adafruit NeoPixel
- Click Install
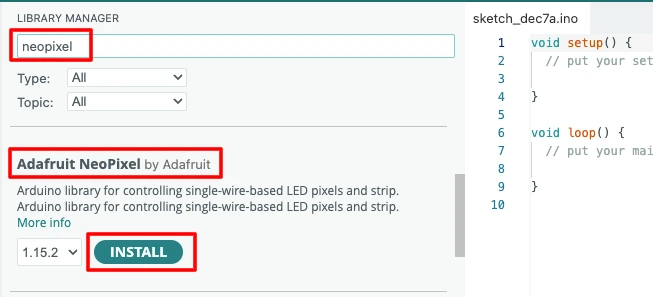
Once installed, you can use all WS2812 functions without worrying about timing issues.
Basic Arduino Test Code (Turn All LEDs On)
#include <Adafruit_NeoPixel.h>

#define LED_PIN 6
#define LED_COUNT 8

Adafruit_NeoPixel ring(LED_COUNT, LED_PIN, NEO_GRB + NEO_KHZ800);

void setup() {
  ring.begin();        // Initialize the LED ring
  ring.show();         // Turn off all LEDs initially
}

void loop() {
  for (int i = 0; i < LED_COUNT; i++) {
    ring.setPixelColor(i, ring.Color(255, 0, 0)); // Set each LED to red
  }
  ring.show();         // Update the ring to apply color
}Explanation
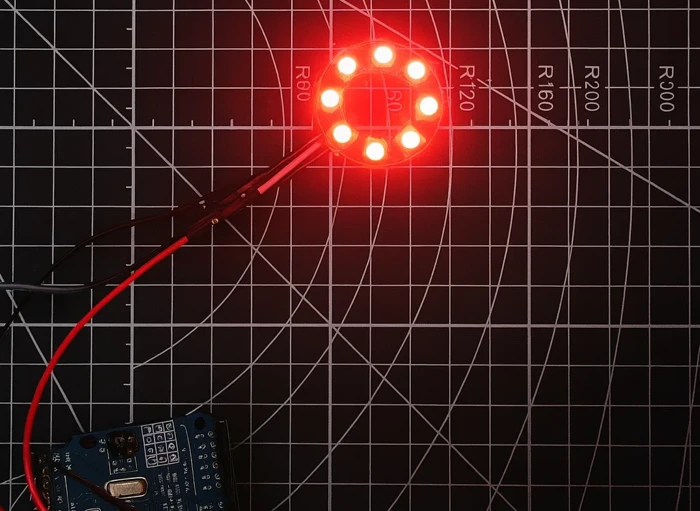
ring.begin()initializes the WS2812 ring.ring.setPixelColor()sets the color of each LED.ring.show()sends the data signal to the LEDs.- The loop turns all 8 LEDs red.
Output
The image below shows all 8 LEDs glowing in solid red color on the WS2812 ring.
WS2812 NeoPixel Function Reference for Arduino
In this section, we will cover all must-know WS2812 functions one by one. These functions help you control colors, brightness, clearing, and updating the LEDs.
setPixelColor() — Control Individual LEDs
#include <Adafruit_NeoPixel.h>

#define LED_PIN 6
#define LED_COUNT 8

Adafruit_NeoPixel ring(LED_COUNT, LED_PIN, NEO_GRB + NEO_KHZ800);

void setup() {
  ring.begin();
  ring.show();
}

void loop() {
  ring.setPixelColor(0, ring.Color(0, 255, 0)); // LED 0 → Green
  ring.setPixelColor(3, ring.Color(255, 0, 0)); // LED 3 → Red
  ring.setPixelColor(7, ring.Color(0, 0, 255)); // LED 7 → Blue
  ring.show();  // Apply changes
}
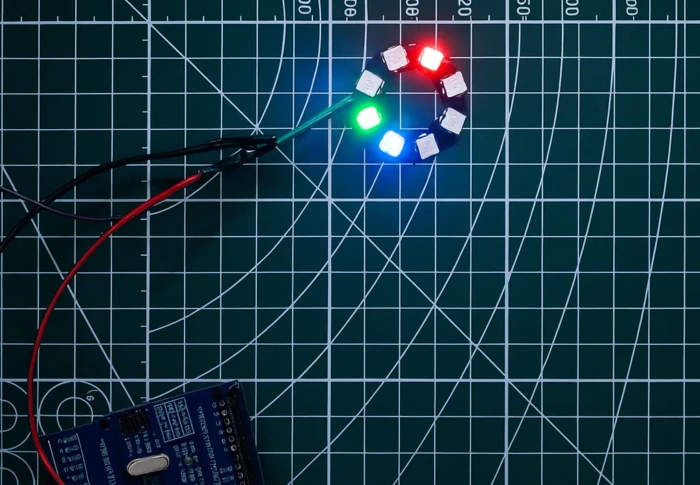
setPixelColor(0, ...)sets LED number 0 to a selected color.- You can choose any LED index from 0 to 7.
- Each color uses Red, Green, Blue values.
Output
The image below shows LEDs 0, 3, and 7 glowing in green, red, and blue respectively.
fill() — Set All LEDs to One Color
#include <Adafruit_NeoPixel.h>

#define LED_PIN 6
#define LED_COUNT 8

Adafruit_NeoPixel ring(LED_COUNT, LED_PIN, NEO_GRB + NEO_KHZ800);

void setup() {
  ring.begin();
  ring.show();
}

void loop() {
  ring.fill(ring.Color(255, 255, 0)); // Fill all LEDs with yellow
  ring.show();
}
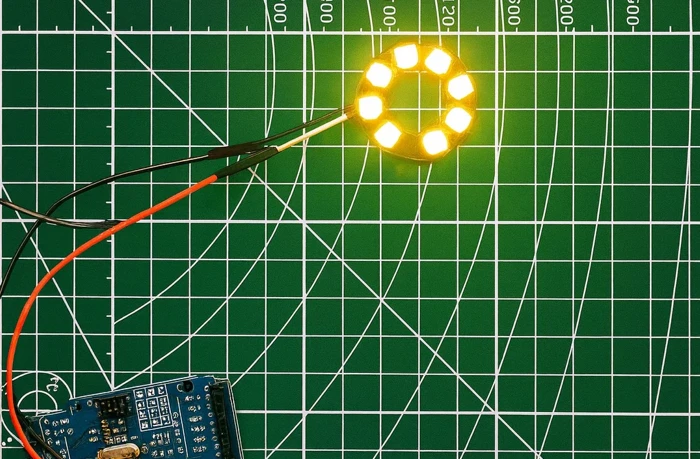
ring.fill(color)sets every LED to the same color.- The example fills all LEDs with yellow (255 red + 255 green).
Output
The image below shows all 8 LEDs glowing in bright yellow.
setBrightness() — Control LED Brightness
#include <Adafruit_NeoPixel.h>

#define LED_PIN 6
#define LED_COUNT 8

Adafruit_NeoPixel ring(LED_COUNT, LED_PIN, NEO_GRB + NEO_KHZ800);

void setup() {
  ring.begin();
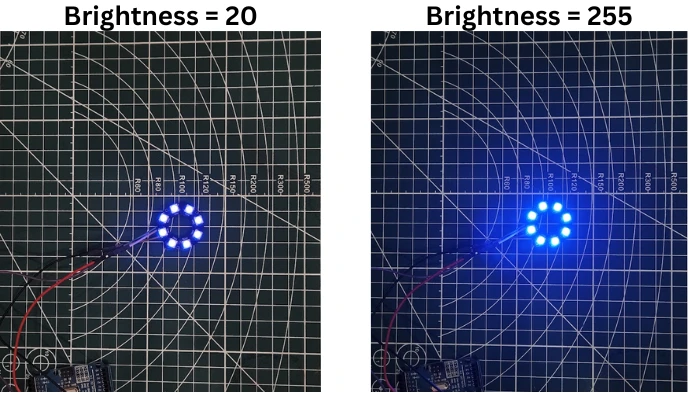
  ring.setBrightness(20); // Brightness range: 0 to 255
//  ring.setBrightness(255); // Brightness range: 0 to 255
  ring.show();
}

void loop() {
    ring.fill(ring.Color(0, 0, 255)); // Blue
    ring.show();
}setBrightness(value)changes brightness from 0 (dim) to 255 (full).ring.fill()fills all the LEDs with blue color.
Output
The image below shows the difference in brightness for all LEDs, when the brightness is set to 20 vs 255.
clear() — Turn All LEDs Off
#include <Adafruit_NeoPixel.h>

#define LED_PIN 6
#define LED_COUNT 8

Adafruit_NeoPixel ring(LED_COUNT, LED_PIN, NEO_GRB + NEO_KHZ800);

void setup() {
  ring.begin();
  ring.show();
}

void loop() {
  ring.fill(ring.Color(255, 0, 0)); // Red
  ring.show();
  delay(1000);

  ring.clear(); // Clear all LEDs
  ring.show();
  delay(1000);
}ring.clear()resets all LEDs to off.- You must call
ring.show()to apply the change.
Output
The GIF below shows LEDs glowing red for 1 second, then turning off.

WS2812 NeoPixel Animation Effects for Arduino
In this section, we will create common and simple WS2812 LED effects. These animations are perfect for beginners because they use basic functions but still look attractive.
Breathing Effect (Fade In / Fade Out)
#include <Adafruit_NeoPixel.h>

#define LED_PIN 6
#define LED_COUNT 8

Adafruit_NeoPixel ring(LED_COUNT, LED_PIN, NEO_GRB + NEO_KHZ800);

void setup() {
  ring.begin();
  ring.show();
}

void loop() {
  for (int brightness = 0; brightness <= 255; brightness++) {
    ring.setBrightness(brightness);
    ring.fill(ring.Color(0, 0, 255)); // Blue
    ring.show();
    delay(5);
  }

  for (int brightness = 255; brightness >= 0; brightness--) {
    ring.setBrightness(brightness);
    ring.fill(ring.Color(0, 0, 255)); // Blue
    ring.show();
    delay(5);
  }
}- Brightness slowly increases and decreases.
- Creates a breathing or pulsing glow.
- We apply the same color on each cycle.
Output
The GIF below shows the LEDs glowing blue with a soft fade-in and fade-out breathing effect.

Color Wipe Animation
#include <Adafruit_NeoPixel.h>

#define LED_PIN 6
#define LED_COUNT 8

Adafruit_NeoPixel ring(LED_COUNT, LED_PIN, NEO_GRB + NEO_KHZ800);

void setup() {
  ring.begin();
  ring.show();
}

void loop() {
  for (int i = 0; i < LED_COUNT; i++) {
    ring.setPixelColor(i, ring.Color(0, 255, 0)); // Green wipe
    ring.show();
    delay(120);
  }

  delay(500);

  ring.clear();
  ring.show();
  delay(300);
}- LEDs turn on one by one in the same color.
- Looks like the color is wiping across the ring.
- Example uses green for a smooth wipe effect.
Output
The GIF below shows a green color wiping across the ring and then clearing.

Clockwise Rotation Effect
#include <Adafruit_NeoPixel.h>

#define LED_PIN 6
#define LED_COUNT 8

Adafruit_NeoPixel ring(LED_COUNT, LED_PIN, NEO_GRB + NEO_KHZ800);

void setup() {
  ring.begin();
  ring.show();
}

void loop() {
  static int pos = 0;

  ring.clear();
  ring.setPixelColor(pos, ring.Color(255, 100, 0)); // Orange
  ring.show();

  pos++;
  if (pos >= LED_COUNT) pos = 0;

  delay(120);
}- Only one LED stays ON at a time.
- Position increases from 0 to 7, creating a clockwise movement.
- Uses warm orange color for a glowing rotating effect.
Output
The GIF below shows a single orange LED smoothly rotating clockwise around the ring.

Counter-Clockwise Rotation Effect
#include <Adafruit_NeoPixel.h>

#define LED_PIN 6
#define LED_COUNT 8

Adafruit_NeoPixel ring(LED_COUNT, LED_PIN, NEO_GRB + NEO_KHZ800);

void setup() {
  ring.begin();
  ring.show();
}

void loop() {
  static int pos = 7;  // Start from the last LED

  ring.clear();
  ring.setPixelColor(pos, ring.Color(0, 200, 255)); // Cyan
  ring.show();

  pos--;
  if (pos < 0) pos = LED_COUNT - 1;

  delay(120);
}- Index moves backward from 7 to 0.
- Creates a clean counter-clockwise effect.
- Color set to cool cyan.
Output
The GIF below shows a cyan LED rotating counter-clockwise around the ring.

Fire Ring Flicker Effect
#include <Adafruit_NeoPixel.h>

#define LED_PIN 6
#define LED_COUNT 8

Adafruit_NeoPixel ring(LED_COUNT, LED_PIN, NEO_GRB + NEO_KHZ800);

void setup() {
  ring.begin();
}

void loop() {
  for (int i = 0; i < LED_COUNT; i++) {
    int intensity = random(150, 255); // Flicker brightness
    ring.setPixelColor(i, ring.Color(intensity, random(40, 80), 0));
  }

  ring.show();
  delay(80);
}- Random brightness + warm tones (red/orange/yellow).
- Creates a natural flickering flame effect.
- Updates quickly for a real fire-like animation.
Output
The GIF below shows warm fire-like flickers moving around the ring.

Dual-Color Opposite Rotation
#include <Adafruit_NeoPixel.h>

#define LED_PIN 6
#define LED_COUNT 8

Adafruit_NeoPixel ring(LED_COUNT, LED_PIN, NEO_GRB + NEO_KHZ800);

void setup() {
  ring.begin();
}

void loop() {
  static int pos1 = 0;
  static int pos2 = 4; // Opposite LED

  ring.clear();

  ring.setPixelColor(pos1, ring.Color(255, 0, 0)); // Red
  ring.setPixelColor(pos2, ring.Color(0, 0, 255)); // Blue

  ring.show();

  pos1++;
  pos2--;

  if (pos1 >= LED_COUNT) pos1 = 0;
  if (pos2 < 0) pos2 = LED_COUNT - 1;

  delay(150);
}- Two LEDs rotate in opposite directions.
- Colors: red clockwise, blue counter-clockwise.
- Creates a symmetrical dual-rotation effect.
Output
The GIF below shows two LEDs rotating in opposite directions with red and blue colors.

Sparkle Effect
#include <Adafruit_NeoPixel.h>

#define LED_PIN 6
#define LED_COUNT 8

Adafruit_NeoPixel ring(LED_COUNT, LED_PIN, NEO_GRB + NEO_KHZ800);

void setup() {
  ring.begin();
}

void loop() {
  ring.clear();

  int randomLED = random(0, LED_COUNT);
  ring.setPixelColor(randomLED, ring.Color(255, 255, 255)); // White sparkle

  ring.show();
  delay(80);
}- Random LED lights up in white.
- Looks like small sparkles or twinkling stars.
- Works great on circular rings and small displays.
Output
The GIF below shows random white sparkles appearing across the LED ring.

WS2812 Rainbow Effects for NeoPixel Ring
In this section, we’ll explore how to create vibrant and dynamic rainbow animations for the WS2812 ring. These effects cycle smoothly through multiple colors, making the ring look far more lively and visually appealing.
Rotating Rainbow Effect
#include <Adafruit_NeoPixel.h>

#define PIN 6
#define NUM_LEDS 8

Adafruit_NeoPixel ring(NUM_LEDS, PIN, NEO_GRB + NEO_KHZ800);

void setup() {
  ring.begin();
  ring.show();
}

void loop() {
  rainbowEffect(20);   // Lower = faster rainbow
}

// Smooth rainbow wheel
void rainbowEffect(uint8_t wait) {
  for (long firstPixelHue = 0; firstPixelHue < 5 * 65536; firstPixelHue += 256) {
    for (int i = 0; i < ring.numPixels(); i++) {
      int pixelHue = firstPixelHue + (i * 65536L / ring.numPixels());
      ring.setPixelColor(i, ring.gamma32(ring.ColorHSV(pixelHue)));
    }
    ring.show();
    delay(wait);
  }
}This code creates a smooth rainbow animation by changing the hue value of each LED. The function rainbowEffect() continuously shifts the color wheel and updates all 8 LEDs. Each LED gets a slightly shifted hue, which makes it look like the rainbow is moving around the ring.
The line ring.ColorHSV() generates natural rainbow colors, and gamma32() makes the colors look smoother to the human eye. The animation speed is controlled by the wait delay.
Output
The GIF below shows the rotating rainbow effect on the WS2812 LED ring.

Rainbow Breathing Pulse
#include <Adafruit_NeoPixel.h>
#define PIN 6
#define NUM_LEDS 8

Adafruit_NeoPixel ring(NUM_LEDS, PIN, NEO_GRB + NEO_KHZ800);

void setup() {
  ring.begin();
  ring.show();
}

void loop() {
  rainbowBreathing(10);
}

void rainbowBreathing(uint8_t wait) {
  static uint16_t hueBase = 0;
  hueBase += 20;  // rainbow shift

  // Smooth breathing brightness: 0 → 255 → 0
  float breathe = (exp(sin(millis() / 1000.0 * PI)) - 0.36787944) * 108.0;

  for (int i = 0; i < NUM_LEDS; i++) {
    uint16_t hue = hueBase + (i * 65536L / NUM_LEDS);
    uint32_t color = ring.ColorHSV(hue, 255, (uint8_t)breathe);
    ring.setPixelColor(i, ring.gamma32(color));
  }

  ring.show();
  delay(wait);
}- All LEDs show a shifting rainbow, but the brightness fades in and out smoothly.
- The breathing pattern is created using a sine-based brightness curve.
- The rainbow shifts continuously, giving a soft glowing pulse.
Output
The GIF below shows the rainbow breathing effect on the WS2812 LED ring.

WS2812 Arduino NeoPixel — Frequently Asked Questions
Conclusion
WS2812 LEDs punch well above their weight for a single-wire component. One data pin, 24 bits of color per LED, and a 800 kHz signal handled entirely by the Adafruit NeoPixel library — you never touch the timing logic directly, yet you get full individual control over every LED in the chain.
In this tutorial you covered the complete picture: how the daisy-chain data protocol works, safe wiring with the 470 Ω series resistor and 1000 µF decoupling capacitor, all four core library functions, and nine animation effects ranging from a simple breathing pulse to a physics-style fire flicker and a gamma-corrected rainbow that cycles smoothly through the full HSV color space.
From here you can add a PIR sensor to trigger a red alert animation on motion, combine the ring with a passive buzzer for audio-visual alarm feedback, or log animation state to an SD card for playback sequences. If you want a larger canvas, the same code scales directly to any WS2812 strip — just change LED_COUNT. Download the full project above and explore the Arduino Modules collection for the next build.
Download WS2812 Arduino NeoPixel Project Files
Complete Arduino project with all four NeoPixel function examples and nine animation sketches — breathing, color wipe, clockwise/counter-clockwise rotation, fire flicker, dual-color opposite spin, sparkle, rotating rainbow, and rainbow breathing pulse. Requires Adafruit NeoPixel library. Compatible with Uno, Nano, and Mega. Free to download — support the work if it helped you.
Browse More Arduino Modules Tutorials

AT25C256 EEPROM with Arduino using I2C – Read, Write, and Store Data Easily

Arduino W25Q Flash Memory Tutorial: Read, Write, and Store Data Efficiently

DS3231 Arduino Tutorial: Real-Time Clock with LCD1602, Alarms & Temperature

DS1307 Arduino Tutorial: Interfacing RTC Module with LCD1602 I2C Display

Arduino Passive Buzzer Tutorial: tone(), Alarm, Siren & Music Codes

Subscribe
Login
0 Comments
Newest

