
Home ▸ Arduino ▸ Sensors Interfacing ▸
Updated On: May 15, 2026
SHT3X Arduino Tutorial: Interface SHT30, SHT31 & SHT35 via I2C — Serial & LCD Output
The SHT3X is Sensirion’s mid-to-high accuracy temperature and humidity sensor series — covering SHT30 (good), SHT31 (better), and SHT35 (best). All three share the same I2C command set, the same pinout, and the same conversion formulas. One sketch runs on all of them. Connect SDA and SCL, send a single 16-bit measurement command, read six bytes back, and you have calibrated temperature and humidity data.
In this tutorial you will learn how to wire any SHT3X sensor to Arduino Uno, Nano, or Mega, set or change the I2C address (0x44 vs 0x45), and read temperature and humidity using raw Wire.h commands — no external library required. The raw approach means this code works on every SHT3X variant, now and in the future, without waiting for a library update. You will then add an I2C LCD1602 to the same bus for a standalone display. A full troubleshooting section covers address conflicts, CRC errors, and blank LCD issues.
For a refresher on I2C, the Arduino I2C Tutorial covers bus scanning and multi-device wiring. If you want to use the Adafruit library approach instead of raw Wire, the AHT20 tutorial shows that pattern.
Working with other temperature and humidity sensors on Arduino? Check out these related guides:
- SHT21 Temperature & Humidity Sensor with Arduino
- AHT20 Temperature & Humidity Sensor with Arduino
- DHT11 & DHT22 Temperature & Humidity with Arduino
- BME280 Environmental Sensor with Arduino
- BMP180 Pressure & Temperature Sensor with Arduino
- DS18B20 Temperature Sensor with Arduino
Browse the full Arduino Sensor Interfacing tutorial collection for more.

SHT3X Sensor Overview
The SHT3X series is a family of digital temperature and humidity sensors made by Sensirion. These sensors use I2C communication, so they only need two wires to talk to an Arduino. They come in a small module, respond quickly, and provide stable readings. The SHT3X sensors measure both temperature and relative humidity with good accuracy, which makes them useful for home automation, weather stations and IoT projects.
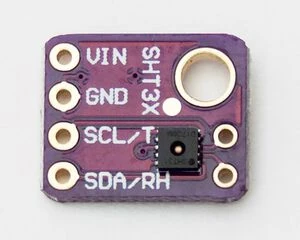
All SHT3X sensors use the same command set, so one Arduino code works for all of them. The difference mainly comes from how accurate each version is. Because the SHT3X family shares the same electrical interface, you can easily switch between models without changing your wiring or code.
SHT30 vs SHT31 vs SHT35 — Key Differences
The main difference between SHT30, SHT31 and SHT35 lies in their accuracy and performance. The table below shows the difference between the three:
| Feature | SHT30 | SHT31 | SHT35 |
|---|---|---|---|
| Category | Basic version | Mid-range version | High-end version |
| Accuracy | Good accuracy | Better accuracy | Best accuracy |
| Long-term Stability | Standard | Improved | Excellent (lowest drift) |
| Use Case | Hobby projects, general applications | Higher-precision applications | Industrial / professional use |
| Overall Performance | Entry-level | Enhanced performance | Highest performance in the series |
Even though the accuracy improves across the series, the sensors work the same way. They share the same I2C address, the same pinout and the same read commands. So you can upgrade from SHT30 to SHT35 without changing your Arduino code.
Why Use SHT3X with Arduino
The SHT3X sensors are a great match for Arduino because they are simple to connect and easy to program. They work on low power, respond quickly and provide stable results. Their I2C interface keeps the wiring clean, so even beginners can set them up in minutes.
These sensors are also reliable. They include features like heater control, CRC checks and built-in compensation. This helps the Arduino read accurate values, even in changing conditions. Whether you want to build a weather monitor, a greenhouse controller or an IoT device, the SHT3X series gives you consistent and precise temperature and humidity readings with minimal effort.
SHT3X Arduino Wiring & Pinout
Before working with the SHT3X temperature and humidity sensors, it’s important to understand their hardware layout and communication details. In this section, we will take a look at the pinout of the SHT3X series sensors, what is their I2C address and how can we modify it. This will give you a clear foundation before moving on to coding and testing the sensor.
SHT3X Pin Configuration
Most SHT3X breakout modules use the same pin layout, no matter which sensor version you choose. The pins are simple and match the I2C interface. You will usually find four pins on the module.
The image below shows the pinout of the SHT3X module.
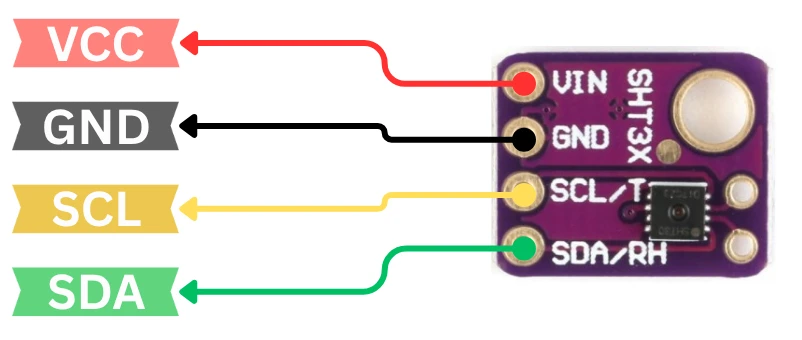
The pin functions are mentioned in the table below:
| Pin | Name | Description |
|---|---|---|
| 1 | VCC | Power supply input (typically 3.3V or 5V depending on module) |
| 2 | GND | Ground reference |
| 3 | SDA | I²C data line |
| 4 | SCL | I²C clock line |
| 5 | ADDR / A0 | I²C address selection pin (LOW = 0x44, HIGH = 0x45) |
| 6 | ALERT / AL / RST | Programmable alert output or reset pin (varies by module) |
Note:
Some SHT3X breakout boards label the address pin as A0 and the alert pin as AL instead of ADDR and ALERT/RST. The functionality remains the same, only the naming differs depending on the module manufacturer.
Default I2C Address — 0x44 and How to Change to 0x45
The SHT3X sensors use a default I2C address of 0x44. This address works for SHT30, SHT31 and SHT35. If you want to connect two SHT3X sensors on the same I2C bus, you can change the address to 0x45. You can do this by pulling the ADDR (A0) pin HIGH. Some modules provide a jumper for this. On others, you may need to solder a small pad.
If your module does not expose the ADDR pin, then the address stays fixed at 0x44. In that case, connecting multiple sensors requires using an I2C multiplexer.
Supported Operating Voltage — 3.3V and 5V Modules
Most SHT3X modules support 3.3V to 5V, which makes them compatible with almost all Arduino boards. The original SHT3X sensor chip is a 3.3V device, but many breakout boards include a voltage regulator and level shifters. This allows them to work safely with 5V Arduinos like the Uno or Nano.
Always check your module’s markings. If the board mentions 3.3V only, then make sure you do not connect it to 5V. But in most cases, modules labeled “SHT30,” “SHT31,” or “SHT35” are designed to handle both voltages without issue.
Wiring Diagram — SHT3X to Arduino Uno
The image below shows the 4-pin wiring between the SHT3X breakout module and the Arduino Uno. Since the sensor uses I²C communication, only four wires are required: VCC, GND, SDA, and SCL.
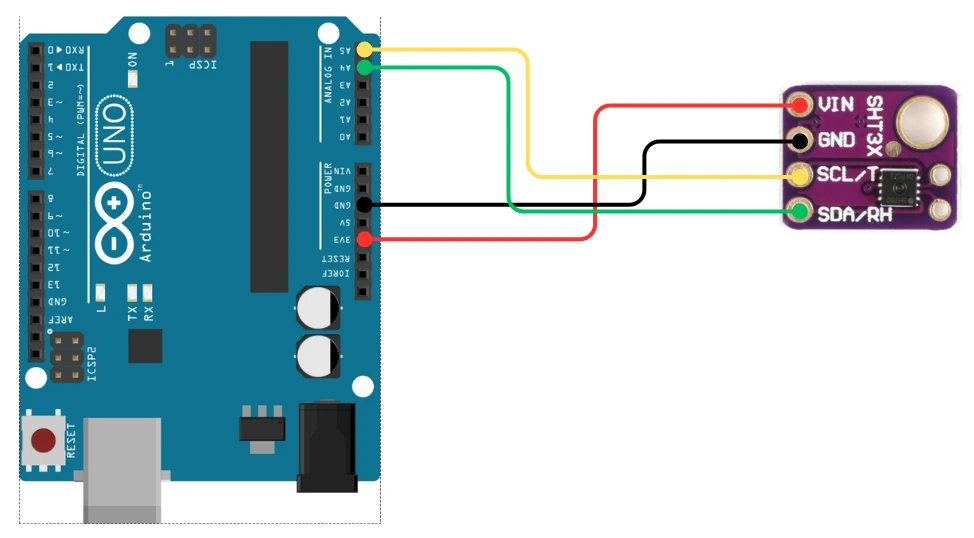
Connection Details
| SHT3X Pin | Arduino Uno Pin |
|---|---|
| VCC | 5V or 3.3V (depends on module) |
| GND | GND |
| SDA | A4 |
| SCL | A5 |
I2C Pin Map for Uno, Nano, Mega & ESP32
If you use an Arduino Nano / Pro Mini (5V) the SDA and SCL pins are the same (A4, A5).
If you use an Arduino Leonardo / Micro or ESP32, use the board’s dedicated SDA and SCL pins. Check your board pinout.
If the module lacks pull-ups, connect two 4.7 kΩ resistors:
- one between SDA and VCC
- one between SCL and VCC
SHT3X Arduino Code — Raw I2C, No Library
How the SHT3X Measurement Command Works
The SHT3X sensors use simple 16-bit commands to start a measurement. When we send 0x2400, the sensor takes a single-shot reading in high repeatability mode. This mode gives the most accurate results, which is why it works well for the SHT30, SHT31 and SHT35.
After sending the command, the sensor needs a short time to prepare the data. In most cases, 12–15 ms is enough. Once the time is over, we read six bytes: two bytes for temperature, one CRC, two bytes for humidity and one more CRC. The CRC bytes are optional for basic use, but you can add error checking if needed.
Required Libraries
To read temperature and humidity from the SHT3X sensor, you can use the Wire library that comes with Arduino. It handles the I2C communication. You do not need any external library because the SHT3X uses simple read commands that we can send directly over I2C.
If you prefer using a library, you can install the Adafruit SHT31 library from the Arduino Library Manager. But the raw I2C method works on all SHT30, SHT31 and SHT35 sensors without modification, so we will use that here to keep the code universal.
Complete Sketch — Read and Print via Serial Monitor
Here is a clean and simple code example that works on every SHT3X sensor. It sends the measurement command, waits briefly and then reads out the temperature and humidity values.
#include <Wire.h>

#define SHT31_ADDR 0x44      // Works for SHT30, SHT31, SHT35

void setup() {
  Serial.begin(9600);
  Wire.begin();
}

void loop() {
  Wire.beginTransmission(SHT31_ADDR);
  Wire.write(0x24);          // High repeatability measurement command
  Wire.write(0x00);
  Wire.endTransmission();

  delay(15);                  // Wait for measurement

  Wire.requestFrom(SHT31_ADDR, 6);
  if (Wire.available() == 6) {
    uint16_t rawT = (Wire.read() << 8) | Wire.read();
    Wire.read();              // CRC (ignore)
    uint16_t rawH = (Wire.read() << 8) | Wire.read();
    Wire.read();              // CRC (ignore)

    float temp = -45 + (175 * (rawT / 65535.0));
    float hum  = 100 * (rawH / 65535.0);

    Serial.print("Temperature: ");
    Serial.print(temp);
    Serial.println(" °C");

    Serial.print("Humidity: ");
    Serial.print(hum);
    Serial.println(" %RH");
  }

  delay(1000);
}Code Explained — Step by Step
1. I²C Initialization
Wire.begin()starts the I²C bus so the Arduino can communicate with the SHT3X sensor.
2. Sending the Measurement Command
Wire.beginTransmission()+Wire.write()send the measurement command (0x2400) to the sensor.Wire.endTransmission()finalizes the command.- A short
delay(15)allows the sensor time to perform the measurement.
3. Reading Sensor Data
Wire.requestFrom()asks the sensor for 6 bytes of data.Wire.read()retrieves:- 2 bytes of raw temperature
- 1 CRC byte (ignored)
- 2 bytes of raw humidity
- 1 CRC byte (ignored)
4. Converting Raw Values
- The raw temperature and humidity values are converted into:
- Temperature (°C)
- Relative Humidity (%RH)
using the official SHT3X formulas.
5. Displaying the Results
Serial.print()andSerial.println()show the temperature and humidity values on the Serial Monitor.
This code sends a command to trigger a high-precision reading and then calculates the temperature and humidity from the raw data. The conversion formulas come directly from the SHT3X datasheet, and they work identically for all sensors in the series.
Output — Serial Monitor at 9600 Baud
Once the code is uploaded successfully, open the Serial Monitor from the Arduino IDE (Tools → Serial Monitor) and set the baud rate to 9600.
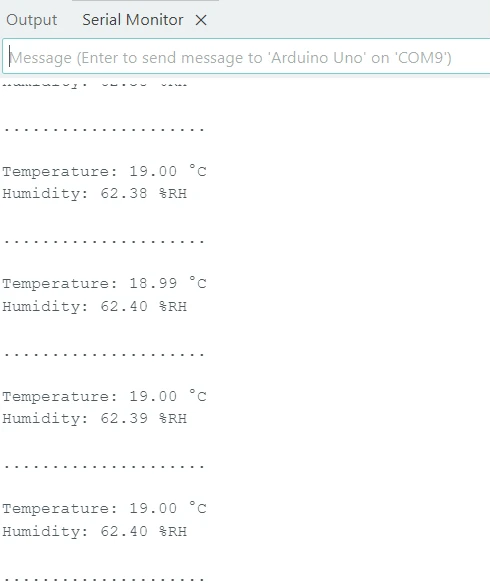
You’ll notice the values update every second. The readings may vary slightly depending on the room temperature and humidity. This confirms your SHT3X sensor is working perfectly, and your Arduino can successfully read and display environmental data.
SHT3X with I2C LCD1602 — Standalone Display
Now that we have successfully displayed temperature and humidity readings from the SHT3X sensor on the Serial Monitor, let’s take the project one step further.
In this section, we’ll learn how to show the same readings on a 16×2 I2C LCD display. This makes the project more practical, allowing you to view real-time sensor data without needing to connect your Arduino to a computer.
Wiring Diagram — SHT3X + LCD1602 to Arduino Uno
The I2C LCD1602 display uses the same SDA and SCL pins as the SHT3X sensor, which means both can share the same I2C bus. This setup is simple and efficient since I2C supports multiple devices on a single bus.
The Image below shows how SHT3X sensor module and LCD1602 are connected to the Arduino UNO using the same I2C pins.
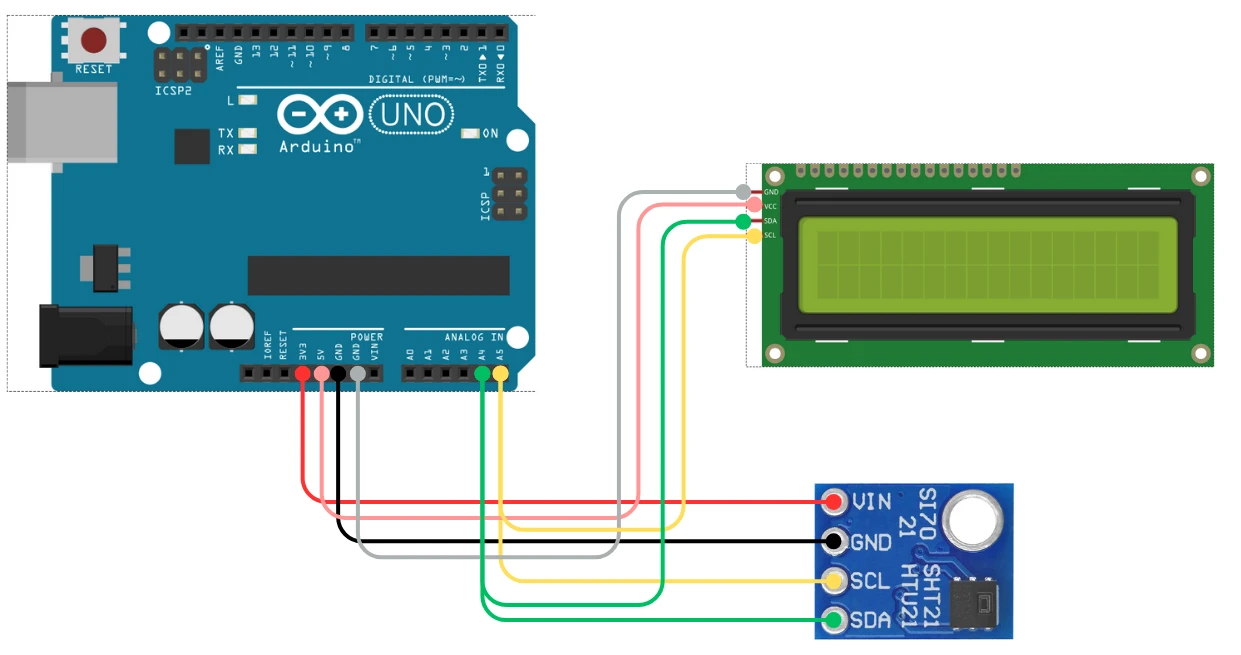
Here’s how to connect the I2C LCD1602 to your Arduino UNO:
| LCD Pin | Arduino UNO Pin |
|---|---|
| VCC | 5V |
| GND | GND |
| SDA | A4 |
| SCL | A5 |
Note:
Both the SHT3X and the LCD use I2C, so you can connect their SDA lines together and SCL lines together. Just ensure each device has a unique I2C address.
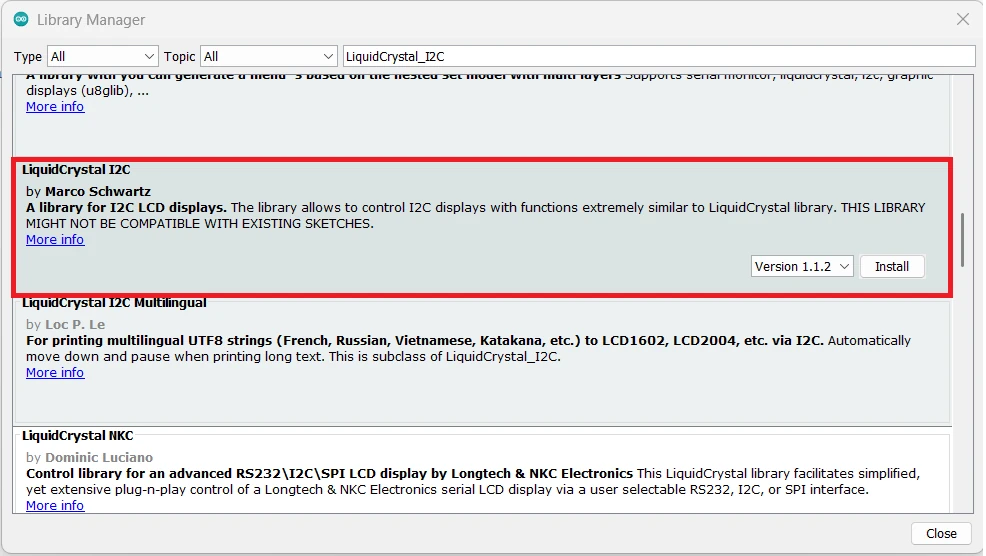
Install LiquidCrystal_I2C Library
Before running the code, make sure you have installed the LiquidCrystal_I2C library. You can do this by:
- Opening the Arduino IDE
- Going to Sketch → Include Library → Manage Libraries…
- Searching for “LiquidCrystal I2C”
- Installing the library by Frank de Brabander
Complete Code — SHT3X + LCD1602
We’ll now modify our previous SHT3X code to display the sensor readings on both the Serial Monitor and the I2C LCD. The LCD will show the temperature on the first line and the humidity on the second line, updating every second.
Here’s the complete and tested Arduino code that displays SHT3X sensor data on the Serial Monitor and I2C LCD1602 display
#include <Wire.h>
#include <LiquidCrystal_I2C.h>

#define SHT31_ADDR 0x44    // Works for SHT30, SHT31, SHT35

LiquidCrystal_I2C lcd(0x27, 16, 2);  // Change 0x27 to 0x3F if needed

void setup() {
  Serial.begin(9600);
  Wire.begin();

  lcd.init();
  lcd.backlight();
  lcd.clear();
  lcd.setCursor(0, 0);
  lcd.print("SHT3X Sensor");
}

void loop() {
  // Send measurement command
  Wire.beginTransmission(SHT31_ADDR);
  Wire.write(0x24);    // High repeatability
  Wire.write(0x00);
  Wire.endTransmission();

  delay(15);           // Wait for measurement

  // Read 6 bytes
  Wire.requestFrom(SHT31_ADDR, 6);
  if (Wire.available() == 6) {
    uint16_t rawT = (Wire.read() << 8) | Wire.read();
    Wire.read();      // skip CRC
    uint16_t rawH = (Wire.read() << 8) | Wire.read();
    Wire.read();      // skip CRC

    float temp = -45 + (175 * (rawT / 65535.0));
    float hum  = 100 * (rawH / 65535.0);

    // Print on Serial Monitor
    Serial.print("Temp: ");
    Serial.print(temp);
    Serial.print(" C  |  Humidity: ");
    Serial.print(hum);
    Serial.println(" %");

    // Print on LCD
    lcd.setCursor(0, 0);
    lcd.print("Temp: ");
    lcd.print(temp, 1);
    lcd.print((char)223); // degree symbol
    lcd.print("C   ");

    lcd.setCursor(0, 1);
    lcd.print("Hum : ");
    lcd.print(hum, 1);
    lcd.print("%    ");
  } else {
    Serial.println("Sensor Error!");
    lcd.setCursor(0, 0);
    lcd.print("Sensor Error     ");
  }

  delay(1000);
}Code Explained
1. I²C and LCD Initialization
Wire.begin()starts the I²C communication for the SHT3X sensor.lcd.init()initializes the I²C LCD module, andlcd.backlight()turns on the display.- A welcome message (“SHT3X Sensor”) is printed on the LCD at startup.
2. Sending the Measurement Command
Wire.beginTransmission()andWire.write()send the high-repeatability measurement command (0x2400) to the sensor.Wire.endTransmission()completes the command.- A short
delay(15)gives the sensor time to perform the measurement.
3. Reading Temperature and Humidity Data
Wire.requestFrom()asks the sensor for 6 bytes of data.Wire.read()retrieves:- 2 bytes of raw temperature
- 1 CRC byte (ignored)
- 2 bytes of raw humidity
- 1 CRC byte (ignored)
4. Converting the Raw Data
- The raw temperature and humidity values are converted using standard SHT3X formulas to calculate:
- Temperature (°C)
- Relative Humidity (%RH)
5. Displaying the Readings
- Serial Monitor:
Serial.print()shows temperature and humidity for debugging or monitoring. - LCD Display:
The temperature and humidity are printed on the I²C LCD.lcd.setCursor()positions the text.(char)223prints the degree symbol.
This allows real-time display of sensor values without needing a computer.
6. Error Handling
- If the sensor does not provide all 6 bytes, a “Sensor Error!” message is shown on both Serial Monitor and the LCD, indicating a communication problem.
This code displays the temperature on the first line and humidity on the second line. It also updates both values every second. If the sensor does not respond, the display shows an error message.
Output — Temperature on Line 1, Humidity on Line 2
Once the code is uploaded successfully, the LCD should print the Temperature and Humidity values as shown in the image below.
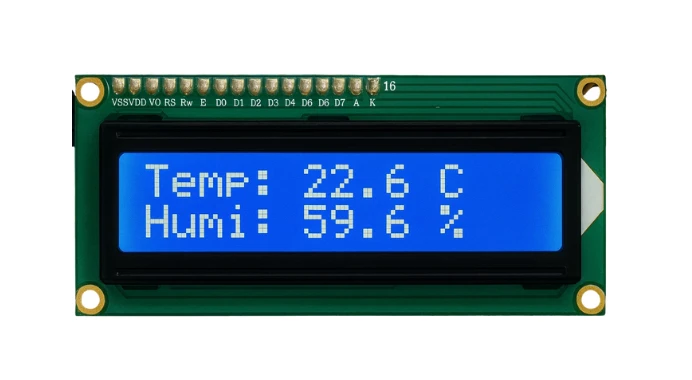
These values will update every second.
Troubleshooting SHT3X with Arduino
“Sensor Error” or Empty Serial Monitor — I2C Not Detected
Most problems with the SHT3X sensor come from I2C communication. If the readings do not appear or the Serial Monitor stays empty, check the wiring first. Make sure SDA and SCL are connected to the correct pins on your Arduino board. A loose jumper wire can stop the communication completely.
Also check that both the sensor and the Arduino share the same ground. Without a common ground, I2C will not work. If the wires are long, you may also notice unstable readings or missing data. Keeping the cables short helps the I2C signals stay clean.
Sensor Not Responding
If the sensor does not respond at all, the I2C address might be different. The SHT3X sensors normally use 0x44, but some modules allow switching to 0x45. If your module has an ADDR pin or jumper, confirm its position. Try scanning for I2C devices using an I2C scanner sketch to locate the correct address.
If the sensor still does not respond, check the power supply. Some modules work on both 3.3V and 5V, but others need only 3.3V. Connecting a 3.3V-only sensor to 5V can damage it, so always verify the voltage marking on your module.
Wrong Temperature or Humidity Output
If the sensor prints values that look wrong or unrealistic, the raw data may be incomplete. This happens when the Arduino reads fewer than six bytes. Adding a simple check before processing the data ensures that the values are valid. If the I2C line is noisy, the CRC bytes may also fail, causing incorrect results.
Environmental factors also affect readings. Touching the sensor or placing it near heat sources can cause sudden spikes. Allow the sensor a few seconds to stabilize after powering it up. Keeping it away from direct airflow also improves accuracy. Once the sensor is stable, the SHT3X should provide consistent and reliable temperature and humidity values.
SHT3X Arduino — Frequently Asked Questions
Conclusion
All three sensors in the SHT3X family — SHT30, SHT31, and SHT35 — share an identical I2C command interface. The single sketch in this tutorial reads both of them with the same six bytes, the same conversion formula, and the same two-pin wiring. If you need better accuracy tomorrow, you replace the sensor module; you do not touch the code.
In this tutorial you wired any SHT3X to Arduino Uno over I2C (SDA to A4, SCL to A5 at address 0x44), sent the 0x2400 high-repeatability measurement command directly via Wire.h, parsed the six-byte response — two bytes temperature, one CRC, two bytes humidity, one CRC — and applied the official Sensirion conversion formulas to get accurate °C and %RH readings on the Serial Monitor. You then added an I2C LCD1602 to the same bus at 0x27, confirmed no address conflict with the sensor at 0x44, and built a standalone display that shows temperature on line 1 and humidity on line 2, updating every second.
The raw Wire.h approach used here works without a library update cycle. If Sensirion releases a new SHT3X variant, the same 0x2400 command and the same conversion formulas will apply — nothing in your sketch changes.
From here you can log timestamped readings to an SD card with a DS3231 RTC, push data to a dashboard over Wi-Fi via an ESP8266, or add CRC validation to the read loop for production-quality error detection. For wider sensing coverage, the BME280 adds barometric pressure on the same I2C bus. Download the full project above and explore the Arduino Sensor Interfacing collection for more.
Download SHT3X Arduino Project Files
Complete Arduino project with two sketches: raw Wire.h SHT3X Serial Monitor output (0x2400 command, 6-byte read, Sensirion conversion formulas — works on SHT30, SHT31, and SHT35 at 0x44 or 0x45) and the full SHT3X + I2C LCD1602 standalone display code. No external sensor library required — uses built-in Wire.h only. LCD requires LiquidCrystal_I2C library. Compatible with Uno, Nano, and Mega. Free to download — support the work if it helped you.
Browse More Arduino Sensors Tutorials
SHT21 Arduino Tutorial: I2C Wiring, SHT2x Library, Serial & LCD Output
AHT20 Arduino Tutorial: I2C Wiring, Adafruit AHTX0 & OLED Display
DS18B20 Arduino Tutorial: Single & Multiple Sensors, Serial & OLED Output
BMP180 Arduino Tutorial: I2C Wiring, Temperature, Pressure, Altitude & LCD1602
Arduino BME280 Tutorial: Wiring, Pinout, Code and LCD1602 Display Output

Subscribe
Login
0 Comments
Newest

