
Home ▸ Arduino ▸ Modules Interfacing ▸
Updated On: May 3, 2026
Arduino SD Card SPI Tutorial: Wiring, File Read/Write & CSV Data Logging
The Arduino Uno has only 2 KB of SRAM and 32 KB of flash — enough to run your code, but nowhere near enough to store a continuous stream of sensor readings. An SD card module solves this completely. Four SPI wires, one chip select pin, and the built-in SD library give you access to gigabytes of FAT32 storage from any Arduino board.
In this tutorial you’ll learn how SPI communication works between Arduino and the SD card module, how to wire the six-pin module correctly for Uno, Nano, Mega, and Leonardo, how to format the card and run the CardInfo example to verify the connection, and how to write code that creates files, logs text, reads data back to the Serial Monitor, and saves sensor readings in CSV format that opens directly in Excel or Google Sheets. A complete troubleshooting section covers every common failure — initialization errors, wrong CS pins, file naming limits, and board-specific SPI pin differences. A full project download is at the end.
For real sensor data logging, pair this tutorial with:
- DHT11 & DHT22 Temperature & Humidity with Arduino
- BMP180 Pressure & Temperature with Arduino
- BME280 Environmental Sensor with Arduino
- DS3231 RTC Module with Arduino — Add Real Timestamps
- MPU6050 Accelerometer & Gyroscope with Arduino
- WS2812 NeoPixel LED Ring with Arduino
Browse the full Arduino Modules Interfacing tutorial collection for more.
SD Card & SPI Overview
Connecting an SD card to Arduino lets you store and access large amounts of data easily. Whether it’s saving sensor readings, logging temperature data, or creating a mini file system, using an SD card makes your Arduino project more powerful and practical.
Let’s start by understanding what an SD card is, why it’s useful for Arduino, and how SPI communication makes it all work.
What is an SD Card?
An SD (Secure Digital) card is a small memory card used for data storage in devices like cameras, mobile phones, and microcontrollers. It can store anything from text files to sensor readings and program data.
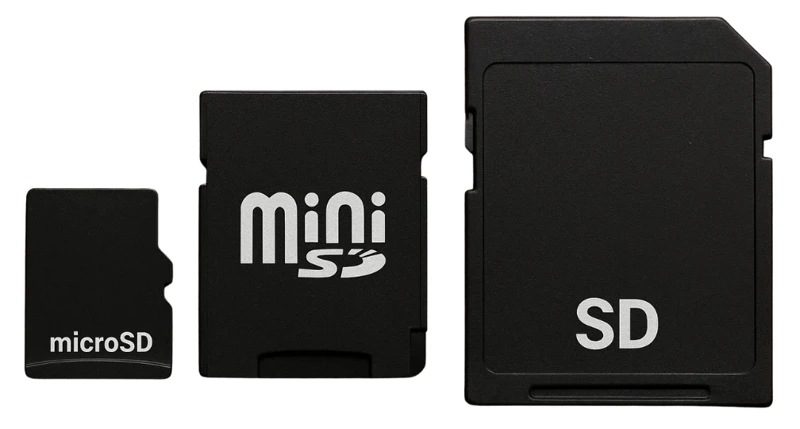
In Arduino projects, an SD card acts like a tiny external hard drive. You can read, write, delete, and modify files directly through your code. Most SD card modules support FAT16 or FAT32 file formats, which are easily managed by the Arduino SD library.
Why Use an SD Card with Arduino?
Arduino boards have limited memory — for example, the Arduino Uno has only 2 KB of SRAM and 32 KB of flash memory. That’s not enough when you want to store continuous sensor data or create a data logging system.
By connecting an SD card, you can:
- Store large data files, such as temperature or humidity logs.
- Record and retrieve project data even after power is turned off.
- Create offline data logs for later analysis on a computer.
Using an SD card with Arduino gives you a simple and low-cost way to expand your storage capacity and make your projects smarter.
How SPI Communication Works with SD Cards
The SPI (Serial Peripheral Interface) protocol is the communication bridge between Arduino and the SD card module. It allows fast and reliable data transfer using just a few pins.
SPI uses four main lines:
- MOSI (Master Out Slave In) – sends data from Arduino to SD card
- MISO (Master In Slave Out) – receives data from SD card
- SCK (Serial Clock) – synchronizes data transfer
- CS (Chip Select) – enables the SD card during communication
In this setup, Arduino works as the SPI master, and the SD card acts as the slave device. This setup ensures smooth communication and efficient data handling.
SD Card Module Arduino Wiring & Pinout
Before starting the project, you need to gather all the required components and understand how to connect them properly. The SD card module communicates with the Arduino board using the SPI interface, so correct wiring is essential for it to work.
Required Components
Here’s the list of components you’ll need to interface SD card with Arduino using SPI:
- Arduino Uno (or any compatible board)
- SD card module (supports standard SD or microSD cards)
- MicroSD card (formatted as FAT32)
- Jumper wires (male-to-female)
- Breadboard (optional, for clean wiring)
Tip: Use a genuine SD card module with a built-in voltage regulator and logic level shifters. SD cards work at 3.3V logic, while Arduino Uno operates at 5V. Using a proper module prevents damage.
SD Card Module 6-Pin Pinout
The SD card module has six main pins that connect to Arduino’s SPI pins.
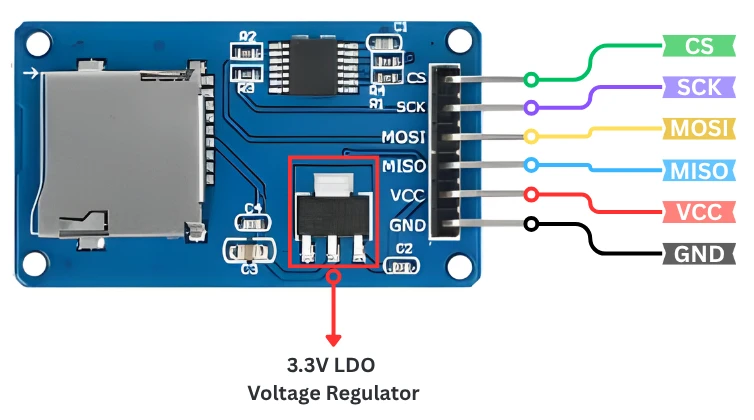
Here’s the typical pin configuration:
| SD Card Module Pin | Function |
|---|---|
| VCC | Provides power to the SD card module |
| GND | Connects to ground for circuit reference |
| MOSI | Sends data from Arduino (Master) to SD card (Slave) |
| MISO | Sends data from SD card (Slave) to Arduino (Master) |
| SCK | Provides clock signal for data synchronization |
| CS (Chip Select) | Enables or selects the SD card module for SPI communication |
Wiring Diagram — SD Module to Arduino Uno
The wiring between the Arduino and SD card module is straightforward.
The image below shows how the module is connected to the Arduino UNO.
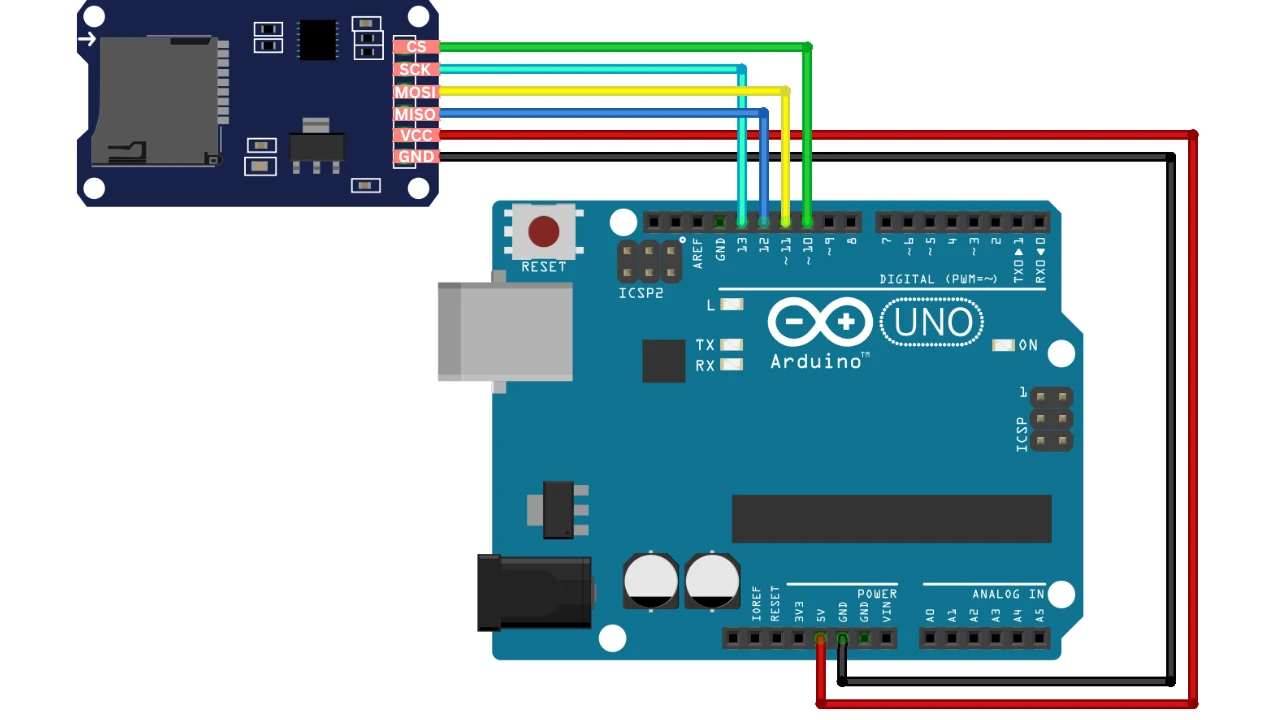
You can follow the table below for connection:
| SD Card Module Pin | Arduino Uno Pin |
|---|---|
| VCC | 5V |
| GND | GND |
| MISO | Pin 12 |
| MOSI | Pin 11 |
| SCK | Pin 13 |
| CS (Chip Select) | Pin 10 |
Make sure all the connections are tight and the SD card is properly inserted into the slot. Once the wiring is complete, you can move on to setting up the Arduino IDE and testing communication with the SD card.
If you’re using another Arduino board (like Mega, Nano, or Leonardo), the SPI pins may differ. Always check your board’s SPI pin mapping before wiring.
Arduino SD Library Setup & CardInfo Test
Once your hardware connections are ready, it’s time to prepare the Arduino IDE to communicate with the SD card. In this section, we’ll install the required library, explore the example code, and upload a simple sketch to test if everything is working correctly.
Install the SD Library
The SD library is included with the Arduino IDE by default, but it’s always a good idea to check if it’s installed and up to date. This library helps Arduino boards read and write files on SD cards using the SPI protocol.
Here’s how to install or verify it:
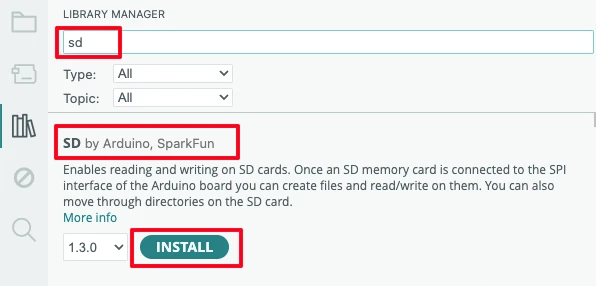
- Open the Arduino IDE.
- Go to Sketch → Include Library → Manage Libraries…
- In the search bar, type “SD”.
- Look for the library named “SD by Arduino, SparkFun”.
- If it’s not installed, click Install.
GitHub Link: Arduino SD Library
Once installed, the SD library provides several example sketches that make testing your module easy.
Run the CardInfo Example
The Arduino IDE includes a simple example to test the SD card connection. You can access it by going to:
File → Examples → SD → CardInfo
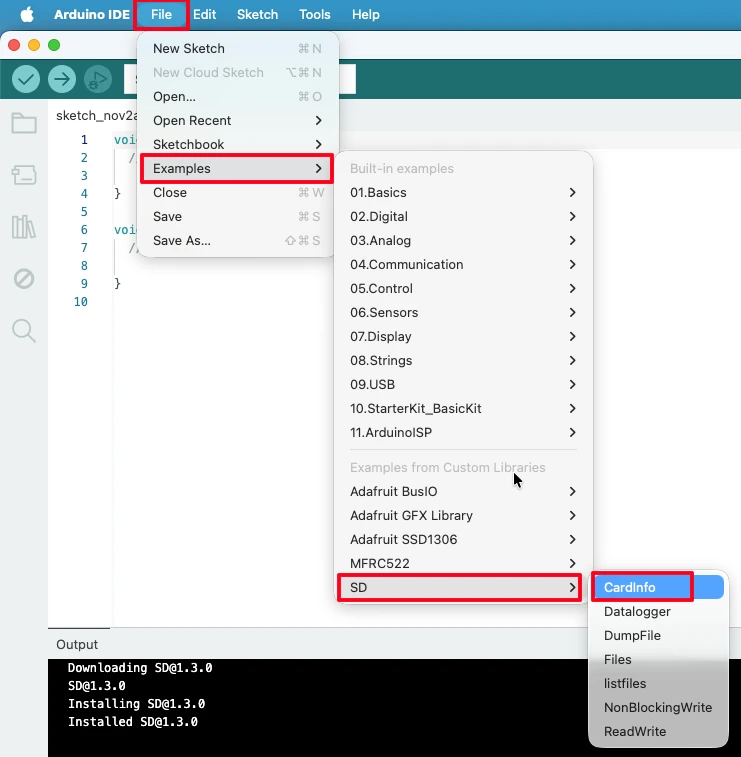
This example sketch reads the SD card’s basic information and checks if it initializes correctly.
Here’s a quick breakdown of what it does:
- Initializes SPI communication with the SD card module.
- Checks card presence and type (e.g., SDHC or standard SD).
- Lists available files on the card (if any).
- Displays all this information in the Serial Monitor.
This example helps verify that your connections, SPI pins, and SD card are all working properly before moving on to custom read/write projects.
- Connect your Arduino board to your computer using a USB cable.
- Open the CardInfo example from the SD library.
- Make sure the CS pin in the code matches your connection (usually
10for Arduino Uno). - Select your board and port from Tools → Board / Port.
- Click Upload.
CardInfo Serial Monitor Output Explained
After uploading, open the Serial Monitor (Ctrl + Shift + M) and set the baud rate to 9600.
If everything is wired and configured correctly, you’ll see messages like:
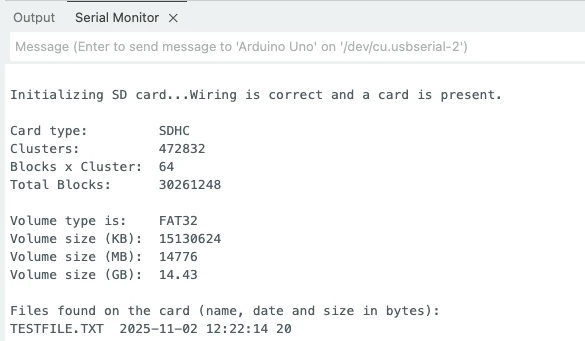
I have created a testFile.txt on the SD Card and you can see it being displayed on the serial console. You might see a list of other files as well, which are generally generated automatically by the system.
If you get an error like Card initialization failed!, double-check your wiring, CS pin, and card format (FAT32).
SD Card SPI Communication Internals
The SD card communicates with Arduino using the SPI protocol (Serial Peripheral Interface). SPI is a fast and efficient communication method that transfers data between the Arduino (master) and SD card (slave) using just four main lines.
Understanding how SPI works helps you troubleshoot connection errors and optimize your project’s performance.
SPI Pins and Their Functions
In an SPI connection, four main signals handle the data transfer:
| Signal Name | Function | Direction |
|---|---|---|
| MOSI (Master Out Slave In) | Sends data from Arduino to SD card | Master → Slave |
| MISO (Master In Slave Out) | Sends data from SD card to Arduino | Slave → Master |
| SCK (Serial Clock) | Provides the clock signal for synchronization | Master → Slave |
| CS (Chip Select) | Activates the SD card during communication | Master → Slave |
Here’s what happens:
- Arduino sends data through MOSI, and receives data through MISO.
- The SCK line keeps both devices synchronized by providing a common clock pulse.
- The CS (Chip Select) pin ensures that only the SD card module responds to SPI commands when multiple SPI devices are connected.
This makes SPI both fast and reliable for data storage tasks like file reading and logging.
Data Write Process Step by Step
When Arduino communicates with the SD card, data transfer happens in two main directions — write (save) and read (retrieve).
- Arduino sends a write command through MOSI.
- The SD card acknowledges and stores the data block in its memory.
- Once done, it sends a confirmation response back to Arduino via MISO.
Data Read Process Step by Step
- Arduino sends a read command to request specific data blocks.
- The SD card fetches the requested data.
- It sends the data back through the MISO line.
This process is repeated many times per second, allowing the Arduino to continuously log sensor readings or update files on the SD card efficiently.
SD Card Initialization Sequence
Before any data can be written or read, the SD card must be properly initialized. The SD library takes care of this automatically, but understanding the steps helps if you face “Card initialization failed” errors.
Here’s what happens during initialization:
- Power-Up and Reset – The SD card powers up and enters SPI mode.
- Clock Synchronization – Arduino provides several clock pulses to stabilize communication.
- Send Initialization Commands – Arduino sends specific SPI commands like
CMD0andCMD8to prepare the SD card. - Read Card Type – The card responds with details (e.g., Standard SD, SDHC).
- File System Mounting – The FAT16/FAT32 file system is recognized and made ready for file operations.
Once these steps are complete, the SD card is ready to store and access files just like a computer’s drive.
Arduino SD Card Read & Write Code
Now that your SD card module is connected and initialized, it’s time to test how to write and read data using Arduino. We’ll go through both examples, saving data to a file and reading it back.
Write Data to SD Card
Let’s start with a simple example that creates a text file and writes data to it.
#include <SPI.h>
#include <SD.h>

File myFile;

const int chipSelect = 10;  // CS pin for SD card module

void setup() {
  Serial.begin(9600);
  Serial.print("Initializing SD card...");

  if (!SD.begin(chipSelect)) {
    Serial.println("Initialization failed!");
    while (1);
  }
  Serial.println("Initialization done.");

  myFile = SD.open("data.txt", FILE_WRITE);

  if (myFile) {
    Serial.println("Writing to data.txt...");
    myFile.println("Hello, this is a test log.");
    myFile.println("Arduino SD Card Write Example");
    myFile.close();
    Serial.println("Data written successfully!");
  } else {
    Serial.println("Error opening data.txt!");
  }
}

void loop() {
  // Nothing to do here
}- The
SD.begin()function initializes the SD card. SD.open()creates (or opens) a file nameddata.txt. The FILE_WRITE mode allows writing new content.- After writing data, the file is closed to save changes properly.
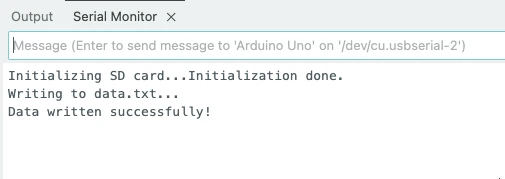
Once uploaded, open the Serial Monitor. You’ll see messages confirming successful initialization and writing data to the file.
Read Data from SD Card
Now, let’s read back the contents of data.txt that we just created.
#include <SPI.h>
#include <SD.h>

File myFile;

const int chipSelect = 10;  // CS pin for SD card module

void setup() {
  Serial.begin(9600);
  Serial.print("Initializing SD card...");

  if (!SD.begin(chipSelect)) {
    Serial.println("Initialization failed!");
    while (1);
  }
  Serial.println("Initialization done.");

  myFile = SD.open("data.txt");

  if (myFile) {
    Serial.println("Reading data.txt...");
    while (myFile.available()) {
      Serial.write(myFile.read());
    }
    myFile.close();
  } else {
    Serial.println("Error opening data.txt!");
  }
}

void loop() {
  // Nothing to do here
}- The
SD.open()function opens the file in read mode. - The
while (myFile.available())loop reads each character from the file. - The Serial Monitor displays the same text you wrote earlier.
Once the code is uploaded, you will see the data read from the file is printed in the serial console.
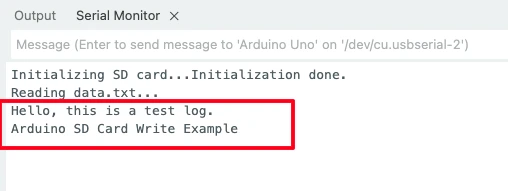
Note that this is the same data that we wrote the the file data.txt.
SD Library Function Reference Table
| Function | Description |
|---|---|
SD.begin(csPin) | Initializes the SD card and SPI communication |
SD.open(filename, mode) | Opens or creates a file on the SD card |
file.println(data) | Writes a line of text to the file |
file.read() | Reads a single character from the file |
file.close() | Closes the file to save changes |
Always close files after writing or reading. Leaving them open can corrupt data, especially if power is lost.
CSV Data Logging with Arduino SD Card
What Is CSV Format and Why Use It?
In real-world projects, we often use SD cards to log sensor readings like temperature, humidity, or light intensity. The best way to save such data is in CSV (Comma-Separated Values) format — because it’s lightweight and easy to open in Excel or Google Sheets for analysis.
In this example, we’ll simulate sensor readings (using random values) and write them to a CSV file on the SD card every few seconds.
CSV Logging Code — Temperature & Humidity
#include <SPI.h>
#include <SD.h>

File dataFile;
const int chipSelect = 10;  // CS pin for SD module

void setup() {
  Serial.begin(9600);
  Serial.println("Initializing SD card...");

  if (!SD.begin(chipSelect)) {
    Serial.println("SD card initialization failed!");
    while (1);
  }
  Serial.println("SD card ready.");

  // Try creating or opening the file
  dataFile = SD.open("log.csv", FILE_WRITE);

  if (dataFile) {
    // If the file is empty, write the header
    if (dataFile.size() == 0) {
      dataFile.println("Time(s),Temperature(C),Humidity(%)");
      Serial.println("Header written to log.csv");
    }
    dataFile.close();
  } else {
    Serial.println("Error opening log.csv!");
  }
}

void loop() {
  static unsigned long previousMillis = 0;
  unsigned long currentMillis = millis();

  // Log data every 3 seconds
  if (currentMillis - previousMillis >= 3000) {
    previousMillis = currentMillis;

    // Simulated sensor values (replace with real sensor reads)
    float temperature = random(20, 35);  // °C
    float humidity = random(40, 70);     // %

    // Create a timestamp
    float timeSec = currentMillis / 1000.0;

    // Open the file to append new data
    dataFile = SD.open("log.csv", FILE_WRITE);

    if (dataFile) {
      dataFile.print(timeSec);
      dataFile.print(",");
      dataFile.print(temperature);
      dataFile.print(",");
      dataFile.println(humidity);
      dataFile.close();

      Serial.print("Logged: ");
      Serial.print(timeSec);
      Serial.print("s | ");
      Serial.print(temperature);
      Serial.print("°C | ");
      Serial.print(humidity);
      Serial.println("%");
    } else {
      Serial.println("Error opening log.csv!");
    }
  }
}How This Code Works:
- The setup() function initializes the SD card and creates a CSV file with column headers.
- Every 3 seconds, the loop generates simulated temperature and humidity readings.
- The data is appended to
log.csvin this format:
Time(s),Temperature(C),Humidity(%)
3,27.5,55
6,29.2,53
9,28.4,50- You can replace the
random()functions with real sensor data (e.g., from a DHT11 or LM35 sensor).
Tip: When using real sensors, always open and close the file in each write cycle. This prevents data corruption if the Arduino resets or power is lost.
Also, use FAT32-formatted SD cards (≤32GB) for best compatibility.
Serial Monitor Output
The image below shows the output of the above code on the Arduino serial console.
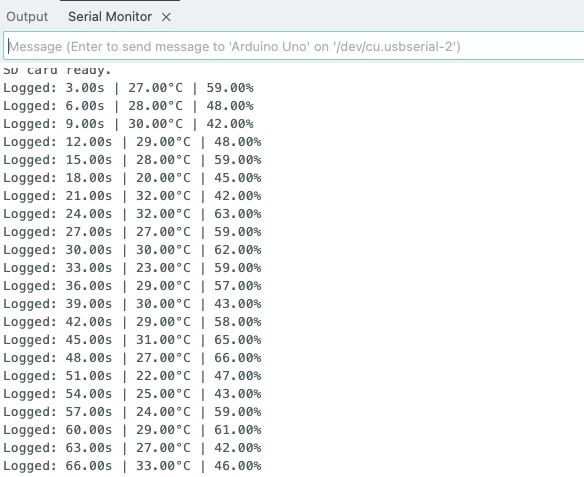
You can see that the temperature and humidity data is logging to the SD card every 3 seconds.
Read and Verify the CSV File on Arduino
You can read the contents of the file directly on the Arduino using the dataFile.read() or dataFile.readString() function. This allows you to verify that the data was successfully written to the SD card without removing it and checking on a computer.
For example:
File dataFile = SD.open("log.csv");
if (dataFile) {
  Serial.println("Reading file content:");
  while (dataFile.available()) {
    Serial.write(dataFile.read());
  }
  dataFile.close();
} else {
  Serial.println("Error opening log.csv for reading");
}When you open the Serial Monitor, you’ll see the same data that was stored in your CSV file, just like reading it on a PC.
View CSV File in Excel or Google Sheets
After verifying it through Arduino, you can remove the SD card and open the file on your computer.
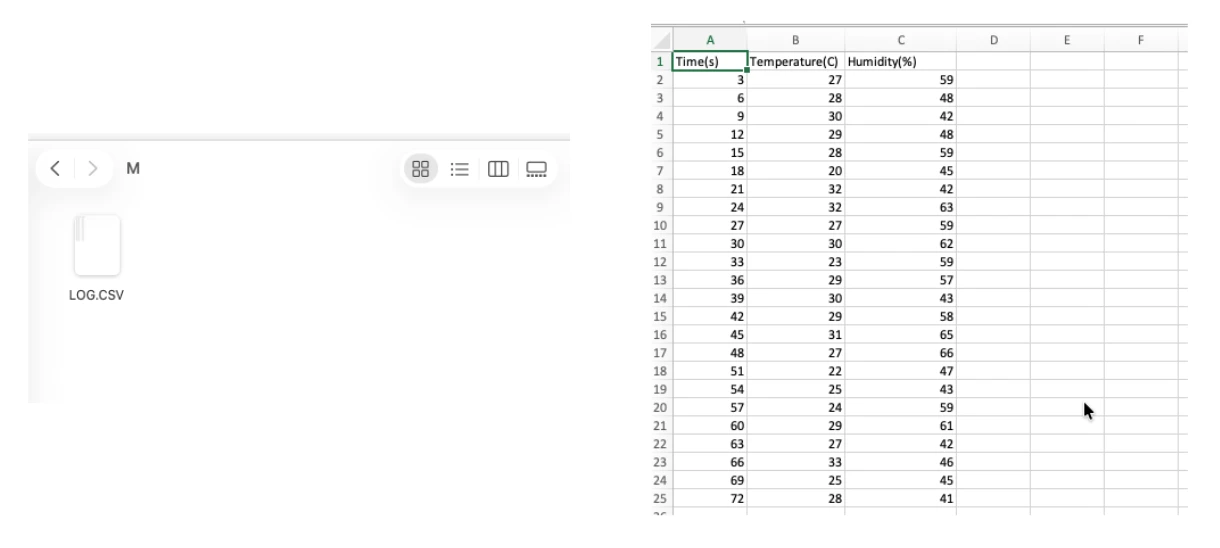
When viewed in a spreadsheet program like Excel or Google Sheets, each entry appears neatly organized in separate columns — Time (s), Temperature (°C), and Humidity (%) — making it easy to analyze or visualize sensor data.
The image below shows how the file looks when viewed on the computer, with each row representing a new sensor reading logged over time.
SD Card Arduino Troubleshooting
Even with the correct code and setup, you might face some common issues when interfacing an SD card with Arduino. Let’s go through the most frequent problems and how to fix them.
SD Card Initialization Failed
If your Serial Monitor showsSD card initialization failed!,
it means the Arduino couldn’t communicate with the SD card module.
Possible causes and fixes:
- Incorrect wiring: Double-check all SPI connections — MISO, MOSI, SCK, and CS.
- Wrong CS pin: Ensure that the chip select pin in your code matches the module connection (usually pin 10 for Arduino Uno).
- Unsupported SD card format: Format your SD card to FAT16 or FAT32 using your computer or the official SD Formatter tool.
- Power issue: Some SD modules require 3.3V, while others have a built-in regulator for 5V. Ensure proper voltage.
- Loose connections: Use solid jumper wires and ensure the SD card is properly seated in the slot.
File Not Opening or Saving
If you see Error opening file! or your data isn’t being written to the SD card, it usually points to file handling issues.
Possible causes and fixes:
- File name too long: Use short file names (e.g.,
LOG.TXTorDATA.CSV) — some libraries only support 8.3 filenames. Here 8 is the filename and 3 is the extension. - File not closed: Always close files after writing using
dataFile.close(). - Card full or corrupted: Check the SD card on your computer and reformat if necessary.
- Open mode issue: Use
SD.open("filename", FILE_WRITE)to allow file creation and writing.
Tip: Test with the basic “Write example” from the SD library before running your main code. If that works, your hardware is fine.
Wrong SPI Pins or Wiring Mistakes
SPI communication relies on specific pins that vary between Arduino boards. Using the wrong pins will prevent data transfer.
| Arduino Board | MOSI | MISO | SCK | CS (Default) |
|---|---|---|---|---|
| UNO / Nano | 11 | 12 | 13 | 10 |
| Mega 2560 | 51 | 50 | 52 | 53 |
| Leonardo / Micro | ICSP-4 | ICSP-1 | ICSP-3 | 10 (or custom) |
Fix:
- Always use the hardware SPI pins — do not remap them arbitrarily.
- Double-check your jumper connections and pin labels on the module.
- Make sure your SD module’s GND and VCC are correctly connected (GND to GND, VCC to 5V or 3.3V depending on module).
Arduino SD Card — Frequently Asked Questions
Conclusion
The SD card module is one of the most practical additions to any Arduino data project. Four SPI wires, a FAT32-formatted card, and the built-in SD library give you persistent file storage that survives power cycles, resets, and unplugging — something Arduino's 2 KB of SRAM can never offer on its own.
In this tutorial you covered the complete workflow: how the SPI protocol transfers data between Arduino master and SD card slave, how to wire the module safely with proper voltage level shifting, how to verify the connection with the CardInfo example, and how to write production-quality code that creates files, appends data, reads it back to the Serial Monitor, and saves structured sensor readings in CSV format ready for Excel or Google Sheets.
The natural next step is replacing the random() values with real sensors. Pair the SD card with a DHT22 for a temperature and humidity logger, add a DS3231 RTC to give every row a real timestamp instead of millis(), or connect a BMP180 to log barometric pressure. For wireless logging, the same CSV approach works over an ESP32 Wi-Fi connection. Download the full project above and explore the Arduino Modules collection for the next build.
Download Arduino SD Card SPI Project Files
Complete Arduino project with SD card write sketch, read sketch, and full CSV temperature and humidity data logger. Includes SD.begin() initialization, FILE_WRITE append mode, millis()-based non-blocking logging, and file close on every write cycle. Compatible with Uno, Nano, Mega, and Leonardo (check board SPI pin map). Free to download — support the work if it helped you.
Browse More Arduino Modules Tutorials

Arduino W25Q Flash Memory Tutorial: Read, Write, and Store Data Efficiently

DS3231 Arduino Tutorial: Real-Time Clock with LCD1602, Alarms & Temperature
DS1307 Arduino Tutorial: Interfacing RTC Module with LCD1602 I2C Display
Arduino Passive Buzzer Tutorial: tone(), Alarm, Siren & Music Codes
WS2812 Arduino Tutorial: NeoPixel Ring Wiring, Effects & Animations

Subscribe
Login
0 Comments
Newest

