
Home ▸ Arduino ▸ Modules Interfacing ▸
Updated On: May 3, 2026
Arduino Passive Buzzer Tutorial: Wiring, tone() Function, Alarm, Siren & Music
A passive buzzer is one of the most satisfying components to add to an Arduino project. One digital pin, one tone() call, and you get clean, frequency-controlled sound — beeps, alarms, sweeping sirens, and even recognisable melodies — all without any library.
In this tutorial you’ll learn exactly how a passive buzzer works and why it’s fundamentally different from an active buzzer, how to wire both the 2-pin and 3-pin module variants to Arduino, and how to use the built-in tone() and noTone() functions. You’ll then build five complete sound examples: a simple beep, an emergency sweep, a police siren, the Mario theme, and the Star Wars intro. All code is beginner-friendly and runs on Uno, Nano, and Mega without modification. A full project download is included at the end.
Looking for other output modules to pair with your buzzer? Check out these related guides:
- WS2812 NeoPixel LED Ring with Arduino
- DS3231 RTC Module with Arduino
- DS1307 RTC Module with Arduino
- SD Card Interface with Arduino (SPI)
- I2C LCD1602 Display with Arduino
- PIR Motion Sensor with Arduino — Intruder Alarm
Browse the full Arduino Modules Interfacing tutorial collection for more.
Table Of Contents
Passive Buzzer Overview & How It Works
What Is a Passive Buzzer?
A passive buzzer is a small sound-making device that needs an external signal to produce tones. It cannot create sound on its own. You must send a square wave from the Arduino to generate beeps, alarms, or music. Because of this, a passive buzzer gives you full control over frequency and timing. This makes it perfect for projects that need custom sounds.
How a Passive Buzzer Produces Sound
A passive buzzer has a tiny piezoelectric element inside it. When you feed it a fast ON–OFF electrical pulse, the piezo vibrates. These vibrations create sound waves.
A passive buzzer does not have a built-in oscillator. So it depends completely on the microcontroller. By changing the frequency of the signal, you can create low-pitch or high-pitch tones. You can even play melodies by changing frequencies quickly.
Active vs Passive Buzzer — Key Differences
Active Buzzer:
- Has a built-in oscillator
- Produces sound with just a HIGH signal
- Always produces the same tone
- Cannot play music or different frequencies
- Used when you need a simple beep
Passive Buzzer:
- No internal oscillator
- Needs a frequency signal from Arduino
- Can create many tones
- Can play alarms, sirens, and music
- More flexible for DIY projects
Why Use a Passive Buzzer in Arduino Projects?
Passive buzzers are ideal when you need:
- Custom tones or melodies
- Alarm systems with changing pitch
- Notification sounds
- Emergency sirens
- Fun hobby projects that involve music
They are cheap, easy to use, and work with just one digital pin. Because you control the frequency, the passive buzzer becomes a very versatile sound module for any Arduino DIY project.
Passive Buzzer Arduino Wiring & Pinout
Required Components
To work with a passive buzzer, you only need a few basic components. These parts are easy to find and perfect for beginners. The setup is simple and takes only a couple of minutes. Before we move to the coding section, let’s first gather the required hardware.
You will need the following components:
- Arduino Uno (or any Arduino board)
- Passive Buzzer Module or a raw passive piezo buzzer
- Male-to-Female Jumper Wires
- Breadboard (optional but useful)
These few items are enough to build alarms, tones, and small music projects.
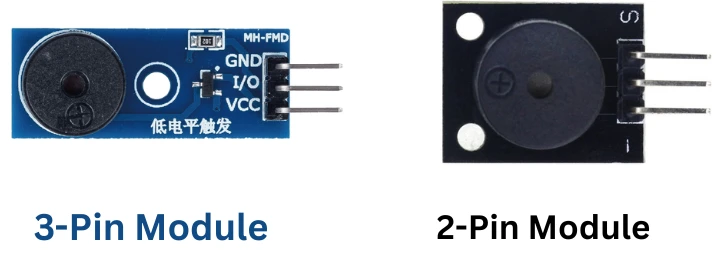
2-Pin vs 3-Pin Passive Buzzer Module Pinout
The circuit is very easy. The passive buzzer has two/three pins. The pinouts for both types of modules is shown below.

Wiring Diagram — Buzzer to Arduino
Connecting buzzer to an Arduino is very simple. The image below shows the connection for both 3-pin module and 2-pin module.
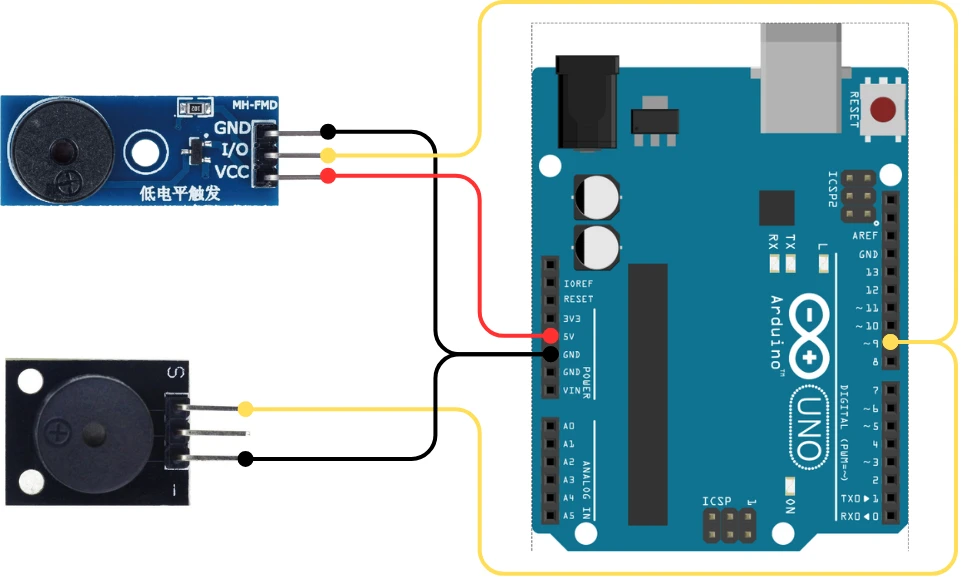
In case of 3-pin module, the VCC must be connected to 5V. Whereas in case of 2-pin module, only the ground and signal pins are enough.
Arduino tone() Function — Complete Reference
Now that your passive buzzer is connected, let’s start with some basic Arduino codes. Arduino makes it very easy to generate tones using built-in functions. In this section, you will learn how to play a simple tone, how to stop it, and how the tone() function actually works. These basics will help you understand the advanced sounds later in this tutorial.
Simple Beep Using tone()
The tone() function is the easiest way to play sound on a passive buzzer. It sends a square wave to the buzzer at a frequency you set.
Here is a simple example:
int buzzer = 9;  // Buzzer connected to digital pin 9

void setup() {
  // Nothing to set up
}

void loop() {
  tone(buzzer, 1000);   // Play a 1000 Hz tone
  delay(1000);           // Wait for 1 second
  noTone(buzzer);        // Stop sound
  delay(1000);           // Wait for 1 second
}This code plays a clear beep every second. You can check the audio below to see how it sounds.
Stop Sound with noTone()
To stop the buzzer, Arduino provides a simple function called noTone(). It turns off the square wave signal and makes the buzzer silent.
Example:
noTone(buzzer);You can call this function at any time to stop the sound. It’s useful when you want short beeps or timed alarms.
tone() Parameters Explained
The tone() function has two main parameters:
- tone(pin, frequency)
- pin -> the Arduino pin connected to the buzzer
- frequency -> the pitch of the sound in Hertz (Hz)
- tone(pin, frequency, duration)
- duration -> time in milliseconds
- After the duration ends, the tone stops automatically
Examples of frequency:
- 500 Hz -> low-pitched sound
- 1000 Hz -> normal beep
- 2000+ Hz -> sharp, high-pitched tone
Passive Buzzer Sound Effects for Arduino
With a passive buzzer, you can create many sound effects by simply changing the frequency and timing. In this section, we will build three useful and popular sounds: an emergency alert, a police siren, and a beeping alarm. These examples use simple code, short delays, and the tone() function to keep things easy and beginner-friendly.
Emergency Alert Sound
An emergency sound has a fast rising and falling pitch. This creates a sense of urgency.
Here is the code:
int buzzer = 9;

void setup() {
}

void loop() {
  // Rising frequency
  for (int freq = 500; freq <= 1500; freq += 50) {
    tone(buzzer, freq);
    delay(20);
  }

  // Falling frequency
  for (int freq = 1500; freq >= 500; freq -= 50) {
    tone(buzzer, freq);
    delay(20);
  }
}The loop increases and decreases the frequency to create an emergency-style sweep. Fast changes in pitch make the sound intense and attention-grabbing.
Output
The audio below is the output of this code. You can press the play button to hear the sound generated by the buzzer.
Police Siren Sound
A police siren has two alternating tones. This back-and-forth pitch gives the classic siren effect.
int buzzer = 9;

void setup() {
}

void loop() {
  // High tone
  tone(buzzer, 800);
  delay(500);

  // Low tone
  tone(buzzer, 500);
  delay(500);
}Two tones play repeatedly. The shift between high and low frequencies produces the well-known police siren sound.
Output
The audio below is the output of this code. You can press the play button to hear the sound generated by the buzzer.
Beeping Alarm
A beeping alarm is simple. It turns the buzzer ON and OFF at fixed intervals.
int buzzer = 9;

void setup() {
}

void loop() {
  tone(buzzer, 1000);  // Play tone
  delay(300);          // Short beep

  noTone(buzzer);      // Stop tone
  delay(300);          // Pause
}The buzzer plays a medium-pitch tone for a short time, then stops, then repeats. This pattern creates a clean and clear alarm beep.
Output
The audio below is the output of this code. You can press the play button to hear the sound generated by the buzzer.
Play Music Tones on Arduino Passive Buzzer
A passive buzzer can also play simple music. By changing the frequency quickly, you can create melodies. In this section, we will play two very popular tones: the Mario theme (short version) and the Star Wars intro tone. These are simplified versions, so they work smoothly on any Arduino board.
Mario Theme (Short Version)
Here is a short and fun version of the Mario melody:
int buzzer = 9;

void playTone(int frequency, int duration) {
  tone(buzzer, frequency, duration);
  delay(duration * 1.3);
}

void setup() {
}

void loop() {
  playTone(660, 100);
  playTone(660, 100);
  delay(100);
  playTone(660, 100);

  delay(150);
  playTone(510, 100);
  playTone(660, 100);
  delay(150);
  playTone(770, 100);

  delay(300);
  playTone(380, 100);

  delay(500); // Wait and loop
}This code uses a helper function to play each note with a small delay. The frequency values match the musical notes from the Mario theme, giving a recognizable tune.
Output
The audio below is the output of this code. You can press the play button to hear the sound generated by the buzzer.
Star Wars Intro Tone
This is a simplified intro from the classic Star Wars theme:
int buzzer = 9;

void playTone(int frequency, int duration) {
  tone(buzzer, frequency, duration);
  delay(duration * 1.3);
}

void setup() {
}

void loop() {
  playTone(440, 500);  // A
  playTone(440, 500);  // A
  playTone(440, 500);  // A

  playTone(349, 350);  // F
  playTone(523, 150);  // C
  playTone(440, 500);  // A

  playTone(349, 350);  // F
  playTone(523, 150);  // C
  playTone(440, 650);  // A (long note)

  delay(1000);         // Pause before repeating
}Each tone represents a musical note. The timing and pitch create the famous Star Wars intro. The small delays help separate the notes and make the melody smooth.
Output
The audio below is the output of this code. You can press the play button to hear the sound generated by the buzzer.
Troubleshooting Arduino Passive Buzzer Issues
Sometimes the buzzer may not sound as expected. It can be too weak, too noisy, or may not work at all. Most issues are simple and can be fixed quickly. This section covers the most common problems beginners face when using a passive buzzer with Arduino.
Buzzer Produces Weak or Quiet Sound
A weak or low sound usually means:
- The buzzer is a passive buzzer, but you are not sending the correct frequency.
- Your tone frequency is too low.
- The buzzer is connected through loose jumper wires.
- The Arduino pin may not be making proper contact.
Quick fixes:
- Increase frequency to around 800–1500 Hz for a louder sound.
- Check positive and negative pins.
- Use shorter jumper wires to reduce signal loss.
- Try another digital pin, like D8 or D10.
tone() Function Not Working
If the tone() function does nothing, check the following:
- Pin conflict
Some pins may be used by other libraries (Servo, PWM timers, etc.). Try another pin. - Wrong buzzer type
tone() works only with passive buzzers. Active buzzers will just beep the same tone. - Hardware issue
A burnt piezo element or broken wire causes silent output. - Incorrect wiring
Even swapping + and – can stop sound.
Quick test code:
tone(9, 1000);If you hear nothing, it means wiring or buzzer type is the issue.
Active vs Passive Buzzer Confusion — How to Tell Them Apart
Many beginners mix these two modules. The wrong buzzer will behave differently.
Passive Buzzer:
- Needs tone()
- Can play melodies
- Can change pitch
- MUST get a frequency signal
Active Buzzer:
- Has built-in sound circuit
- Makes a single fixed beep
- tone() will NOT work
- Only needs HIGH and LOW
How to check quickly:
- If the buzzer makes the same sound on 5V directly, it is active.
- If it stays silent until Arduino sends a frequency, it is passive.
Arduino Passive Buzzer — Frequently Asked Questions
Conclusion
The passive buzzer is one of the most underrated components in the Arduino ecosystem. No library, no I2C address, no wiring complexity — just one digital pin and the built-in tone() function, and you have complete control over frequency, duration, and timing.
In this tutorial you covered everything from how the piezoelectric element vibrates to produce sound, to the key differences between active and passive buzzers, to wiring both 2-pin and 3-pin module variants. You then built five complete sound programs — a simple beep, an emergency sweep, a police siren, and two iconic music themes — each verified with audio output.
From here you can trigger the buzzer from sensor events: use the PIR sensor to fire an intruder alarm, the IR sensor to beep on each object count, or the HC-SR04 to produce proximity warnings with changing pitch. Combine it with an LCD1602 for a complete alarm display panel. Download the full project above and explore the Arduino Modules collection for the next build.
Download Arduino Passive Buzzer Project Files
Complete Arduino project with simple beep, emergency alarm, police siren, beeping alarm, Mario theme, and Star Wars intro sketches. No external libraries required — uses built-in tone() and noTone() functions only. Compatible with Uno, Nano, and Mega. Free to download — support the work if it helped you.
Browse More Arduino Modules Tutorials

AT25C256 EEPROM with Arduino using I2C – Read, Write, and Store Data Easily

Arduino W25Q Flash Memory Tutorial: Read, Write, and Store Data Efficiently

DS3231 Arduino Tutorial: Real-Time Clock with LCD1602, Alarms & Temperature

DS1307 Arduino Tutorial: Interfacing RTC Module with LCD1602 I2C Display

WS2812 Arduino Tutorial: NeoPixel Ring Wiring, Effects & Animations

Subscribe
Login
0 Comments
Newest
