Home ▸ ESP32 ▸ FreeRTOS Tutorials ▸
Updated On: April 26, 2026
FreeRTOS on ESP32 (ESP-IDF): Tasks, Scheduling & Code
Every while(1) loop eventually hits its limit. Add a second sensor, a Wi-Fi upload, and an LED blink to the same loop and you are immediately dealing with timing conflicts, blocking delays, and code that is hard to reason about. FreeRTOS solves this cleanly — split the work into independent tasks, let the scheduler decide what runs when, and every part of your application gets CPU time without blocking everything else.
This is Part 1 of the ESP32 FreeRTOS Series using ESP-IDF. It covers what FreeRTOS is, how the scheduler and task states work, and how to create concurrent tasks using xTaskCreate(). The example runs two LED blink tasks at different rates on the same ESP32 — simple enough to be clear, real enough to demonstrate true multitasking.
ESP32 FreeRTOS Series — all parts:
- Part 1 — Intro to FreeRTOS: Tasks, Scheduler & xTaskCreate ← you are here
- Part 2 — Understanding the FreeRTOS Scheduler
- Part 3 — Task Priority & Stack Management
- Part 4 — Inter-Task Communication: Queues, Semaphores & Event Groups
- Part 5 — Software Timers & Task Notifications
- Part 6 — Task Control: Suspend, Resume & Delete
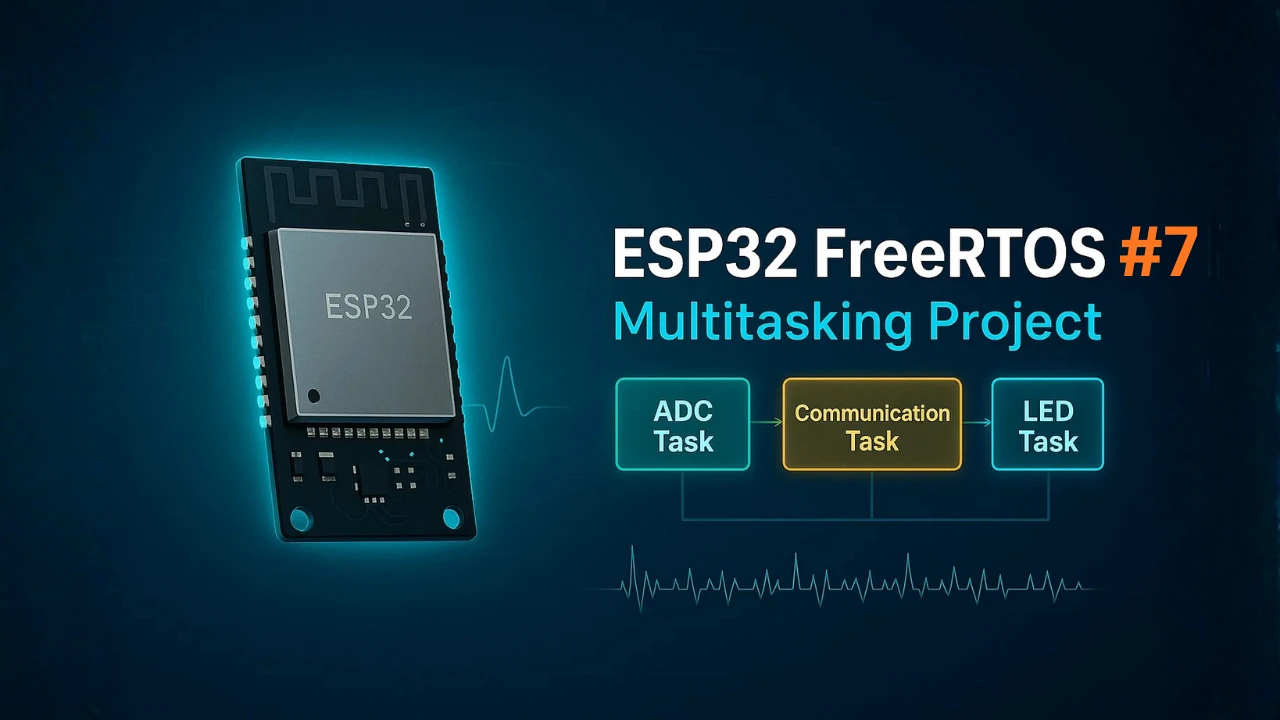
- Part 7 — Real-Time Multitasking Project (ADC, UART, LED)
FreeRTOS on ESP32: What It Is & Why Use It
What is FreeRTOS and How Does it Work on ESP32?
FreeRTOS is a lightweight real-time operating system (RTOS) designed for microcontrollers, including the ESP32. It allows your microcontroller to run multiple independent tasks concurrently without blocking each other.
FreeRTOS schedules tasks according to their priority and timing requirements, ensuring that critical operations are executed on time. This is useful for IoT projects, robotics, and embedded systems, where multiple processes need to run simultaneously, such as reading sensors, controlling actuators, and communicating over Wi-Fi or Bluetooth.
Understanding Real-Time Operating Systems
A real-time operating system (RTOS) is an operating system that guarantees deterministic behavior for executing tasks. This means tasks run predictably within a known time frame, which is crucial for applications where timing matters.
Key features of an RTOS:
- Multitasking: Run multiple tasks “simultaneously” on a single CPU.
- Task Priorities: Assign priorities to tasks so critical operations run first.
- Time Management: Control task execution with precise delays and timers.
- Resource Sharing: Use semaphores and mutexes to prevent conflicts between tasks.
How FreeRTOS Works on ESP32 (Task Scheduling Basics)
On microcontrollers like the ESP32, FreeRTOS functions by scheduling tasks on the CPU. Even though the ESP32 has only a few cores, FreeRTOS makes it appear as if multiple tasks are running at the same time.
How it works in simple terms:
- Tasks are defined as independent functions.
- FreeRTOS maintains a task list with their states (running, ready, blocked).
- A scheduler decides which task runs at any moment based on priority and timing.
- Delays and waiting mechanisms allow tasks to pause without blocking the CPU, letting other tasks run.
On the ESP32, FreeRTOS is already integrated into ESP-IDF, so when you create tasks in your app_main(), FreeRTOS automatically manages scheduling and multitasking. This allows you to focus on writing functional tasks without worrying about low-level timing management.
Why Use FreeRTOS Instead of a Super Loop?
The ESP32 is a powerful microcontroller with built-in Wi-Fi and Bluetooth, making it ideal for IoT and embedded applications. However, as your projects grow more complex, using the traditional “super loop” approach—where everything runs sequentially inside a while(1) loop—can quickly become messy and difficult to manage.
This is where FreeRTOS comes in. It provides a structured and efficient way to handle multiple tasks simultaneously, ensuring each part of your application runs smoothly without interfering with others.
Advantages for IoT and Embedded Projects
FreeRTOS brings several key advantages that make it ideal for real-world IoT and embedded systems:
- True Multitasking
- Run multiple tasks in parallel, such as reading sensors, sending data to the cloud, and updating displays—all without blocking each other.
- Better Code Organization
- Separate different functionalities into independent tasks instead of putting everything inside a single loop. This makes your code modular, easier to read, and simpler to maintain.
- Precise Timing Control
- Use
vTaskDelay()or timers to control the timing of tasks accurately, without relying on busy loops ordelay()functions that block other operations.
- Use
- Improved Responsiveness
- High-priority tasks (e.g., safety checks, interrupts, or critical sensors) can run immediately, while lower-priority tasks wait, ensuring time-sensitive operations are never delayed.
- Scalability
- As your project grows, adding new features becomes easier. You can simply create new tasks and adjust priorities, without rewriting existing code logic.
These benefits make FreeRTOS especially useful for IoT devices, where multiple peripherals, sensors, and communication protocols must work together seamlessly.
Built-in FreeRTOS Support in ESP-IDF
One of the biggest advantages of using ESP32 is that FreeRTOS comes pre-integrated with ESP-IDF, the official development framework from Espressif.
- There’s no need to download or configure FreeRTOS separately—it’s part of the core system.
- When you create tasks using
xTaskCreate()in your ESP-IDF project, they are automatically scheduled and managed by FreeRTOS. - ESP-IDF also provides additional FreeRTOS APIs and debugging tools to monitor task performance, stack usage, and system behavior.
This built-in support means you can focus directly on application logic – defining tasks, setting priorities, and leveraging queues or semaphores – without worrying about integrating a third-party RTOS.
Key FreeRTOS Concepts: Tasks, Queues, Semaphores
Before we start coding with FreeRTOS on the ESP32, it’s important to understand a few fundamental concepts. These form the core of how FreeRTOS manages multiple operations efficiently in real-time.
Tasks
In FreeRTOS, tasks are like independent functions that run in parallel, each performing a specific job. For example, you might have one task reading sensor data, another sending data to the cloud, and another controlling an LED.
You create a task using the xTaskCreate() or xTaskCreatePinnedToCore() function in ESP-IDF. Each task has:
- A priority, which determines when and how often it runs compared to other tasks.
- A stack size, which defines how much memory it uses.
- A task function, where you define the task’s behaviour.
FreeRTOS uses a preemptive scheduler to decide which task runs at any moment. The task with the highest priority is always given CPU time. If two tasks have the same priority, the scheduler will switch between them in a round-robin fashion.
This multitasking mechanism allows your ESP32 to handle multiple operations without blocking, making your applications smoother and more responsive.
Delays — vTaskDelay and vTaskDelayUntil
In a regular Arduino-style loop, using delay() blocks the CPU completely, stopping all other code from running. In FreeRTOS, this problem is solved using vTaskDelay() and vTaskDelayUntil().
vTaskDelay(ticks)
Suspends the task for a specific number of ticks (usually 1 tick = 1 ms on ESP32). While this task is waiting, other tasks are free to run.vTaskDelayUntil()
Useful when you want tasks to run at fixed, periodic intervals, regardless of when the delay was called. This helps maintain precise timing, especially in applications like sensor sampling or real-time control loops.
Queues — Task Communication
When multiple tasks run simultaneously, they often need to share data. FreeRTOS provides queues as a safe and efficient way to pass data between tasks.
For example, you can have:
- A sensor task pushing new readings into a queue.
- A communication task reading those values from the queue and sending them to the cloud.
Queues act like first-in-first-out (FIFO) buffers. They ensure data is passed in order and prevent race conditions, that can occur when tasks access the shared variables directly.
In ESP-IDF, you can create a queue using xQueueCreate(), and then use xQueueSend() or xQueueReceive() to transfer data. Queues also support blocking, so a task can wait until new data arrives.
Semaphores & Mutexes — Resource Management
When multiple tasks need to use a shared resource (like a UART port, an I²C bus, or even a shared variable), there’s a risk of conflicts and data corruption. FreeRTOS provides semaphores and mutexes to manage this.
- Binary Semaphores
Work like a signaling mechanism. One task can “give” the semaphore, and another can “take” it. This is useful for synchronizing tasks or signaling that an event has occurred (like an ISR notifying a task). - Mutexes (Mutual Exclusion)
Used to protect shared resources. Only one task can hold the mutex at a time. If another task tries to take it, it will wait until the mutex is released.
Using semaphores and mutexes ensures that shared resources are accessed safely, preventing data corruption and ensuring smooth multitasking on the ESP32.
Creating FreeRTOS Tasks in ESP32 with xTaskCreate
What is a FreeRTOS Task?
In FreeRTOS, a task is a small, independent program that runs inside your main application. Each task performs a specific job — for example, blinking an LED, reading a sensor, or sending data over Wi-Fi.
FreeRTOS allows the ESP32 to handle multiple tasks at once. This is called multitasking. Instead of writing one long loop with delays, you split your code into several smaller tasks that run together without blocking each other.
Every task in FreeRTOS has its own stack, priority, and state. The scheduler manages these tasks and decides which one runs at any given time. It switches between tasks so quickly that it looks like they’re all running simultaneously.

Task States: Running, Ready, Blocked, Suspended
Each task in FreeRTOS can be in one of several states:
- Running: The task currently using the CPU.
- Ready: The task is waiting for CPU time.
- Blocked: The task is waiting for a delay or an event (like a semaphore).
- Suspended: The task is paused until resumed.
- Deleted: The task is removed from memory.
The scheduler constantly checks these states. It only runs tasks that are in the Ready state.
The xTaskCreate() Function
The main API to create a task is xTaskCreate(). It registers your task with the FreeRTOS kernel and sets parameters such as stack size, priority, and task handle.
Here’s the syntax:
BaseType_t xTaskCreate(
    TaskFunction_t pvTaskCode,       // Task function
    const char * const pcName,       // Task name (for debugging)
    const uint32_t usStackDepth,     // Stack size in words
    void *pvParameters,              // Optional parameters
    UBaseType_t uxPriority,          // Task priority
    TaskHandle_t *pvCreatedTask      // Task handle (optional)
);If the function returns pdPASS, the task was created successfully. Otherwise, if the system runs out of heap memory, the function will fail to create the task.
Example: Two LED Tasks Blinking at Different Rates
Let’s create two FreeRTOS tasks to blink two LEDs at different speeds. This shows true multitasking on ESP32 using the ESP-IDF framework.
#include <stdio.h>
#include "freertos/FreeRTOS.h"
#include "freertos/task.h"
#include "driver/gpio.h"

#define LED1 GPIO_NUM_2
#define LED2 GPIO_NUM_4

// ----- Task 1: Blink LED1 every 500 ms -----
void blink_task_1(void *pvParameters)
{
    gpio_reset_pin(LED1);
    gpio_set_direction(LED1, GPIO_MODE_OUTPUT);

    while (1)
    {
        gpio_set_level(LED1, 1);                     // Turn LED ON
        vTaskDelay(pdMS_TO_TICKS(500));              // Wait 500 ms
        gpio_set_level(LED1, 0);                     // Turn LED OFF
        vTaskDelay(pdMS_TO_TICKS(500));              // Wait 500 ms
    }
}

// ----- Task 2: Blink LED2 every 200 ms -----
void blink_task_2(void *pvParameters)
{
    gpio_reset_pin(LED2);
    gpio_set_direction(LED2, GPIO_MODE_OUTPUT);

    while (1)
    {
        gpio_set_level(LED2, 1);                     // Turn LED ON
        vTaskDelay(pdMS_TO_TICKS(200));              // Wait 200 ms
        gpio_set_level(LED2, 0);                     // Turn LED OFF
        vTaskDelay(pdMS_TO_TICKS(200));              // Wait 200 ms
    }
}

// ----- app_main: Entry point in ESP-IDF -----
void app_main(void)
{
    printf("Starting FreeRTOS tasks...\n");

    // Create both tasks
    xTaskCreate(blink_task_1, "Blink1", 2048, NULL, 1, NULL);
    xTaskCreate(blink_task_2, "Blink2", 2048, NULL, 1, NULL);
}Code Breakdown
1. GPIO Setup
Each task begins by configuring its GPIO pin:
gpio_reset_pin(LED1);
gpio_set_direction(LED1, GPIO_MODE_OUTPUT);This ensures the LED pin is ready for output. Doing this inside the task keeps each task self-contained and modular.
2. Infinite Loop for Task Operation
The while(1) loop ensures each task runs forever. Tasks never return — instead, they sleep using vTaskDelay() to give CPU time to other tasks.
while (1) {
    gpio_set_level(LED1, 1);
    vTaskDelay(pdMS_TO_TICKS(500));
    gpio_set_level(LED1, 0);
    vTaskDelay(pdMS_TO_TICKS(500));
}Each delay converts milliseconds to RTOS ticks with pdMS_TO_TICKS(). This keeps timing accurate even if the tick rate changes in FreeRTOSConfig.h.
3. Non-Blocking Delays
vTaskDelay() is a non-blocking delay. Unlike delay() in the MCU, it doesn’t freeze the CPU — it simply tells the scheduler, “Pause this task for X ticks and let others run.” This is the foundation of multitasking in FreeRTOS.
4. Task Creation in app_main()
All FreeRTOS tasks are started inside app_main().
xTaskCreate(blink_task_1, "Blink1", 2048, NULL, 1, NULL);
xTaskCreate(blink_task_2, "Blink2", 2048, NULL, 1, NULL);Each task receives:
- Function name – pointer to the task code
- Readable name – useful for debugging
- Stack size – 2048 words (~8 KB)
- Parameters – none in this case
- Priority – both are priority 1 (same level)
- Handle – set to NULL since we don’t need to control the task later
When both tasks have the same priority, FreeRTOS time-slices the CPU between them, making both LEDs blink independently and smoothly.
How It Works
The FreeRTOS scheduler alternates CPU time between blink_task_1 and blink_task_2. When one task calls vTaskDelay(), it moves to the blocked state, and the scheduler immediately switches to the other task.
This rapid switching gives the impression of parallel execution — a hallmark of real-time multitasking on the ESP32.
Result: FreeRTOS Tasks Running Concurrently
The GIF below shows the two FreeRTOS tasks running concurrently on the ESP32.

Each LED blinks at a different rate — one slow and one fast — demonstrating how the FreeRTOS scheduler efficiently switches between tasks without blocking the CPU.
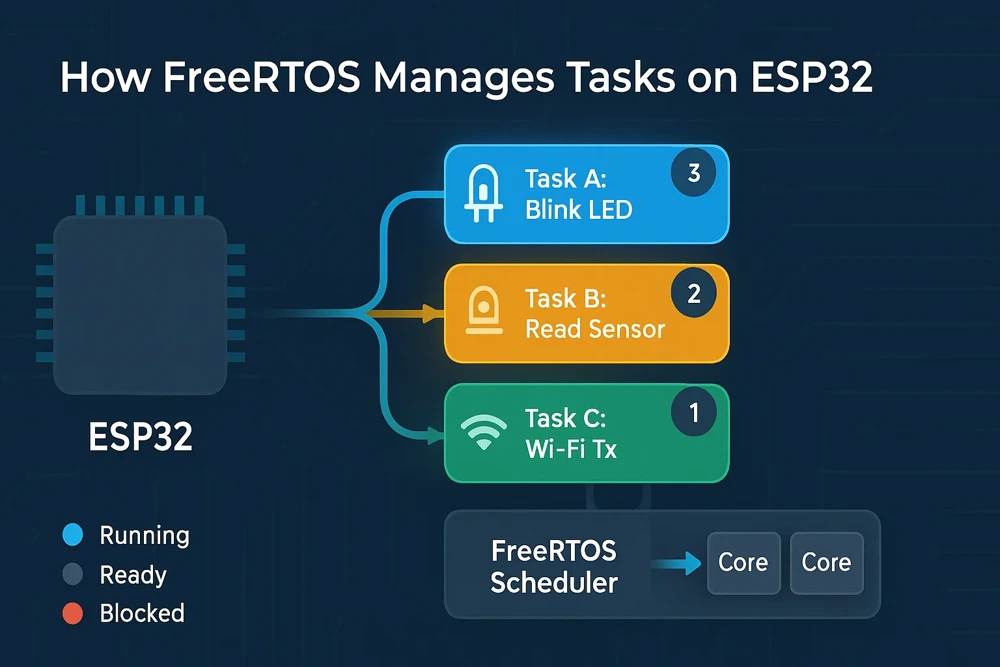
FreeRTOS Scheduler, Priorities & Stack Size
How the FreeRTOS Scheduler Works
The FreeRTOS Scheduler is the part of the system that decides which task runs and when. It manages all active tasks and switches between them efficiently. This makes your ESP32 run multiple operations as if they were happening at the same time.
FreeRTOS uses preemptive scheduling by default. This means a higher-priority task can interrupt a lower-priority one at any time. The scheduler instantly switches control to the more important task.
This behaviour ensures that time-critical tasks — like reading sensors or handling Wi-Fi packets — always get CPU time first. Lower-priority tasks resume automatically once the high-priority work is done.
The diagram below shows how the FreeRTOS Scheduler switches between multiple tasks on the ESP32.
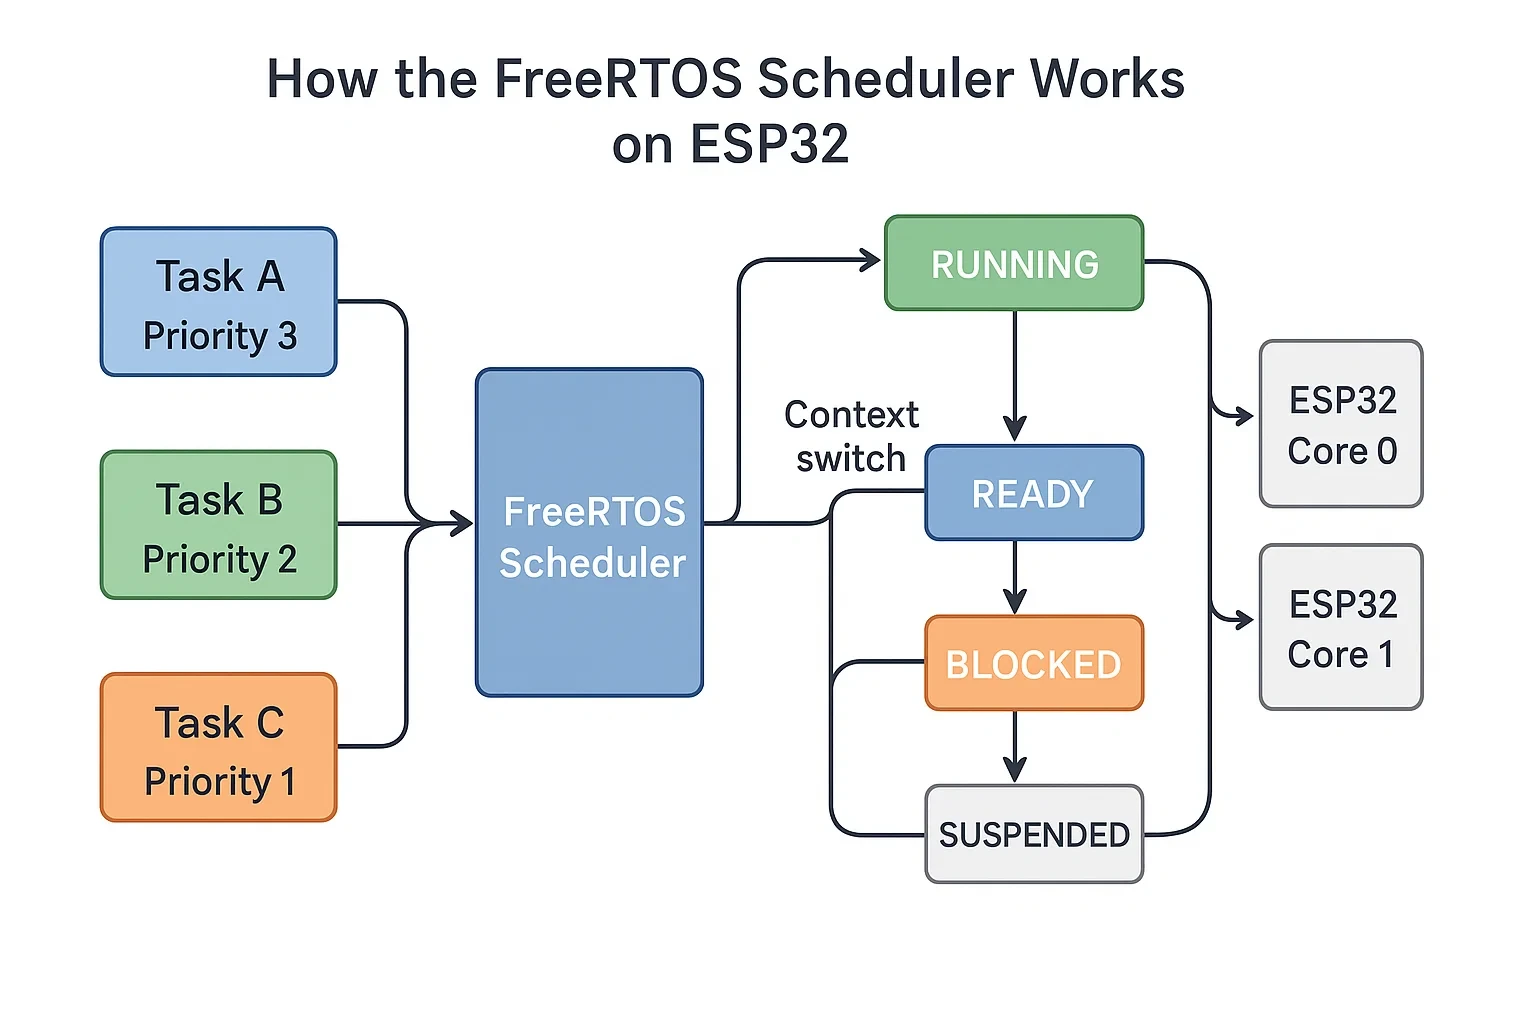
Task States and Context Switching
Each task in FreeRTOS can be in one of several states:
- Running: The task currently using the CPU.
- Ready: The task is waiting for CPU time.
- Blocked: The task is waiting for a delay or an event (like a semaphore).
- Suspended: The task is paused until resumed.
- Deleted: The task is removed from memory.
The scheduler constantly checks these states. It only runs tasks that are in the Ready state.
Context Switching
The scheduler performs a context switch whenever it changes which task is running. During a context switch, FreeRTOS saves the current task’s data and loads the next task’s data from memory. This process happens very quickly — usually every few milliseconds.
Context switching allows multiple tasks to share the same CPU without interfering with each other. It’s what makes FreeRTOS feel truly multitasking.
Task Priority: Setting and Adjusting Levels
In FreeRTOS, every task has two important parameters — priority and stack size. These determine how often a task runs and how much memory it uses. Understanding both helps you create stable, efficient ESP32 applications.
Priority defines how important a task is to the system. FreeRTOS uses integer values for priorities — a higher number means higher importance. By default, priority 0 is the lowest, and there’s no upper limit (though ESP-IDF usually supports up to 25 levels).
The scheduler always runs the highest-priority task that’s ready to execute. If two tasks share the same priority, the scheduler switches between them in round-robin fashion.
Example:
- Task A (priority 2): Reads sensor data.
- Task B (priority 1): Blinks an LED.
If both are ready, Task A runs first. When Task A blocks or delays, Task B runs next.
Setting the right priorities ensures that critical tasks get CPU time when needed, while background tasks run only when the system is free.
Stack Size: Choosing the Right Value
Each task also needs stack memory. This is the private space a task uses to store variables, return addresses, and function calls. If the stack is too small, your program may crash or behave unpredictably.
You define stack size in words, not bytes, when creating a task with xTaskCreate(). For ESP32 (32-bit architecture), one word = 4 bytes.
Example:
xTaskCreate(taskFunction, "TaskA", 2048, NULL, 2, NULL);Here, the stack size is 2048 words (≈8 KB). This is usually enough for most small tasks, but tasks with heavy computation or large local variables may need more.
You can monitor stack usage with:
uxTaskGetStackHighWaterMark(taskHandle);This helps you detect if a task is close to running out of stack space.
Download ESP32 FreeRTOS Part 1 Project Files
Complete ESP-IDF project for ESP32 — includes two concurrent LED blink tasks created with xTaskCreate(), vTaskDelay() non-blocking delays, and GPIO configuration using ESP-IDF driver API. Free to download — support the work if it helped you.
FreeRTOS ESP32: Frequently Asked Questions
Conclusion
In this tutorial you learned what FreeRTOS is, why it exists, and how its core building blocks — tasks, delays, queues, semaphores — work together on the ESP32. You created two concurrent LED blink tasks using xTaskCreate(), saw how vTaskDelay() yields the CPU without blocking other tasks, and understood how the preemptive scheduler decides which task runs based on priority.
The two things to carry forward: every task needs a while(1) loop — a task function that returns is undefined behaviour in FreeRTOS. And every task needs a correctly sized stack — too small and it will corrupt memory silently. Use uxTaskGetStackHighWaterMark() during development to tune stack sizes before you ship.
This is the foundation. In Part 2, we go deeper into the FreeRTOS scheduler — how time slicing works between equal-priority tasks, how preemption interrupts lower-priority work, and how to tune task timing for real-time behaviour.
Browse More ESP32 FreeRTOS Tutorials
ESP32 FreeRTOS Task Priority & Stack Size: Full Guide
ESP32 FreeRTOS Queues, Semaphores, Mutexes & Event Groups
ESP32 FreeRTOS Software Timers & Task Notifications
ESP32 FreeRTOS: Suspend, Resume & Delete Tasks (ESP-IDF)
ESP32 FreeRTOS Multitasking Project: ADC, UART & LED Tasks


This is a great introduction to freeRTOS. It is very useful like a mini-OS. Thank you.