Send and Receive data from the WebServer using STM32
I have already covered how to create a webserver using ESP8266 and STM32. In that tutorial, we controlled the LED on STM32 using the webserver on ESP8266. This tutorial will take a step forward on the same aspect, and today we will see how to send and receive actual data from the webserver.
Although I will demonstrate a small use of it, but you can use it for a wide range of purposes. For eg- sending the sensor values, or receiving some form data, etc. This tutorial will use the Ringbuffer and you should take a look at that article first.
************* UPDATE 2 ***************
L4 series and G series MCUs have some issues with UART_ISR_TXE. If you are having issues even after making changes according to UPDATE 1, then Replace the Uart_isr with the file https://controllerstech.com/wp-content/uploads/2020/08/Uart_Isr_single_new.c
************* UPDATE 1 ***************
Those, who have errors in the Uart_isr function, eg- F7 series MCU, replace the Uart_isr functon with the one provided in this file https://controllerstech.com/wp-content/uploads/2020/04/Uart_Isr_single.c
VIDEO TUTORIAL
You can check the video to see the complete explanation and working of this project.
Connection
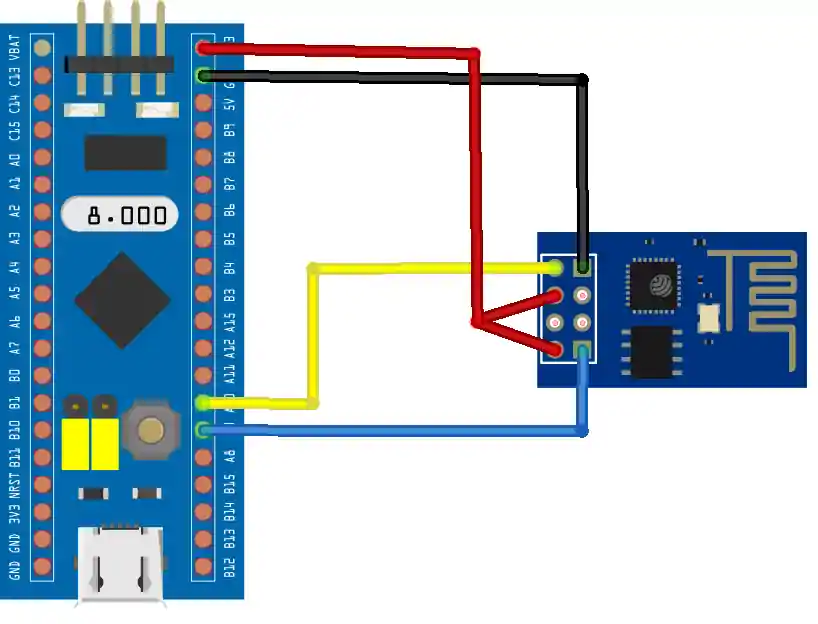
The connection is simple. Just connect the Rx of the MCU to the Tx of the ESP, and vice versa.
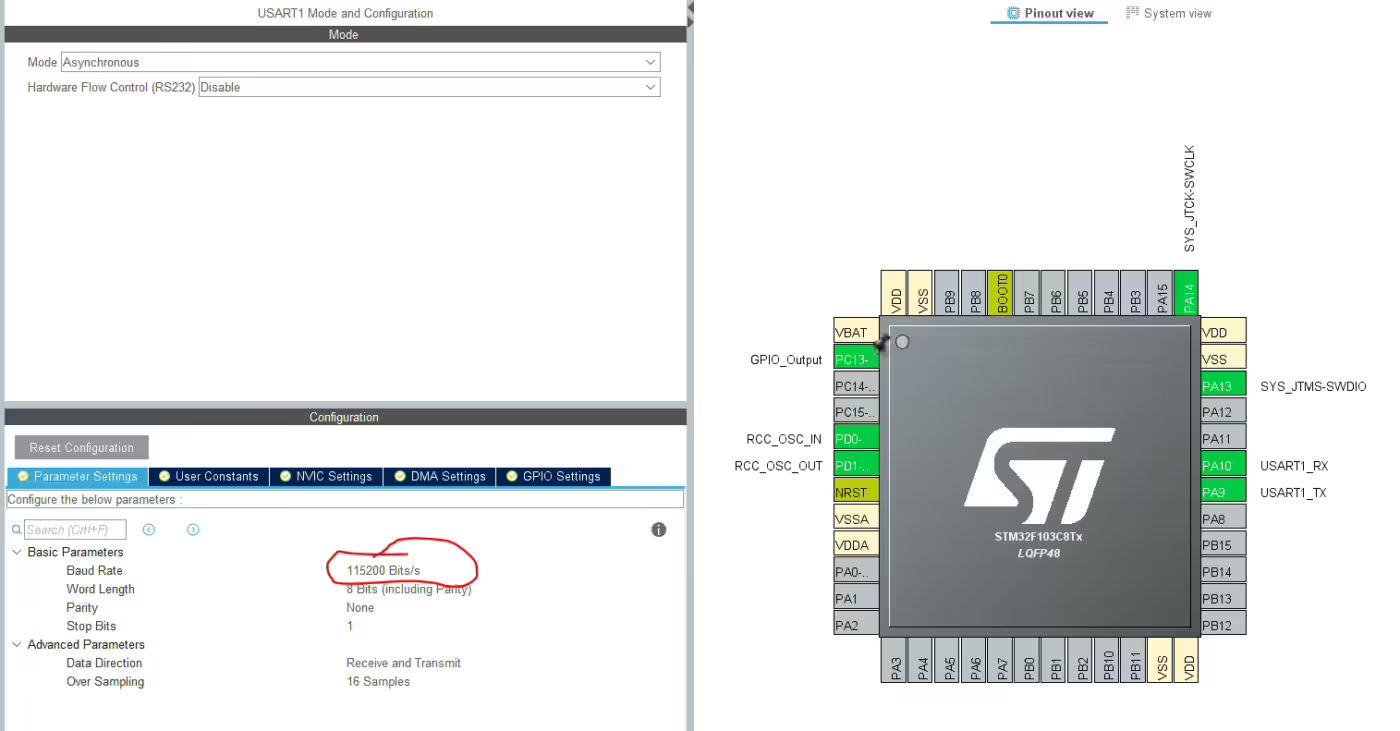
CubeMX SETUP
All we need to do is just enable a UART. Below is my Cubemx setup. I am using baud rate of 115200 and make sure that the interrupt is enabled.
Next, copy the required header files and source files in the inc and src directories respectively. These files are located under /src and /inc folders of the code attached below. You should also copy them to the same locations in your project.
Once copied, open the stm32….it.c file and copy extern void Uart_isr (UART_HandleTypeDef *huart); in the file. And at last we need to replace the default ISR with the one we have. So browse down the file to the void USART1_IRQHandler(void) and replace the default ISR just as shown in the picture below
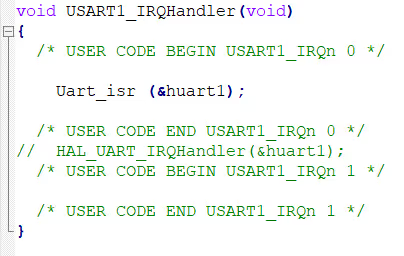
This completes the setup part Now let’s take a look inside some functions available.
Some Insight into the CODE
ESP_Init
void ESP_Init (char *SSID, char *PASSWD, char *STAIP)
{
	char data[80];

	Ringbuf_init();

	Uart_sendstring("AT+RST\r\n");
	HAL_Delay(2000);

	/********* AT **********/
	Uart_flush();
	Uart_sendstring("AT\r\n");
	while(!(Wait_for("OK\r\n")));


	/********* AT+CWMODE=1 **********/
	Uart_flush();
	Uart_sendstring("AT+CWMODE=1\r\n");
	while (!(Wait_for("OK\r\n")));

	/* Set Static IP Address */
	/********* AT+CWSTAIP=IPADDRESS **********/
	Uart_flush();
	sprintf (data, "AT+CIPSTA=\"%s\"\r\n", STAIP);
	Uart_sendstring(data);
	while (!(Wait_for("OK\r\n")));

	/********* AT+CWJAP="SSID","PASSWD" **********/
	Uart_flush();
	sprintf (data, "AT+CWJAP=\"%s\",\"%s\"\r\n", SSID, PASSWD);
	Uart_sendstring(data);
	while (!(Wait_for("OK\r\n")));

	/********* AT+CIPMUX **********/
	Uart_flush();
	Uart_sendstring("AT+CIPMUX=1\r\n");
	while (!(Wait_for("OK\r\n")));

	/********* AT+CIPSERVER **********/
	Uart_flush();
	Uart_sendstring("AT+CIPSERVER=1,80\r\n");
	while (!(Wait_for("OK\r\n")));

}ESP_Init (“SSID”, “PASSWD”, “STAIP”) Initializes the ESP8266. Its parameter are the @SSID and @PASSWD of the Access point that you want to connect to. @STAIP is the static IP that you want to assign to this connection.
This function sends some AT commands in a sequence, and than waits for the expected response (OK\r\n) after every command. These commands are given below
- AT –> to check if the ESP is responding
- AT+CWMODE=1 –> to set the ESP into the station mode
- AT+STAIP = “STAIP” –> to set the static IP for the connection
- AT+CWJAP=”SSID”, “PASSWD” –> Join the access point with the SSID, and PASSWD
- AT+CIPMUX=1 –> Set the multiple connection as TRUE
- AT+CIPSERVER=1,80 –> Starts a server at port 80
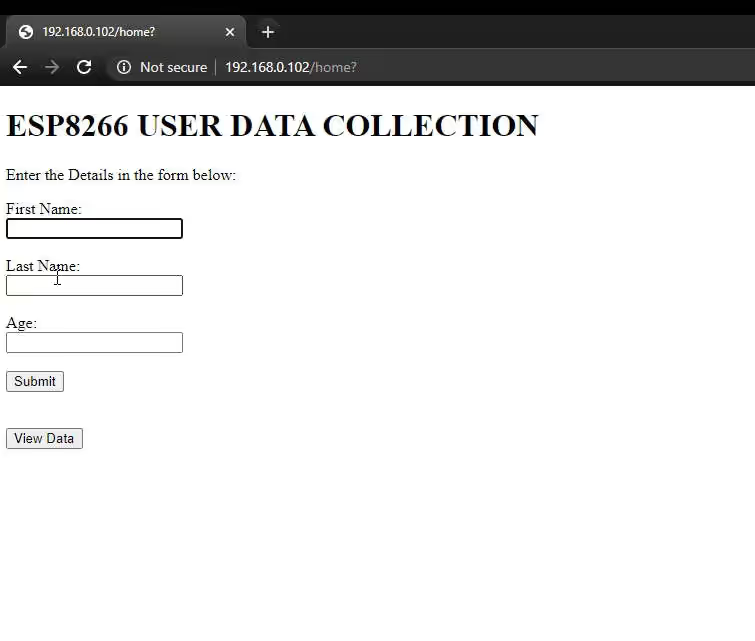
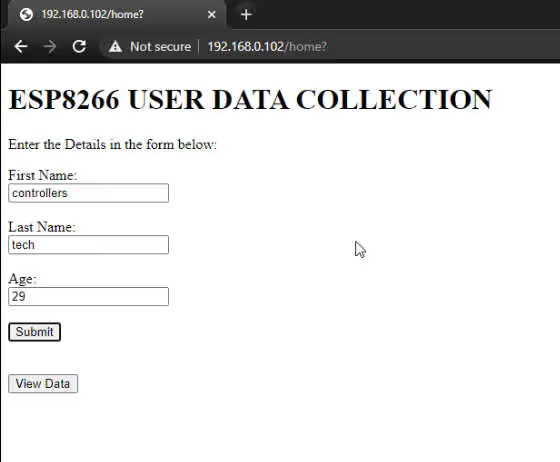
Next, we will connect to this IP address, but make sure the device and the ESP should be connected to the same network. The Webserver page will look like as shown below
Server_Start
void Server_Start (void)
{
	char buftostoreheader[128] = {0};
	char Link_ID;
	while (!(Get_after("+IPD,", 1, &Link_ID)));

	Link_ID -= 48;
	while (!(Copy_upto(" HTTP/1.1", buftostoreheader)));
	if (Look_for("/page1", buftostoreheader) == 1)
	{
		GetDataFromBuffer("fname=", "&", buftostoreheader, user[usernumber].firstname);
		GetDataFromBuffer("lname=", "&", buftostoreheader, user[usernumber].lastname);
		GetDataFromBuffer("age=", " HTTP", buftostoreheader, user[usernumber].age);
		usernumber++;
		if (usernumber >9) usernumber = 0;
		Server_Handle("/page1",Link_ID);
	}

	else if (Look_for("/page2", buftostoreheader) == 1)
	{
		Server_Handle("/page2",Link_ID);
	}

	else if (Look_for("/home", buftostoreheader) == 1)
	{
		Server_Handle("/home",Link_ID);
	}

	else if (Look_for("/favicon.ico", buftostoreheader) == 1);

	else
	{
		Server_Handle("/ ", Link_ID);
	}
}- Server_Start() checks the incoming connection, and look for the request made by the browser. If the request is about page1, or page2, or the home.
- If the request is made for the page1 (submit), it will first store the data entered into the structure (user), and then call the server_handle to handle that request
- if the request is about page2 (View Data) or home, then the server handle is called directly to handle these requests
Server_Handle
void Server_Handle (char *str, int Link_ID)
{
	char datatosend[4096] = {0};
	if (!(strcmp (str, "/page1")))
	{
		sprintf(datatosend, page1);
		Server_Send(datatosend, Link_ID);
	}

	else if (!(strcmp (str, "/page2")))
	{
		char localbuf[2048];
		sprintf(datatosend, page2_Top);
		strcat (datatosend, table);
		int bufsize = (sizeofuser (user));
		for (int i=0; i<bufsize; i++)
		{
			sprintf (localbuf, "<tr><td>%s %s</td>	<td>%s</td></tr>",user[i].firstname,user[i].lastname,user[i].age);
			strcat (datatosend, localbuf);
		}
		strcat (datatosend, "</table>");
		strcat(datatosend, page2_end);
		Server_Send(datatosend, Link_ID);
	}
	else
	{
		sprintf (datatosend, home);
		Server_Send(datatosend, Link_ID);
	}

}- Server_Handle is to handle the requests made by the browser. It sends the required HTML code to the server
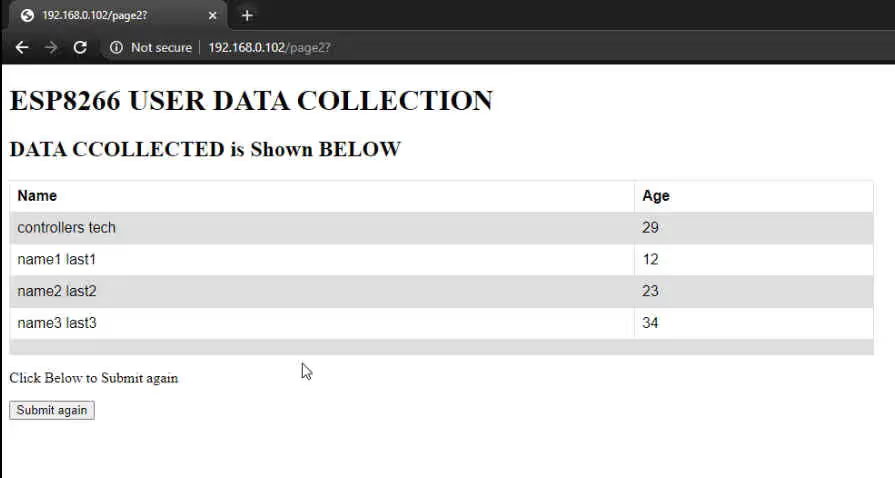
- In order to handle the request for page2 (View Data), it will first format the data from the structure (user) along with some HTML table syntax, and then send this data to the server
- For any other request, it will simply send the respective HTML code (defined in the beginning of ESP_DATA_HANDLER.c file) to the server.
The main function
  /* USER CODE BEGIN 2 */

  ESP_Init("SSID", "PASSWORD", "192.168.0.109");

  /* USER CODE END 2 */

  /* Infinite loop */
  /* USER CODE BEGIN WHILE */
  while (1)
  {
    /* USER CODE END WHILE */

    /* USER CODE BEGIN 3 */
	  Server_Start();
  }
  /* USER CODE END 3 */
}- In the main function, we will simply initialize the ESP with the SSID, PASSWORD, and the IP address that we need to set.
- And call the server_start in the while loop
Result
Below are the pictures for all the three pages


Hi friend, I tring to set this for H7, but nothing around your ring buffer seems to be correct, you place single but all the rest of the code is made for double buffer, buffer1 and buffer2… We need to recraft everyting? thanks.
I noticed that HTML page is located in the microcontroller RAM which consumes a lot if the HTML content is expended. How could locate html page in the Flash and handle different data exchanges between client/server in that case?
Thanks.
Hello sir, could you solve that
Good jobs
Hi; In the Uart_isr functon, the code never enter in this if clause.
“if (((isrflags & USART_ISR_TXE_TXFNF) != RESET) && ((cr1its & USART_CR1_TXEIE_TXFNFIE) != RESET))”
(isrflags & USART_ISR_TXE_TXFNF) != RESET) is always false. What should i do to avoid this? I am using nucleo stm32WL board. And register configurations is in this header file “stm32wl55xx.h” Thanks
Great tutorial, it works for me!:)
I have an additional question: is it possible to create web server this method, but with possibility to access esp web-server anywhere the world? At the moment I can connect from smartphone or PC but only if that devices are connected the same wifi hotspot as ESP module :c
i am unable to donate please check your PAYPAL limit
i am looking into it
hi thanks for your tutorial
i need help can you help me
please design local and offline wireless with 2or 3 nrf module for connect to a 1 nrf and send data for it
Nice.
A few of comments:
thanks for suggestions.
i have already included another uart_isr function for those mcu, which have USART_ISR instead of USART_SR. (see the black highlighted box before result)
I can’t do it in the same code, coz there are a lot of mcu and i am not sure which ones have SR and which have ISR.
I would love to see the timeout feature. I tried implementing it myself. Although it worked but i could experience some data loss when dealing with huge burst of data at very ransom time. Maybe you could contact me on telegram or mail..
I completely forgot about UART_IT_ERR. I guess it’s better if I remove that.