
Home ▸ Uncategorized ▸
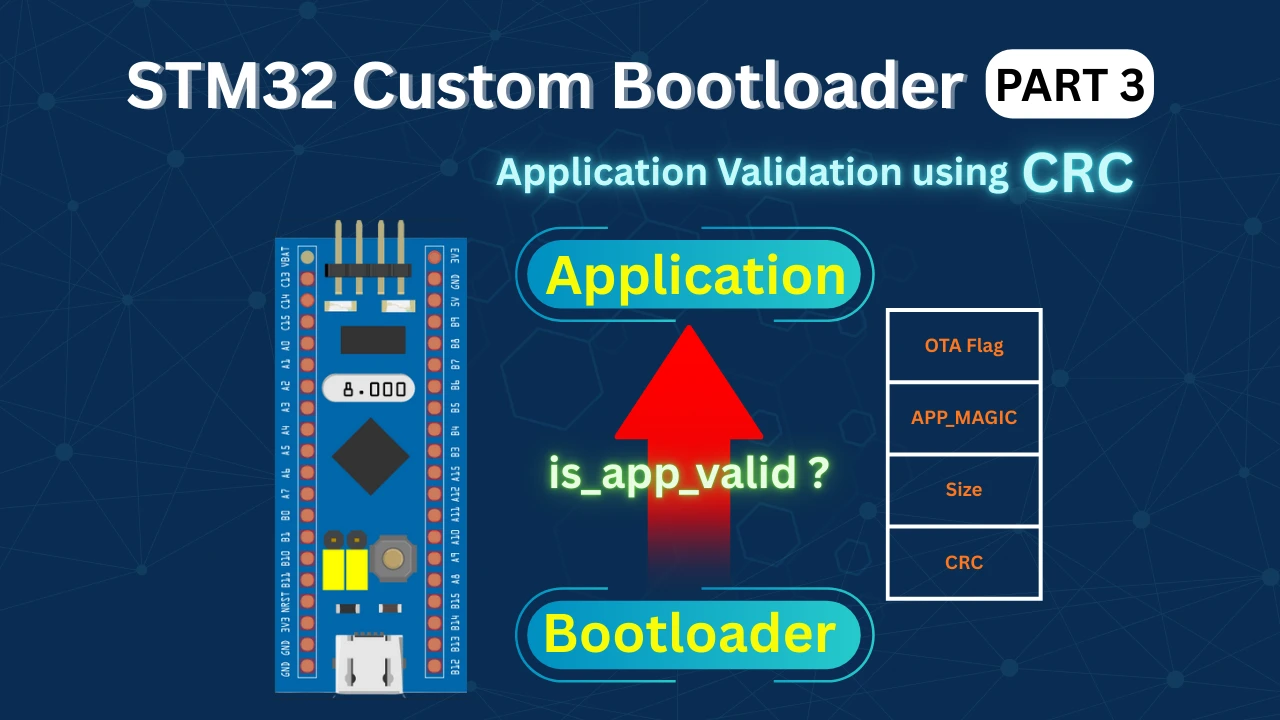
STM32 Custom Bootloader: CRC Based Application Validation
A custom STM32 bootloader must ensure that the application stored in flash memory is safe to run. Without proper validation, a corrupted or incomplete firmware can crash the system or lock the device permanently.
In this tutorial, we implement a strict STM32 bootloader application validation mechanism using CRC32. Along with CRC, we also verify the application size, magic number, and reset handler address before jumping to the application.
This approach is commonly used in secure boot, firmware upgrade, and OTA update systems. The goal is simple: only run the application if it is valid, complete, and not corrupted.
This tutorial continues from the previous tutorial of the STM32 bootloader series and uses the same hardware setup.
Overview of STM32 Bootloader Application Validation
A custom STM32 bootloader must be able to decide whether the application stored in flash memory is safe to run. Basic checks are not always enough, especially when firmware updates or OTA mechanisms are involved.
In this part of the tutorial, we focus on strict application validation. We add stronger checks so the bootloader can detect corrupted or invalid firmware and avoid jumping to it.
Why Application Validation Is Important in STM32 Bootloader
The bootloader always runs first after reset. Its main job is to decide whether it should jump to the application or stay in bootloader mode. If the application image in flash is incomplete or corrupted, jumping to it can crash the system. This can happen due to power loss during flashing, a failed update, or memory corruption.
Application validation protects against these issues. It ensures that the bootloader only executes firmware that is complete, consistent, and verified.
With proper validation in place, the system becomes more reliable and much safer to update in the field.
What We Implement in This Part (Size and CRC Validation)
In this part, we extend the existing bootloader validation logic with two important checks:
- Application size check
- CRC32 based integrity check
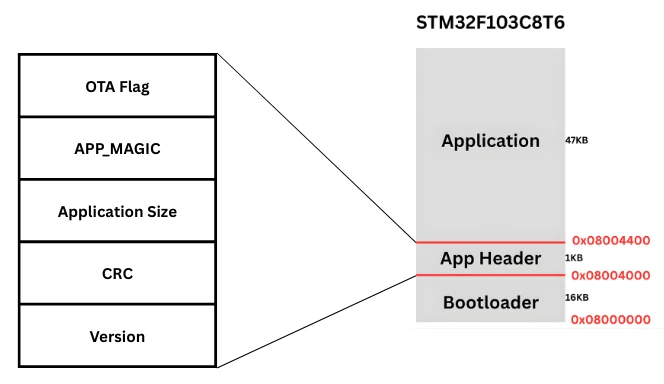
The application stores its size and CRC value inside a dedicated application header. During startup, the bootloader reads this information and validates it.
- First, the bootloader checks whether the application size is within valid limits.
- Then it calculates the CRC over the application image stored in flash.
- If the calculated CRC matches the stored CRC, the application is considered valid.
- If any check fails, the bootloader blocks the jump and reports the error.
These checks form the foundation for secure firmware execution and are essential for future OTA update support.
Application Size and CRC Validation in STM32 Bootloader
We have already covered bootloader_is_app_valid() function in the previous part of this series. Although the function was only checking the APP_MAGIC value along with the Reset Handler. Now we will expand the functionality of this function to check for application size and CRC as well.
Application Size Check
The application size is stored inside the app_hdr structure. The bootloader reads this value and checks whether it falls within valid limits.
The rules are simple:
- The size must not be zero
- The size must not exceed the maximum allowed application size
Below is the code used for the application size check:
/* 3. Size sanity */
if (app_hdr->size == 0 || app_hdr->size > APP_MAX_SIZE)
return 3;Here:
app_hdr->sizeis read from the application headerAPP_MAX_SIZEis defined in the flash layout file- If the size is invalid, the function returns error code 3
This check ensures that the bootloader never reads outside the valid flash region.
CRC32 Based Application Integrity Check
Once the size check passes, the bootloader verifies the integrity of the application image using CRC32. The CRC is calculated over the application image starting from the application start address. The number of bytes processed is exactly the application size stored in the header.
Below is the CRC validation code used in the bootloader:
/* 4. CRC check */
uint32_t calc_crc =
crc32((const uint8_t *)APP_START_ADDR, app_hdr->size);
if (calc_crc != app_hdr->crc)
return 4;Here:
crc32()is a software CRC32 functionAPP_START_ADDRpoints to the application start in flashapp_hdr->crcis the CRC stored in the application header
If the calculated CRC does not match the stored CRC, the function returns error code 4. This check guarantees that the application image has not been modified or corrupted.
Validation Return Codes and Their Meaning
The application validation function returns a specific value depending on the result of each check. This makes error handling clear and predictable.
Below is the complete application validation function:
int bootloader_is_app_valid(void)
{
uint32_t HDR_ADDR = APP_HEADER_ADDR;
const app_header_t *app_hdr = (const app_header_t *)HDR_ADDR;
/* 1. Magic */
if (app_hdr->magic != APP_MAGIC)
return 1;
/* 2. Reset handler sanity */
uint32_t reset_handler = *(uint32_t *)(APP_START_ADDR + 4);
if ((reset_handler & 0xFF000000) != 0x08000000)
return 2;
/* 3. Size sanity */
if (app_hdr->size == 0 || app_hdr->size > APP_MAX_SIZE)
    return 3;
/* 4. CRC check */
uint32_t calc_crc =
    crc32((const uint8_t *)APP_START_ADDR, app_hdr->size);

if (calc_crc != app_hdr->crc)
    return 4;
return 0; // VALID
}Each return value has a clear meaning:
0: Application is valid1: Magic number error2: Reset handler address error3: Application size error4: CRC mismatch error
These return codes are later used by the bootloader to print logs and control LEDs.
Bootloader Main Flow and Error Handling in main()
Once the application validation logic is ready, the next step is to handle its result inside the bootloader main function. This is where the bootloader decides whether to jump to the application or stay in the bootloader and report the error.
Calling the Application Validation Function
Inside the bootloader main() function, the application validity check is called after basic initialization.
Below is the code used to invoke the validation function:
HAL_UART_Transmit(&huart1, (uint8_t *)"Inside Bootloader!!\r\n", 21, 100);

int err = bootloader_is_app_valid();At this point:
- The bootloader is running
- UART is initialized
- The validation function returns an error code based on the checks
Handling Validation Errors in Bootloader Main
If the validation function returns a non-zero value, it means the application is invalid. The bootloader then prints a clear error message based on the error code.
Below is the complete error handling logic inside main():
if (err != 0)
{
    HAL_UART_Transmit(&huart1, (uint8_t *)"Failed to Jump!! ", 17, 100);

    switch (err)
    {
    case 1:
        HAL_UART_Transmit(&huart1, (uint8_t *)"MAGIC ERROR!!\r\n", 15, 100);
        break;

    case 2:
        HAL_UART_Transmit(&huart1, (uint8_t *)"RESET ERROR!!\r\n", 15, 100);
        break;

    case 3:
        HAL_UART_Transmit(&huart1, (uint8_t *)"SIZE ERROR!!\r\n", 14, 100);
        break;

    case 4:
        HAL_UART_Transmit(&huart1, (uint8_t *)"CRC ERROR!!\r\n", 13, 100);
        break;

    default:
        HAL_UART_Transmit(&huart1, (uint8_t *)"ERROR!!\r\n", 9, 100);
        break;
    }

    while (1)
    {
        HAL_GPIO_TogglePin(GPIOA, GPIO_PIN_4);
        HAL_Delay(100);
    }
}Each error code results in:
- A clear UART log message
- The bootloader blocking the jump
- The red LED blinking continuously
This makes it very easy to identify exactly why the application failed validation.
Jumping to the Application on Success
If the validation function returns 0, it means all checks passed. In this case, the bootloader directly jumps to the application.
JumpToApplication();No error logs are printed. The bootloader hands over control to the application safely.
Post-Build Process to Generate CRC-Ready Application Binary
At this point, the bootloader is fully ready. All validation checks are in place, and the bootloader knows how to verify the application size and CRC.
Now we move to the application project. We do not need to modify anything in the application code. Our goal is to generate an application binary that can be used for correct CRC calculation.
For this to work, the application header must be excluded from the CRC calculation. This section explains how we achieve that using a post-build step.
Why the Application Header Must Be Removed
The application header is placed in a dedicated flash section. It contains metadata such as magic number, size, CRC, and version.
This header is not part of the actual application code. It is only used by the bootloader for validation.
If we include the header while calculating CRC:
- The CRC value will change every time the header is updated
- The bootloader CRC check will fail
- Application validation will break
For this reason, the CRC must be calculated only on the actual application image, excluding the header section. That is why we need a separate binary file that does not contain the application header.
Post-Build Command to Remove Header Section
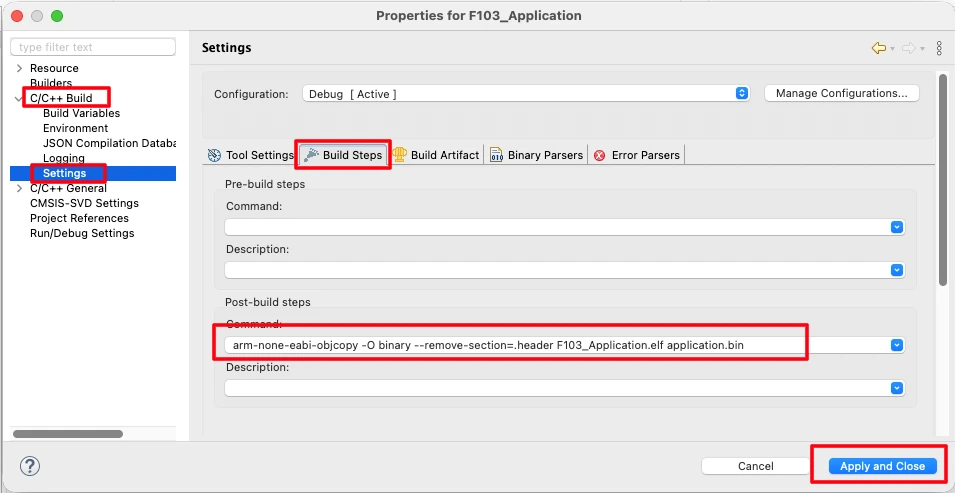
We generate a clean application binary using a post-build command. This command converts the ELF file to a binary file and removes the header section.
Below is the post-build command used in the application project:
arm-none-eabi-objcopy -O binary --remove-section=.header F103_Application.elf application.binHere:
arm-none-eabi-objcopyconverts ELF to binary--remove-section=.headerremoves the application headerF103_Application.elfis the application ELF fileapplication.binis the generated output binary
This command must be added in the Post-Build Steps of the application project in STM32CubeIDE. It is shown in the image below.
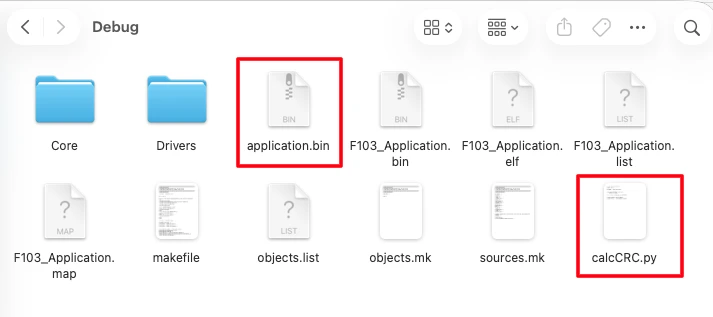
Verifying the Generated Application Binary
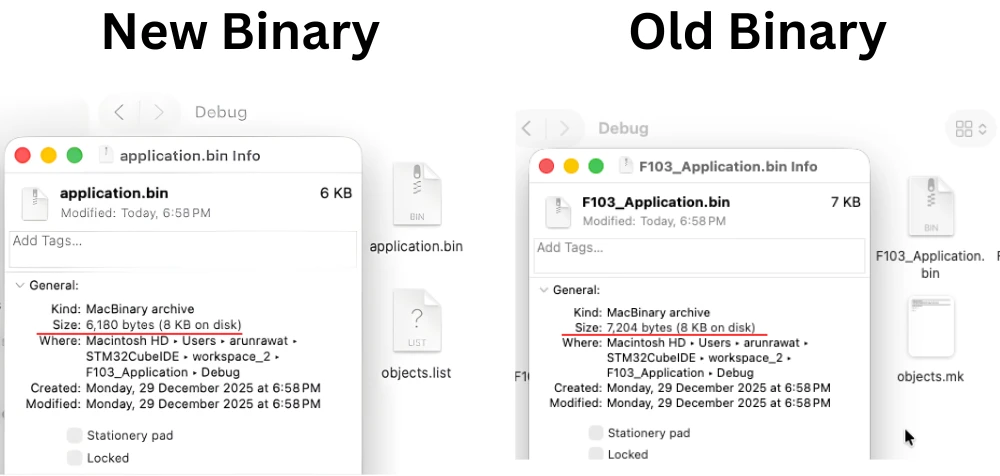
After saving the build settings, rebuild the application project. A new binary file is generated inside the Debug folder.
This binary:
- Contains only the application code
- Does not include the header section
- Can be safely used for CRC calculation
The image below shows the newly generated application binary file inside the Debug folder. The file size is smaller than the original binary, confirming that the application header has been removed.
This CRC-ready binary is now used in the next step to generate the application size and CRC value using a Python script.
Generating Application CRC and Size Using Python Script
Once the CRC-ready application binary is generated, the next step is to calculate the application CRC and application size. These values are generated on the PC side and then stored inside the application header.
The bootloader later reads these values and uses them to validate the application before execution.
calcCRC.py Script Overview
To calculate the CRC and size, we use a simple Python script called calcCRC.py.
This script:
- Reads the application binary file
- Calculates CRC32 using a standard algorithm
- Prints the CRC value and application size
Since the CRC must be calculated on the binary without the header, this script is run on the clean application binary generated in the previous step.
Generating CRC32 and Application Size
First, copy the calcCRC.py script into the Debug folder of the application project. This is the same folder where the new application binary file is generated. Placing the script here makes it easy to access the binary file.
Now open a terminal inside the Debug folder and run the script. Make sure Python is installed on your system before running it.
When the script runs, it reads the application binary and prints:
- The CRC32 value
- The application size in bytes
The image below shows the terminal output displaying the calculated CRC and application size.

These values will be used in the next step.
Updating the Application Header Values
Once the CRC and size are generated, copy these values and update them in the application header structure. The application header is defined inside the application code and stored in a dedicated flash section.
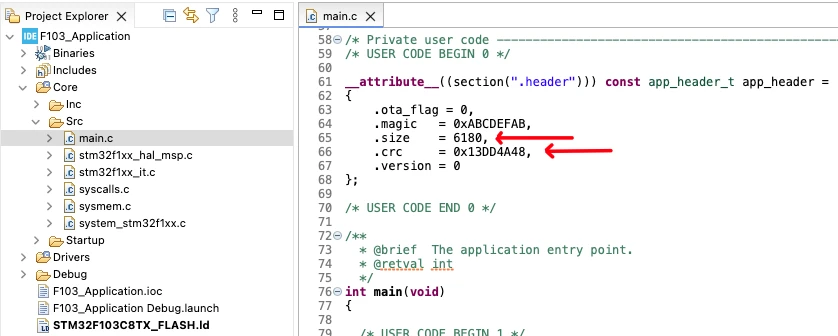
Only the header values are updated at this stage. The application binary used for CRC calculation remains unchanged.
After updating the header values, rebuild the application project. Since the header section is excluded from CRC calculation, the CRC value does not change after rebuilding. These updated header values allow the bootloader to correctly validate the application during startup.
Testing CRC Based Application Validation on STM32
In this section we will verify both valid and invalid application cases and observe how the bootloader behaves in each scenario. This confirms that the validation logic works correctly before jumping to the application.
Successful Application Validation and Jump
First, flash both the bootloader and the application to the STM32 device.
- Flash the bootloader to the start of flash memory (
0x08000000). - Flash the application (application.bin) at the application start address (
0x0800C000)
Once flashing is complete, reset the board. If the application header values are correct:
- Magic number is valid
- Application size is within range
- CRC matches the calculated value
The bootloader prints a success message on UART and jumps to the application. The application then starts executing normally.
Output
The image below shows the UART log where the bootloader successfully validates the application and jumps to it.
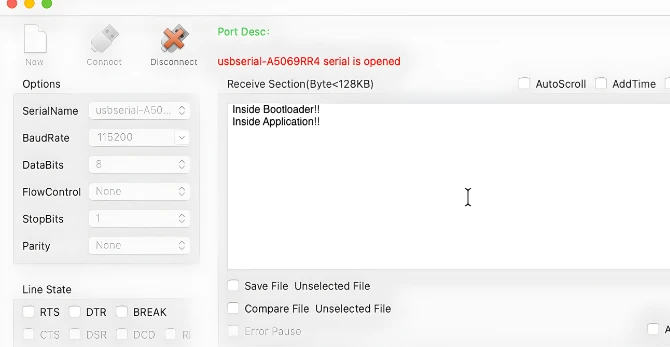
You can clearly see the bootloader messages followed by application output.
Simulating CRC Failure and Observing Bootloader Response
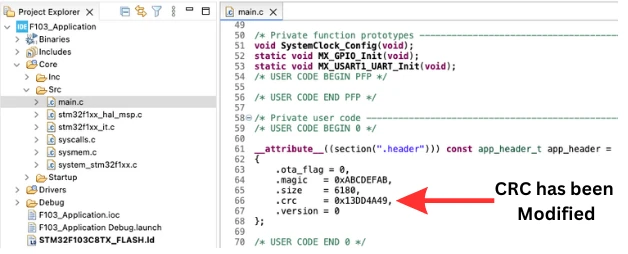
To test failure handling, intentionally create a CRC mismatch. To do this, we will modify the CRC value stored in the app_header.
Build and flash the application project again. Now reset the board.
Since the calculated CRC no longer matches the stored CRC:
- The bootloader detects a CRC error
- The application jump is blocked
- An error message is printed on UART
The bootloader stays active and indicates the error, usually by LED blinking or debug logs.
Output
The image below shows the UART output where the bootloader detects a CRC error and refuses to jump to the application.
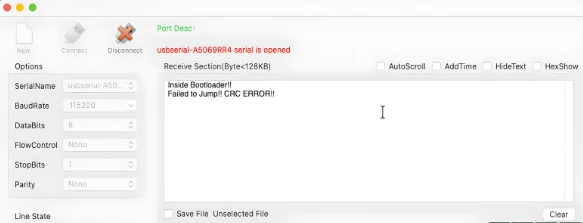
This confirms that CRC based application validation is working as expected.
Video Tutorial
STM32 Custom Bootloader – Application Size and CRC Validation (Video Tutorial)
Prefer video learning? Watch this tutorial where we implement strict application validation in a custom STM32 bootloader. This video explains how the application stores its size and CRC inside a dedicated header section and how the bootloader validates these values before jumping to the application. You will also learn how to generate a CRC-ready application binary using post-build steps and why excluding the application header from CRC calculation is critical for reliable validation.
Watch the STM32 Bootloader Validation VideoConclusion
In this tutorial, we successfully implemented strict application validation in a custom STM32 bootloader. The bootloader now verifies the application size and CRC32 integrity before jumping to the application. These checks ensure that only complete and uncorrupted firmware is executed, improving the reliability and safety of the system.
We also covered the post-build process to generate a CRC-ready application binary, the Python script to calculate CRC and size, and how to update the application header. Finally, we tested the system on actual hardware, showing both successful jumps and error handling when the CRC check fails. This gives a complete, end-to-end understanding of how the bootloader enforces application integrity.
In the next part of this series, we will implement the OTA flag in the bootloader. The bootloader will check this flag during startup and decide whether to flash a new OTA image or jump to the application. This will be an essential step toward over-the-air firmware updates and advanced bootloader functionality for production-ready STM32 projects.
Browse More STM32 Tutorials
STM32 Flash Programming: Erase, Write & Read (Page-& Sector-Based)

Getting started with Riverdi STM32 Embedded Display

Modbus #4. STM32 as Slave || Read Holding and Input Registers

W25Q Flash Series Part 5 – how to update sectors

STM32 Ethernet PART 12 – HTTP Server using AJAX PART2
STM32 Communication using HC-05

TouchGFX#4. Sending data from another task || Gauge || Animation
STM32 Bootloader Project Download
STM32 Bootloader Validation FAQs
Subscribe
Login
0 Comments
Newest