Custom characters in LCD 1602 || STM32
I have already covered how to interface LCD 1602 using the I2C, and using simply the parallel connection. This is yet another tutorial covering the LCD 16×2, but this time we will see how to use custom characters with this display.
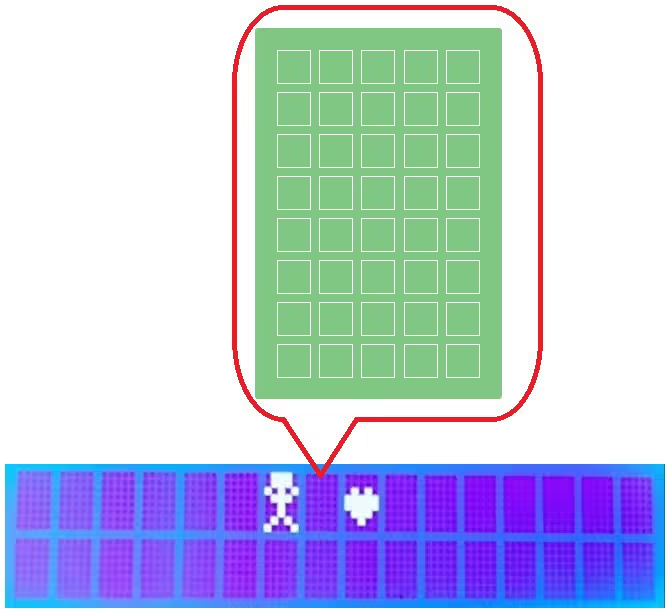
The LCD 1602 have 16 blocks of 40 pixels each. These 40 pixels are divided into 5 columns and 8 rows, and we will use these 5 columns and 8 rows to draw a 5×8 custom character.
As per the LCD 1602 datasheet, the IC contains the Character Generator ROM (CGROM) and Character Generator RAM (CGRAM).
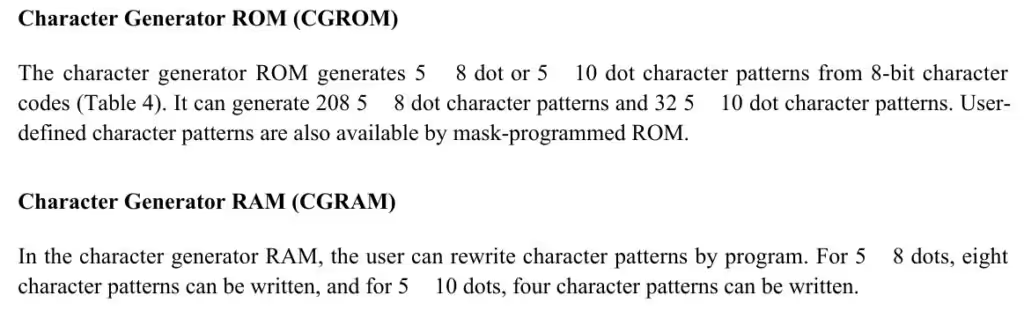
The CGROM is where the characters patterns are predefined and each character have fixed address associated with it, which helps us access these characters. Basically all the ascii characters we use in the LCD are defined here in the CGROM. This is shown below in the figure 3.
The CGRAM is where the user can save the custom character patterns. In total we can store up to 8 patterns of 5×8 dots. We can later access these characters by calling the address of the corresponding character. The CGRAM addresses for custom characters are shown blown in figure 3.
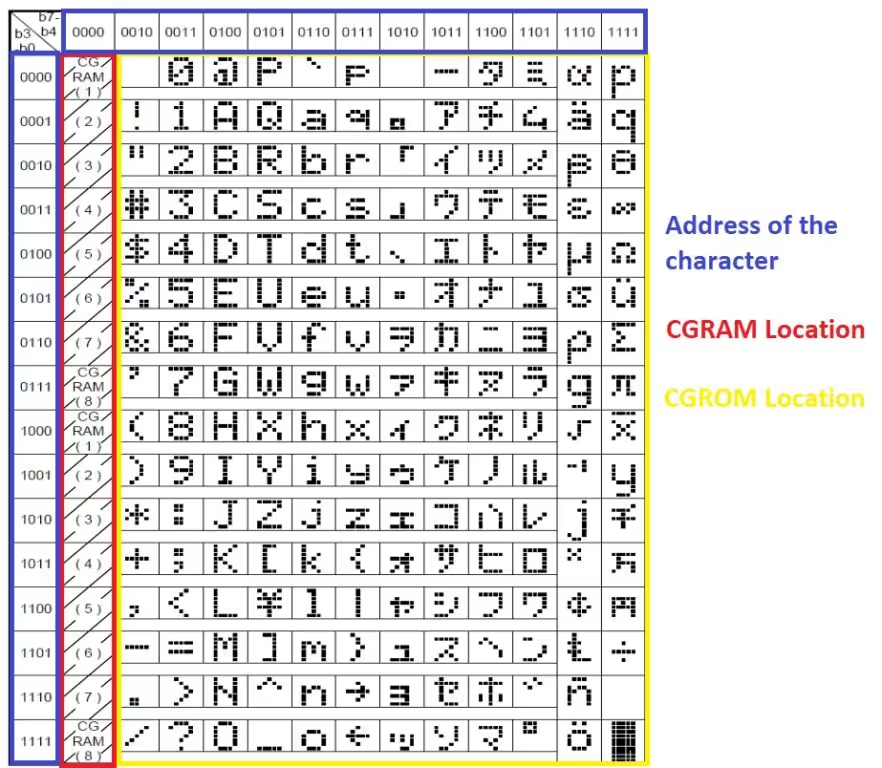
- As shown in the figure above, the red box is the location of the CGRAM. There are totally 8 bytes (CGRAM1 – CGRAM8).
- The yellow box represents the location of the CGROM
- The blue box represents the address of these locations.
We will first display the character in the CGROM and then create the custom characters, store them in the CGRAM and display them.
VIDEO TUTORIAL
You can check the video to see the complete explanation and working of this project.
How to Display CGROM Characters
Here we will display some characters from the CGROM by using the address associated with them.

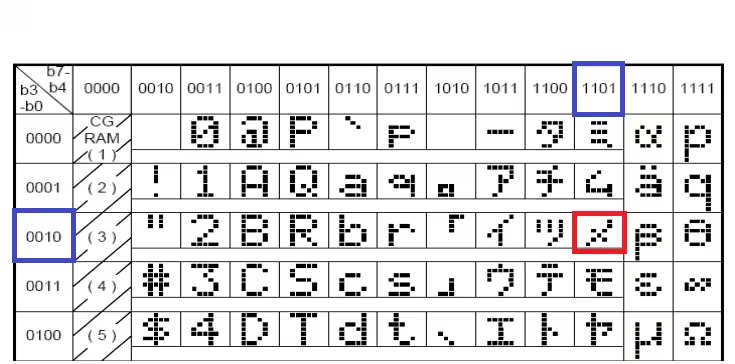
Here I am going to display 2 characters from the CGROM. The address of the ‘ALPHA‘ is 1110 0000 i.e. 0xE0. Similarly the address of the second one is 1101 0010 i.e. 0xD2.
lcd_init ();
lcd_put_cur(0, 0);
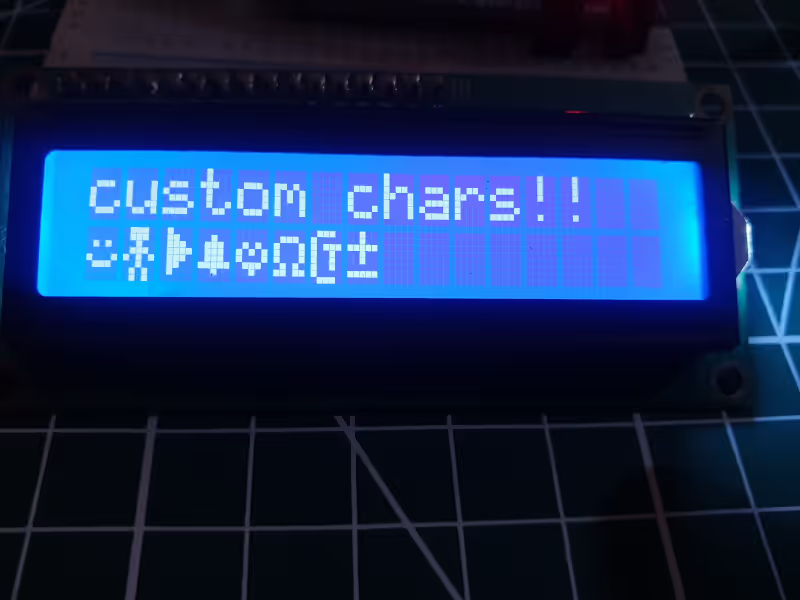
lcd_send_string("custom chars!!");
lcd_put_cur(1, 5);
lcd_send_data(0xE0);
lcd_put_cur(1, 7);
lcd_send_data(0xD2);- First of all we will initialize the LCD.
- Then display “Custom chars!!” in the top row of the LCD.
- Then we will put the cursor in the bottom row fifth column, and send the address of the ‘ALPHA’ character, 0xE0.
- Put the cursor in the 7th column and send the address of the second character, 0xD2.
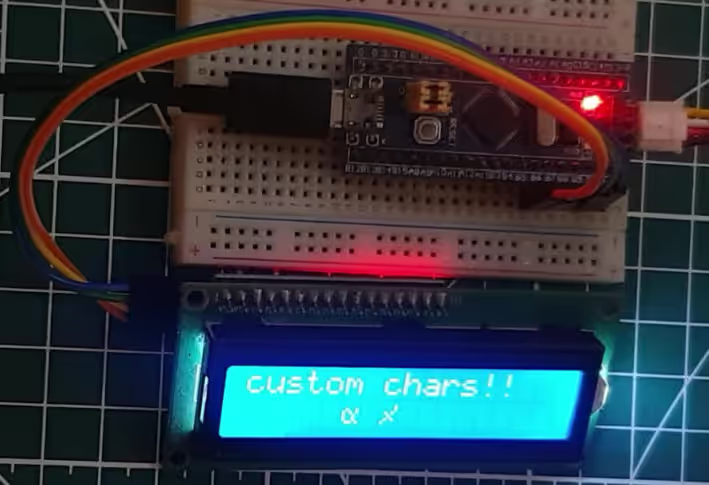
As you can see in the picture above, the characters are being displayed in the second row of the LCD. So we can simply use the characters available in the CGROM by using the address corresponding to each character.
Create Custom characters
So we can store 8 characters of the size 5×8 in the CGRAM. We will start with creating a custom character first.
Let’s say I want to create a smiley face. The 5×8 matrix for the same is shown below
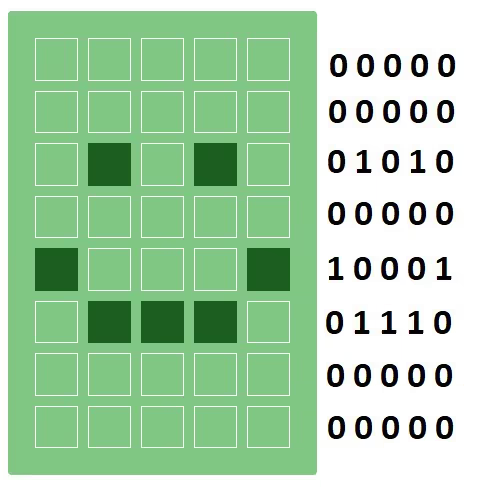
There are some websites which allows you to create these characters, or you can do it yourself also. the process is very simple, you just need to put a ‘1’ wherever the pixel is turned on.
The 5 columns are the 5 least significant bits of the byte we store in the CGRAM. The codes for the smiley character are shown below in the hexadecimal format.
char cc1[] = {0x00, 0x00, 0x0A, 0x00, 0x11, 0x0E, 0x00, 0x00}; // smileyAs the CGRAM is capable of storing 8 different characters, we can store another 7 characters. I have created them and they are shown below.
char cc1[] = {0x00, 0x00, 0x0A, 0x00, 0x11, 0x0E, 0x00, 0x00};  // smiley
char cc2[] = {0x0E, 0x0E, 0x04, 0x0E, 0x15, 0x04, 0x0A, 0x0A};  // Robo
char cc3[] = {0x08, 0x0C, 0x0E, 0x0F, 0x0E, 0x0C, 0x08, 0x00};  // arrow
char cc4[] = {0x00, 0x04, 0x0E, 0x0E, 0x0E, 0x1F, 0x04, 0x00};  // bell
char cc5[] = {0x00, 0x00, 0x0A, 0x15, 0x11, 0x0E, 0x04, 0x00};  // Heart
char cc6[] = {0x00, 0x0E, 0x11, 0x11, 0x11, 0x0A, 0x1B, 0x00};  // omega
char cc7[] = {0x0E, 0x10, 0x17, 0x12, 0x12, 0x12, 0x10, 0x0E};  // CT
char cc8[] = {0x04, 0x04, 0x1F, 0x04, 0x04, 0x00, 0x1F, 0x00}; // +-After defining the codes for the characters, we need to store these characters in the CGRAM.
As per the datasheet, the CGRAM address starts from 0x40
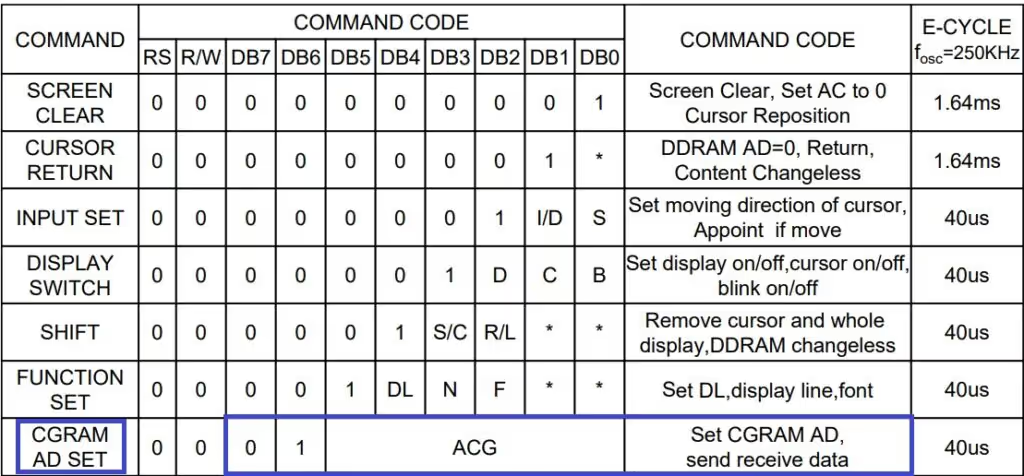
In order to store the character into the CGRAM, we need to write the character code as the data to the CGRAM.
  // store the chars into the CGRAM
  lcd_send_cmd(0x40);
for (int i=0; i<8; i++) lcd_send_data(cc1[i]);In the above code, I am writing the cc1 array (smiley) to the CGRAM1 (0x40).
Since each character takes 8 bytes, the next character can be stored at an offset of 8 bytes in the CGRAM, i.e. 0x48. Similarly we will store the characters keeping an offset of 8 bytes after each character.
  // store the chars into the CGRAM
  lcd_send_cmd(0x40);
  for (int i=0; i<8; i++) lcd_send_data(cc1[i]);
lcd_send_cmd(0x40+8);
for (int i=0; i<8; i++) lcd_send_data(cc2[i]);
lcd_send_cmd(0x40+16);
for (int i=0; i<8; i++) lcd_send_data(cc3[i]);
lcd_send_cmd(0x40+24);
for (int i=0; i<8; i++) lcd_send_data(cc4[i]);
lcd_send_cmd(0x40+32);
for (int i=0; i<8; i++) lcd_send_data(cc5[i]);
lcd_send_cmd(0x40+40);
for (int i=0; i<8; i++) lcd_send_data(cc6[i]);
lcd_send_cmd(0x40+48);
for (int i=0; i<8; i++) lcd_send_data(cc7[i]);
lcd_send_cmd(0x40+56);
for (int i=0; i<8; i++) lcd_send_data(cc8[i]);Alright the characters are stored in the CGRAM and now we can call them anywhere on our display. The example for the same is shown below
  lcd_put_cur(1, 0);
  lcd_send_data(0);  // at 0x40 (smiley)

  lcd_put_cur(1, 2);
  lcd_send_data('R');
  lcd_send_data(1);  // at 0x40+8 (Robo)

  lcd_put_cur(1, 5);
  lcd_send_data(7);  // at 0x40+56 (+-)
lcd_send_data('9');lcd_send_data (0) will display the ‘smiley’ character. Here 0 is the address of the CGRAM1 (0x40). This is shown in the picture below.
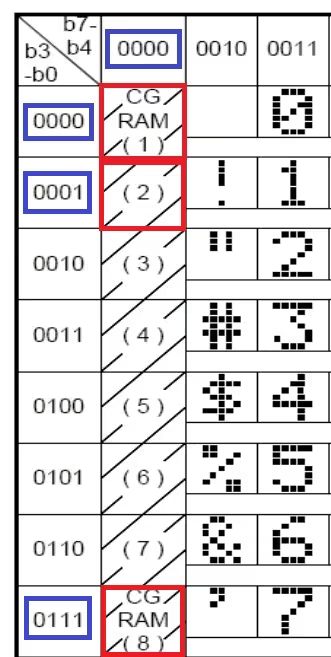
- As shown in the picture, the address of the CGRAM(1) is 0000 0000 i.e. 0
- The CGRAM address for this location is 0x40, and we have the ‘smiley’ character stored here.
- The address of the CGRAM(2) is 0000 0001, i.e. 0x01.
- The CGRAM address for this location is 0x48, and we have the ‘Robo’ character stored here.
- The address of the CGRAM(8) is 0000 0111 i.e. 0x07
- The CGRAM address for this location is 0x56, and we have the ‘+ -‘ character stored here.
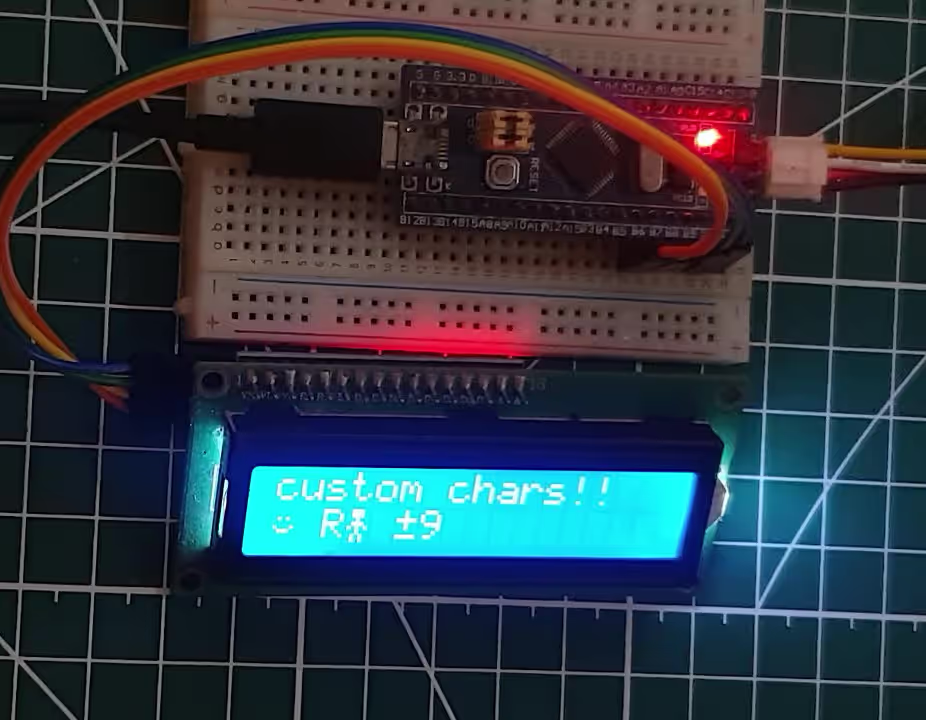
As shown in the picture above, the characters are being displayed in the respective locations.
We can display all the characters together, as mentioned below.
  lcd_put_cur(1, 0);
for (int i=0; i<8; i++) lcd_send_data(i);Here I am sending the CGRAM address from 0 to 7. The result is shown below.