How to Configure UDP Server
This is second tutorial in the STM32 ETHERNET Series, ands today we will see how to create UDP Server using STM32.
UDP is the simplest protocol, and this is why I am starting with it.
This tutorial will simply cover the UDP SERVER mode, the next one will cover UDP Client mode, and similarly we will move to TCP, and then later with HTTP.
VIDEO TUTORIAL
You can check the video to see the complete explanation and working of this project.
Check out the Video Below
Some Insight into the CODE
The cube MX Setup is same as that in the previous tutorial. Now let’s see some code.
Initialize the UDP SERVER
void udpServer_init(void)
{
	// UDP Control Block structure
   struct udp_pcb *upcb;
   err_t err;

   /* 1. Create a new UDP control block  */
   upcb = udp_new();

   /* 2. Bind the upcb to the local port */
   ip_addr_t myIPADDR;
   IP_ADDR4(&myIPADDR, 192, 168, 0, 111);

   err = udp_bind(upcb, &myIPADDR, 7);  // 7 is the server UDP port


   /* 3. Set a receive callback for the upcb */
   if(err == ERR_OK)
   {
	   udp_recv(upcb, udp_receive_callback, NULL);
   }
   else
   {
	   udp_remove(upcb);
   }
}To initialize the UDP Server, the following steps are taken
- Create a new UDP control block using
udp_new. - Bind the block to the local IP address and Port
- To do this we will first convert the IP address to the integer form
- Then we will use the local IP address to bind the control block using the function
udp_bind. - Once the bind is complete, the server will wait for the client to send the data.
- To do this, we can set a callback (udp_recv), which will be called whenever the server will receive the data from the client.
- Once the data is received, we can process the data, and send some reply to the client.
The Receive Callback
void udp_receive_callback(void *arg, struct udp_pcb *upcb, struct pbuf *p, const ip_addr_t *addr, u16_t port)
{
	struct pbuf *txBuf;

	/* Get the IP of the Client */
	char *remoteIP = ipaddr_ntoa(addr);

	char buf[100];


	int len = sprintf (buf,"Hello %s From UDP SERVER\n", (char*)p->payload);

	/* allocate pbuf from RAM*/
	txBuf = pbuf_alloc(PBUF_TRANSPORT,len, PBUF_RAM);

	/* copy the data into the buffer  */
	pbuf_take(txBuf, buf, len);

	/* Connect to the remote client */
	udp_connect(upcb, addr, port);

	/* Send a Reply to the Client */
	udp_send(upcb, txBuf);

	/* free the UDP connection, so we can accept new clients */
	udp_disconnect(upcb);

	/* Free the p_tx buffer */
	pbuf_free(txBuf);

	/* Free the p buffer */
	pbuf_free(p);
}The receive callback is called, when the server receives some data from the client. The following shows a way to handle this data.
- First of all I am creating a new Packet Buffer (txBuf), which will be used to send the data.
char *remoteIP = ipaddr_ntoa(addr);converts the IP address from integer format to the regular IP format.- This is just in case if we want to utilize the address and port of the client.
- Next I am mixing the incoming data with some additional data.
- To send this new data to the client, first we need to allocate some memory for the packet buffer.
- This can be done with
pbuf_alloc. - Then we will copy the data into the packet buffer using
pbuf_take.
- Next we will connect to the client.
- This can be done by using
udp_connect. The parameters, address and port of the client, are the part of the function, where udp_connect is being called. - Then we send the data using the
udp_send(upcb, txBuf); - Here upcb is the control block which have all the information about the local and remote connection.
- txBuf is the packet buffer, and it have all the information about the data.
- Once the data is sent, we will disconnect the client, so that a new client can connect.
- And in the end we will free all the memories.
The main code
/* USER CODE BEGIN 0 */

struct netif gnetif;

/* USER CODE END 0 */

int main(void)
{

  MPU_Config();

  /* Enable I-Cache---------------------------------------------------------*/
  SCB_EnableICache();

  /* Enable D-Cache---------------------------------------------------------*/
  SCB_EnableDCache();

  HAL_Init();

  /* Configure the system clock */
  SystemClock_Config();

  /* Initialize all configured peripherals */
  MX_GPIO_Init();
  MX_LWIP_Init();
  /* USER CODE BEGIN 2 */

  udpServer_init ();

  /* USER CODE END 2 */

  /* Infinite loop */
  /* USER CODE BEGIN WHILE */
  while (1)
  {
    /* USER CODE END WHILE */

    /* USER CODE BEGIN 3 */

	  ethernetif_input(&gnetif);
	  sys_check_timeouts();
  }
  /* USER CODE END 3 */
}- Here everything is similar to the previous tutorial, except that we will also call the
uspServer_init ()function. - ethernetif_input basically handles all the incoming requests.
- It calls the appropriate low level function, based on what protocol is being used.
- So we can just use the same code in the TCP also.
Result
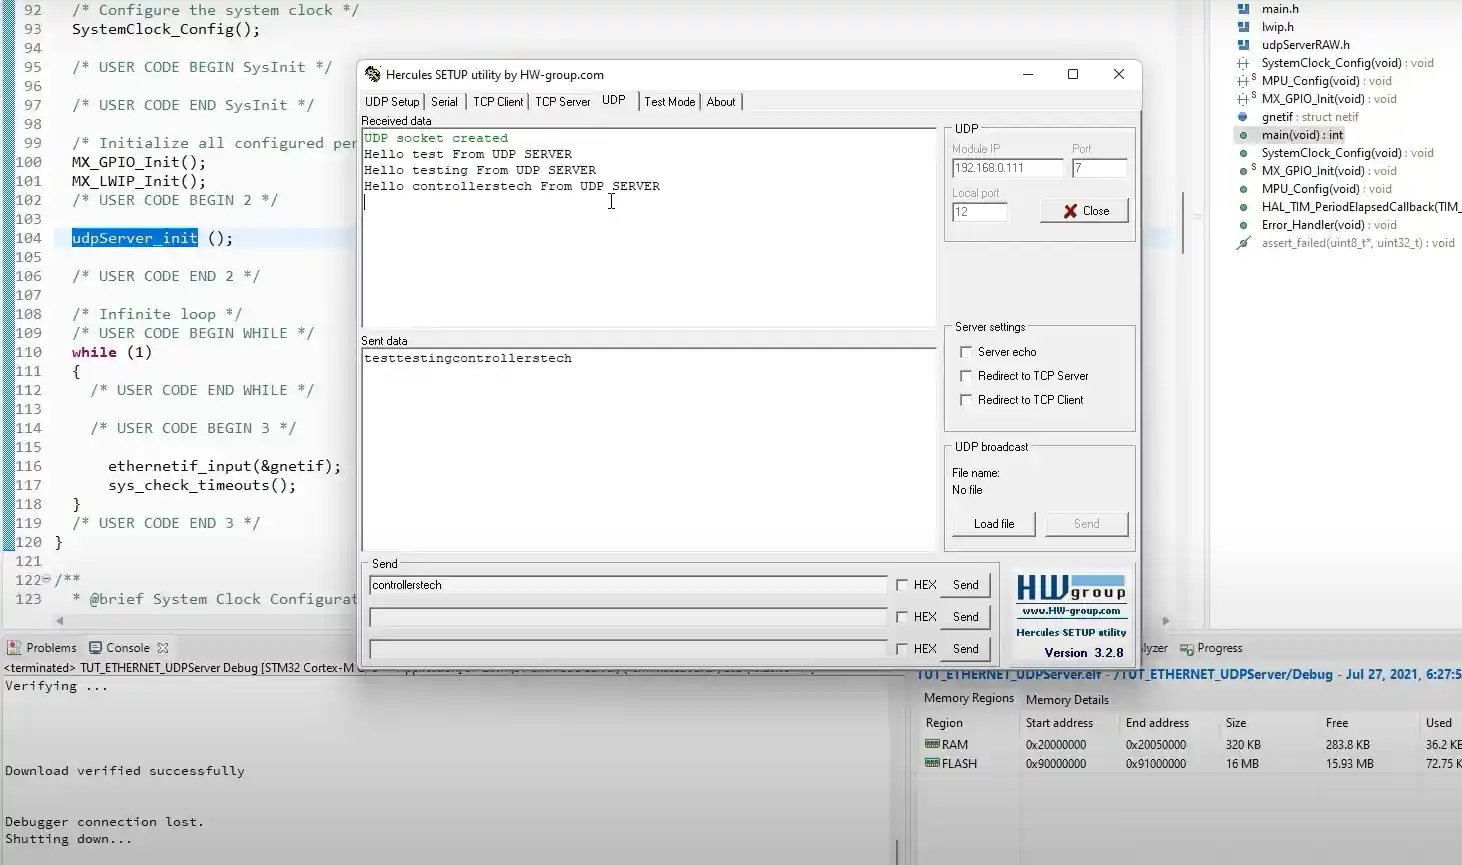
You can see above, the data sent and received by the client.
Next Tutorials in the STM32 Ethernet Series
STM32 Ethernet PART 3 – How to Configure UDP Client
STM32 Ethernet PART 4 – How to Configure TCP Server
STM32 Ethernet PART 5 – How to Configure TCP Client
STM32 Ethernet PART 6 – How to Configure Simple HTTP Webserver
STM32 Ethernet PART 6.1 – Configure HTTP Webserver using SSI
STM32 Ethernet PART 6.2 – Configure HTTP Webserver using CGI
STM32 Ethernet PART 7 – UDP Server using LWIP NETCONN (RTOS)
Info
You can help with the development by DONATING Below.
To download the project, click the DOWNLOAD button.






used the example you showed in the video, works fine, but when I ping to the stm32, only 50% or 25% ping succeeds, otherwise telling I get 50% loss of ping.
I am working with a team and we are all connected over a switch and if some one sends every 0.01 sec a packet of 32 Byte, then my board will be busy receiving this packts and then ignore it, but my Ping will be lost and i cant communicate with my board, any solutions??
if no one sending packets over the switch, then i can ping the board
hi, i want to send 1600 byte array (array[1600]) with udp from mcu to pc(server).can any one help me????
Thanks mate, greatly appreciate these ethernet guides!
The tutorials are really great. Keep doing this good job and sharing knowledge.