
Home ▸ Uncategorized ▸
Published: March 13, 2026
Last Updated: March 13, 2026
Last Updated: March 13, 2026
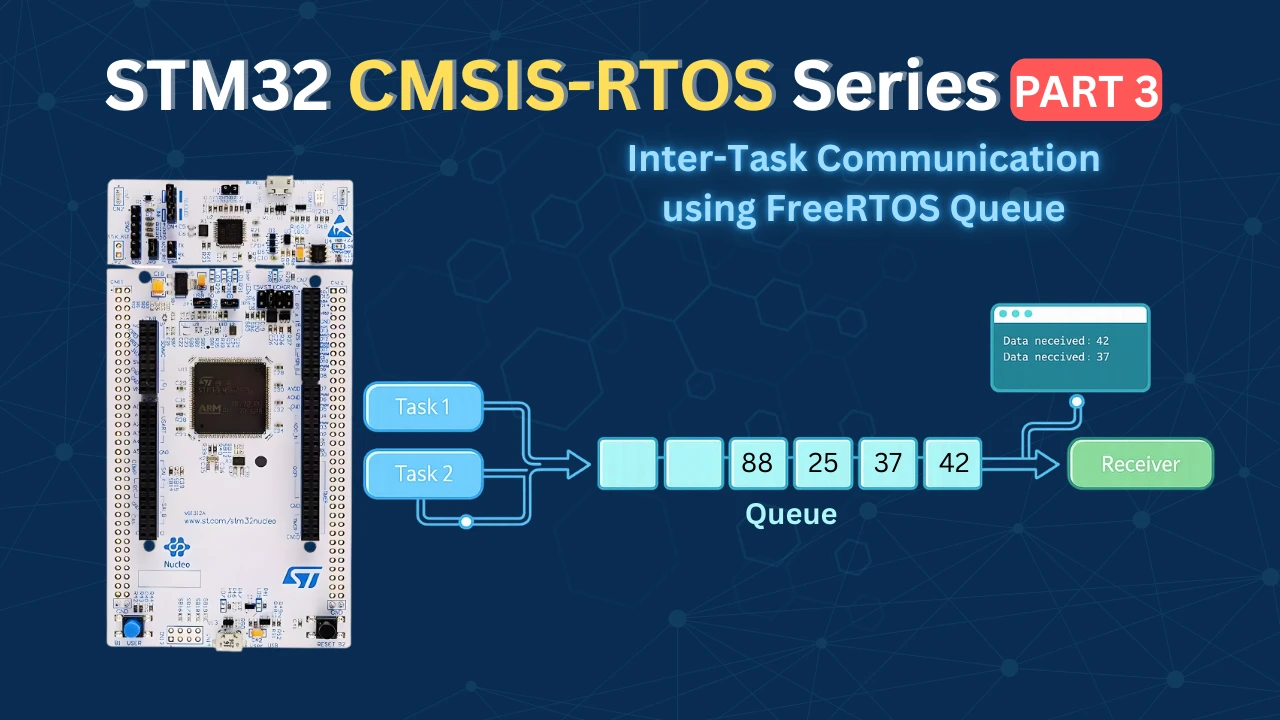
STM32 FreeRTOS Queue: How to Send Data Between Tasks Using CMSIS-OS
In the previous tutorial, we looked at how to create multiple FreeRTOS tasks with different priorities on STM32. Now that we have tasks running in parallel, the next challenge is getting them to talk to each other.
We can do this using global variables. It seems simple — just declare a variable, let one task write to it, and let another task read it. But this approach breaks down fast in a multi-task environment, and it can cause subtle bugs that are very hard to track down.
In this tutorial, we will use FreeRTOS queues — the proper way to pass data between tasks. We will create two sender tasks and one receiver task. Both senders will write data into a shared structure and push it into a queue. The receiver will read from that queue and print the output through UART using printf.
We are working on the STM32L496 Nucleo board, but the same steps apply to any STM32 board running FreeRTOS with CMSIS-OS v2.
Why Global Variables Fail in FreeRTOS (Race Conditions Explained)
Before we jump into queues, we need to understand why the simpler approach (using global variables) is a bad idea in FreeRTOS. Let’s look at what actually goes wrong.
What Is a Race Condition?
A race condition happens when two or more tasks try to access the same data at the same time, and the final result depends on which task runs first. In a FreeRTOS system, the scheduler can switch between tasks at almost any point. This means you can never be sure which task is running at any given moment.
Say we have a structure like this:
typedef struct {
    uint8_t  eventID;
    uint32_t timestamp;
} Message_t;

Message_t sharedData;Task 1 starts writing to it:
sharedData.eventID   = 1;
sharedData.timestamp = HAL_GetTick();But right in the middle of that write (after setting eventID but before setting timestamp) the scheduler switches to Task 2. Task 2 then overwrites the same structure with its own data:
sharedData.eventID = 2;
sharedData.timestamp = HAL_GetTick();Now when the consumer task reads sharedData, it gets a mix of values — eventID from Task 2, but maybe timestamp still half-written from Task 1. The data is corrupted, and you will likely never see a clear error. The system just behaves incorrectly.
The gif below shows how this race condition plays out step by step:
Why You Should Never Use Global Variables for Task Communication
The problem with global variables is that FreeRTOS tasks run concurrently. There is no built-in protection when multiple tasks access a global variable at the same time. Any task can read or write it at any moment.
Here is what that looks like in practice:
// Task 1
void Task1(void *argument) {
for (;;) {
sharedData.eventID   = 1;
sharedData.timestamp = HAL_GetTick();
osDelay(100);
}
}
// Task 2
void Task2(void *argument) {
for (;;) {
sharedData.eventID = 2;
sharedData.timestamp = HAL_GetTick() / 1000;
osDelay(1000);
}
}
// Consumer Task
void ConsumerTask(void *argument) {
for (;;) {
printf("ID: %d, Time: %lu\n",
sharedData.eventID,
sharedData.timestamp);
osDelay(500);
}
}This looks harmless. But consider what happens when all three tasks are running:
- Task 1 and Task 2 are both writing to
sharedData - The consumer task is reading from it at the same time
- The scheduler decides when each task runs
The result is that the consumer task will sometimes read data that belongs to Task 1, sometimes Task 2, and sometimes a corrupted mix of both. The behavior is unpredictable and changes every time you run the program.
Making the variable volatile does not fix this. volatile only tells the compiler not to cache the variable — it does nothing to prevent two tasks from accessing it at the same time.
The only real solution is to use a communication mechanism that is designed for multi-task environments. In FreeRTOS, that mechanism is the queue. A queue ensures that each message is written and read atomically, so there is no risk of one task corrupting another task’s data.
What Is a FreeRTOS Queue and How Does It Work?
Now that we understand the problem with global variables, let’s look at the solution. FreeRTOS queues are built specifically for passing data between tasks safely. They handle all the timing and access issues internally, so we do not have to worry about race conditions.
Queue as a Message Buffer
Think of a queue as a small buffer that sits between your tasks. One task writes a message into it, and another task reads that message out. The queue handles everything in between — safely and in order.
In our example, we will configure the queue to hold 10 elements. You can imagine it as 10 slots, where each slot stores one complete message.
The image below shows how Task 1 and Task 2 push messages into the queue, and the receiver task reads from the other end:
Each message in our case is a structure, not just a simple integer. The queue stores one full copy of the structure per slot. So when Task 1 pushes its struct into the queue, it gets its own slot. When Task 2 pushes its struct, it gets the next slot. Neither message overwrites the other.
This is the key difference from a global variable. With a global variable, both tasks share one memory location. With a queue, every message gets its own dedicated space.
FIFO Rule — First In, First Out
FreeRTOS queues follow the FIFO rule — First In, First Out. This means the first message that enters the queue is also the first one to come out.
So if Task 1 sends a message first, and Task 2 sends a message after that, the receiver task will always read Task 1’s message first, then Task 2’s message. The order is guaranteed.
Here is a simple way to think about it:
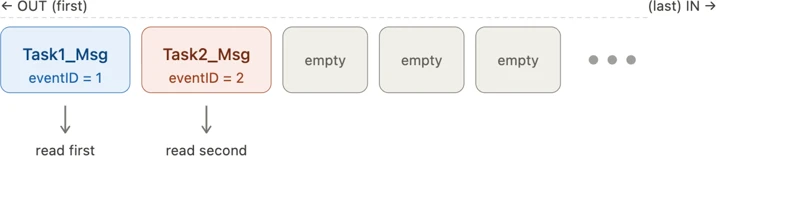
The receiver always reads from the front. New messages always go to the back. The gif below shows the FIFO order in action, with Task 1’s struct being read before Task 2’s:
Priority-Based Messaging in CMSIS-OS Queues
So far we have looked at how queues deliver messages in FIFO order. But CMSIS-OS queues have one more feature worth understanding before we write any code — message priority. This affects the order in which messages are read, and the timeout option controls what happens when the queue has no room left.
How Message Priority Works
By default, messages follow strict FIFO order — first in, first out. But CMSIS-OS allows you to assign a priority value to each message when you call osMessageQueuePut(). A higher priority value means that message will jump ahead of lower-priority messages already waiting in the queue.
So if three messages are sitting in the queue and a new HIGH priority message arrives, it gets placed in front of the others — not at the back.
The gif below shows this in action:
In our example, we will not be using priority-based messaging. We will simply pass 0 as the priority value, which means all messages are treated equally and delivered in normal FIFO order.
osMessageQueuePut(MessageQueueHandle, &message, 0, osWaitForever);The 0 here is the priority parameter. All messages with the same priority follow FIFO order among themselves. So if both tasks send with priority 0, the queue behaves exactly like a standard FIFO queue.
Timeout Options When Sending to a Full Queue
The last parameter in osMessageQueuePut() is the timeout. This tells the function what to do if the queue is already full when you try to send a message.
You have three choices:
0: Do not wait at all. If the queue is full, the function returns immediately with an error code. Use this when your task cannot afford to be blocked.N(milliseconds) : Wait up to N milliseconds for a free slot. If space opens up in time, the message is sent. If not, the function returns with an error.osWaitForever: Wait indefinitely. The task is blocked until a slot becomes free. The scheduler will run other tasks in the meantime, so no CPU time is wasted.
We will use 0 in this project, since there is enough space in the queue. Also the receiver task will run more frequently than the sender tasks, hence it will empty the queue more often.
osMessageQueuePut(MessageQueueHandle, &message, 0, 0);The same timeout logic applies on the receiving side with osMessageQueueGet(). If the queue is empty and the timeout is osWaitForever, the receiver will simply wait until a message arrives. This is actually the cleanest way to write a receiver task — it blocks when there is nothing to read and wakes up the moment new data is available.
osMessageQueueGet(MessageQueueHandle, &message, NULL, osWaitForever);With these two calls in place, the sender blocks when the queue is full and the receiver blocks when the queue is empty. Neither task wastes CPU cycles polling in a loop.
CubeMX Configuration for FreeRTOS Queue
Before we write any code, we need to set up the project in CubeMX. We will configure three tasks, create the message queue, and enable LPUART1 so we can route printf output to the serial console.
Setting Up the Tasks
Go to Middleware → FreeRTOS and open the Tasks and Queues tab. Here we will create three tasks for this example. Task1 and Task2 will update the data in the Queue, whereas the RxTask will read this data and print it on the serial console.
The images below shows the 3 Tasks in FreeRTOS:

Here is a quick breakdown of what each task does:
- Task 1 will send data to the queue when a button is pressed. Set its priority to Normal and its stack size to 128 words. This task does very little, it just loads data into a structure and pushes it to the queue, so 128 words is enough.
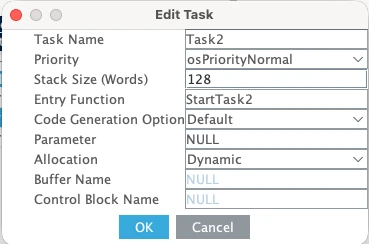
- Task 2 also sends data to the queue, but it does so automatically every second. Give it the same Normal priority and the same stack size of 128 words.
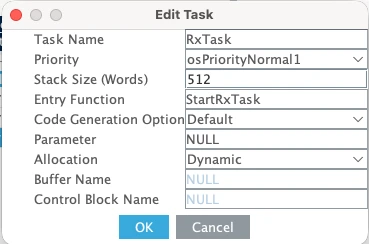
- Task 3 is the receiver. It reads messages from the queue and prints them via UART using
printf. Becauseprintfis a heavier operation, we need a larger stack — set it to 512 words (around 2 KB). We also want this task to have a higher priority than Task 1 and Task 2, so set it to High.
The reason for the higher priority is important. If Task 1 or Task 2 preempts the receiver while it is printing, the UART output can get corrupted. By giving the receiver a higher priority, we ensure it runs to completion before the sender tasks get CPU time. Normally we would protect UART with a mutex or semaphore, but since we have not covered those yet, priority is the simplest solution for now.
After increasing the stack size for Task 3, you will likely see a heap error in CubeMX. Go to Parameter Settings and increase the heap size to around 5 KB. The error should disappear.
Here is a summary of the task configuration:
| Task | Priority | Stack Size | Role |
|---|---|---|---|
| Task 1 | Normal | 128 words | Sends struct on button press |
| Task 2 | Normal | 128 words | Sends struct every 1 second |
| Task 3 | High | 512 words | Reads queue, prints via UART |
Creating the MessageQueue in CubeMX
Still inside the Tasks and Queues tab, scroll down to the queue section and add a new queue. Name it MessageQueue.
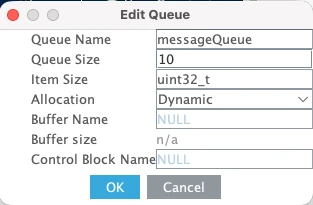
Set the queue size to 10. This means the queue can hold up to 10 messages at a time. Since two tasks are writing to it, 10 slots gives us enough headroom before the queue fills up.
For the item size, CubeMX will ask for a data type. Set it to uint32_t for now, we will change this manually in the code once we define our message structure. The actual structure we will use contains two fields:
eventID— auint8_tthat identifies which task sent the messagetimestamp— auint32_tthat stores the tick count at the time of sending
Set the allocation to Dynamic so the memory is taken automatically from the FreeRTOS heap.
Configuring LPUART1 for printf Output
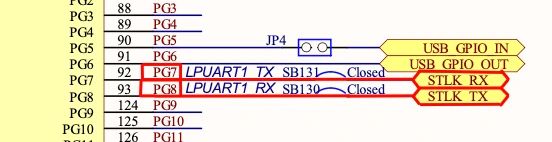
We will use printf to print the received data to a serial console. On the STM32L496 Nucleo board, the Virtual COM port routes UART data through the ST-LINK USB connection. Looking at the board schematic, ST-LINK RX is connected to LPUART1 TX and ST-LINK TX is connected to LPUART1 RX. These map to pins PG7 and PG8.
Go to Connectivity and enable LPUART1 in Asynchronous mode. By default, CubeMX assigns pins PC0 and PC1, so change these to PG7 (TX) and PG8 (RX).
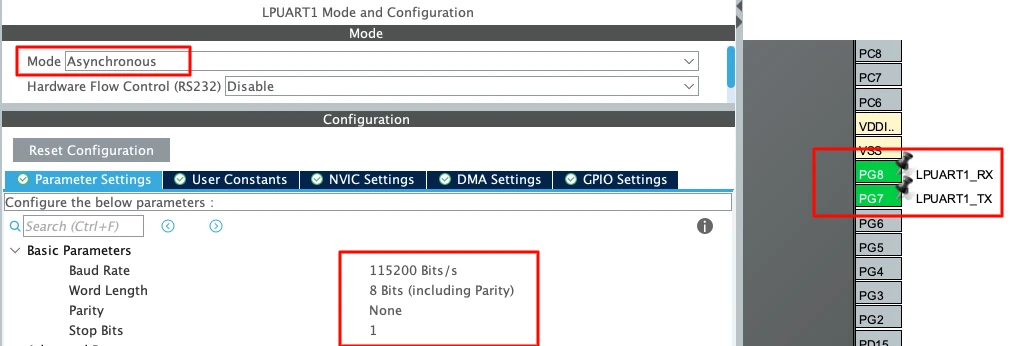
Use the following settings:
| Parameter | Value |
|---|---|
| Baud Rate | 115200 |
| Word Length | 8 bits |
| Parity | None |
| Stop Bits | 1 |
This is the standard UART configuration and matches what we will set in the serial console later.
Adding a button
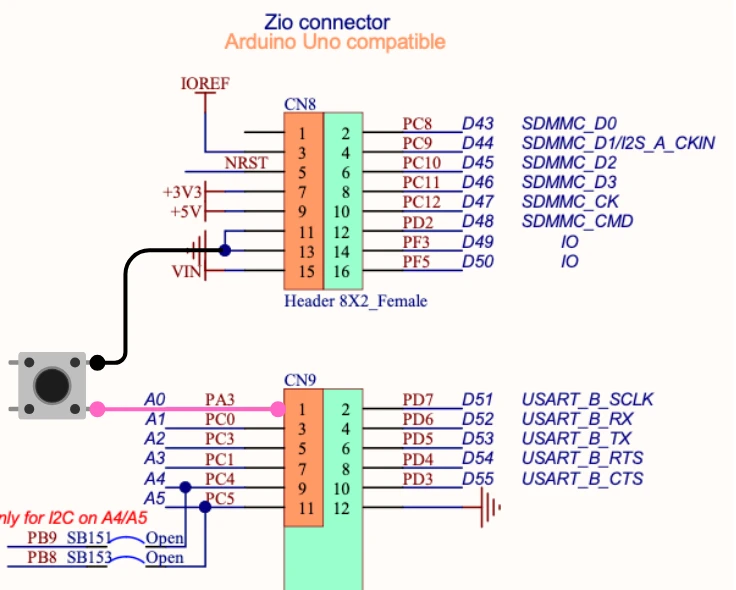
We also need a button for Task 1. I have connected the button between pin PA3 and Ground. The pin will be high by default, and when the button is pressed, it will be pulled low to the ground.
Configure pin PA3 as GPIO Input. Then open the GPIO settings for that pin and set it to Pull-Up mode.
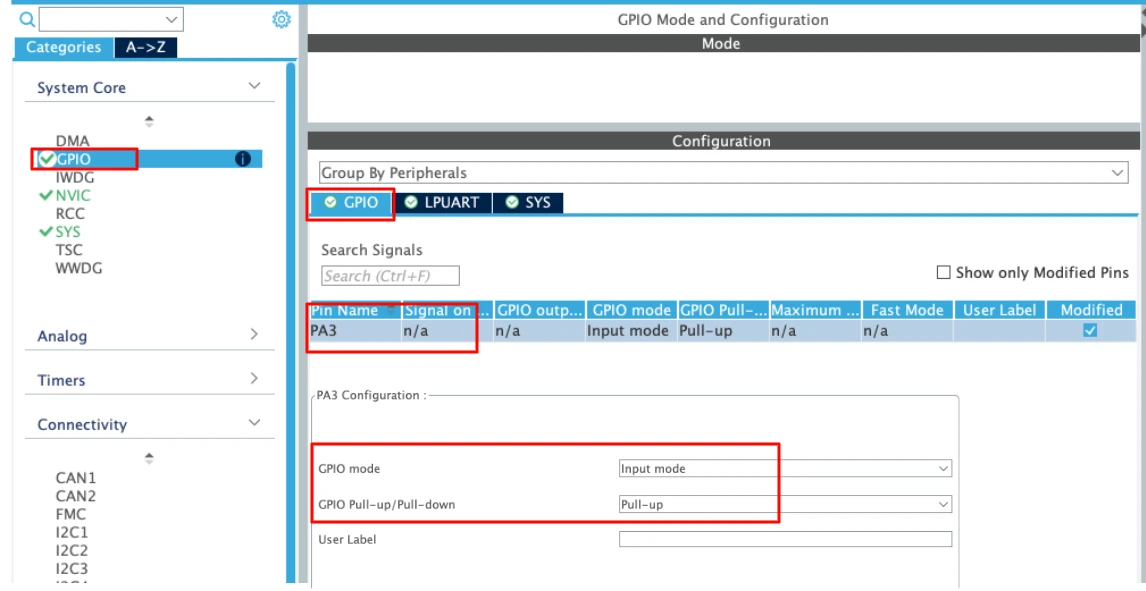
The pin will stay HIGH by default, and when the button is pressed it will be pulled LOW to ground — that is the signal we will check inside Task 1.
Writing the FreeRTOS Queue Code in STM32
With the project generated, we can now write the actual task code. We will define the message structure, wire up printf to UART, write the two sender tasks, and then write the receiver.
Defining the Message Structure
The first thing we need to do is define the structure that both tasks will use to send data. Add this near the top of the file, before the task function definitions:
typedef struct {
	uint8_t event_id;
	uint32_t timestamp;
} messageQueue_t;event_id tells the receiver which task sent the message — we will use 1 for Task 1 and 2 for Task 2. timestamp stores the tick count at the moment the message was created, using HAL_GetTick().
Now we need to update the queue to use this structure instead of uint32_t. Find the line where CubeMX created the queue — it will look something like this:
MessageQueueHandle = osMessageQueueNew(10, sizeof(uint32_t), &MessageQueue_attributes);Change sizeof(uint32_t) to sizeof(messageQueue_t):
MessageQueueHandle = osMessageQueueNew(10, sizeof(messageQueue_t), &MessageQueue_attributes);The queue still holds 10 elements, but now each element is one full messageQueue_t structure instead of a single 32-bit integer.
Routing printf Through UART
To use printf for serial output, we need to redirect it through UART. Add this function to main.c:
int __io_putchar(int ch)
{
HAL_UART_Transmit(&hlpuart1, (uint8_t *)&ch, 1, HAL_MAX_DELAY);
return ch;
}Every time printf outputs a character, it calls __io_putchar() internally. We override it here to transmit that character over LPUART1.
Also make sure to add this include at the top of main.c, otherwise the compiler will complain about printf being undefined:
#include <stdio.h>Task 1 — Sending Data on Button Press
Task 1 monitors the button on pin PA3. When pressed, it loads data into a messageQueue_t structure and pushes it into the queue.
void StartTask1(void *argument)
{
messageQueue_t msg;
for (;;)
{
if (HAL_GPIO_ReadPin(GPIOA, GPIO_PIN_3) == GPIO_PIN_RESET)
{
msg.event_id = 0x01;
msg.timestamp = HAL_GetTick();
osMessageQueuePut(MessageQueueHandle, &msg, 0, 0);
osDelay(200);
}
osDelay(20);
}
}A few things to note here. We check for GPIO_PIN_RESET because the pin is pulled HIGH by default and goes LOW when the button is pressed. We set event_id to 1 so the receiver knows this message came from Task 1. The timestamp is in milliseconds, straight from HAL_GetTick().
We pass 0 as the message priority as this is a standard FIFO message with no special priority. We use 0 as the timeout, so if the queue is full the task will simply skip that particular message and the loop runs again.
The osDelay(200) at the end prevents the button debouncing.
Task 2 — Sending Data Every Second
The Task 2 does not wait for a button press. It automatically sends a message to the queue every second. We use a different event_id and convert the timestamp to seconds so the output is easy to distinguish from Task 1.
void StartTask2(void *argument)
{
messageQueue_t msg;
for (;;)
{
msg.event_id = 2;
msg.timestamp = HAL_GetTick() / 1000;
osMessageQueuePut(MessageQueueHandle, &msg, 0, 0);
osDelay(1000);
}
}This task runs independently of Task 1. So even when the button is not pressed, Task 2 keeps sending data every second. When the button is pressed, both tasks are sending at the same time — and the queue handles both safely without any race conditions.
Receive Task — Reading from Queue and Printing via UART
The receiver task reads messages from the queue one at a time and prints them to the serial console. It uses osWaitForever so it blocks when the queue is empty and wakes up the moment a new message arrives.
void StartRxTask(void *argument)
{
messageQueue_t msg;
for(;;)
{
if (osMessageQueueGet(messageQueueHandle, &msg, 0, osWaitForever) == osOK)
{
printf ("Event ID: %d, Timestamp: %lu\n",
msg.event_id, msg.timestamp);
}
osDelay(1);
}
}We check status == osOK before printing. This ensures we only print when the read was successful. With osWaitForever, the function will always return osOK once it gets a message, but it is good practice to check anyway.
Notice there is no osDelay() here. The task does not need one because osMessageQueueGet() with osWaitForever already blocks the task when the queue is empty. The scheduler runs other tasks during that time, so no CPU cycles are wasted.
Full Combined Code
Here is the complete main.c with everything put together:
c
#include "main.h"
#include "cmsis_os.h"
#include <stdio.h>
/* Queue handle - generated by CubeMX */
extern osMessageQueueId_t MessageQueueHandle;
extern UART_HandleTypeDef hlpuart1;
/* Message structure */
typedef struct {
	uint8_t event_id;
	uint32_t timestamp;
} messageQueue_t;
/* Redirect printf to UART */
int __io_putchar(int ch)
{
    HAL_UART_Transmit(&hlpuart1, (uint8_t *)&ch, 1, HAL_MAX_DELAY);
    return ch;
}
/* Task 1 - Send on button press */
void StartTask1(void *argument)
{
messageQueue_t msg;
for(;;)
{
if (HAL_GPIO_ReadPin(GPIOA, GPIO_PIN_3) == 0)
{
msg.event_id = 0x01;
msg.timestamp = HAL_GetTick();
osMessageQueuePut(messageQueueHandle, &msg, 0, 0);
osDelay(200); // debounce
}
osDelay(20);
}
}
/* Task 2 - Send every second */
void StartTask2(void *argument)
{
messageQueue_t msg;
for(;;)
{
msg.event_id = 0x02;
msg.timestamp = HAL_GetTick()/1000; // in seconds
osMessageQueuePut(messageQueueHandle, &msg, 0, 0);
osDelay(1000);
}
}
/* Task 3 - Receive and print */
void StartRxTask(void *argument)
{
	messageQueue_t msg;
  for(;;)
  {
	  if (osMessageQueueGet(messageQueueHandle, &msg, 0, osWaitForever) == osOK)
	  {
		  printf ("Event ID: %d, Timestamp: %lu\n",
		           msg.event_id, msg.timestamp);
	  }
    osDelay(1);
  }
}This is the core of the application. The rest of main.c — the HAL init, clock config, and CubeMX-generated queue and task creation code — stays exactly as generated. We only add the structure definition, the __io_putchar function, and the three task bodies shown above.
Testing the FreeRTOS Queue on STM32
With the code written and the project built successfully, it is time to flash it to the board and see it in action.
Output on Serial Console
Open your serial console. Make sure the settings match what we configured in CubeMX.
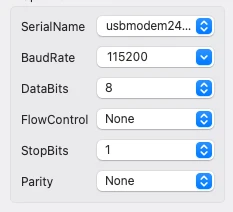
Once connected, you should immediately see output from Task 2 printing every second. And when the button is pressed, the data from Task1 will print alongside.
The image below shows the serial console output with both tasks sending data simultaneously:
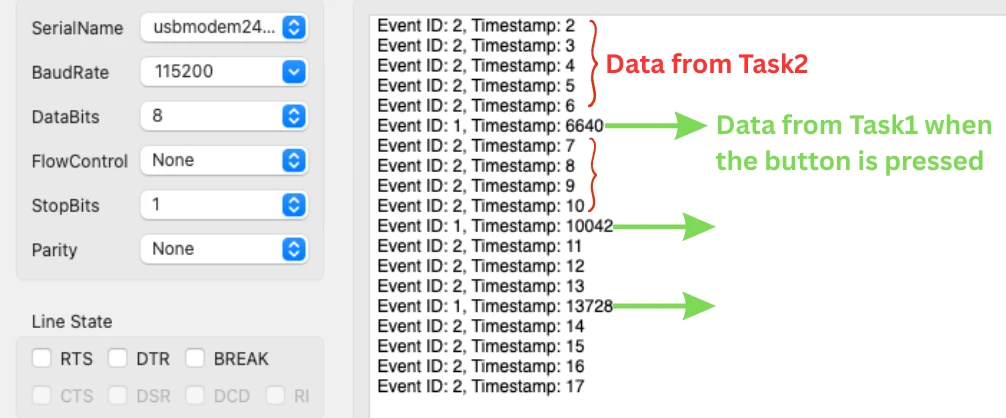
Notice that the messages never overlap or corrupt each other. Task 1 and Task 2 are both writing to the queue at the same time, and the receiver reads them cleanly in order. This is exactly the problem that global variables cannot solve — but a queue handles it without any issues.
Useful CMSIS-OS Queue Functions
Now that our queue is working, let us look at some additional CMSIS-OS functions that come in handy when working with queues. We will not use all of these in this project, but knowing they exist will save you a lot of time as your projects get more complex.
Here is a quick overview of the available functions:
| Function | What it returns |
|---|---|
osMessageQueueGetCapacity() | Total number of slots the queue can hold |
osMessageQueueGetMsgSize() | Size of each message in bytes inside the queue |
osMessageQueueGetCount() | Number of messages currently waiting in the queue |
osMessageQueueGetSpace() | Number of free slots currently available in the queue |
osMessageQueueReset() | Clears all messages from the queue |
Video Tutorial
STM32 FreeRTOS Queue — Inter-Task Communication Video Tutorial
Watch me configure the FreeRTOS queue in CubeMX, write the sender and receiver tasks using osMessageQueuePut() and osMessageQueueGet(), route printf through LPUART1, and test the output on the serial console with both tasks running simultaneously.
Watch the FreeRTOS Queue TutorialConclusion
In this tutorial, we walked through everything you need to get inter-task communication working with FreeRTOS queues on STM32. We started by understanding why global variables are dangerous in a multi-task environment and how race conditions can silently corrupt your data. From there, we set up the project in CubeMX, configured three tasks with the right priorities and stack sizes, created a message queue, and wired up LPUART1 so we could see the output on a serial console.
We then wrote the full task code — two sender tasks pushing a message structure into the queue, and one receiver task reading from it and printing through UART using printf. We also looked at priority-based messaging and timeout options, so you know exactly how to control what happens when the queue is full or empty. Finally, we covered the additional CMSIS-OS queue functions that give you more fine-grained control over how you read and write messages.
Queues are one of the most important building blocks in any FreeRTOS application. Once you start using them, you will find yourself reaching for them constantly — they are reliable, easy to reason about, and they scale well as your project grows. In the next part of this series, we will look at semaphores and mutexes, which solve a different class of problems — protecting shared resources like UART from being accessed by multiple tasks at the same time. If you have any questions, drop them in the comments below.
Browse More STM32 Tutorials

How to Setup DMA using Registers

Riverdi STM32 Display #2. LED Control using Buttons

STM32 Ethernet PART 6 – How to Configure Simple HTTP Webserver

FreeRTOS Tutorial #7 -> Using MUTEX
STM32 Timers (Part 2): How to Measure PWM Input Signal

EEPROM and STM32

Riverdi STM32-U5 Embedded Display
STM32 RTOS Project Download
STM32 FreeRTOS Queue FAQs
Subscribe
Login
0 Comments
Newest
