Home ▸ STM32 Tutorials ▸
Published: August 13, 2025
Last Updated: February 6, 2026
Last Updated: February 6, 2026
How to Interface SSD1306 OLED Display with STM32 Using I2C
The SSD1306 OLED display is a popular choice for embedded projects due to its compact size, excellent contrast, and low power consumption. It is commonly available as a 0.96-inch 128×64 pixel module, and can communicate using either I2C or SPI protocols.
In this tutorial, we’ll focus on interfacing the SSD1306 OLED display with STM32 microcontrollers using the I2C interface. We will configure the I2C peripheral in STM32CubeMX, generate initialization code using the HAL library, and then write a simple driver to display text and graphics on the OLED screen.
This step-by-step STM32 SSD1306 OLED I2C tutorial is beginner-friendly and works across most STM32 series, including F1, F4, and H7 families. Whether you’re creating a real-time sensor dashboard or adding a stylish display to your project, this tutorial will help you get started quickly.
Recommended Resources:
You can also take a look at the other Oled and LCD Displays interfaced with STM32.
- Interface SH1106 1.3″ OLED with STM32
- How to Port U8G2 Graphics Library to STM32
- Interface LCD1602 Display with STM32
- Interface Graphic LCD ST7920 with STM32
- Interface LCD2004 LCD with STM32
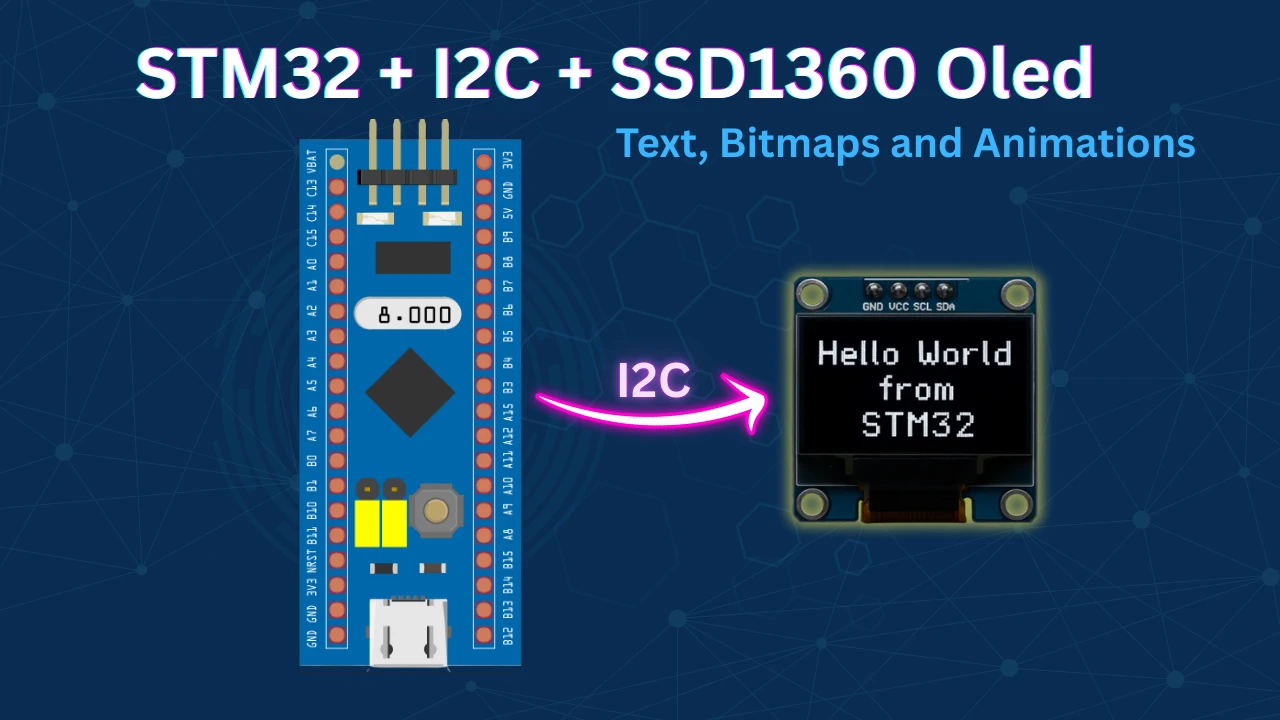
I am going to use a 0.96″ SSD1306 OLED display and STM32f103c8t6 for this project.
Components and OLED Display Overview
Before we start configuring CubeMX or writing any code, it’s important to understand the components used in this project — especially the SSD1306 OLED display. Knowing the display’s features and how it communicates will make it much easier to work with it in your STM32 projects.
What is the SSD1306 OLED Display?
The SSD1306 is a popular display driver IC that powers many 0.96-inch 128×64 pixel OLED modules. These modules are commonly used in embedded systems and hobby electronics due to their high contrast, wide viewing angles, and low power consumption.
Unlike traditional LCDs, OLED (Organic Light Emitting Diode) displays do not require a backlight. Each pixel emits its own light, resulting in deep blacks and clear text, even in low-light environments.
Most SSD1306 modules support both I2C and SPI communication protocols. In this tutorial, we’ll use the I2C version, which requires fewer pins and is easier to set up with STM32.
These displays are perfect for adding simple user interfaces, sensor dashboards, or text output to embedded projects. You can display strings, numbers, graphics, icons, and even small animations.
Key Features and Specifications
Here are some of the most important features of the SSD1306 OLED module:
| Feature | Specification |
|---|---|
| Display Type | Monochrome OLED |
| Driver IC | SSD1306 |
| Resolution | 128 × 64 pixels (common) |
| Operating Voltage | 3.3 V or 5 V (depending on module) |
| Communication Protocol | I2C (also available in SPI variants) |
| I2C Address | Typically 0x3C or 0x3D |
| Viewing Angle | >160° |
| Backlight | Not required (self-emissive pixels) |
| Power Consumption | Very low (ideal for battery applications) |
This compact module fits easily on breadboards and development boards, making it excellent for both prototyping and final embedded designs.
Why Use I2C with STM32?
The I2C interface is a two-wire serial communication protocol that uses only SDA (data) and SCL (clock) lines. Most STM32 microcontrollers have multiple I2C peripherals built in, making them ideal for connecting displays and sensors with minimal wiring.
Using I2C with the SSD1306 OLED has several advantages:
- Fewer GPIO Pins: Only two lines are required, which leaves more pins available for other peripherals.
- Built-in STM32 HAL Support: STM32CubeMX can automatically configure I2C peripherals, making initialization easier.
- Multiple Devices on One Bus: You can connect several I2C devices (e.g., sensors and displays) to the same bus, reducing complexity.
- Stable and Reliable Communication: I2C is well-supported by STM32 HAL drivers, so data transfer to the OLED is straightforward and efficient.
For these reasons, I2C is the most common and beginner-friendly method to interface the SSD1306 display with STM32 microcontrollers.
Circuit Diagram and Connections
The first practical step in this project is to connect the SSD1306 OLED display to the STM32 board. Since we are using the I2C communication protocol, the wiring is very straightforward. We only need two I2C pins (SDA and SCL) along with power and ground connections.
The image below shows how the STM32 is connected to the SSD1306 Oled Display.
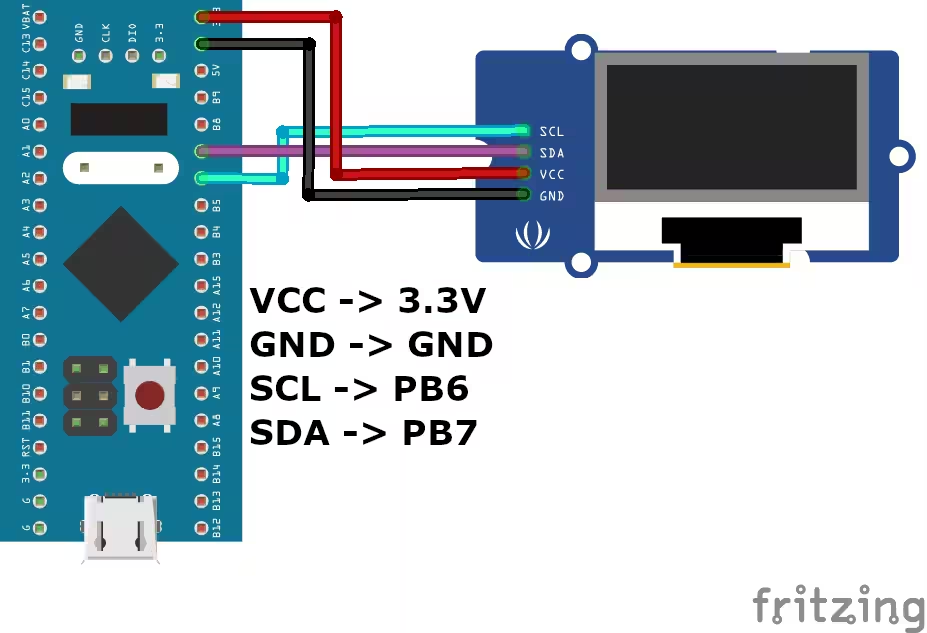
As shown in the image above, the connection is as follows:
| Connection | Description |
|---|---|
| VCC | Connected to 3.3V pin of the STM32 board (powers the display) |
| GND | Connected to GND of the STM32 board |
| SCL (Clock Line) | Connected to STM32’s I²C SCL pin |
| SDA (Data Line) | Connected to STM32’s I²C SDA pin |
The SSD1306 OLED modules typically operate at either 3.3 V or 5 V, depending on the breakout board. Many modules come with an onboard regulator, which allows them to be powered by 5 V while internally running at 3.3 V.
For STM32, which usually operates at 3.3 V logic levels, it is safest to:
- Use a 3.3 V supply to power the OLED if supported.
- If the OLED requires 5 V for VCC, make sure the I2C lines are 5 V tolerant on your STM32 pins (many F1/F4 pins are).
- Alternatively, use level shifters if your MCU pins are not 5 V tolerant.
STM32CubeMX Configuration for I2C
Once the OLED is connected to the STM32 board, the next step is to configure the I2C peripheral using STM32CubeMX.
Clock Configuration
Below is the image showing the Clock configuration for the project.
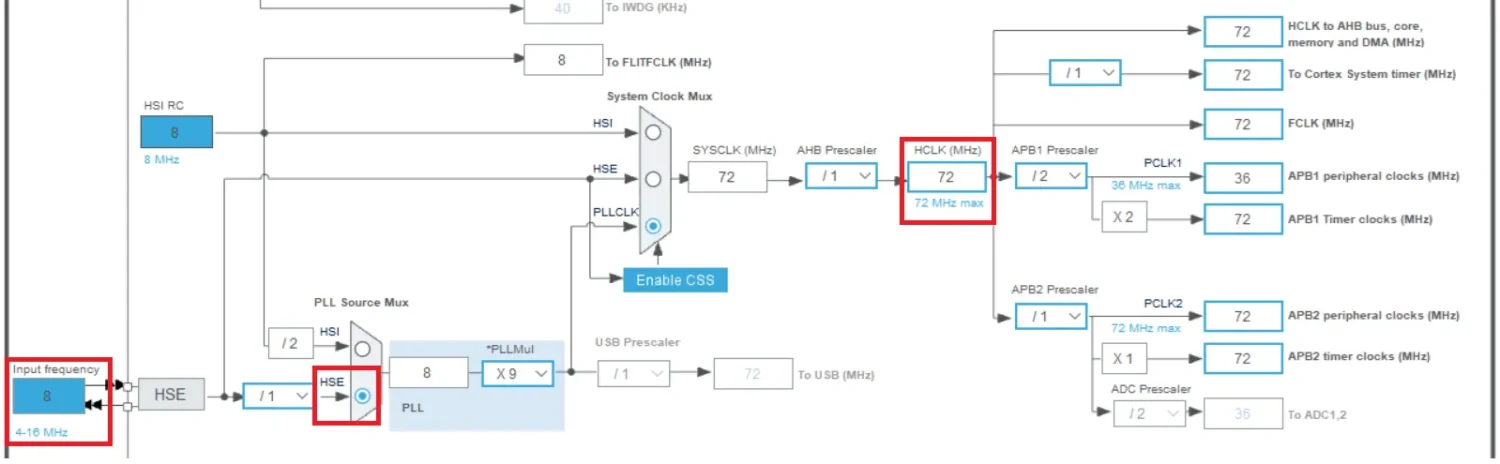
The system is clocked by an external 8MHz HSE Crystal, which is present on the Dev board. We will use the PLL to run the system at maximum 72MHz clock.
I2C Configuration
Below is the image showing the I2C configuration.
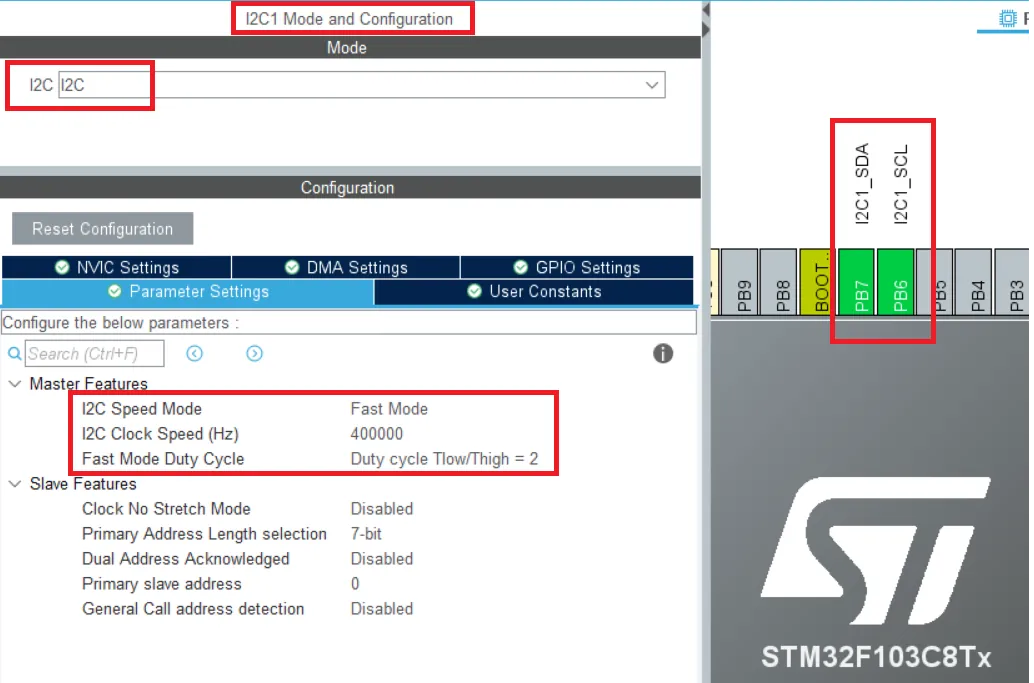
I am using I2C1 for the project.
- Set the I2C in the FAST MODE, as it is required for the OLED Display. The clock speed will automatically set to 400KHz.
- The SCL and SDA Pins will get automatically selected. Here PB6 is configured as SCL and PB7 is configured as SDA.
Writing the SSD1306 Driver with HAL
Open the ssd1306.c file and update the I2C handler to match your STM32 board setup. Configuring the correct I2C peripheral is crucial for reliable communication with the SSD1306 OLED display.
extern I2C_HandleTypeDef hi2c1;
#define SSD1306_I2C &hi2c1In this example, we use I2C1 on the STM32. Replace hi2c1 with the handler corresponding to the I2C interface you have enabled in STM32CubeMX. This ensures the microcontroller sends data correctly to the OLED display.
Tip: Always verify your I2C address and wiring before running the code. SSD1306 modules typically use 0x3C or 0x3D as the default I2C address.
Also configure the display resolution in the ssd1306.h file.
/* SSD1306 width in pixels */
#ifndef SSD1306_WIDTH
#define SSD1306_WIDTH            128
#endif
/* SSD1306 LCD height in pixels */
#ifndef SSD1306_HEIGHT
#define SSD1306_HEIGHT           64
#endifYou can see the functions available in the functions tab under ssd1306.c and in the ssd1306.h file.
Print simple strings on SSD1306
#include "ssd1306.h"
#include "fonts.h"

int main()
{
  .....
  SSD1306_Init (); // initialise the display
  SSD1306_GotoXY (10,10); // goto 10, 10
  SSD1306_Puts ("HELLO", &Font_11x18, 1); // print Hello
  SSD1306_GotoXY (10, 30);
  SSD1306_Puts ("WORLD !!", &Font_11x18, 1);
  SSD1306_UpdateScreen(); // update screen
  while (1) { }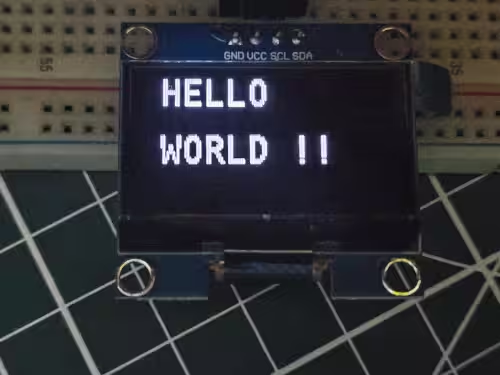
} - Here we will first initialise the display in the main function.
- Then set the cursor at x=10, y=10 and print “HELLO” at this location.
- Set the cursor at x=10, y=30 and print “WORLD !!” at this location.
- We need to call the function SSD1306_UpdateScreen to update the display with the modified content.
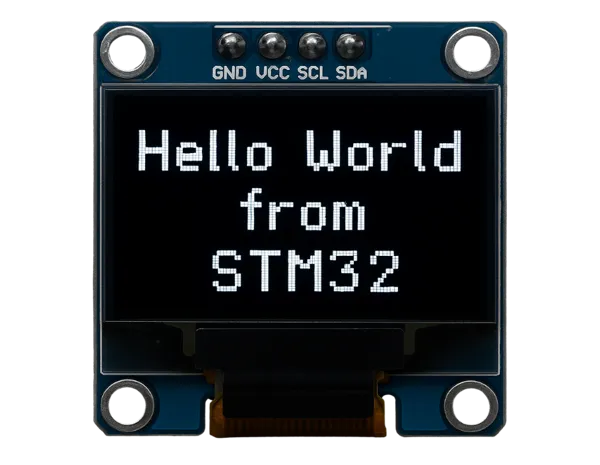
Below is the image showing the output of the above code.
Display Numbers on SSD1306
Any display does not support printing the numbers directly on it. Instead we need to change the number into the equivalent Ascii characters and then print it.
Below the code shows how to print integer and floats.
#include "ssd1306.h"
#include "fonts.h"
#include "stdio.h"  // for sprintf

int main()
{
  .....
  int num = 123456; float flt = 123.45;
  char bufnum[7]; char bufflt[7];
  SSD1306_Init (); // initialise the display
  sprintf (bufnum, "%d", num);
  sprintf (bufflt, "%.2f", flt);
  SSD1306_GotoXY (10,10); // goto 10, 10
  SSD1306_Puts (bufnum, &Font_11x18, 1); // print Hello
  SSD1306_GotoXY (10, 30);
  SSD1306_Puts (bufflt, &Font_11x18, 1);
  SSD1306_UpdateScreen(); // update screen
  while (1) { }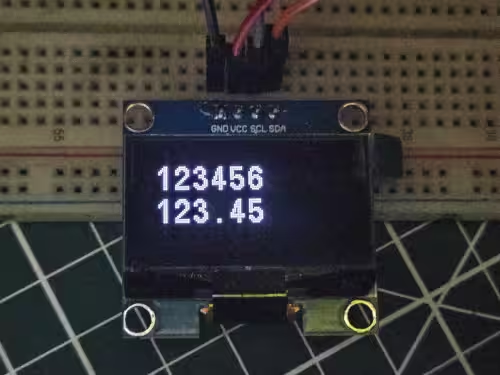
} - Here we will first initialise the display in the main function.
- Then define the character buffers to store the converted integer and float values.
- The sprintf function is used to convert the integer(%d) and float(%f) values to the respective Ascii format.
- Then set the cursor at x=10, y=10 and print num at this location.
- Set the cursor at x=10, y=30 and print flt at this location.
- We need to call the function SSD1306_UpdateScreen to update the display with the modified content.
Below is the image showing the output of the above code.
Display Bitmaps on SSD1306
We can draw a bitmap image anywhere on the display. We just need to convert the bitmap image to c array format. This tool can do that.
Make sure to choose the configuration as shown below.
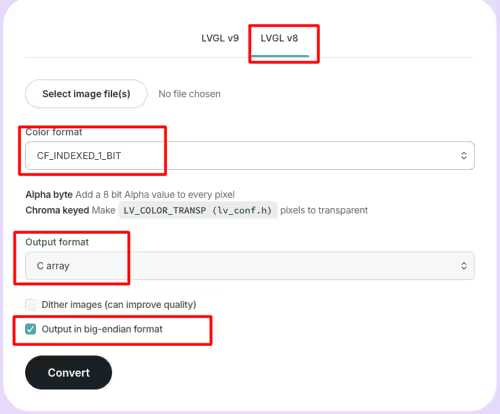
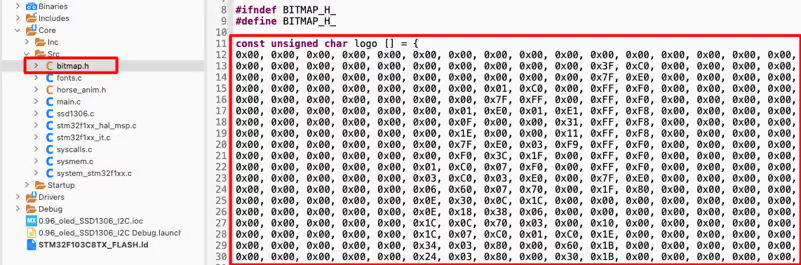
Once you click Convert, the c file containing the image array will download. We will copy the array to our project.
#include "ssd1306.h"
#include "fonts.h"
#include "stdio.h" // for sprintf
#include "bitmap.h"
int main()
{
.....
SSD1306_Init();
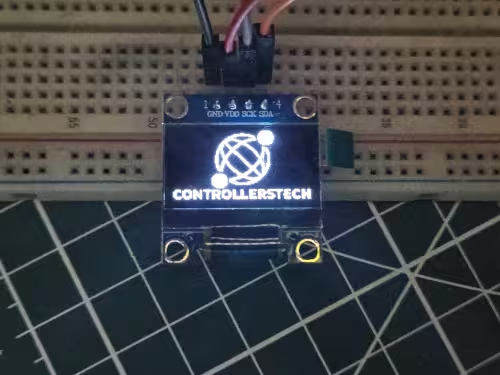
SSD1306_DrawBitmap(0, 0, logo, 128, 64, 1);
SSD1306_UpdateScreen(); // update screen<p style="margin:0;"></p> while (1) { }
} - Here we will first initialise the display in the main function.
- Then draw the bitmap defined in the bitmap.h file.
- The bitmap start position is set to x=0,y=0.
- The size is 128pixels x 64pixels.
- We need to call the function SSD1306_UpdateScreen to update the display with the modified content.
Below is the image showing the output of the above code.
Scrolling and Animation on SSD1306
The SSD1306 has support for scrolling at hardware level. There are registers in the SSD1306 IC which enable the display to scroll in different directions.
The following are the functions available to do so.
#include "ssd1306.h"
#include "fonts.h"
#include "stdio.h"  // for sprintf
#include "bitmap.h"

int main()
{
  .....
  SSD1306_Init();
  SSD1306_DrawBitmap(0, 0, logo, 128, 64, 1);
  SSD1306_UpdateScreen(); // update screen

  SSD1306_ScrollRight(0x00, 0x07);    // scroll entire screen (Page0 to Page7) right
  HAL_Delay (5000);
  SSD1306_Stopscroll();

  SSD1306_ScrollLeft(0x00, 0x07);    // scroll entire screen (Page0 to Page7) right
  HAL_Delay (5000);
  SSD1306_Stopscroll();
<p style="margin:0;"></p>  while (1) { }
} In the code above, we are scrolling the entire screen in the right direction for 5 seconds, and then in the left direction for another 5 seconds. The screen contains the bitmap on it and therefore we will see the bitmap scrolling.

The Animation part is explained in the video shown below. Please check out the video to see the complete working.
Video Tutorial
STM32 SSD1306 OLED I2C Video Tutorial
This video demonstrates the complete process of interfacing the SSD1306 OLED display with STM32 using the I2C interface. It covers the CubeMX configuration, wiring, and the display driver setup step by step. Watch the walkthrough and follow along with the provided code to get your OLED display working quickly.
Watch the STM32 OLED TutorialConclusion
In this tutorial, we successfully interfaced an OLED display with an STM32 microcontroller using the I2C protocol. We covered the initialization process, command/data handling, and demonstrated how to display text and graphics on the screen. The OLED provides a compact and power-efficient way to add a user interface to embedded projects, making it ideal for IoT devices, portable gadgets, and various real-time applications.
By understanding the communication flow and display functions, you can now expand this project further—such as creating custom animations, menus, or integrating sensor data visualization. This not only enhances the usability of your STM32 projects but also gives them a more professional and interactive touch.
Browse More STM32 Display Tutorials
How to use 4×4 keypad with STM32
LCD 20X4 using I2C with STM32
How to interface MPU6050 (GY-521) with STM32
Interface TFT display with STM32

Interface 16×2 LCD with STM32 (No I2C) — 4-bit Guide
ST7735 1.8″ TFT Display with STM32

At line 70 of ssd1306.c, this statement “SSD1306_WRITECOMMAND(0x10);” seems not conform to datasheet. It uses A[1:0] so valid settings are 00b/01b/10b but not 0x10. Could you check that?
This configuration uses DMA? If not, can I do some changes for use it?
Hello there, how do I add some new/custom fonts instead of using the inner fonts in library files?
Probably like file fonts.h you can add you own custom file .h with your fonts or download a font on internet, there are some programs that create it (pixel font for example)
I cannot find where to download the following?? Can you please direct me where to find these files that you mentioned?
”Download the code below, unzip it, Copy the fonts.h, test.h and ssd1306.h in the Inc folder of your project, and fonts.c, test.c and ssd1306.c in the Src folder and open the project now.”
Thank you for very good tutorial. Example runs with minor modification (PB6 & PB7 –> PB8 , PB9) also on NUCLEO-F411RE board and stmcube ide 1.11.0
Would it work in any I2C OLED 128×64 display? and 256×64?
Hi. I am trying to add more fonts. But I did’nt find any program to output 32bit format font archive. Only 8 bit format! Could you tell me wich program did you use? Thanks a lot.
Hi, have you found how to create front ?
Probably didn’t exists, fonts are made 16x16pix, and escalates if you want more resolution, or maybe 256×256, but 32 bits?? That will be 65536 x 65536 resolution, not even 8K
Great tutorial and well explained. One small change I made to your SSD1306_DrawBitmap function. You can add “else SSD1306_DrawPixel(x+i, y, 0);” right after the if statement to draw a black pixel instead of white. This will make for a very smooth horse running and eliminates the need to clear the screen following each call to DrawBitmap. Thanks again for the awesome video.
Hello Sir,
Thank you for the tutorial it’s awesome and very helpful, I have just one question, can I use this SSD1306 library with FreeRTOS, I think it will be very interesting, we could use an SD card with bitmaps in it and print them on the screen with the OLED display.
Thanks, Sir!
if u have possible provide with spi interfacing
I am having a problem in ssd1306.c with undefined references to ‘hi2c1’. What fixes can I do?
you need to enable the I2C in cubeMX. That’s how the OLED will connect to the MCU
i have enabled i2c in cubeMX,why i have the same problem? maybe because there exist 2 i2c?
the code is set to use the i2c1. Either enable that or change the code to use the I2C2
That’s a really helpful tutorial. I want to know if I can connect MPU6050 and the LCD to the same pins at the same time (using I2C only). Will the config of any affect the other.
Of course you can. That’s the entire purpose of I2C. With 7 bit addressing, you can connect upto 128 devices with just 2 pins.
I have a video on it too… Connecting on the same pins https://youtu.be/xxphp9wDnHA
Thanks a lot!! I really Appreciate it!
Hi, I really liked the tutorial, I wandering if this code can be used for a NUCLEO-F446RE (STM32F446RE)? I have been trying to make it work but I haven’t been able to. Thanks.
Yes , check this video https://www.youtube.com/watch?v=Z6VyFYzQWSs. Just need to change #include “stm32f1xx_hal.h” to f4 inside ssd1306.h.
what function has this code line?
It’s defined in main.c file
I don´t have money for you but, I would like to tell you “I LOVE YOU S MUC FOR THIS.”
Is it possible to interface the lcd 128x32u using your library?
why it is can not downloaded
try right click on the download and open in new tab
Thank you for your good writing and explanation.
Hello,
Thank you .
I downloaded the zip file and tried to build the project.
But I have below error :
./Inc/fonts.h:41:10: fatal error: stm32f1xx_hal.h: No such file or directory
What do you think? Can you share me this library please?
create your own project, and then use the library files from this one.
It works if you change to the same header file as the MCU you use.
Thanks for this tutorial! Excellent job! I ran into a problem compiling the code first time in a C++ project in STM32CubeIDE: “error: ‘C’ does not name a type; did you mean ‘_C’?” Needed to add quotation marks on C to get it to compile correctly: extern “C” {
Hi,
Where is the link for all these libraries which you are mentioned in the above tutorials?
click download and look in the src and inc folders
If you click on the download but the download does not start, you right click on the download button then copy the address of the line then paste in the search bar.
The link is obviously broken.. link to a github repo would be much better
Can Anyone send me the library for SSD1309 for STM32?
good work
good work
hi there, really good thanks.. may i ask, could this ssd1306 driver be repurposed for a ssd1327 (128×128) i2c oled ? im using the same ssd1306 code with a different init sequence, however the oled simply doesnt display anything.. any help would be appreciated.. kind thanks
Hi! Thanks, it worked perfectly. Is there any LCDAssistant avaliable for Linux distributions?
Good afternoon. Tell me how you can edit your code to use a smaller buffer?
Brother I started the Payment Process but it says you have exceeded the limit for receiving any more funds.
If this resolves just reply.
Thanks for this contribution
I don’t know what the issue is. It’s fine though. Keep visiting and that’s enough 🙂
Hello,
I need ssd1306 code for stm8s controller. Actually i have done this , but the problem i am facing is font or size. I am not able to change the size of the letter in my code.
The library i used is from this site.
Please help me out how can i change the size.
http://embedded-lab.com/blog/stm8-microcontrollers-final-chapters/3/
Please help me out how can i change the size.
Thanks you.
m.k.verma795@gmail.com
just google some font generator or look in the arduino librarries, you can find different fonts there
hello sir i want ask you something, i make this code to stm32 bluephill and then i get error selected processor does not support `dsb 0xF’ in Thumb mode
Hallo awesome library
only i have this following error message and i dont know how to get around it can you please help me with it?
.\Objects\OLED_i2c.axf: Error: L6218E: Undefined symbol Font_11x18 (referred from main.o).
.\Objects\OLED_i2c.axf: Error: L6218E: Undefined symbol SSD1306_GotoXY (referred from main.o).
.\Objects\OLED_i2c.axf: Error: L6218E: Undefined symbol SSD1306_Init (referred from main.o).
.\Objects\OLED_i2c.axf: Error: L6218E: Undefined symbol SSD1306_Puts (referred from main.o).
.\Objects\OLED_i2c.axf: Error: L6218E: Undefined symbol SSD1306_UpdateScreen (referred from main.o).
Not enough information to list image symbols.
Not enough information to list load addresses in the image map.
Finished: 2 information, 0 warning and 5 error messages.
“.\Objects\OLED_i2c.axf” – 5 Error(s), 0 Warning(s).
Edit:
Nevermind i fixed it already, i was using Keilv5 IDE, where you cannot just copy paste into the source and inc folder, but you have to add the item to the group by right clicking,
and then i modify it for my stm32f030xx and it worked fine, thank you again
thank you for your code just send you a coffee , you saved me some times
i want sent u donate but we are Boycott bye united state.
very very very thanks 🙂
the best likable aspiration for you.
Thanks Again
from IRAN
no worries.. keep supporting this website that’s enough
hi! excellent project, but I have a problem. when I download the .zip, i don´t see any libraries fonts.h, test.h, and ssd1306.h, and neither do libraries fonts.c, test.c and ssd1306.h; but I do see libraries font.d and font.o, likewise with test and ssd1306. Are these libraries similar to .c and .h?
HI
IT IS VERY HARD TO SWITCH ON STM32 FROM AVR 8 BIT BUT YOU DID A GREAT JOB FOR ALL PEOPLE LIKE ME . THANKS
Thank you for the example, got it working on Nucleo-L476RG board
Was anyone able to get this to work on a STM32F466RE?
If you mean 446RE, than yes I got it working.
I adapted the code for Nucleo-32, it works perfectly but sometimes it stops working for no reason.
Once the display just scrolled down alone and almost half-top was the bottom part of the display. Then I disassembled the display to try to reset it or something but when I assembled it again it stopped working. This happened to me before but without de scrolling.
The code works perfectly, I was just adjusting some parameters. I have searched some information about it and some people says it’s because of using the nucleo’s power supply but it doesn’t work when I put an external input voltage to the display. Other people says that it is because its power supply is 3V3 not 5V as in this guide but I have also tried it and guess what, sometimes it works and but when you disassemble the display it doesn’t.
If anyone knows why this happens please tell me.
MUCHAS GRACIAS. It works perfectly, you saved my day, I didn’t know how to use it in keil. Thank you so much.
STM32F103 (BLUE-PILL)
SCK (oled) to PB6
SDA(oled) to PB7
Works very well on my STM32F407 board, Thank you!
A detail…
The ssd1306_I2C_WriteMulti() function has a little bug in the counters, that is the reason why @Oleksandr Gusiev had to change SSD1306_WIDTH 128 to 129
Here is the fix
void ssd1306_I2C_WriteMulti(uint8_t address, uint8_t reg, uint8_t* data, uint16_t count) {
uint8_t dt[256];
dt[0] = reg;
uint8_t i;
for(i = 0; i < count; i++)
dt[i+1] = data[i];
HAL_I2C_Master_Transmit(&hi2c1, address, dt, count+1, 10);
}
I hope it can help to another freaky electronic lover like us 😉
Thanks.. will check and update the code
/* USER CODE BEGIN Includes */
#include “ssd1306.h”
#include “i2c-lcd.h”
/* USER CODE END Includes */
Why i2c-lcd.h in code exists,but in video are not??
/* USER CODE BEGIN Includes */
#include “ssd1306.h”
#include “i2c-lcd.h”
/* USER CODE END Includes */
Why i2c-lcd.h in code exists,but in video are not?
How I can Put float number from adc in the display?
google it. It depends on what IDE you are using.
/* Private variables ———————————————————*/
//variable para LCD
char buf[25];
int dato=1;
…….
…….
while (1)
{
dato +=1;
if(dato>1000)
dato = 5;
dato = ((float)dato/24); // for example
sprintf(buf,”Dat:%.1f”,dato); //convert dato to string
SSD1306_GotoXY (0,0);
SSD1306_Puts (buf, &Font_11x18, 1);
SSD1306_UpdateScreen(); //Update the LCD
//End of LCD display
HAL_Delay(100);
SSD1306_Clear();
}
Thanks Working good,
please tell me command to clear lcd.
to clear lcd, you need to send 0x01
But I prefer sending blank (‘ ‘) as data
thanks….
it was fantastic
Hello. I followed your guide. Thanks a lot, it helped me clarify some points, but i have some troubles. First of all https://goo.gl/XD3yQC there are some dots at right side of screen (tested on two screens, same problem). And the second, but the most important, during run in debug, screen looks https://goo.gl/UMFquG at any
debug step, and it is always so when boot pins in such a state. Please, relpy, if possible. Thanks.
I fixed this issues. First problem with point to the right – bug into the lib. You should change #define SSD1306_WIDTH 128 in ssd1306.h to 129, cause numeration is starts from zero, not 1. The second problem was it that, I changed boot pins to 1. Both should be at 0.
In mi OLED work #define SSD1306_WIDTH 130
many thanks for this, really good c code
Hi, thanks for the explanation, I’m trying to port this code to a STM32L4 family.
I have managed to change all STM32f1xx lines. As well as changes the I2C number that I’m using hi2c3.
What’s is strange is that I’m getting only one error now which is on a completely different part of the code. It’s telling me the variable “count” needs a constant value. So maybe it’s not receiving anything.
void ssd1306_I2C_WriteMulti(uint8_t address, uint8_t reg, uint8_t* data, uint16_t count) {
uint8_t dt[count + 1];
dt[0] = reg;
uint8_t i;
for(i = 1; i <= count; i++)
dt[i] = data[i-1];
HAL_I2C_Master_Transmit(&hi2c3, address, dt, count, 10);
}
thanks,very professional and useful.