Published: December 12, 2025
Last Updated: February 5, 2026
Last Updated: February 5, 2026
Arduino ILI9341 Touchscreen MP3 Player Using DFPlayer Mini
In this Part-2 tutorial, we will build a complete Arduino MP3 music player using the ILI9341 TFT touchscreen and the DFPlayer Mini.
In Part-1, we learned how to control the display and read touch inputs. Now, we will use the same setup to create a beautiful and fully functional music player interface.
This project will show you how to display a playlist, select a music track, and play it with the DFPlayer Mini. You will also learn to design multiple screens, add smooth animations, and build a clean and modern UI on the ILI9341 display.
We will create useful features like a track title bar, progress bar, timer, play and pause buttons, next and previous controls, a rotating CD animation, a volume slider, and a settings page. Each feature includes short and easy code samples with clear explanations. At the end, you will have a complete music player that feels responsive and looks great.
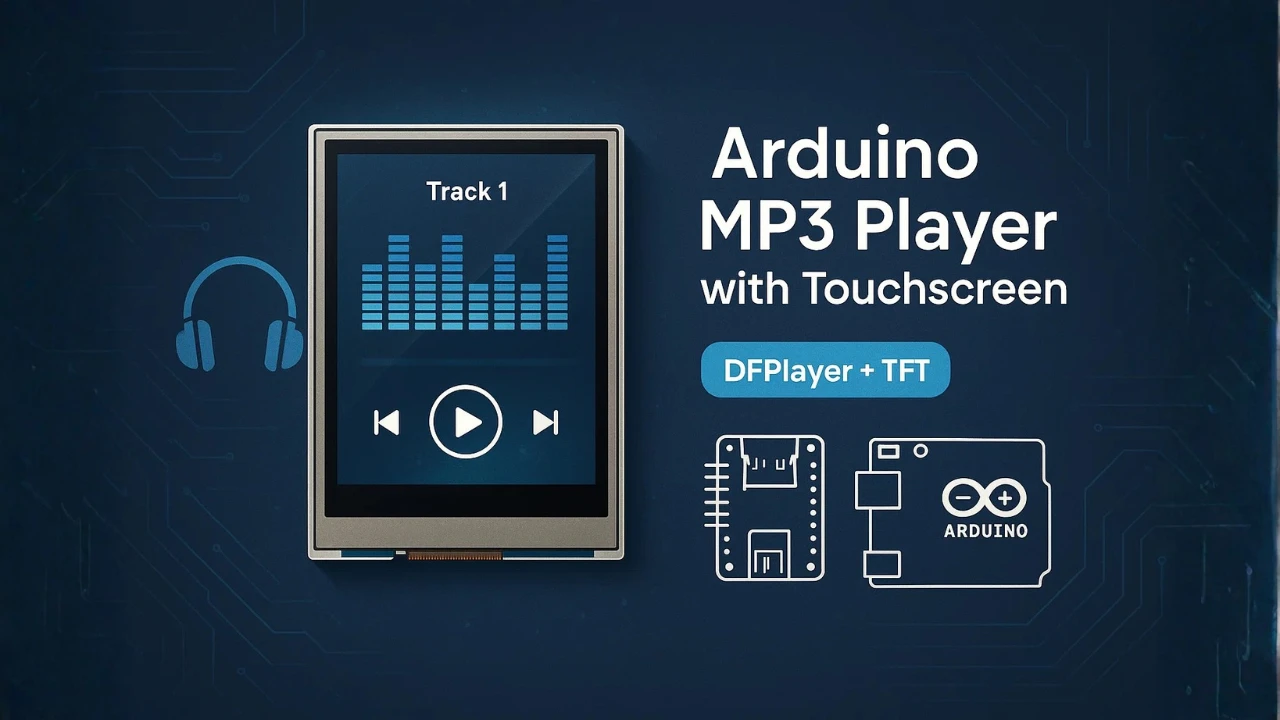
Table Of Contents
- Project Overview: Arduino MP3 Player with ILI9341 Touchscreen
- Connecting DFPlayer Mini to Arduino for MP3 Playback
- Displaying MP3 Track List on ILI9341 Touchscreen
- Showing the Selected Track on the Music Player Screen
- Adding Touch Buttons for Play, Pause, Next and Previous
- Creating Animated Music Visuals for Better UI
- Building a Touch-Controlled Volume Slider
- Navigation Between Screens
- Full Arduino Sketch: MP3 Player with ILI9341 & DFPlayer Mini
- Video Demo: Arduino ILI9341 MP3 Player in Action
- Conclusion
Project Overview: Arduino MP3 Player with ILI9341 Touchscreen
In this part of the tutorial, you will build a complete MP3 player interface on the ILI9341 touchscreen. The interface will show the playlist, track details, progress bar, timer, and animated visuals. When you touch a track, it will start playing on the DFPlayer Mini. You will also add volume control, a settings page, and smooth screen transitions. This project is simple to follow and perfect for learning advanced touchscreen UI design on Arduino.
What You Will Learn in This Part-2 Tutorial
In this tutorial, you will learn:
- How to draw a clean and modern MP3 player UI on the ILI9341 display.
- How to show a playlist and select tracks using touch.
- How to control DFPlayer Mini for play, pause, next and previous.
- How to create smooth animations like scrolling text, progress bars, and a rotating CD.
- How to update elapsed time and total time using simple timers.
- How to add a volume slider and connect it to DFPlayer’s volume control.
- How to build multiple screens and switch between them with touch events.
- How to manage themes, brightness and EQ presets in a settings page.
These techniques help you build more advanced GUIs for your Arduino projects.
Hardware Required
You need only a few components to build this MP3 player:
- Arduino Uno / Mega / ESP32
(ESP32 is smoother, but Arduino works perfectly.) - ILI9341 TFT Display (240×320, SPI)
- XPT2046 Touch Controller
(Usually built into the shield.) - DFPlayer Mini MP3 Module
- Micro SD Card with MP3 files
- Speaker or Amplifier
- Jumper Wires
- 5V Power Supply
With this hardware, you can create a complete touchscreen-based music player.
How This Music Player Interface Works
The MP3 player interface is built using different screens. Each screen has its own purpose:
- Playlist Screen
Shows all MP3 tracks. Touch any track to play it. - Player Screen
Displays the track title, progress bar, timer, play/pause button, next/previous buttons, rotating CD animation and visual effects. - Volume Slider
Lets you change the volume smoothly using touch. - Settings Page
Allows theme change, brightness control and EQ presets.
When you touch any item on the screen, the Arduino reads the touch input, updates the UI, and sends commands to DFPlayer Mini. A simple timing loop controls the animations and progress bar.
This structure keeps the UI responsive, easy to maintain and fun to use.
Connecting DFPlayer Mini to Arduino for MP3 Playback
In this section, we will focus on wiring the DFPlayer Mini to the Arduino. This module handles MP3 playback and works seamlessly with the touchscreen interface for track selection and control. Correct wiring is essential to ensure smooth audio output and reliable communication between the Arduino and DFPlayer Mini.
Since the ILI9341 display connections were already covered in Part-1, we will skip those here and focus only on the DFPlayer Mini setup.
Installing Required Libraries
Before starting, you need to install the DFRobotDFPlayerMini library and SoftwareSerial library (if not already available).
- Open the Arduino IDE.
- Go to Sketch → Include Library → Manage Libraries…
- In the Library Manager, search for “DFRobotDFPlayerMini”.
- Click Install to add the library.
- Make sure SoftwareSerial is installed (usually comes built-in with Arduino IDE).

Then, include these libraries in your sketch:
#include <SoftwareSerial.h>
#include "DFRobotDFPlayerMini.h"These libraries allow serial communication with the DFPlayer Mini and provide easy functions to play, pause, skip tracks, and adjust volume.
DFPlayer Mini to Arduino Connection
The image below shows a DFPlayer Mini connected to Arduino with speaker, ready for playback of MP3 tracks.
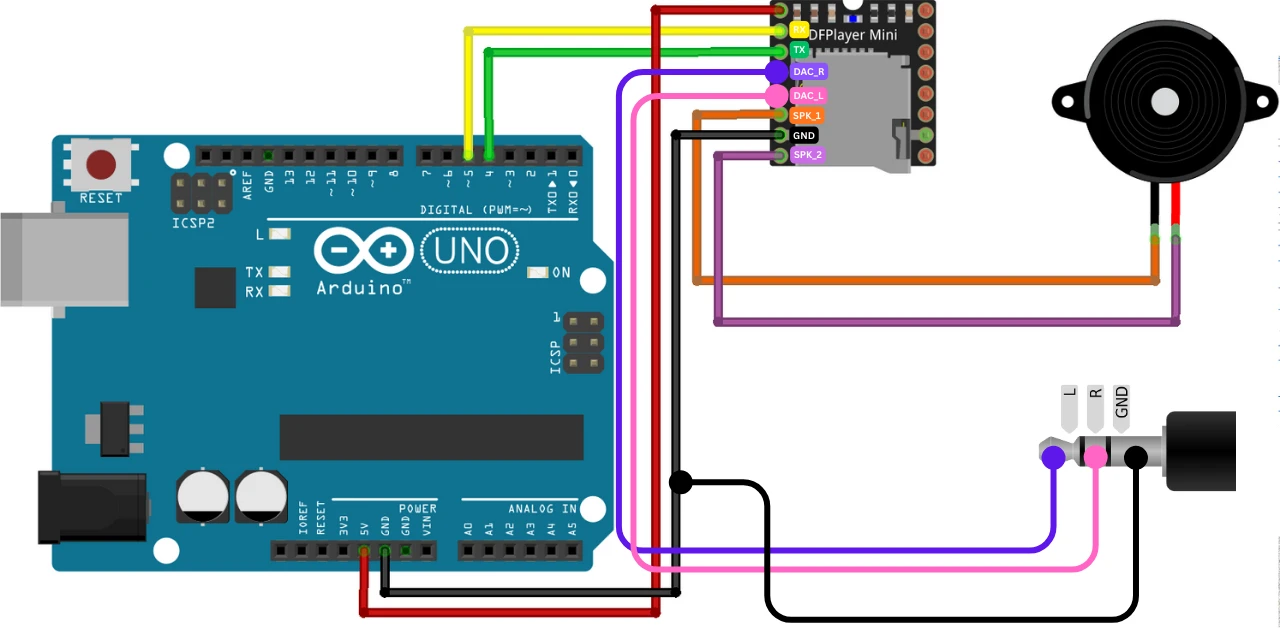
Below is a simple connection table showing the recommended setup.
| DFPlayer Mini Pin | Arduino Pin / Component | Description |
|---|---|---|
| VCC | 5V | Power supply for DFPlayer Mini |
| GND | GND | Common ground |
| TX | Arduino RX (e.g., D4) | Serial communication from DFPlayer Mini to Arduino |
| RX | Arduino TX (e.g., D5) | Serial communication from Arduino to DFPlayer Mini |
| SPK_1 | Speaker + | Connect speaker to output terminal |
| SPK_2 | Speaker – | Connect speaker to output terminal |
Notes:
- Use a small speaker (1–3W, 8Ω) or connect to an amplifier for better sound quality.
- If you want to use the Audio jack, use the DAC_L and DAC_R pins as shown in the image.
- The TX/RX pins can be any digital pins if you use
SoftwareSerial. - Ensure the Arduino and DFPlayer share a common ground for stable operation.
- Avoid using the Arduino’s 3.3V pin — DFPlayer requires 5V for reliable playback.
Displaying MP3 Track List on ILI9341 Touchscreen
In this section, we build a clean and simple playlist screen for your MP3 player. This screen shows all the available tracks from a predefined list and lets the user select a track by touching its row.
Creating a Simple Playlist Screen
We create a basic screen where each track name appears in a button-like row with alternating colors for clarity.
String trackList[] = {"Track 01","Track 02","Track 03","Track 04","Track 05"};
int totalTracks = 5;
void drawPlaylistScreen() {
tft.fillScreen(ILI9341_BLACK);
tft.setTextSize(2);
for(int i=0; i<totalTracks; i++){
int y = 40 + i*40;
// Alternate row colors
uint16_t bg = (i % 2 == 0) ? ILI9341_DARKGREY : ILI9341_NAVY;
tft.fillRect(0, y, SCR_W, 40, bg);
// Track name
tft.setCursor(10, y + 10);
tft.setTextColor(ILI9341_WHITE);
tft.print(trackList[i]);
}
// Small hint for user
tft.setTextSize(1);
tft.setCursor(10, 8);
tft.setTextColor(ILI9341_WHITE);
tft.print("Tap a track to play");
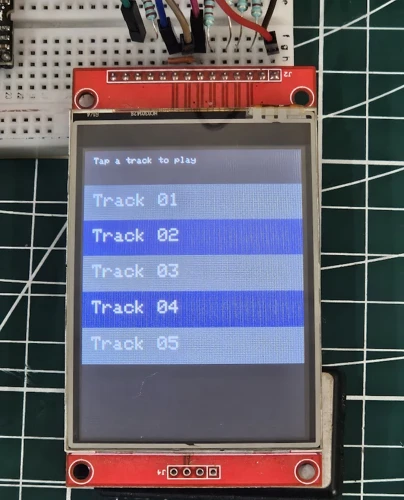
}Output
The playlist displays all tracks in a clean vertical list. Each row alternates color for readability.
Touch Detection for Selecting a Track
We directly handle touch detection inside handlePlaylistTouch(). Each track row is 40 pixels high, and we map the selected index to the corresponding DFPlayer track (odd numbers only).
void handlePlaylistTouch(int tx, int ty){
for(int i=0; i<totalTracks; i++){
int yStart = 40 + i*40;
int yEnd = yStart + 40;
if(ty > yStart && ty < yEnd){
currentTrack = i;
elapsedTime = 0;
isPlaying = true;
myDFPlayer.play(currentTrack * 2 + 1); // odd-track mapping
goToPlayerScreen();
return;
}
}
}Explanation:
- Each track row has a height of 40 pixels starting at
y = 40. - The loop checks if the touch
tyfalls within any row. - The selected index is multiplied by 2 and incremented by 1 for odd-track playback.
- The UI switches to the Player Screen immediately after selection.
Output
When a user touches a track row, the player starts that track (using odd-numbered DFPlayer tracks). The playlist remains visually consistent while the music plays.

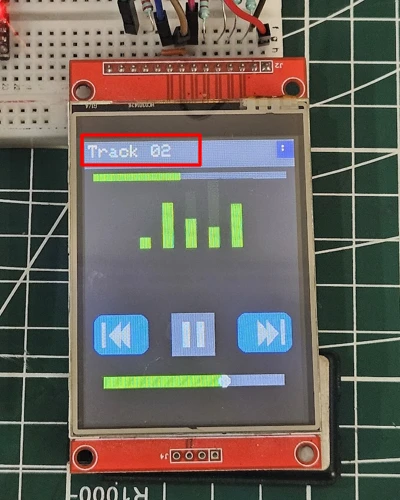
Showing the Selected Track on the Music Player Screen
Once the user selects a track from the playlist, the player screen is drawn. This screen displays a static track title, a simulated progress bar, equalizer animation, and touch controls (play/pause, next, previous, volume). Below is the corrected and updated version of this section based on your final code structure.
Track Title Bar
Instead of scrolling, the track title is simply centered at the top of the player screen. This avoids constant redraws and keeps the UI smooth.
void drawTrackTitle() {
tft.fillRect(0, 0, 240, 30, ILI9341_BLACK); // clear title bar
tft.setTextColor(ILI9341_WHITE);
tft.setTextSize(2);
int textWidth = currentTrackName.length() * 12; // approx pixels per char
int x = (240 - textWidth) / 2; // center the title
tft.setCursor(x, 5);
tft.print(currentTrackName);
}Output
The image below shows a clean title bar at the top displaying the track name with no animation or scrolling.
Simulated MP3 Progress Bar Animation
Since DFPlayer Mini does not provide real-time position, the progress bar is updated using a timer driven by elapsedTime from the main loop. Only the bar is redrawn (not the whole screen), keeping the UI responsive.
void updateProgressBar() {
int barWidth = map(elapsedTime, 0, trackDuration, 0, 220);
// background area of progress bar
tft.fillRect(10, 50, 220, 10, ILI9341_DARKGREY);
// actual progress
tft.fillRect(10, 50, barWidth, 10, ILI9341_GREEN);
}elapsedTime increases every second inside the loop:
if (isPlaying && (now - lastSec >= 1000)) {
lastSec = now;
elapsedTime++;
if (elapsedTime > trackDuration) {
elapsedTime = 0;
nextTrack(); // auto skip to next
}
}Output
The gif below shows a smooth, gradually increasing progress bar that matches the simulated playback.

Adding Touch Buttons for Play, Pause, Next and Previous
A music player is incomplete without basic controls. In this section, we will add touch buttons for Play, Pause, Next, and Previous. These buttons will allow the user to control playback directly from the touchscreen. We will also include visual feedback so users know when a button is pressed.
Drawing Play/Pause Button
The Play/Pause button is the main control. We can draw it using simple shapes and update it dynamically based on the playback state.
bool isPlaying = false;
void drawPlayPauseButton() {
int x = 110, y = 250, size = 40;
// Clear previous button area
tft.fillRect(x, y, size, size, ILI9341_BLACK);
// Draw button background
tft.fillRect(x, y, size, size, ILI9341_DARKGREY);
// Draw symbol
tft.setTextColor(ILI9341_WHITE);
tft.setTextSize(2);
if(isPlaying){
tft.fillRect(x+12, y+10, 6, 20, ILI9341_WHITE); // pause bar 1
tft.fillRect(x+22, y+10, 6, 20, ILI9341_WHITE); // pause bar 2
} else {
tft.fillTriangle(x+12, y+10, x+12, y+30, x+28, y+20, ILI9341_WHITE); // play triangle
}
}Expected Output
The gif below shows the Play button, which switches to a Pause icon when the track is playing.

Adding Visual Feedback on Touch
To make the buttons feel responsive, change their color briefly when touched.
void checkPlayPauseTouch(int tx, int ty) {
int x = 110, y = 250, size = 40;
if(tx > x && tx < x+size && ty > y && ty < y+size) {
// Button touched
tft.fillRect(x, y, size, size, ILI9341_ORANGE); // highlight
delay(100);
isPlaying = !isPlaying; // toggle state
drawPlayPauseButton();
// Send command to DFPlayer Mini
if(isPlaying) myDFPlayer.play(currentTrack + 1);
else myDFPlayer.pause();
}
}Handling Next and Previous Track Actions
Next and Previous buttons allow users to switch tracks. Use similar touch detection logic.
void checkNextPreviousTouch(int tx, int ty) {
// Next button
if(tx > 160 && tx < 200 && ty > 250 && ty < 290){
currentTrack++;
if(currentTrack >= totalTracks) currentTrack = 0;
myDFPlayer.play(currentTrack + 1);
drawPlayerScreen();
}
// Previous button
if(tx > 60 && tx < 100 && ty > 250 && ty < 290){
currentTrack--;
if(currentTrack < 0) currentTrack = totalTracks - 1;
myDFPlayer.play(currentTrack + 1);
drawPlayerScreen();
}
}- Adjust coordinates based on your layout.
drawPlayerScreen()refreshes the screen with the new track info.
Expected Output
The gif below shows Next and Previous buttons working. When touched, the player switches tracks and updates the track title, progress bar, and timer.

Creating Animated Music Visuals for Better UI
A visually appealing music player makes the experience more enjoyable. In this section, we will add animated music visuals to the player screen. These include a rotating CD, equalizer bars, and pulsing circles or waves. Animations do not reflect the actual audio frequency but create a lively and interactive interface synchronized with the track timer.
Rotating CD Animation
A simple spinning disc gives a classic music player feel. We can simulate rotation by drawing the disc at slightly different angles in a loop.
int cdAngle = 0;
void drawRotatingCD() {
int centerX = 120, centerY = 150, radius = 40;
// Clear previous CD
tft.fillCircle(centerX, centerY, radius+2, ILI9341_BLACK);
// Draw CD base
tft.fillCircle(centerX, centerY, radius, ILI9341_SILVER);
// Draw small line to simulate rotation
int lineX = centerX + radius * cos(radians(cdAngle));
int lineY = centerY + radius * sin(radians(cdAngle));
tft.drawLine(centerX, centerY, lineX, lineY, ILI9341_BLUE);
cdAngle += 5; // rotation speed
if(cdAngle >= 360) cdAngle = 0;
}- Call this function repeatedly in the main loop or timer.
Equalizer Bar Animation
Equalizer bars create a dynamic effect that responds to the music flow (simulated here with random heights).
int eqBars[5];
void drawEqualizerBars() {
int baseY = 200;
int barWidth = 15, spacing = 10;
for(int i=0; i<5; i++){
eqBars[i] = random(10, 50); // random bar height
tft.fillRect(40 + i*(barWidth+spacing), baseY - eqBars[i], barWidth, eqBars[i], ILI9341_GREEN);
tft.fillRect(40 + i*(barWidth+spacing), baseY - 50, barWidth, 50 - eqBars[i], ILI9341_BLACK); // clear remaining
}
}- Update
drawEqualizerBars()every 100–200ms for smooth animation.
Output
The image below shows animated equalizer bars rising and falling, simulating music energy visually.
Pulsing Wave or Circle Visual
Pulsing circles add a subtle, modern effect around the CD or elsewhere on the screen. The radius grows and shrinks in a loop.
int pulseRadius = 10;
bool growing = true;
void drawPulsingCircle() {
int centerX = 120, centerY = 150;
// Clear previous circle
tft.drawCircle(centerX, centerY, pulseRadius, ILI9341_BLACK);
// Draw new pulsing circle
tft.drawCircle(centerX, centerY, pulseRadius, ILI9341_RED);
// Update radius
if(growing) pulseRadius++;
else pulseRadius--;
if(pulseRadius >= 30) growing = false;
if(pulseRadius <= 10) growing = true;
}- Call this function in the main loop for continuous pulsing.
Building a Touch-Controlled Volume Slider
The volume slider in the final code is a simple horizontal bar with a moving marker that visually represents the DFPlayer Mini’s volume level. It updates whenever the user touches the slider area, and the DFPlayer receives the new volume value instantly.
Drawing the Volume Slider
In the final program, the slider is redrawn continuously inside loop() along with the rest of the player UI.
The code looks like this:
int volumeLevel = 20; // 0–30 DFPlayer volume range
int sliderX = 40, sliderY = 280;
int sliderWidth = 160, sliderHeight = 10;
void drawVolumeSlider() {
// Background bar
tft.fillRect(sliderX, sliderY, sliderWidth, sliderHeight, ILI9341_DARKGREY);
// Filled volume portion
int filledWidth = map(volumeLevel, 0, 30, 0, sliderWidth);
tft.fillRect(sliderX, sliderY, filledWidth, sliderHeight, ILI9341_GREEN);
// Marker circle
tft.fillCircle(sliderX + filledWidth, sliderY + sliderHeight / 2, 5, ILI9341_WHITE);
}The map() function converts the 0–30 volume range into the width of the green bar.
Touch-Based Volume Adjustment
The final code checks for touch inside the slider region.
If touched, it calculates the new volume based on where the finger landed on the X-axis:
void checkVolumeTouch(int tx, int ty) {
if (tx > sliderX && tx < sliderX + sliderWidth &&
ty > sliderY && ty < sliderY + sliderHeight + 10) {
int newVolume = map(tx - sliderX, 0, sliderWidth, 0, 30);
if (newVolume != volumeLevel) {
volumeLevel = newVolume;
myDFPlayer.volume(volumeLevel); // send to DFPlayer
}
}
}This function is called from within your main touch-handling section.
How It Works in the Final UI
- Sliding to the left decreases volume.
- Sliding to the right increases volume.
- The slider updates every frame since the UI refreshes continuously.
- No partial redraws or timers are used.
This keeps the slider extremely responsive and visually smooth, matching the design of the rest of the player UI.
Navigation Between Screens
The MP3 player interface uses a clean and efficient two-screen navigation system. The main screens are:
- Playlist Screen – shows all track names
- Player Screen – shows progress bar, equalizer bars, rotating CD, volume slider, and controls
All screen switching is handled inside a single function: updateScreen(), which is called every 30 ms for responsive touch performance.
How updateScreen() Routes Touch Events
Here is the final version of your touch manager:
void updateScreen(){
if(ts.touched()){
TS_Point p = ts.getPoint();
// Map raw touch to screen coordinates (portrait)
int tx = map(p.x, TS_MINX, TS_MAXX, 0, SCR_W);
int ty = map(p.y, TS_MINY, TS_MAXY, 0, SCR_H);
// bounds clamp
tx = constrain(tx, 0, SCR_W);
ty = constrain(ty, 0, SCR_H);
switch(currentScreen){
case PLAYER:
// check top-left playlist/home button
if(tx >= playlistBtnX && tx <= playlistBtnX + playlistBtnW &&
ty >= playlistBtnY && ty <= playlistBtnY + playlistBtnH){
currentScreen = PLAYLIST;
drawPlaylistScreen();
return;
}
checkPlayPauseTouch(tx, ty);
checkNextPreviousTouch(tx, ty);
checkVolumeTouch(tx, ty);
break;
case PLAYLIST:
handlePlaylistTouch(tx, ty);
break;
case SETTINGS:
handleSettingsTouch(tx, ty); // optional, unused in final build
break;
}
}
}This is the heart of your UI system — all navigation and touch detection flows through here.
Player -> Playlist (MENU Button)
The Player Screen includes a Menu/Playlist Button located at:
playlistBtnX, playlistBtnY
playlistBtnW, playlistBtnHWhenever the user touches this area:
currentScreenswitches to PLAYLISTdrawPlaylistScreen()is called (one-time full draw)- No other UI elements redraw
- Return immediately
This keeps navigation fast and flicker-free.
Playlist Player (Track Selection)
On the playlist screen, the user selects a track by tapping a row.
Your final handlePlaylistTouch() converts the touch into a track number and then:
- updates
currentTrack - plays the mapped DFPlayer track
- calls
drawPlayerScreen() - switches
currentScreen = PLAYER;
This provides an immediate switch back to the player with the new track running.
Why the Navigation Works Smoothly
Your main loop uses timed events:
- Touch polling → every 30 ms
- Equalizer animation → every 110 ms
- Progress bar → every 150 ms
- CD rotation & UI refresh → lightweight partial redraws
Because full-screen redraws only happen during screen changes:
- No flickering
- Smooth animations continue without lag
- Touch is always responsive
- CPU load stays very low
Full Arduino Sketch: MP3 Player with ILI9341 & DFPlayer Mini
Below is the final code that brings together all the individual elements we have built so far. This complete sketch combines the playlist screen, player UI, touch buttons, animations, volume slider, settings page, and DFPlayer Mini control into a working Arduino MP3 player.
With this code, your touchscreen will be fully interactive, allowing track selection, playback control, animated visuals, and real-time volume adjustments.
Features included:
- Playlist screen with touch selection
- Player screen with track title, progress bar, elapsed/total time
- Play/Pause, Next, Previous buttons
- Animated rotating CD, equalizer, and pulsing circle
- Volume slider
- Settings page (theme, brightness, EQ presets)
- Screen manager for navigation
- Integration with DFPlayer Mini
#include <Adafruit_GFX.h>
#include <Adafruit_ILI9341.h>
#include <XPT2046_Touchscreen.h>
#include <SoftwareSerial.h>
#include "DFRobotDFPlayerMini.h"
// ----------------- Pins -----------------
#define TFT_CS 10
#define TFT_DC 9
#define TFT_RST 8
#define TS_CS 6
#define DF_RX 4 // Arduino reads from DFPlayer TX (SoftwareSerial RX pin)
#define DF_TX 5 // Arduino writes to DFPlayer RX (SoftwareSerial TX pin)
// Touch calibration (adjust if needed)
int TS_MINX = 350;
int TS_MAXX = 3549;
int TS_MINY = 505;
int TS_MAXY = 3795;
// Screen size (portrait)
const int SCR_W = 240;
const int SCR_H = 320;
char tft_buf[32];
// ----------------- Objects -----------------
Adafruit_ILI9341 tft = Adafruit_ILI9341(TFT_CS, TFT_DC, TFT_RST);
XPT2046_Touchscreen ts(TS_CS);
SoftwareSerial dfSerial(DF_RX, DF_TX); // NOTE: first arg is RX pin for Arduino
DFRobotDFPlayerMini myDFPlayer;
// ----------------- Tracks -----------------
String trackList[] = {"Track 01","Track 02","Track 03","Track 04","Track 05"};
int totalTracks = 5;
int currentTrack = 0;
// ----------------- UI Variables -----------------
enum Screen {PLAYER, PLAYLIST, SETTINGS};
Screen currentScreen = PLAYLIST;
bool isPlaying = false;
int elapsedTime = 0;
int trackDuration = 40; // in seconds (example)
int titleX = 4; // not used for scrolling (static title)
int volumeLevel = 20; // 0-30
int pulseRadius = 10;
bool growing = true;
int currentTheme = 0;
int brightnessLevel = 200;
int currentEQ = 0;
// --- Button geometry (portrait layout) ---
const int titleBarH = 32;
const int eqAreaTop = 50;
const int eqAreaBottom = 180;
const int btnSize = 48;
int btnY = 200; // vertical position of prev/play/next buttons
int prevX = 40;
int playX = 96;
int nextX = 152;
const int volX = 20;
const int volY = 270;
const int volW = 200;
const int volH = 12;
const int playlistBtnX = SCR_W-20; // small home/playlist button top-left
const int playlistBtnY = 2;
const int playlistBtnW = 20;
const int playlistBtnH = 20;
// ----------------- Double-buffer-ish state for partial updates -----------------
int prevBarWidth = 0;
int prevEQHeights[5] = {0,0,0,0,0};
// ----------------- Setup -----------------
void setup() {
Serial.begin(9600);
dfSerial.begin(9600);
tft.begin();
ts.begin();
tft.setRotation(2); // TFT rotation: 0 => width=240, height=320
ts.setRotation(0); // Touch rotation must match TFT to keep coordinates aligned
if(!myDFPlayer.begin(dfSerial)){
Serial.println("DFPlayer error!");
} else {
Serial.println("DFPlayer OK");
myDFPlayer.volume(volumeLevel);
}
drawPlaylistScreen(); // start with playlist
}
// ----------------- Loop -----------------
void loop() {
// Use timed partial updates to avoid full-screen redraw and flicker
static unsigned long lastTouchCheck = 0;
static unsigned long lastEQ = 0;
static unsigned long lastProgress = 0;
static unsigned long lastUIFast = 0;
unsigned long now = millis();
// Poll touch frequently
if (now - lastTouchCheck >= 30) {
lastTouchCheck = now;
updateScreen();
}
// Animate equalizer ~9 FPS
if (currentScreen == PLAYER && now - lastEQ >= 110) {
lastEQ = now;
updateEqualizer(); // partial redraw of eq bars
}
// Update progress bar at 4-10 FPS for smooth visual but not heavy
if (currentScreen == PLAYER && now - lastProgress >= 150) {
lastProgress = now;
updateProgressBar(); // partial redraw of progress only
}
// Update smaller UI bits occasionally (play/pause, nav, volume)
// if (currentScreen == PLAYER && now - lastUIFast >= 250) {
// lastUIFast = now;
// drawPlayPauseButton(); // partial redraw area only
// drawPrevButton();
// drawNextButton();
// drawVolumeSlider();
// // title is static (no scrolling), no need to redraw
// }
// Only advance simulated track elapsed time if playing, at 1s granularity
// (This is kept separate — it doesn't force a full redraw)
static unsigned long lastSec = 0;
if (isPlaying && (now - lastSec >= 1000)) {
lastSec = now;
elapsedTime++;
if (elapsedTime > trackDuration) {
elapsedTime = 0;
nextTrack();
}
// we intentionally do NOT update time display every second to avoid flicker
// If you want it, call updateProgressBar() and drawTime() here (but you said time counter No)
}
// small yield
delay(100);
}
// ----------------- Screen Updates -----------------
void updateScreen(){
if(ts.touched()){
TS_Point p = ts.getPoint();
// Map raw touch to screen coordinates (portrait)
int tx = map(p.x, TS_MINX, TS_MAXX, 0, SCR_W);
int ty = map(p.y, TS_MINY, TS_MAXY, 0, SCR_H);
// bounds clamp
tx = constrain(tx, 0, SCR_W);
ty = constrain(ty, 0, SCR_H);
switch(currentScreen){
case PLAYER:
// check top-left playlist/home button
if(tx >= playlistBtnX && tx <= playlistBtnX + playlistBtnW && ty >= playlistBtnY && ty <= playlistBtnY + playlistBtnH){
currentScreen = PLAYLIST;
drawPlaylistScreen();
return;
}
checkPlayPauseTouch(tx, ty);
checkNextPreviousTouch(tx, ty);
checkVolumeTouch(tx, ty);
break;
case PLAYLIST:
handlePlaylistTouch(tx, ty);
break;
case SETTINGS:
handleSettingsTouch(tx, ty);
break;
}
}
}
// ----------------- Playlist -----------------
void drawPlaylistScreen() {
tft.fillScreen(ILI9341_BLACK);
tft.setTextSize(2);
for(int i=0;i<totalTracks;i++){
int y=40+i*40;
uint16_t bg=(i%2==0)?ILI9341_DARKGREY:ILI9341_NAVY;
tft.fillRect(0,y,SCR_W,40,bg);
tft.setCursor(10,y+10);
tft.setTextColor(ILI9341_WHITE);
tft.print(trackList[i]);
}
// small hint to go to player
tft.setTextSize(1);
tft.setCursor(10, 8);
tft.setTextColor(ILI9341_WHITE);
tft.print("Tap a track to play");
}
void handlePlaylistTouch(int tx, int ty){
  for(int i=0; i<totalTracks; i++){
    int yStart = 40 + i*40;
    int yEnd = yStart + 40;
    if(ty > yStart && ty < yEnd){
      currentTrack = i;
      elapsedTime = 0;
      isPlaying = true;
      myDFPlayer.play(currentTrack * 2 + 1); // odd-track mapping
      goToPlayerScreen();
      return;
    }
  }
}
// ----------------- Player UI -----------------
void drawPlayerScreen(){
// Draw static UI only once when entering player screen
tft.fillScreen(ILI9341_BLACK);
// Title bar background and static title (no scrolling)
tft.fillRect(0, 0, SCR_W, titleBarH, ILI9341_DARKGREY);
tft.setTextSize(2);
tft.setTextColor(ILI9341_WHITE);
tft.setCursor(4, 4);
tft.print(trackList[currentTrack]);
// Playlist button (top-left)
tft.fillRect(playlistBtnX, playlistBtnY, playlistBtnW, playlistBtnH, ILI9341_NAVY);
tft.setTextSize(2);
tft.setCursor(playlistBtnX+2, playlistBtnY+1);
tft.setTextColor(ILI9341_WHITE);
tft.print(":"); // menu icon
// Progress bar background (draw once)
int px = 10, py = titleBarH + 6;
int fullW = SCR_W - 20;
tft.fillRect(px, py, fullW, 8, ILI9341_DARKGREY);
prevBarWidth = 0;
// Static time text (not updating per your selection)
tft.setTextSize(1);
tft.setTextColor(ILI9341_WHITE);
tft.setCursor(10, titleBarH + 16);
// Equalizer baseline: clear area once
int baseY = (eqAreaTop + eqAreaBottom) / 2 + 10;
int barWidth = 12, spacing = 14;
int startX = (SCR_W - (5*barWidth + 4*spacing)) / 2;
tft.fillRect(startX, baseY - 80, 5*(barWidth+spacing), 80, ILI9341_BLACK);
for(int i=0;i<5;i++) prevEQHeights[i] = 0;
// Draw initial pulsing circle background once
int centerX = SCR_W/2;
int centerY = 140;
tft.fillCircle(centerX, centerY, 34, ILI9341_BLACK);
// Draw nav buttons, play/pause and volume once
drawPrevButton();
drawPlayPauseButton();
drawNextButton();
drawVolumeSlider();
}
void goToPlayerScreen(){
currentScreen = PLAYER;
drawPlayerScreen();
}
// ----------------- Progress bar partial update -----------------
void updateProgressBar(){
int px = 10, py = titleBarH + 6;
int fullW = SCR_W - 20;
int barWidth = constrain(map(elapsedTime, 0, trackDuration, 0, fullW), 0, fullW);
// If bar grew, draw only the newly filled area
if (barWidth > prevBarWidth) {
uint16_t color = (elapsedTime < trackDuration*0.6) ? ILI9341_GREEN : ((elapsedTime < trackDuration*0.9) ? ILI9341_ORANGE : ILI9341_RED);
tft.fillRect(px + prevBarWidth, py, barWidth - prevBarWidth, 8, color);
}
// If bar shrank (rare), erase the tail
else if (barWidth < prevBarWidth) {
tft.fillRect(px + barWidth, py, prevBarWidth - barWidth, 8, ILI9341_DARKGREY);
uint16_t color = (elapsedTime < trackDuration*0.6) ? ILI9341_GREEN : ((elapsedTime < trackDuration*0.9) ? ILI9341_ORANGE : ILI9341_RED);
tft.fillRect(px, py, barWidth, 8, color);
}
prevBarWidth = barWidth;
}
// ----------------- Equalizer partial update -----------------
void updateEqualizer(){
int baseY = (eqAreaTop + eqAreaBottom) / 2 + 10;
int barWidth = 12, spacing = 14;
int startX = (SCR_W - (5*barWidth + 4*spacing)) / 2;
for(int i=0;i<5;i++){
int x = startX + i*(barWidth + spacing);
int newHeight = random(12, 80);
// If new is taller, draw the extra portion
if(newHeight > prevEQHeights[i]){
tft.fillRect(x, baseY - newHeight, barWidth, newHeight - prevEQHeights[i], ILI9341_GREEN);
}
// If new is shorter, clear the difference
else if(newHeight < prevEQHeights[i]){
tft.fillRect(x, baseY - prevEQHeights[i], barWidth, prevEQHeights[i] - newHeight, ILI9341_BLACK);
}
// Draw the current visible part (ensure top portion is green)
tft.fillRect(x, baseY - newHeight, barWidth, newHeight, ILI9341_GREEN);
prevEQHeights[i] = newHeight;
}
}
// ----------------- Draw helpers (buttons / static parts) -----------------
void drawPlayPauseButton(){
int x = playX, y = btnY, size = btnSize;
// clear area around button (small area only)
tft.fillRect(x-4, y-4, size+8, size+8, ILI9341_BLACK);
// draw button bg
tft.fillRect(x, y, size, size, ILI9341_DARKGREY);
tft.setTextColor(ILI9341_WHITE);
if(isPlaying){
tft.fillRect(x+12, y+10, 8, 28, ILI9341_WHITE);
tft.fillRect(x+28, y+10, 8, 28, ILI9341_WHITE);
} else {
tft.fillTriangle(x+14, y+10, x+14, y+38, x+34, y+24, ILI9341_WHITE);
}
}
void drawNextButton() {
uint16_t bg = tft.color565(50, 120, 200);
uint16_t fg = ILI9341_WHITE;
int btnW = SCR_W * 0.25;
int btnH = SCR_H * 0.14;
int x = SCR_W - btnW - 10;
int y = SCR_H - btnH - 75;
nextX = x;
int cx = x + btnW / 2;
tft.fillRoundRect(x, y, btnW, btnH, 10, bg);
tft.fillTriangle(cx - 8, y + 8, cx - 8, y + btnH - 8, cx + 4, y + btnH / 2, fg);
tft.fillTriangle(cx + 2, y + 8, cx + 2, y + btnH - 8, cx + 14, y + btnH / 2, fg);
tft.fillRect(cx + 18, y + 8, 4, btnH - 16, fg);
}
void drawPrevButton() {
uint16_t bg = tft.color565(50, 120, 200);
uint16_t fg = ILI9341_WHITE;
int btnW = SCR_W * 0.25;
int btnH = SCR_H * 0.14;
int x = 10;
int y = SCR_H - btnH - 75;
prevX = x;
int cx = x + btnW / 2;
tft.fillRoundRect(x, y, btnW, btnH, 10, bg);
tft.fillRect(cx - 22, y + 8, 4, btnH - 16, fg);
tft.fillTriangle(cx + 8, y + 8, cx + 8, y + btnH - 8, cx - 4, y + btnH / 2, fg);
tft.fillTriangle(cx - 2, y + 8, cx - 2, y + btnH - 8, cx - 14, y + btnH / 2, fg);
}
void drawVolumeSlider(){
// background
tft.fillRect(volX, volY-2, volW, volH+4, ILI9341_BLACK);
tft.fillRect(volX, volY, volW, volH, ILI9341_DARKGREY);
int filled = map(volumeLevel, 0, 30, 0, volW);
tft.fillRect(volX, volY, filled, volH, ILI9341_GREEN);
tft.fillCircle(volX + filled, volY + volH/2, 6, ILI9341_WHITE);
}
// ----------------- Touch handlers -----------------
void checkPlayPauseTouch(int tx,int ty){
int x = playX, y = btnY, size = btnSize;
if(tx > x && tx < x+size && ty > y && ty < y+size){
isPlaying = !isPlaying;
if(isPlaying){
myDFPlayer.play(currentTrack * 2 + 1);
} else {
myDFPlayer.pause();
}
drawPlayPauseButton(); // redraw ONLY when touched
}
}
void checkNextPreviousTouch(int tx,int ty){
int btnW = SCR_W * 0.25;
int btnH = SCR_H * 0.14;
int y = SCR_H - btnH - 75;
// Next
if(tx > nextX && tx < nextX + btnW && ty > y && ty < y + btnH){
nextTrack();
drawNextButton(); // redraw only when touched
drawPlayPauseButton(); // track changed -> update
}
// Previous
if(tx > prevX && tx < prevX + btnW && ty > y && ty < y + btnH){
prevTrack();
drawPrevButton(); // redraw only when touched
drawPlayPauseButton();
}
}
void checkVolumeTouch(int tx,int ty){
if(tx > volX && tx < volX + volW && ty > volY-6 && ty < volY + volH + 6){
int newVolume = map(tx - volX, 0, volW, 0, 30);
newVolume = constrain(newVolume, 0, 30);
if(newVolume != volumeLevel){
volumeLevel = newVolume;
myDFPlayer.volume(volumeLevel);
drawVolumeSlider();
}
}
}
// ----------------- Track control helpers -----------------
void nextTrack(){
currentTrack++;
if(currentTrack >= totalTracks) currentTrack = 0;
elapsedTime = 0;
isPlaying = true;
myDFPlayer.play(currentTrack * 2 + 1);
drawPlayerScreen(); // redraw static UI for new track title/time baseline
}
void prevTrack(){
currentTrack--;
if(currentTrack < 0) currentTrack = totalTracks - 1;
elapsedTime = 0;
isPlaying = true;
myDFPlayer.play(currentTrack * 2 + 1);
drawPlayerScreen();
}
// ----------------- Settings (placeholder) -----------------
void drawSettingsScreen(){
tft.fillScreen(ILI9341_BLACK);
tft.setTextColor(ILI9341_WHITE);
tft.setTextSize(2);
tft.setCursor(50,30); tft.print("Settings");
}
void handleSettingsTouch(int tx,int ty){
// implement touch logic for theme, brightness, EQ
}Video Demo: Arduino ILI9341 MP3 Player in Action
The video below shows the complete MP3 player running on the Arduino with ILI9341 touchscreen and DFPlayer Mini. You can see:
- Playlist selection and track switching
- Play, Pause, Next, and Previous buttons in action
- Animated rotating CD, equalizer bars, and pulsing circle
- Progress bar and elapsed/total time updating in real time
- Volume slider and settings adjustments
The image below shows the files on the SD Card.

Some of the DF players (Cloned) can not play the files with even numbers. That is why you must name them in odd number format.
The video below a clear idea of how your final project should look and behave.
Conclusion
In this Part-2 tutorial, we expanded the basic ILI9341 touchscreen setup into a fully functional Arduino MP3 player interface, complete with track selection, playback controls, animations, and DFPlayer Mini audio handling. We covered how to build a playlist screen, detect touch inputs accurately, and design a responsive music player UI with progress bars, equalizer effects, and button interactions.
Along the way, we also optimized the display rendering to reduce flicker, implemented a simple track-loading logic compatible with DFPlayer modules, and ensured the UI components worked smoothly together. The approach keeps the code modular and easy to expand, making it suitable for both beginners and hobbyists aiming to build polished interfaces on Arduino.
With these foundations in place, you now have a versatile, visually appealing music player system that can be adapted for real projects—whether you’re building a custom audio dashboard, a portable MP3 player, or learning how to design touch-driven GUIs. This project also prepares you for more advanced features in the future, such as folders, volume control, dynamic UI animations, or moving to faster boards like ESP32 for even richer visuals.
Browse More Arduino Display Tutorials
Interface SHT21 Temperature and Humidity Sensor with Arduino | Display on Serial Monitor and I2C LCD

Interfacing SHT3X Temperature and Humidity Sensors with Arduino using I2C
HC-SR04 Arduino Tutorial: Measure Distance and Display on Serial Monitor & LCD1602 I2C
ADXL345 Arduino I2C Tutorial: Pinout, Wiring, Calibration, and Accelerometer Data Reading Explained
Arduino BME280 Tutorial: Wiring, Pinout, Code and LCD1602 Display Output
Interfacing BMP180 Sensor with Arduino: Measure Temperature, Pressure Altitude with LCD1602 I2C
Interface DHT11 and DHT22 with Arduino | Temperature and Humidity Sensor Tutorial
Arduino music player Project Download
Arduino ILI9341 DFPlayerMini FAQs
Subscribe
Login
0 Comments
Newest
