Home ▸ Uncategorized ▸
Published: March 17, 2026
Last Updated: March 17, 2026
Last Updated: March 17, 2026
STM32 FreeRTOS Mutex : How to Use Mutex to Fix Priority Inversion
In the previous tutorial, we covered semaphores in FreeRTOS and saw how they can be used to protect shared resources between tasks. We also saw a problem called priority inversion, where a high priority task ends up waiting for a low priority task, and a medium priority task makes things even worse by preempting the low priority task in between.
In this tutorial, we will solve that problem using a mutex. A mutex works similarly to a semaphore, but it has one key advantage — it implements priority inheritance, which prevents priority inversion from happening.
We will also cover recursive mutexes, which solve another problem called deadlock that can occur when the same task tries to acquire a mutex more than once.
Here is what we will cover in this tutorial:
- Why a mutex is better than a semaphore for protecting shared resources
- How priority inheritance works and how it prevents priority inversion
- What a recursive mutex is and when to use it
This tutorial is part of the STM32 FreeRTOS series. If you haven’t read the previous parts, I recommend starting from the beginning so you have the necessary background. You can find the links below:
- CMSIS RTOS Setup and LED blinking
- Creating Multiple Tasks and Priorities in CMSIS RTOS
- How to use Queues for inter task communication
- Using Semaphores in CMSIS RTOS
What is a Mutex in FreeRTOS?
A mutex (short for Mutual Exclusion) is a synchronization primitive used to protect shared resources in a multitasking system. Just like a semaphore, only one task can hold the mutex at a time. Any other task that tries to acquire it will be blocked until the mutex is released.
But a mutex is not just a semaphore with a different name. It has a very important feature that a semaphore does not : priority inheritance. This is what makes a mutex the right tool for protecting shared resources between tasks of different priorities.
Mutex vs Semaphore – What is the Difference?
On the surface, a mutex and a binary semaphore look very similar. Both allow only one task to access a shared resource at a time. But there is one fundamental difference between them.
A semaphore has no concept of ownership. Any task can release a semaphore, even if it was not the one that acquired it. A mutex, on the other hand, has ownership, therefore, only the task that acquired the mutex can release it.
This ownership concept is what enables priority inheritance, which we will see in a moment.
The table below shows the comparison between semaphore and mutex:
| Feature | Semaphore | Mutex |
|---|---|---|
| Ownership | No | Yes |
| Priority Inheritance | No | Yes |
| Default State | Available or Depleted | Always Available |
| Recursive Acquire | No | Only with Recursive Mutex |
| Use Case | Task Signaling | Resource Protection |
How Does Priority Inheritance Work?
Let’s say we have three tasks — a low priority task (LPT), a medium priority task (MPT), and a high priority task (HPT).
- LPT acquires the mutex and starts using the shared resource.
- HPT wakes up and tries to acquire the mutex, but it is already held by LPT, so HPT has to wait.
- MPT wakes up and since it does not need the mutex, it preempts LPT and starts running.
- Now LPT cannot release the mutex because MPT is occupying the CPU.
- HPT is stuck waiting, not because of the mutex, but because MPT is indirectly blocking LPT.
This is priority inversion. Here HPT is waiting while MPT is running, which effectively reverses their priorities.
The image below demonstrates the priority inversion caused while using a semaphore.
With a mutex, FreeRTOS solves this automatically using priority inheritance. The moment HPT starts waiting for the mutex, FreeRTOS temporarily raises the priority of LPT to match HPT. This means LPT now has a higher priority than MPT, so MPT cannot preempt it anymore.
The diagram below illustrates this:
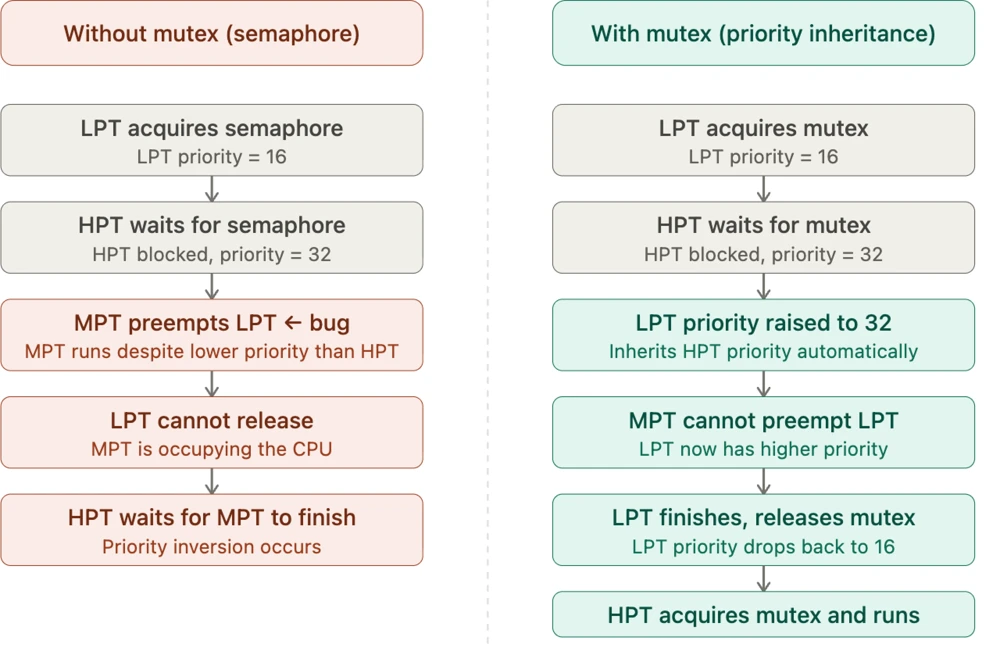
Once LPT releases the mutex, its priority is immediately dropped back to its original value. This priority boost is temporary and automatic and FreeRTOS handles it internally.
This is the core reason why you should always use a mutex instead of a semaphore when protecting shared resources between tasks of different priorities.
Setting Up the FreeRTOS Mutex in STM32CubeIDE
Before we write any task code, we need to configure the mutex in STM32CubeMX. We need four tasks and one mutex for this part.
Configuring Tasks
Go to Middleware → FreeRTOS and open the Tasks and Queues tab. We need four tasks here. LPT and HPT will compete for the shared resource, and MPT will simply run without needing the mutex. VHPT will print the priorities of all the other tasks peridically.
The image below shows the four tasks configured in CubeMX:
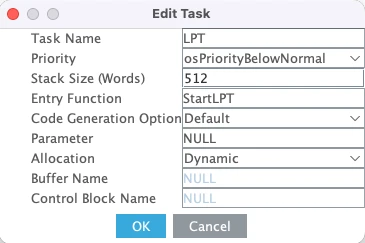
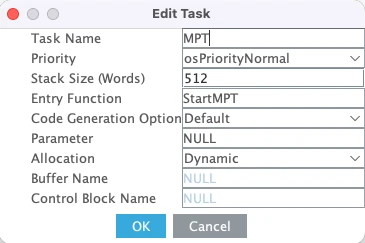
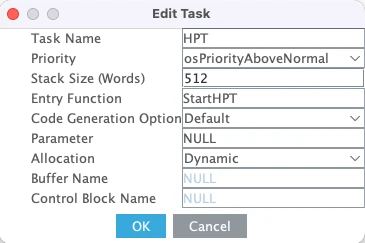
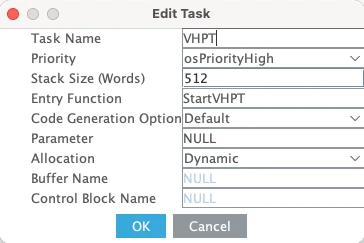
Here is a quick breakdown of each task:
- LPT is the low priority task. Set its priority to Below Normal and stack size to 512 words. This task will acquire the mutex and simulate resource usage for a few seconds.
- MPT is the medium priority task. Set its priority to Normal and stack size to 512 words. This task will try to preempt LPT while it is holding the mutex.
- HPT is the high priority task. Set its priority to Above Normal and stack size to 512 words. This task also needs the mutex to run, so it will be blocked whenever LPT holds it.
- VHPT is the Very high priority task. Set its priority to High and stack size to 512 words. This task will print the priorities of the other tasks periodically.
We are using 512 words for all three tasks because we will be printing logs using printf, which needs a decent amount of stack space.
Adding a Mutex in STM32CubeMX
Now go to the Mutex tab. Here you will see two types of mutexes available:
- Mutex — the standard mutex with priority inheritance
- Recursive Mutex — a mutex that the same task can acquire multiple times
We will cover the recursive mutex later in this tutorial. For now, click Add to add a standard mutex.
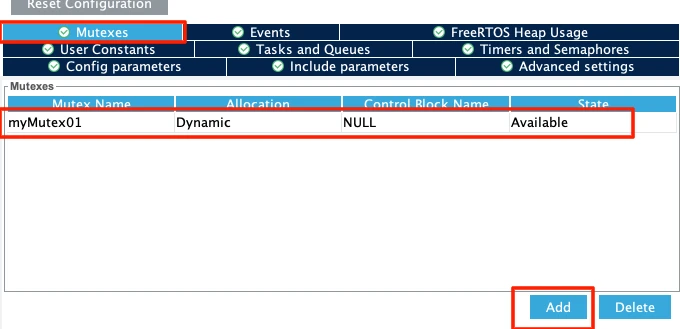
You can leave the name as myMutex01. Make sure the allocation is set to Dynamic so it takes memory from the FreeRTOS heap.
Note:
After configuring tasks and mutexes, you might see a heap size error. Go to Config Parameters and increase the Total Heap Size to around 10000 bytes. The error should go away.
Generated Code – osMutexNew()
Once the code is generated, open the main.c file. You will see that CubeMX has added the following line to initialize the mutex:
myMutex01Handle = osMutexNew(&myMutex01_attributes);The osMutexNew() function creates the mutex and returns a handle that we will use in our tasks to acquire and release it. By default, the mutex is always available with a count of 1, so any task that needs it can simply call the acquire function to acquire it. Unlike a semaphore, where we had the option to make it either available or depleted by default, a mutex is always available by default.
Configuring LPUART1 for printf Output
We will use printf to print the received data to a serial console. On the STM32L496 Nucleo board, the Virtual COM port routes UART data through the ST-LINK USB connection. Looking at the board schematic, ST-LINK RX is connected to LPUART1 TX and ST-LINK TX is connected to LPUART1 RX. These map to pins PG7 and PG8.
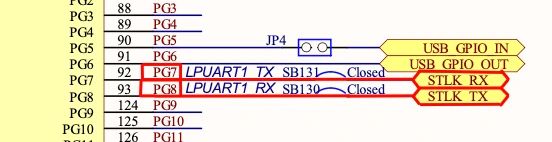
Go to Connectivity and enable LPUART1 in Asynchronous mode. By default, CubeMX assigns pins PC0 and PC1, so change these to PG7 (TX) and PG8 (RX).
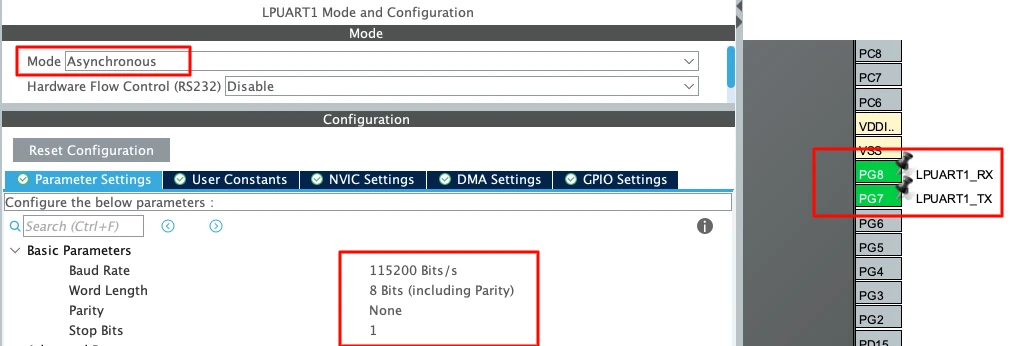
Use the following settings:
| Parameter | Value |
|---|---|
| Baud Rate | 115200 |
| Word Length | 8 bits |
| Parity | None |
| Stop Bits | 1 |
This is the standard UART configuration and matches what we will set in the serial
Writing the Task Code for Mutex
We have four tasks in this project. Let’s go through each one and write the code. The overall idea is simple, the low priority task holds the mutex while simulating resource usage, the high priority task needs the mutex to run, and the medium priority task runs freely without needing the mutex at all. The very high priority task just monitors the priorities of all three tasks so we can observe priority inheritance in action.
Low Priority Task – Acquiring and Releasing the Mutex
The low priority task is where the interesting part happens. It acquires the mutex, simulates resource usage by running an empty loop for around one second, and then releases the mutex.
void StartLPT(void *argument)
{
    uint32_t wait;
    for(;;)
    {
        printf("Entered LPT, waiting for Mutex\n\n");
        osMutexAcquire(myMutex01Handle, osWaitForever);
        printf("LPT Acquired Mutex, using Resource\n\n");
        wait = 10000000;
        while (wait--);
        printf("LPT finished, released Mutex\n\n");
        osMutexRelease(myMutex01Handle);
        printf("LPT going to Sleep\n\n");
    }
}We use osWaitForever as the timeout so the task blocks indefinitely until the mutex becomes available. Once it acquires the mutex, it runs the empty while loop to simulate one second of resource usage. After that, it calls osMutexRelease() to release the mutex and let other tasks acquire it.
Medium Priority Task – Running Without the Mutex
The medium priority task does not need the mutex at all. It simply runs its empty loop for around five seconds and then goes to sleep.
void StartMPT(void *argument)
{
uint32_t wait;
for(;;)
{
printf("Entered MPT, performing task\n\n");
wait = 50000000;
while (wait--);
printf("MPT finished, going to Sleep\n\n");
osDelay(500);
}
}This task is the one that causes priority inversion when using a semaphore. Since it does not need the mutex, it can freely preempt the low priority task. But as we will see, the mutex prevents this from being a problem.
High Priority Task – Waiting for the Mutex
The high priority task needs the mutex to run its process.
void StartHPT(void *argument)
{
for(;;)
{
printf("Entered HPT, waiting for Mutex\n\n");
osMutexAcquire(myMutex01Handle, osWaitForever);
printf("HPT Acquired and now releasing Mutex\n\n");
osMutexRelease(myMutex01Handle);
printf("HPT going to Sleep\n\n");
osDelay(200);
}
}It acquires the mutex, prints its success message, and immediately releases it before going to sleep for 200 milliseconds.
Very High Priority Task – Monitoring Task Priorities
This task runs every 50 milliseconds and prints the current priorities of all three tasks. Since priority inheritance temporarily changes the priority of the low priority task, this task lets us observe that change in real time.
void StartVHPT(void *argument)
{
for(;;)
{
printf("Priorities ->-> LPT:%d MPT:%d HPT:%d\n\n",
osThreadGetPriority(LPTHandle),
osThreadGetPriority(MPTHandle),
osThreadGetPriority(HPTHandle));
osDelay(50);
}
}We use osThreadGetPriority() to fetch the current priority of each task. Normally, LPT has a priority of 16, MPT has 24, and HPT has 32. But when HPT starts waiting for the mutex, you will see LPT’s priority temporarily jump to 32. This task runs every 50 milliseconds, so we will be able to observe the priority changes in real time.
Here is the full task code combined:
void StartLPT(void *argument)
{
    uint32_t wait;
    for(;;)
    {
        printf("Entered LPT, waiting for Mutex\n\n");
        osMutexAcquire(myMutex01Handle, osWaitForever);
        printf("LPT Acquired Mutex, using Resource\n\n");
        wait = 10000000;
        while (wait--);
        printf("LPT finished, released Mutex\n\n");
        osMutexRelease(myMutex01Handle);
        printf("LPT going to Sleep\n\n");
    }
}
void StartMPT(void *argument)
{
    uint32_t wait;
    for(;;)
    {
        printf("Entered MPT, performing task\n\n");
        wait = 50000000;
        while (wait--);
        printf("MPT finished, going to Sleep\n\n");
        osDelay(500);
    }
}
void StartHPT(void *argument)
{
    for(;;)
    {
        printf("Entered HPT, waiting for Mutex\n\n");
        osMutexAcquire(myMutex01Handle, osWaitForever);
        printf("HPT Acquired and now releasing Mutex\n\n");
        osMutexRelease(myMutex01Handle);
        printf("HPT going to Sleep\n\n");
        osDelay(200);
    }
}
void StartVHPT(void *argument)
{
    for(;;)
    {
        printf("Priorities ->-> LPT:%d MPT:%d HPT:%d\n\n",
                osThreadGetPriority(LPTHandle),
                osThreadGetPriority(MPTHandle),
                osThreadGetPriority(HPTHandle));
        osDelay(50);
    }
}Testing the Mutex – Observing Priority Inheritance
Now that we have written the task code, let’s flash the project to the board and observe the output on the serial monitor. This is where we can actually see priority inheritance happening in real time.
Output – Priority Changes in Real Time
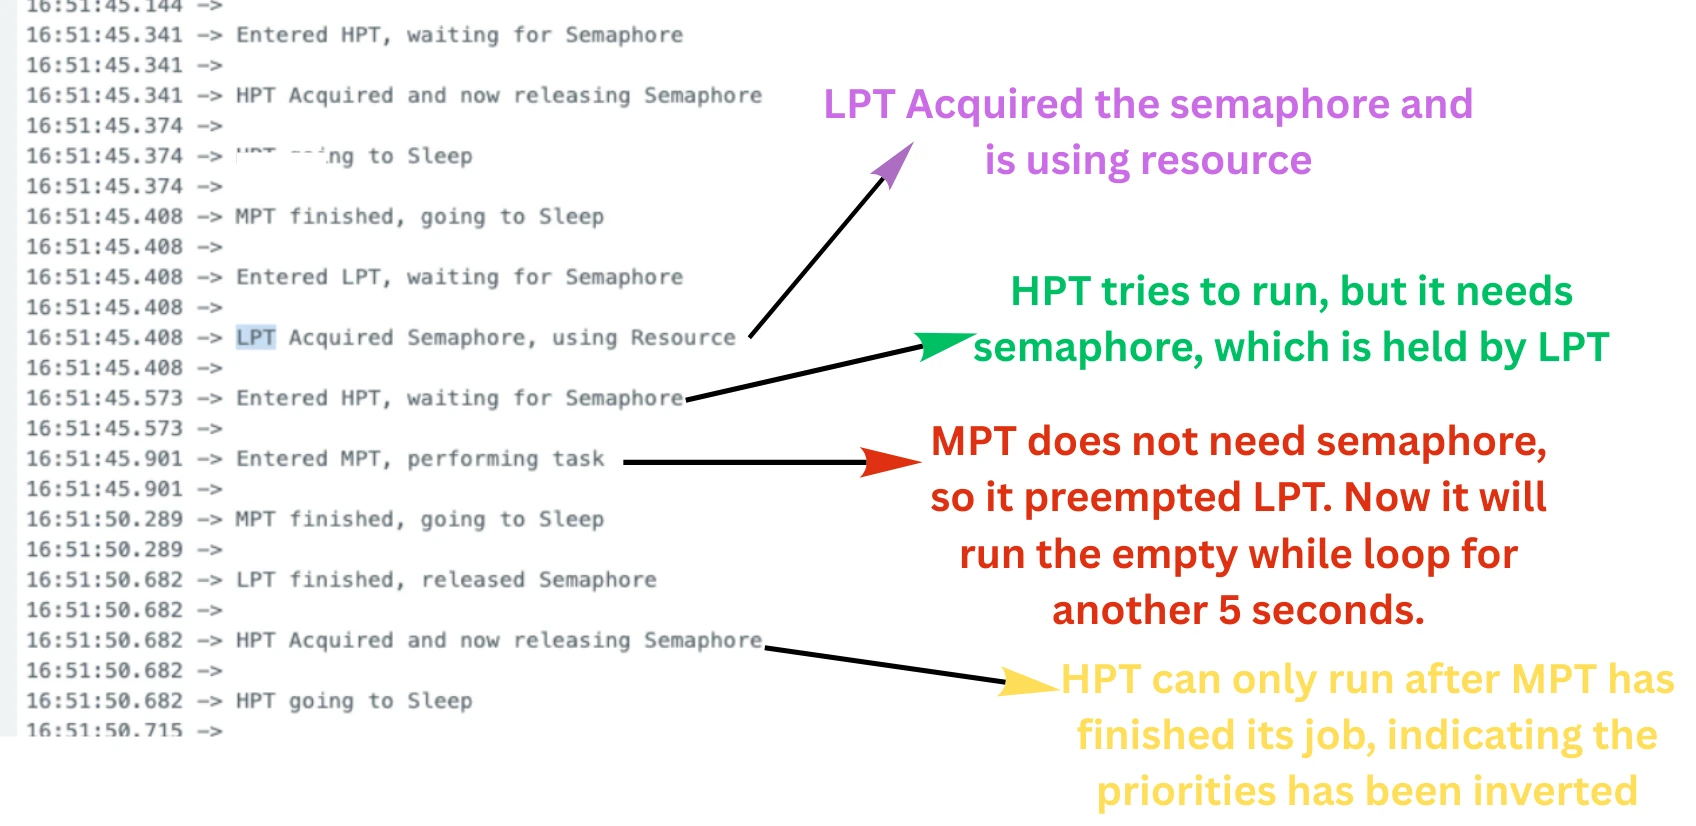
The image below shows the full output on the serial monitor with annotations explaining each step.
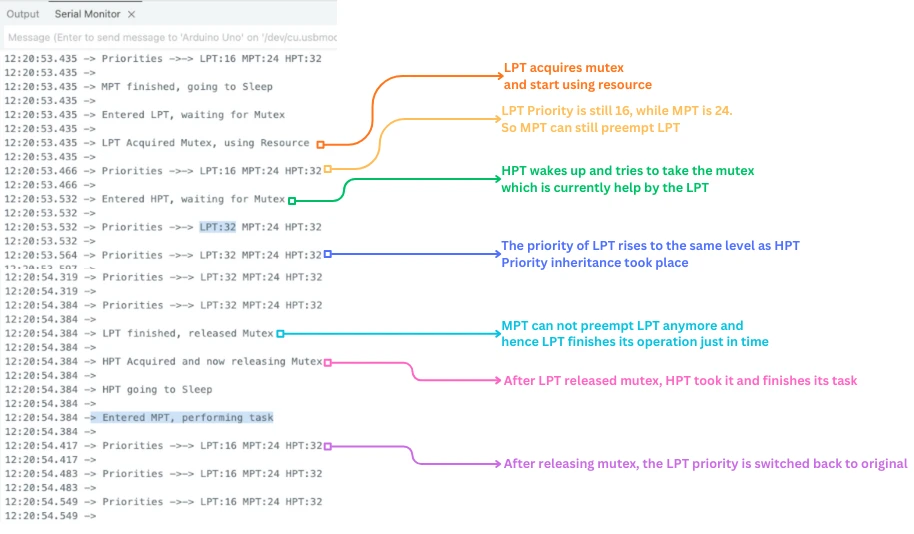
Let’s walk through what is happening step by step.
The output starts with the very high priority task printing the priorities of all three tasks — LPT is 16, MPT is 24, and HPT is 32. After that, MPT runs its empty loop and goes to sleep. Once MPT finishes, LPT gets the CPU, acquires the mutex, and starts using the resource.
At this point the priorities are still the same. Since LPT has a lower priority than MPT, MPT could still preempt it at any moment.
But then HPT wakes up and tries to acquire the mutex. The mutex is already held by LPT, so HPT has to wait. The moment HPT starts waiting, something interesting happens — the priority of LPT instantly jumps from 16 to 32. This is priority inheritance in action. FreeRTOS automatically raised LPT’s priority to match HPT’s priority.
Now LPT has a priority of 32, which is higher than MPT’s priority of 24. So MPT cannot preempt LPT anymore. LPT finishes its resource usage and releases the mutex. As soon as the mutex is released, HPT acquires it and runs its process.
You can also see that once LPT releases the mutex, its priority immediately drops back to 16. The priority boost was only temporary — it lasted just long enough for LPT to finish and release the mutex. After that, MPT enters the CPU and starts its task as usual.
This is exactly how priority inheritance is supposed to work. The mutex handled the entire thing automatically without any extra code on our part.
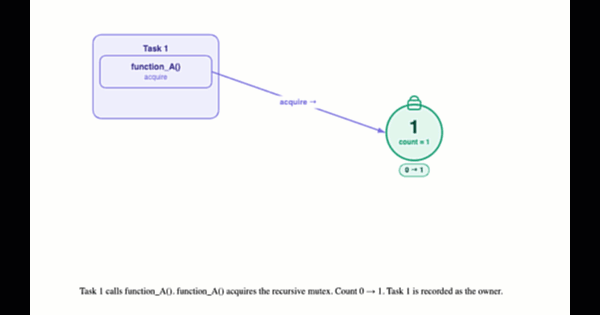
What is a Recursive Mutex in FreeRTOS?
A standard mutex works well for most cases, but it has one limitation — the same task cannot acquire it more than once. If a task tries to acquire a mutex it already holds, it will deadlock and freeze forever. This is where the recursive mutex comes in.
The Problem of Deadlock with a Simple Mutex
Imagine a task that calls fs_write() to write data to a file. To protect the shared filesystem, fs_write() acquires a mutex before doing anything.
But internally, fs_write() calls fs_allocate_block() to allocate space on the filesystem, which in turn calls fs_update_metadata() to update the filesystem records. Both of these functions also try to acquire the same mutex to protect the shared resource.
fs_write()               // acquires mutex
└── fs_allocate_block()  // tries to acquire the same mutex → DEADLOCK
└── fs_update_metadata()Here is what happens at runtime:
fs_write()acquires the mutex successfully.- It calls
fs_allocate_block(), which tries to acquire the same mutex. - The mutex is already held by the same task, so
fs_allocate_block()blocks and waits. - But the task is the one holding the mutex, so it can never release it.
- The task waits forever and this is a deadlock.
The simple mutex has no concept of how many times the same task has acquired it. It just sees that the mutex is taken and blocks the caller, even if the caller is the one holding it.
How Recursive Mutex Solves the Deadlock
A recursive mutex solves this by keeping an internal acquisition count. Every time the owning task acquires it again, the count increases. Every time the task releases it, the count decreases. The mutex is only truly released and made available to other tasks when the count reaches zero.
fs_write()               // acquires recursive mutex → count = 1
└── fs_allocate_block()  // acquires recursive mutex → count = 2
    └── fs_update_metadata()
    // fs_update_metadata returns → count = 2
// fs_allocate_block releases → count = 1
// fs_write releases → count = 0 → mutex now available to other tasksThe rule is simple, for every osMutexAcquire() call, there must be a matching osMutexRelease() call. If a task acquires the recursive mutex three times, it must also release it three times before another task can acquire it.
This makes the recursive mutex the right choice whenever you have nested function calls that all need to protect the same shared resource.
Setting Up the Recursive Mutex in STM32CubeIDE
Now that we understand what a recursive mutex is, let’s add one to the project.
Adding the Recursive Mutex in STM32CubeMX
Open the project in STM32CubeMX and go to FreeRTOS → Mutexes tab. Under the Recursive Mutex section, click Add to add the mutex.
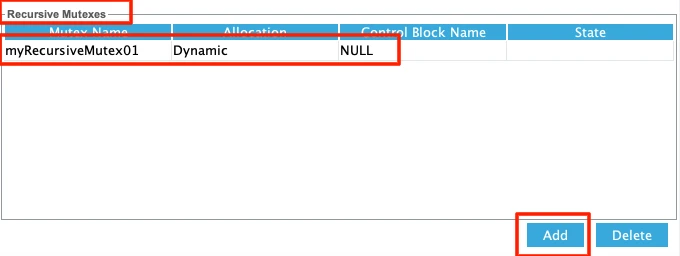
You can leave the name as myRecursiveMutex01. Make sure the allocation is set to Dynamic so it takes memory from the FreeRTOS heap.
Once the code is generated, you will see the recursive mutex initialized in main.c:
myRecursiveMutex01Handle = osMutexNew(&myRecursiveMutex01_attributes);Writing the Task Code
I will only use of the Tasks (LPT in this case) to demonstrate the Recursive mutex. The rest of the tasks created earlier are commented out.
Here we will add two functions — FunctionA and FunctionB. FunctionA runs first, acquires the recursive mutex, and then calls FunctionB. FunctionB also tries to acquire the same recursive mutex.
void FunctionB(void)
{
    printf("FunctionB trying to lock mutex\n");
    osMutexAcquire(myRecursiveMutex01Handle, osWaitForever);
    printf("FunctionB acquired mutex\n");
    osDelay(100);
    osMutexRelease(myRecursiveMutex01Handle);
    printf("FunctionB released mutex\n");
}

void FunctionA(void)
{
    printf("FunctionA trying to lock mutex\n");
    osMutexAcquire(myRecursiveMutex01Handle, osWaitForever);
    printf("FunctionA acquired mutex\n");
    FunctionB();   // tries to lock the same mutex again
    osMutexRelease(myRecursiveMutex01Handle);
    printf("FunctionA released mutex\n\n");
}Here is what happens step by step:
FunctionAacquires the recursive mutex — count goes to 1.FunctionAcallsFunctionB, which acquires the same mutex again — count goes to 2.FunctionBfinishes its work and releases the mutex — count drops back to 1.- Control returns to
FunctionA, which releases the mutex — count drops to 0. - The mutex is now fully available to other tasks.
With a simple mutex, step 2 would have caused a deadlock. But with the recursive mutex, the same task can acquire it multiple times without any issue, as long as it releases it the same number of times.
Inside the low priority task, we simply call FunctionA every 5 seconds.
void StartLPT(void *argument)
{
    for(;;)
    {
        FunctionA();
        osDelay(5000);
    }
}Output
The image below shows the output on the serial monitor.
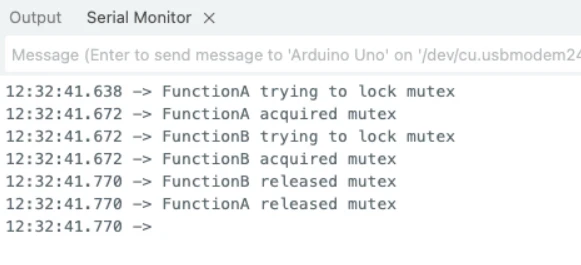
FunctionA acquires the mutex first, then calls FunctionB which also acquires the same mutex successfully. FunctionB releases it first, then FunctionA releases it, bringing the count back to 0. No deadlock here, everything works exactly as expected.
Video Tutorial
STM32 FreeRTOS Mutex — Priority Inheritance and Recursive Mutex Video Tutorial
Watch me configure the mutex and recursive mutex in CubeMX, write the task functions using osMutexAcquire() and osMutexRelease(), demonstrate priority inheritance in action, and verify the output on the serial console.
Watch the FreeRTOS Mutex TutorialConclusion
In this tutorial, we covered the mutex in FreeRTOS and saw how it solves the priority inversion problem that we had with semaphores. We configured the mutex in STM32CubeMX, wrote the task code using osMutexAcquire() and osMutexRelease(), and observed priority inheritance in real time on the serial monitor. We also covered the recursive mutex and saw how it prevents deadlocks in situations where the same task needs to acquire the same mutex more than once.
Mutexes are an essential tool in any RTOS-based application. Whenever you have shared resources being accessed by tasks of different priorities, a mutex is the right choice over a semaphore. Priority inheritance happens automatically, so you don’t need any extra code — just switching from a semaphore to a mutex is enough to prevent priority inversion in your application.
In the next tutorial, we will cover task notifications. Task notifications are a lightweight alternative to semaphores and mutexes for synchronizing tasks. They are faster, use less memory, and work well for most simple signaling scenarios. We will see how to send and receive notifications between tasks and when to use them over semaphores and mutexes.
Browse More STM32 Tutorials

STM32 ADC Part 2 – Single Channel with Interrupt and DMA
STM32 W5500 Ethernet Tutorial (PART 3): TCP Server with FreeRTOS
STM32 UART Part 6 – Half-Duplex Communication (Single-Wire Mode)

STM32 as I2C SLAVE || PART 1

TouchGFX#4. Sending data from another task || Gauge || Animation

Modbus #3. STM32 Master Writes single Coil and Holding Register
How to Interface GC9A01 Round Display with STM32 Using SPI + LVGL Integration
STM32 RTOS Project Download
STM32 FreeRTOS Mutex FAQs
Subscribe
Login
0 Comments
Newest
