
Home ▸ STM32 Tutorials ▸ LWIP Ethernet ▸
Published: August 29, 2021
Last Updated: March 23, 2026
Last Updated: March 23, 2026
How to Configure an STM32 TCP Server Using lwIP Raw API
This is Part 4 of the STM32 Ethernet series. So far, we covered the hardware setup, UDP server, and UDP client. Now we move on to TCP.
TCP is different from UDP. It is a connection-based protocol, which means the client and server must first establish a connection before any data is exchanged. This makes it more reliable as every packet is acknowledged, and nothing gets lost silently.
We will use the lwIP Raw API to build this server. The Raw API is callback-driven. Instead of blocking and waiting for data, lwIP calls specific functions when something happens, like when a client connects, sends data, or disconnects. This approach works well without an RTOS and keeps things lightweight.
The server we build will bind to a fixed IP and port, wait for a client to connect, receive whatever the client sends, and reply back with the same data plus a short message appended to it. We use Hercules as the TCP client on the PC side to test this.
The CubeMX setup stays the same as the previous tutorials. If you have not done that yet, check out Part 1 of this series first.
What You Need Before Getting Started
Before we dive into the code, let me quickly cover what this tutorial assumes and what setup you need.
Prerequisites and Prior Tutorials
This tutorial is part of the STM32 Ethernet series. We build on top of what was already covered. So make sure you have gone through these first:
- Part 1 – Hardware setup and LWIP ping test
- Part 2 – UDP Server
- Part 3 – UDP Client
You should already have a working Ethernet connection on your STM32 before starting here. If ping is not working, go back to Part 1 and sort that out first. The TCP server will not work if the basic connection is broken.
Also, make sure you are comfortable with how callbacks work in lwIP. The Raw API is entirely callback-driven. You do not call functions and wait for a response. Instead the lwIP calls your functions when something happens. We will see this in detail as we go through the code.
CubeMX Configuration for Ethernet and lwIP
The CubeMX setup is the same as the previous tutorials. I am not going to repeat it all here, check Part 1 for the detailed walkthrough.
The images below show the key settings you need to have in place.
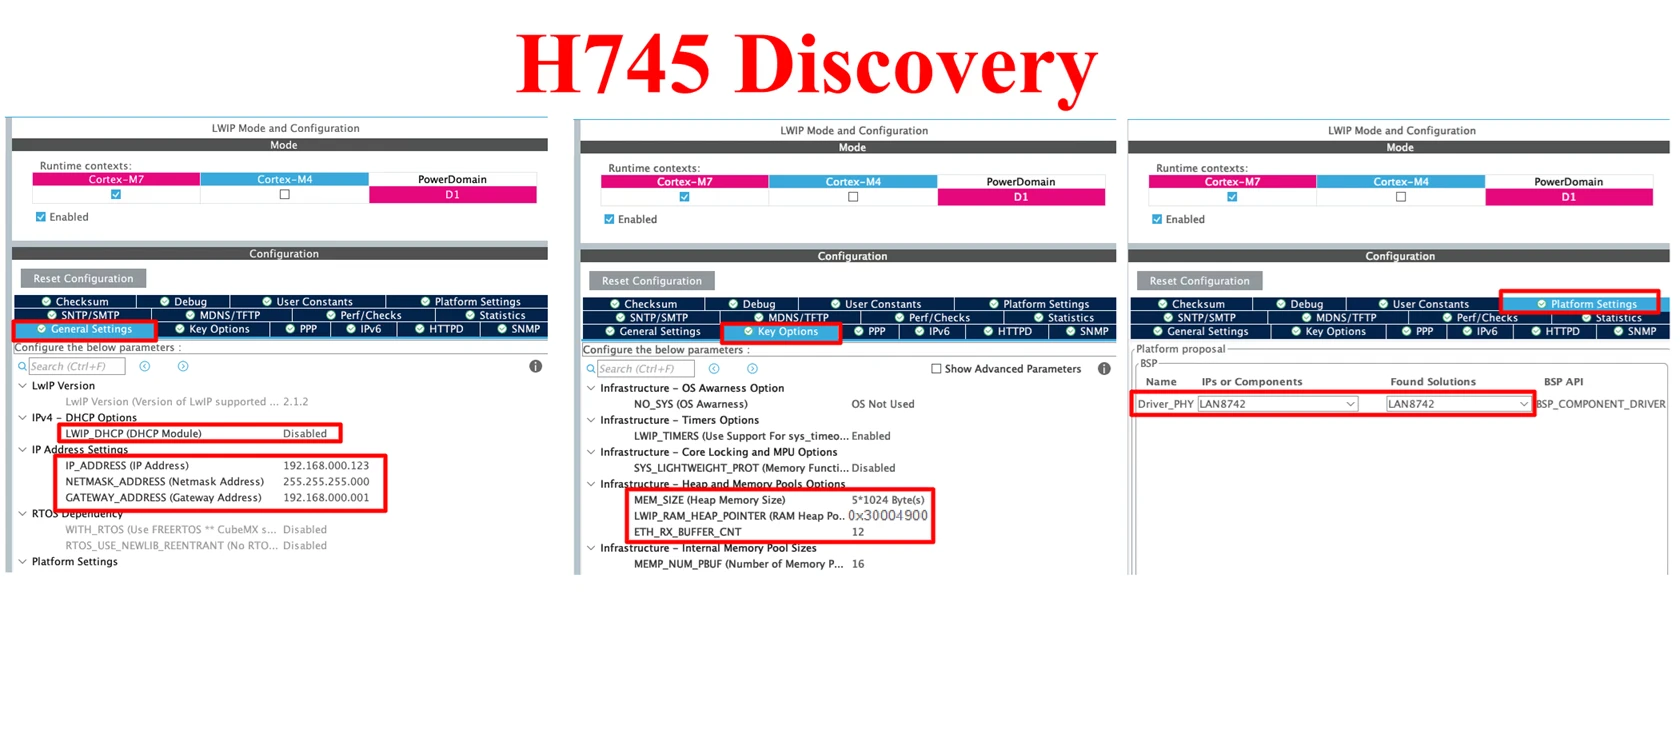
A few things to double-check before moving on. Make sure lwIP is enabled under Middleware, and the Ethernet peripheral is properly configured for your board. Also confirm your IP address settings. In our code, we will bind the server to 192.168.0.123 on port 7. So your CubeMX IP should match that.
How the STM32 TCP Server Works: The 4-Step Flow
The TCP server follows four key steps under the lwIP Raw API. Let’s go through each one.
Step 1 – Create a TCP Control Block
Every TCP connection in lwIP is managed through a Protocol Control Block (PCB). Think of it as a structure that holds all the information about a connection, the IP, port, state, callbacks, everything.
We create one like this:
struct tcp_pcb *tpcb;
tpcb = tcp_new();tcp_new() allocates a new PCB and returns a pointer to it. All the next steps will use this pointer.
Step 2 – Bind the Server to an IP Address and Port
Once we have the PCB, we bind it to a local IP address and port. This is the address the server will listen on.
ip_addr_t myIPADDR;
IP_ADDR4(&myIPADDR, 192, 168, 0, 123);
err = tcp_bind(tpcb, &myIPADDR, 7);Here we are binding to IP 192.168.0.123 on port 7. If tcp_bind() returns ERR_OK, we are good to move forward. If not, we free the PCB and stop.
Step 3 – Start Listening for Incoming Connections
After binding, we put the server into listen mode. This is where the server sits and waits for a client to connect.
tpcb = tcp_listen(tpcb);Notice that tcp_listen() returns a new PCB. The old one gets freed internally. So we must reassign the pointer, otherwise we lose track of it.
Step 4 – Accept the Client Connection
The final step is to register an accept callback. lwIP calls this function automatically whenever a client establishes a connection.
tcp_accept(tpcb, tcp_server_accept);This registers tcp_server_accept as the callback function for incoming connections. All the connection handling logic goes inside that function, which we will cover in the next section.
These four steps form the core setup of the TCP server. Everything else — receiving data, sending replies, closing connections — happens inside the callbacks that follow.
Initializing the TCP Server in STM32 lwIP
Now let’s write the initialization function. This is where all four steps come together in a single function call.
Writing the tcp_server_init() Function
We start by creating the PCB and binding it to the server IP and port.
struct tcp_pcb *tpcb;
tpcb = tcp_new();
ip_addr_t myIPADDR;
IP_ADDR4(&myIPADDR, 192, 168, 0, 123);
err = tcp_bind(tpcb, &myIPADDR, 7);If the bind is successful, we move the PCB into listen mode and register the accept callback.
if (err == ERR_OK)
{
    tpcb = tcp_listen(tpcb);
    tcp_accept(tpcb, tcp_server_accept);
}But if the tcp_bind() fails, we need to free the PCB to avoid a memory leak.
else
{
    memp_free(MEMP_TCP_PCB, tpcb);
}Full Initialization Code
Here is the complete tcp_server_init() function with all the steps combined.
void tcp_server_init(void)
{
    /* 1. Create new TCP PCB */
    struct tcp_pcb *tpcb;
    tpcb = tcp_new();

    err_t err;

    /* 2. Bind to IP address and port 7 */
    ip_addr_t myIPADDR;
    IP_ADDR4(&myIPADDR, 192, 168, 0, 111);
    err = tcp_bind(tpcb, &myIPADDR, 7);

    if (err == ERR_OK)
    {
        /* 3. Start listening */
        tpcb = tcp_listen(tpcb);

        /* 4. Register accept callback */
        tcp_accept(tpcb, tcp_server_accept);
    }
    else
    {
        /* Free the PCB if bind failed */
        memp_free(MEMP_TCP_PCB, tpcb);
    }
}This function should be called once during startup, after the lwIP stack is initialized. Once it runs, the server is up and ready to accept incoming TCP connections.
Handling the Accept Callback in lwIP TCP Server
Once a client connects, lwIP calls the accept callback. We need to set up a few more callbacks inside it to handle what happens next.
Setting Up tcp_server_accept()
The first thing we do inside the accept callback is set the priority for the new connection and allocate memory for our custom structure tcp_server_struct. This structure holds the connection state, the PCB pointer, and the incoming data buffer.
tcp_setprio(newpcb, TCP_PRIO_MIN);

es = (struct tcp_server_struct *)mem_malloc(sizeof(struct tcp_server_struct));If the memory allocation is successful, we initialize the structure fields.
if (es != NULL)
{
    es->state = ES_ACCEPTED;
    es->pcb = newpcb;
    es->retries = 0;
    es->p = NULL;
}We set the state to ES_ACCEPTED to indicate that the connection has just been established. The p field is set to NULL for now — it will hold the incoming data buffer once data arrives.
If memory allocation fails, we close the connection immediately and return a memory error.
else
{
    tcp_server_connection_close(newpcb, es);
    ret_err = ERR_MEM;
}Registering the Receive, Error and Poll Callbacks
After the structure is set up, we pass it as an argument to the new PCB and register the remaining callbacks.
tcp_arg(newpcb, es);
tcp_recv(newpcb, tcp_server_recv);
tcp_err(newpcb, tcp_server_error);
tcp_poll(newpcb, tcp_server_poll, 0);tcp_arg— passes theesstructure to all subsequent callbacks so we have access to the connection state everywhere.tcp_recv— registers the function that handles incoming data from the client.tcp_err— registers the function that handles any connection errors.tcp_poll— registers a periodic polling function, useful for retransmissions or timeouts.
Among these, tcp_recv is the most important one. That is where the actual data handling happens, and we will cover it in detail in the next section.
Full Accept Callback Code
Here is the complete tcp_server_accept() function.
static err_t tcp_server_accept(void *arg, struct tcp_pcb *newpcb, err_t err)
{
    err_t ret_err;
    struct tcp_server_struct *es;

    LWIP_UNUSED_ARG(arg);
    LWIP_UNUSED_ARG(err);

    /* Set priority for the new connection */
    tcp_setprio(newpcb, TCP_PRIO_MIN);

    /* Allocate structure to maintain connection info */
    es = (struct tcp_server_struct *)mem_malloc(sizeof(struct tcp_server_struct));

    if (es != NULL)
    {
        es->state = ES_ACCEPTED;
        es->pcb = newpcb;
        es->retries = 0;
        es->p = NULL;

        /* Pass es structure as argument to newpcb */
        tcp_arg(newpcb, es);

        /* Register receive callback */
        tcp_recv(newpcb, tcp_server_recv);

        /* Register error callback */
        tcp_err(newpcb, tcp_server_error);

        /* Register poll callback */
        tcp_poll(newpcb, tcp_server_poll, 0);

        ret_err = ERR_OK;
    }
    else
    {
        /* Close connection on memory failure */
        tcp_server_connection_close(newpcb, es);
        ret_err = ERR_MEM;
    }

    return ret_err;
}Once this function returns ERR_OK, the connection is fully set up. lwIP will now call tcp_server_recv every time the client sends data.
Receiving Data from the TCP Client
The receive callback is where the real action happens. Every time the client sends data, lwIP triggers this function.
Understanding the tcp_server_recv() Function
The tcp_server_recv() function handles several different situations depending on the connection state. The pbuf *p argument carries the incoming data. If p is NULL, it means the client has closed the connection.
if (p == NULL)
{
    es->state = ES_CLOSING;
    if(es->p == NULL)
    {
        tcp_server_connection_close(tpcb, es);
    }
    else
    {
        tcp_sent(tpcb, tcp_server_sent);
        tcp_server_send(tpcb, es);
    }
    ret_err = ERR_OK;
}We set the state to ES_CLOSING. If there is no pending data to send, we close the connection immediately. Otherwise, we send the remaining data first and then close.
If p is not NULL but err is not ERR_OK, something went wrong. We free the buffer and return the error.
else if(err != ERR_OK)
{
if (p != NULL)
{
es->p = NULL;
pbuf_free(p);
}
ret_err = err;
}Handling the ES_ACCEPTED and ES_RECEIVED States
These are the two most important states. When data arrives for the first time after a connection is accepted, the state is ES_ACCEPTED.
else if(es->state == ES_ACCEPTED)
{
es->state = ES_RECEIVED;
es->p = p;
tcp_sent(tpcb, tcp_server_sent);
tcp_server_handle(tpcb, es);
ret_err = ERR_OK;
}We change the state to ES_RECEIVED, store the incoming buffer, register the tcp_sent callback, and pass everything to tcp_server_handle() for processing. The tcp_sent callback is registered here inside ES_ACCEPTED, so it only gets registered once per connection.
When more data arrives after the first chunk, the state is already ES_RECEIVED.
else if(es->state == ES_RECEIVED)
{
if(es->p == NULL)
{
es->p = p;
tcp_server_handle(tpcb, es);
}
else
{
struct pbuf *ptr;
ptr = es->p;
pbuf_chain(ptr, p);
}
ret_err = ERR_OK;
}If the previous buffer has already been processed, we store the new one and handle it. If there is still unprocessed data, we chain the new buffer to the existing one using pbuf_chain().
Full Receive Callback Code
Here is the complete tcp_server_recv() function.
static err_t tcp_server_recv(void *arg, struct tcp_pcb *tpcb, struct pbuf *p, err_t err)
{
struct tcp_server_struct *es;
err_t ret_err;
LWIP_ASSERT("arg != NULL", arg != NULL);
es = (struct tcp_server_struct *)arg;
/* Client closed the connection */
if (p == NULL)
{
    es->state = ES_CLOSING;
    if(es->p == NULL)
    {
        tcp_server_connection_close(tpcb, es);
    }
    else
    {
        tcp_sent(tpcb, tcp_server_sent);
        tcp_server_send(tpcb, es);
    }
    ret_err = ERR_OK;
}
/* Error on receive - free the buffer */
else if(err != ERR_OK)
{
    if (p != NULL)
    {
        es->p = NULL;
        pbuf_free(p);
    }
    ret_err = err;
}
/* First data received after connection accepted */
else if(es->state == ES_ACCEPTED)
{
    es->state = ES_RECEIVED;
    es->p = p;
    tcp_sent(tpcb, tcp_server_sent);
    tcp_server_handle(tpcb, es);
    ret_err = ERR_OK;
}
/* More data received */
else if(es->state == ES_RECEIVED)
{
    if(es->p == NULL)
    {
        es->p = p;
        tcp_server_handle(tpcb, es);
    }
    else
    {
        struct pbuf *ptr;
        ptr = es->p;
        pbuf_chain(ptr, p);
    }
    ret_err = ERR_OK;
}
/* Connection is closing - discard data */
else if(es->state == ES_CLOSING)
{
tcp_recved(tpcb, p->tot_len);
es->p = NULL;
pbuf_free(p);
ret_err = ERR_OK;
}
/* Unknown state - discard data */
else
{
tcp_recved(tpcb, p->tot_len);
es->p = NULL;
pbuf_free(p);
ret_err = ERR_OK;
}
return ret_err;
}We should leave this function as it is and focus on customizing the data handling inside tcp_server_handle(), which we cover in the next section.
Processing and Responding to Client Data
I separated the data handling into its own function — tcp_server_handle(). This is where we process what the client sends and build the reply.
Extracting the Client IP and Payload
First, we extract the remote IP address and port from the PCB. This can be useful for logging or filtering connections.
ip4_addr_t inIP = tpcb->remote_ip;
uint16_t inPort = tpcb->remote_port;
char *remIP = ipaddr_ntoa(&inIP);The IP address is stored as an integer inside the PCB. We use ipaddr_ntoa() to convert it into a readable string format like 192.168.0.100.
Next, we allocate memory for our transmit structure and copy the connection state from the received structure.
esTx = (struct tcp_server_struct *)mem_malloc(sizeof(struct tcp_server_struct));
esTx->state = es->state;
esTx->pcb = es->pcb;
esTx->p = es->p;Note that we must allocate memory for esTx before using it.
Modifying the Payload and Sending the Response
We copy the incoming payload into a local buffer using memcpy. We then append our response string to it.
char buf[100];
memset(buf, '\0', 100);
memcpy(buf, (char *)es->p->payload, es->p->len);
strcat(buf, " + Hello from TCP SERVER\n");Now we update the pbuf fields with the new buffer and send it.
esTx->p->payload = (void *)buf;
esTx->p->tot_len = (es->p->tot_len - es->p->len) + strlen(buf);
esTx->p->len = strlen(buf);
tcp_server_send(tpcb, esTx);After sending, we free both the received pbuf and the transmit structure to avoid memory leaks.
pbuf_free(es->p);
if (esTx != NULL)
{
mem_free(esTx);
}Full Server Handle Function Code
Here is the complete corrected tcp_server_handle() function with all the fixes applied.
static void tcp_server_handle(struct tcp_pcb *tpcb, struct tcp_server_struct *es)
{
struct tcp_server_struct *esTx;
/* Get the remote IP and port */
ip4_addr_t inIP = tpcb->remote_ip;
uint16_t inPort = tpcb->remote_port;
char *remIP = ipaddr_ntoa(&inIP);
/* Allocate memory for the transmit structure */
esTx = (struct tcp_server_struct *)mem_malloc(sizeof(struct tcp_server_struct));
esTx->state = es->state;
esTx->pcb = es->pcb;
esTx->p = es->p;
/* Copy payload into local buffer and append response */
char buf[100];
memset(buf, '\0', 100);
memcpy(buf, (char *)es->p->payload, es->p->len);
strcat(buf, " + Hello from TCP SERVER\n");
/* Update pbuf with new payload */
esTx->p->payload = (void *)buf;
esTx->p->tot_len = (es->p->tot_len - es->p->len) + strlen(buf);
esTx->p->len = strlen(buf);
/* Send the response */
tcp_server_send(tpcb, esTx);
/* Free the received pbuf and transmit structure */
pbuf_free(es->p);
if (esTx != NULL)
{
    mem_free(esTx);
}
}This function is the only place where we actually touch the data. Everything before this (the accept, the receive callback) is just setup. What we do here is take what the client sent, append our message to it, and send it back. If we need to add any custom data processing logic in the future, this is where it goes.
Calling the TCP Server from main.c
Once all the callback functions are ready, we need to initialize the server from main.c. We call tcp_server_init() once after the lwIP stack is initialized, and then keep calling MX_LWIP_Process() inside the main loop.
/* USER CODE BEGIN 2 */
tcp_server_init();
/* USER CODE END 2 */

while (1)
{
    /* USER CODE BEGIN 3 */
    MX_LWIP_Process();
    /* USER CODE END 3 */
}MX_LWIP_Process() is the lwIP stack handler. It must run continuously in the main loop to process incoming and outgoing packets. Without it, the server will never receive or respond to any data.
We do not need to add anything else here. The callbacks we registered earlier will handle everything automatically once a client connects.
Testing the STM32 TCP Server with Hercules
With the code flashed, we can test the server using a TCP client tool on a PC. I used Hercules for this.
Setting Up Hercules as a TCP Client
Download and open Hercules. Navigate to the TCP Client tab. We need to enter the server IP and port to connect to our STM32.
- Set the IP address to
192.168.0.111 - Set the Port to
7 - Click Connect
Once connected, type any message in the send field and hit Send. The STM32 server will receive it, append + Hello from TCP SERVER to it, and send it back.
The image below shows the result of sending a message from Hercules to the STM32 TCP server.
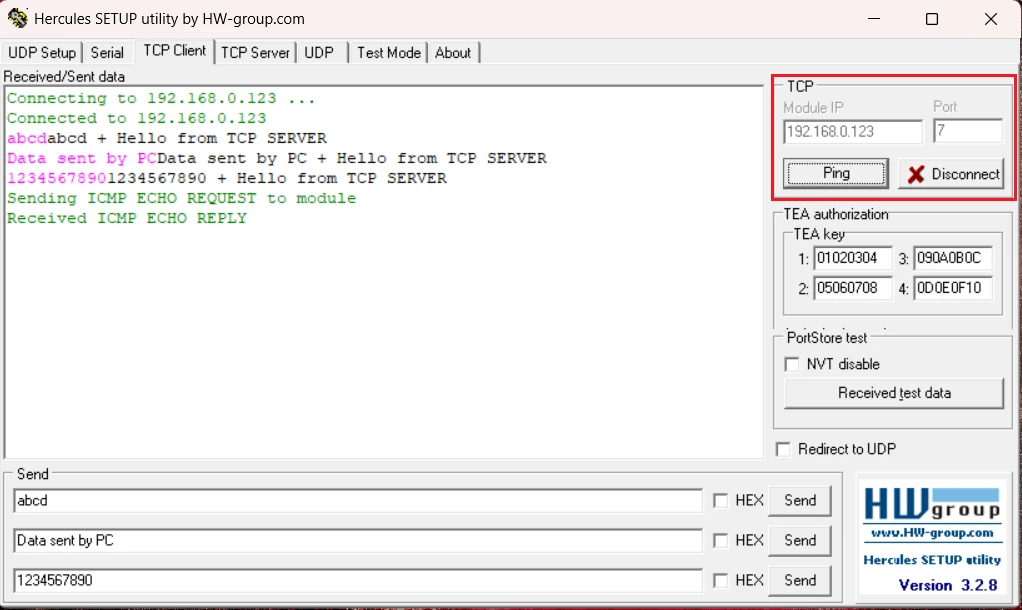
The pink text is the data sent by the client. The black text is the response from the STM32 server — the same message with + Hello from TCP SERVER appended to it.
This confirms that the server is receiving data, processing it correctly, and sending the response back to the client.
Video Tutorial
STM32 TCP Server Video Tutorial
This STM32 TCP Server tutorial shows you the complete code and testing process in action. I walk you through the tcp_server_init function, the accept and receive callbacks, and the server handle function step by step. Watch the video and follow the written guide together to easily set up a TCP Server and test it with Hercules acting as the client.
Watch the TCP Server TutorialConclusion
In this tutorial, we built a TCP server on STM32 using the lwIP Raw API. We covered the full setup — from creating the PCB and binding it to an IP and port, to accepting connections and handling incoming data through callbacks. The four-step flow we discussed at the beginning should now make complete sense after going through each function in detail.
The most important thing to take away from this is how the callback chain works. Each callback has a specific role — tcp_server_accept sets up the connection, tcp_server_recv handles incoming data, and tcp_server_handle is where we process and respond. Keeping these responsibilities separate makes the code easier to manage and extend.
If you want to build on top of this, tcp_server_handle is the only function you need to modify. You can add your own data parsing logic, trigger GPIO outputs, send sensor readings back to the client — anything you need. The rest of the callback structure stays the same. In the next tutorial, we will look at the TCP Client, where the STM32 takes the other side of the connection and initiates communication itself.
Check out more STM32 Ethernet Tutorials

STM32 Ethernet PART 6 – How to Configure Simple HTTP Webserver

STM32 Ethernet PART 6.1 – Configure HTTP Webserver using SSI

STM32 Ethernet PART 6.2 – Configure HTTP Webserver using CGI

STM32 Ethernet PART 7 – UDP Server using LWIP NETCONN (RTOS)

STM32 Ethernet PART 8 – UDP Client using LWIP NETCONN (RTOS)

STM32 Ethernet PART 9 – TCP Server and Client using LWIP NETCONN (RTOS)


static void tcp_server_handle (struct tcp_pcb *tpcb, struct tcp_server_struct *es)
{
struct tcp_server_struct *esTx;
Missing mem_malloc for this “*esTx” ??
well i did same as you did but when i am going to connect the TCP Client no callback receive and in hercules displaying connection time out
Hello, thank you for your excellent explanation, it was a very good tutorial. I am a bit confused. Please guide me. I get the following error after the build. How can I fix it?
02-stm32server\02-stm32server.axf: Error: L6218E: Undefined symbol SCB_EnableDCache (referred from main.o).
02-stm32server\02-stm32server.axf: Error: L6218E: Undefined symbol SCB_EnableICache (referred from main.o).
Please generate your own project instead of copying the entire code. Which MCU are you using anyway ?
it only echo back not Hello from TCP SERVER is not recived , echo back working, please give guide which change required?
./LWIP/App/lwip.o:C:/Users/syd/STM32CubeIDE/workspace_1.12.0/stm32F207/Debug/../LWIP/App/lwip.c:42: multiple definition of `gnetif’;
I am getting above error when i built the code. Any comments?
In main.c change:
struct netif gnetif;
to:
extern struct netif gnetif;
I have a problem on Nucleo-F207ZG. UDP server works perfectly, so I think network config is OK. I tried TCP server, ping is OK, it is possible to connect and disconnect but if you send any data (e.g. “TEST”), you get reply (“TEST+ Hello from TCP SERVER”) but on debug UART there are two same messages: “Assertion “pbuf_free: p->ref > 0″ failed at line 747 in ../Middlewares/Third_Party/LwIP/src/core/pbuf.c”. This means that “LWIP_ASSERT(“pbuf_free: p->ref > 0″, p->ref > 0);” failed in loop which should de-allocate all consecutive pbufs. LWIP 2.0.3. Perhaps someone can help?
I solved this problem in this way: I removed tcp_server_handle (and changed tcp_server_handle calls to tcp_server_send in tcp_server_recv) and modified tcp_server_send:
– changed line:
wr_err = tcp_write(tpcb, ptr->payload, ptr->len, 1);
– with following lines:
char buf[100];
memset (buf, ‘\0’, 100);
strncpy(buf, ptr->payload, ptr->len);
strcat (buf, “+ Hello from TCP SERVER\n”);
wr_err = tcp_write(tpcb, buf, strlen (buf), 1);
Now it works properly (and is simplier).
I tried your fix on the STM32F423.
While the code worked I still get the error “Assertion “pbuf_free: p->ref > 0″ failed at line 747 in ../Middlewares/Third_Party/LwIP/src/core/pbuf.c”
ı am struggling multiple client situations.
If ı use stm32 tcp server and one tcp client connections — there is no problem.
But ı use stm32 tcp server and two or more tcp client connect to stm32. All connections succesfully happen and all client can send data to tcp server. but tcp server try to send data. just last client receive data. How can tcp server send data all connected client ?
What should I do for 8 different ports?
Hello everyone
thanks for education
I write same code
But it dosn’t work
Is this code depends on CubeMX version or CubeIDE version??
witch version do you use??
I use f407IG Cortex Board.
What doesn’t work ?
If the ping is not successful, you should start with the first tutorial in this series.
ping is worked
but it echo for 10 times in one send
I want to find the why
Thanks a lot!
I am using STM32F767ZI and STM32CubeIDE. In this case I found HardFault error after calling “tcp_server_handle()”. that was about memmory allocation for “struct tcp_server_struct *esTx;”. I’ve added solved it “esTx = (struct tcp_server_struct *)mem_malloc(sizeof(struct tcp_server_struct));” before using “esTx” and solved it.
Hey man, make sure to use the following after SendData(tpcb, esTx);
/* delete es structure */ if (esTx != NULL) { mem_free(esTx); }
You need to free the memory otherwise your board will crash after X received TCP messages.
Has anyone used lwip and tcpserver in cube?
I have a very hard problem with this on my stm32f107vct6 micro and no one can help.
I used Cube’s LWIP TCP ECHO SERVER example in stm32f107, but the same problem exists.
Hello
In static void tcp_server_handle app crash in line esTx->pcb = es->pcb;
I use stm32f107 and FreeRTOS and LWIP
https://controllerstech.com/how-to-use-stm32-as-tcp-server-and-client-using-netconn/
How can this work?
	struct tcp_server_struct *esTx = 0;
    ...
  	esTx->state = es->state;
	esTx->pcb = es->pcb;
	esTx->p = es->p;
What a horror …
Oh, this has been written before
how to get lwip file
struct tcp_server_struct *esTx = 0;
:
:
esTx->state = es->state;
Thank you very much Sir.
Would you create the example with ADC and GPIO?
I want to send message from the server to the client without a request from the client.
is this possible ? if so can you point for an example
Hi there,
my question is: Why does this work ?
I started an STM32 Project and wanted to use the Socket Library. But for that i needed an RTOS on my NucleoBoard.
Why does the TCP and UDP Server work without that ?
What you mean why ?
this is the raw library, and it works pretty well without RTOS also
Hello, for me first packet is correctly echoed but then the program hangs and subsequent packets are ignored
That’s obvious isn’t it. If the program hangs, it’s going to ignore things
Hi, may I know which buffer I should clear? I’m facing the same reply corrupted issue in the payload message
clear that pbuf (received and sent both) after processing the data. I don’t have the lan connection right now to test it.
Hi, I cleared the pbuf but it is still the same unfortunately. Only managed to send 5 char at once without any corruptions.
while testing, I was able to sent quite lengthy packets at once. I don’t know why your is only limited to 5.
Hello Tim,
me too. <= 5 characters ok, >5 I get a corrupted response (originale string with trailing garbage). Did you solve it ?
Hi, yes managed to solve it by using memcpy for the incoming data, and manipulating it further(anything you want). then subtract the original data length from tot len before adding ur new data length to send back
HI Tim,
I followed your hint and ended with the following function:
static void my_server_handle(struct tcp_pcb *tpcb, struct tcp_echoserver_struct *es)
{
char buf[100] = “Ricevuto: “;
memcpy(buf + 10, es->p->payload, es->p->len);
int len = 100;
es->p->payload = buf;
es->p->tot_len = (es->p->tot_len – es->p->len) + len;
es->p->len = len;
tcp_echoserver_send(tpcb, es);
}
This works perfectly as an echo repeater (where I cannot make work the one in the article since sometimes I get corrupted data). Anyway, the next task for me is to send an infinite stream of data once the client is connected: do you have any hint ?
Thanx