Home ▸ ESP32 ▸ FreeRTOS Tutorials ▸
Updated On: April 26, 2026
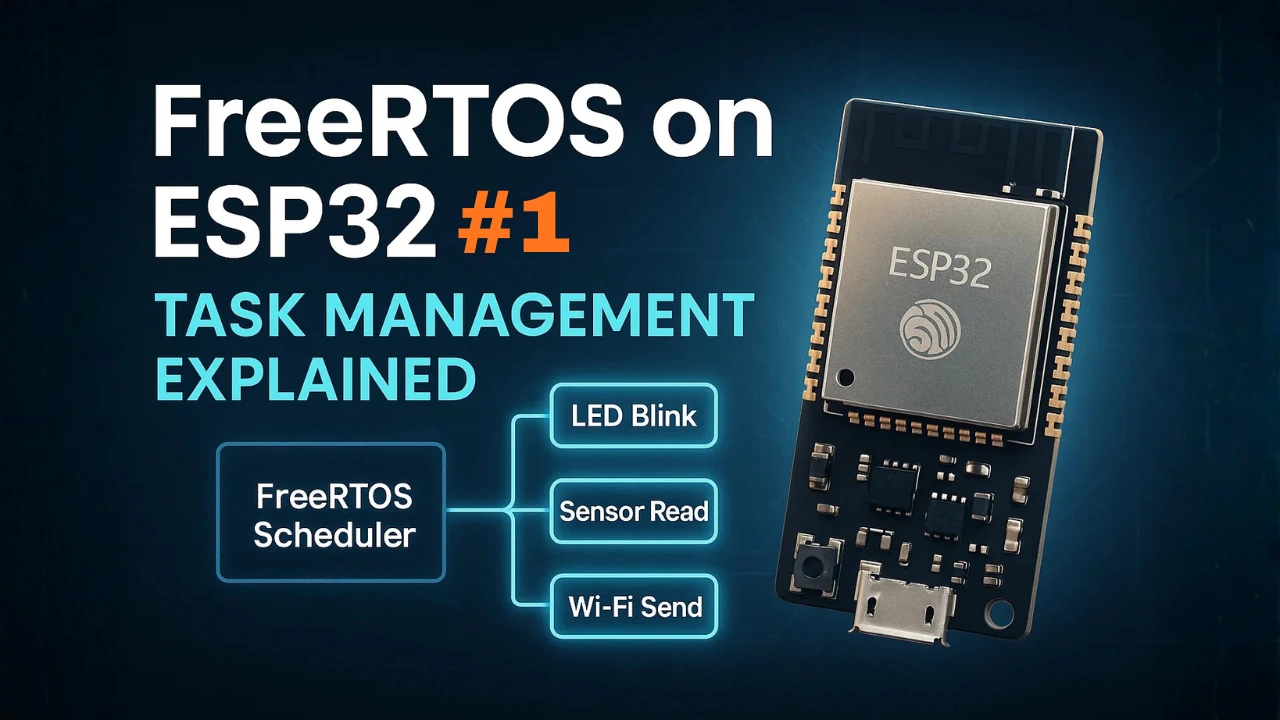
ESP32 FreeRTOS Scheduler: Task States, Context Switching & Time Slicing
The FreeRTOS scheduler in ESP32 is responsible for deciding which task runs at any given time. In this tutorial, you’ll understand how scheduling works, including task states, priorities, context switching, and time slicing, along with practical examples using ESP-IDF.
In this tutorial we will explore:
- How the FreeRTOS scheduler works in ESP32.
- Different task states and their transitions.
- What context switching means and how it happens.
- The difference between preemptive and cooperative scheduling.
- And how time slicing works on ESP32’s two cores.
This is Part 2 of the ESP32 FreeRTOS Series using ESP-IDF. You can check the other parts as well, here are the links:
- Part 1 — Intro to FreeRTOS: Tasks, Scheduler & xTaskCreate
- Part 2 — Understanding the FreeRTOS Scheduler ← you are here
- Part 3 — Task Priority & Stack Management
- Part 4 — Inter-Task Communication: Queues, Semaphores & Event Groups
- Part 5 — Software Timers & Task Notifications
- Part 6 — Task Control: Suspend, Resume & Delete
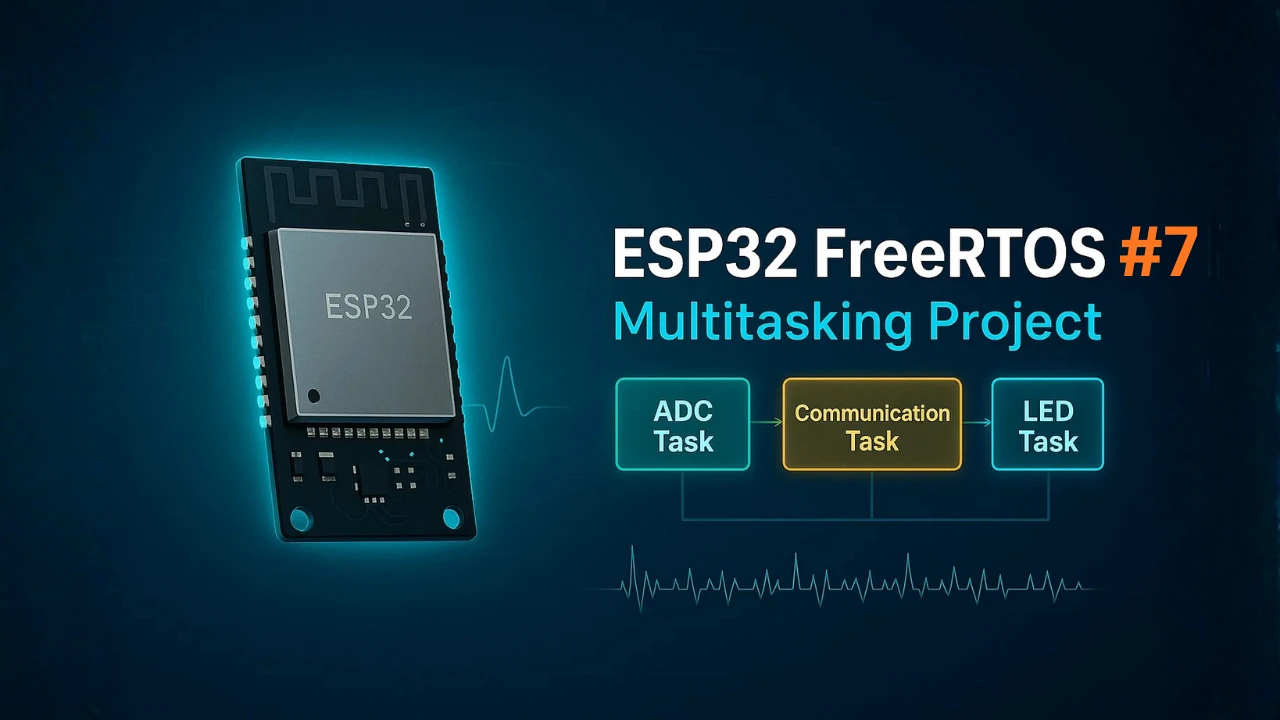
- Part 7 — Real-Time Multitasking Project (ADC, UART, LED)
How the ESP32 FreeRTOS Scheduler Works
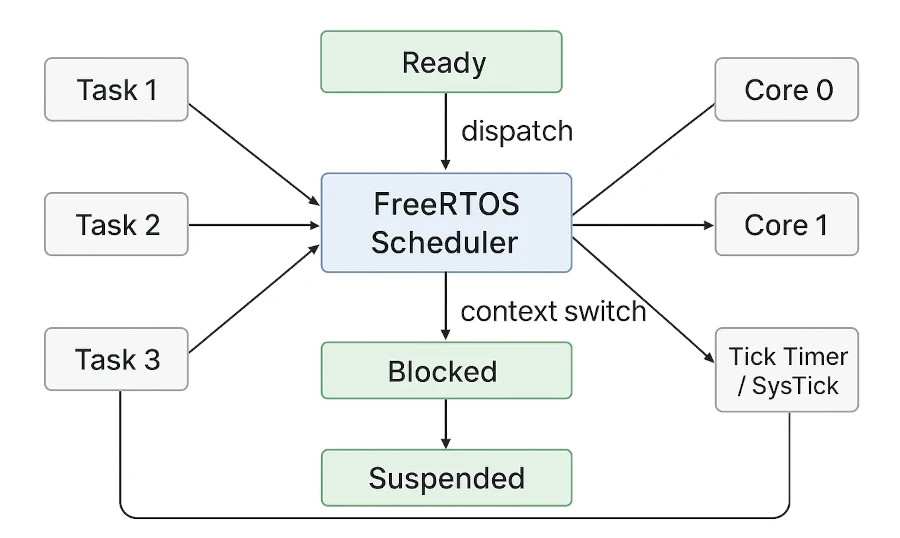
The FreeRTOS Scheduler is the core part of the FreeRTOS operating system. It manages all tasks created in your program and decides which one should run at any given moment. In simple words, the scheduler acts as a task manager for the ESP32.
Each task in FreeRTOS gets a specific priority and its own share of CPU time. The scheduler continuously checks which tasks are ready to run and which are waiting. Then, based on their priority and system timing, it selects the next task to execute.
Without the scheduler, all tasks would try to run at once, and the CPU would not know which one to handle first. So, the scheduler brings order and control to multitasking on the ESP32.
Role of the Scheduler in FreeRTOS
The main role of the scheduler is to control the execution flow of all tasks in the system. It ensures that the highest priority ready task always gets CPU time. If a new task with higher priority becomes ready, the scheduler immediately switches to it. This process is called context switching.
The scheduler also handles task delays, blocking, and suspension. When a task waits for a delay or an event, the scheduler pauses it and moves it to the appropriate state. At the same time, it gives the CPU to another task that is ready to run.
In short, the scheduler:
- Keeps track of all active and waiting tasks.
- Selects the next task based on priority and state.
- Handles switching between tasks smoothly.
- Maximizes CPU utilization without user intervention.
On the ESP32, the scheduler runs on both cores, allowing true parallel task execution. This is what makes the ESP32 FreeRTOS system powerful for real-time applications.
Why Task Scheduling is Important in ESP32 Projects
Task scheduling is crucial in any multitasking system, especially on the ESP32. Most embedded projects involve several operations running together — such as sensor reading, Wi-Fi communication, and data display. If all these operations run in a single loop, the system becomes slow and unresponsive.
By using the FreeRTOS scheduler, you can assign each task a specific role and priority. For example, Wi-Fi handling can run at a higher priority, while LED blinking can stay at a lower one. This ensures critical tasks always get CPU time, even when the system is busy.
Proper scheduling also improves real-time performance, reduces latency, and saves power. When no tasks are ready, the scheduler puts the CPU in an idle state, helping conserve energy — an important factor for IoT devices.
ESP32 FreeRTOS Task States Explained
FreeRTOS tasks move through different states during execution. Understanding these task states helps you design efficient ESP32 applications. Each task can be in ready, running, blocked, or suspended state at any time. The scheduler uses these states to decide which task should execute next.
Ready State
A task is in the ready state when it is prepared to run but is waiting for the CPU. All tasks start in this state after creation. The scheduler keeps track of ready tasks and selects one based on priority. If multiple tasks have the same priority, time slicing allows each task to run for a short period in turn.
Running State
A task enters the running state when the scheduler assigns it CPU time. Only one task per core can run at a time.
While running, the task executes its code until:
- Its time slice ends, or
- A higher-priority task becomes ready, or
- It blocks or suspends itself.
On the ESP32, with two cores, one task can run on each core simultaneously. This allows true parallel execution, improving performance for multitasking applications.
Blocked and Suspended States
A task moves to the blocked state when it waits for an event or a delay to complete. For example, a task can block while waiting for a queue message, semaphore, or timer. Blocked tasks do not consume CPU time.
The suspended state is similar, but the task stays inactive until explicitly resumed. You can suspend a task using vTaskSuspend() and resume it with vTaskResume(). These states help manage tasks efficiently and prevent CPU wastage.
Task State Transitions (Diagram)
Tasks often move between states during execution.
For example:
- A ready task becomes running when the scheduler selects it.
- A running task moves to blocked if it waits for a resource.
- A suspended task becomes ready when resumed.
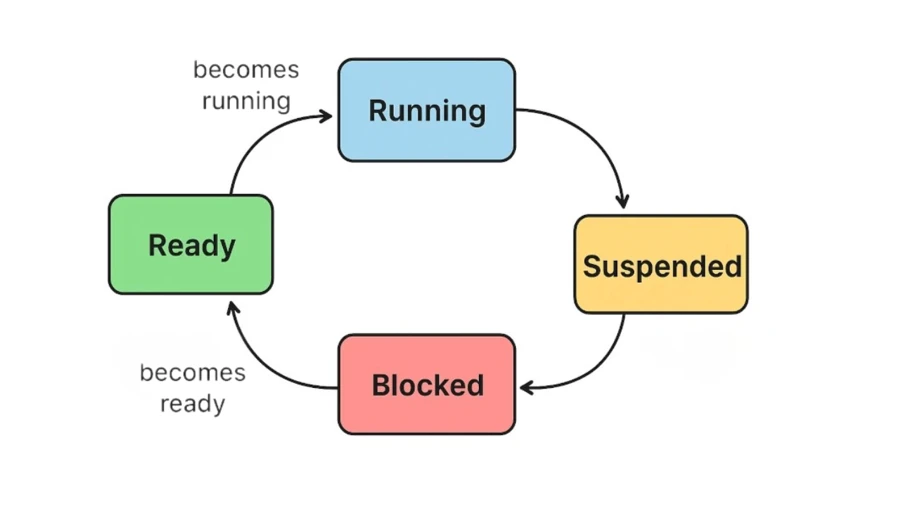
Understanding these transitions helps you design responsive and reliable ESP32 FreeRTOS systems. It ensures that high-priority tasks get CPU time when needed, while low-priority tasks wait efficiently.
Context Switching & Scheduling Modes on ESP32
In FreeRTOS, multiple tasks share the CPU. The scheduler manages when each task runs and when it pauses. The act of switching the CPU’s execution from one task to another is called context switching. It’s a core mechanism that enables multitasking on the ESP32.
What is Context Switching?
Context switching is the process of:
- Saving the current state (context) of a running task, and
- Restoring the previously saved context of the next task to run.
This “context” typically includes:
- CPU registers (general-purpose and special-purpose)
- Stack pointer (SP)
- Program counter (PC)
- Processor status registers
- Floating-point registers (if used)
When the scheduler switches tasks, it ensures that each task can resume exactly where it left off, as if it had never been paused.
Without context switching, multiple tasks would overwrite each other’s CPU state, causing data corruption and system crashes.
How FreeRTOS Saves and Restores Task Context
FreeRTOS automates the entire context switch process.
Here’s what happens step by step:
- Tick interrupt or event triggers the scheduler (for example, a timer tick or a task becoming ready).
- The current task’s context (registers, stack pointer, program counter) is pushed onto its stack.
- The scheduler selects the next ready task based on priority and state.
- The next task’s context is popped from its stack and restored to the CPU registers.
- The CPU resumes execution from that task’s saved program counter.
On the ESP32, which has dual cores (Core 0 and Core 1), FreeRTOS maintains separate schedulers — one per core.
Each core can independently switch tasks, and tasks are pinned to a specific core unless explicitly created as pinned-to-core = tskNO_AFFINITY.
When Does Context Switching Occur?
FreeRTOS performs context switches in several cases:
- Preemption: A higher-priority task becomes ready to run.
- Time slicing: Two tasks of equal priority share CPU time in round-robin fashion.
- Blocking: A task waits for an event, delay, or semaphore.
- ISR yield: An interrupt handler unblocks a task with higher priority.
Context switching is not “free” — it consumes CPU cycles for saving/restoring registers and updating stacks.
- Each switch introduces a few microseconds of latency (depending on clock frequency).
- Very frequent switches can cause performance degradation due to overhead.
- However, FreeRTOS is highly optimized to keep this minimal — especially with ESP-IDF’s efficient ISR and tick handling.
Tips to optimize performance:
- Keep task code short and efficient.
- Avoid unnecessary blocking (like long
vTaskDelay()calls). - Use appropriate priorities to avoid excessive preemption.
- Consider pinning critical tasks to a specific core to reduce scheduler contention.
Example Timeline of Context Switching
Let’s say you have three tasks:
| Task | Priority | Description |
|---|---|---|
| Task A | 2 | Sensor Reading |
| Task B | 1 | UART Communication |
| Task C | 3 | Control Loop |
- Task C (priority 3) runs first.
- It blocks while waiting for an event (like sensor data ready).
- Task A (priority 2) becomes the highest ready task → scheduler switches context.
- After some ticks, Task C unblocks and preempts Task A.
- Scheduler performs another context switch back to Task C.
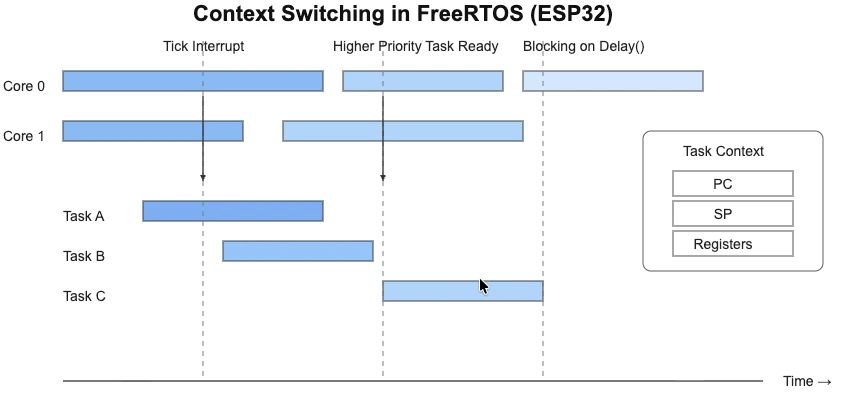
This diagram shows how FreeRTOS manages context switching on the ESP32. Each coloured bar represents a task running on Core 0 or Core 1. The vertical dashed lines marking represents the context switch points triggered by tick interrupts, higher-priority tasks, or task blocking. The inset box illustrates the task’s saved CPU state (PC, SP, Registers) during a switch.
Preemptive vs Cooperative Scheduling
FreeRTOS supports two main scheduling methods: preemptive and cooperative. These methods determine how the scheduler decides which task runs next. Understanding the difference is essential for building efficient ESP32 multitasking applications.
How Preemptive Scheduling Works in ESP32
In preemptive scheduling, the scheduler can interrupt a running task. It immediately switches to a higher-priority task if one becomes ready. This ensures that critical tasks always run on time.
On the ESP32, preemptive scheduling works on both cores. Even if a low-priority task is running, the scheduler can preempt it for a higher-priority task. This is the default scheduling method in FreeRTOS and is ideal for real-time applications.
When to Use Cooperative Scheduling
In cooperative scheduling, a task runs until it yields control voluntarily. The scheduler does not force a running task to stop. Tasks must call functions like taskYIELD() or wait for delays/events to let other tasks run.
Cooperative scheduling is simpler and reduces context-switching overhead. It is suitable for applications where tasks have predictable execution times and timing is not critical. However, one long-running task can block others if it does not yield.
| Feature | Preemptive Scheduling | Cooperative Scheduling |
|---|---|---|
| Task Switching | Scheduler can interrupt a running task anytime | Task runs until it yields control voluntarily |
| Responsiveness | High — critical tasks get CPU immediately | Moderate — depends on tasks yielding in time |
| Context Switching | More frequent; slightly higher CPU overhead | Less frequent; lower CPU overhead |
| Complexity | Slightly more complex to manage | Simpler and easier to implement |
| Use Case | Real-time applications where timing is critical | Simple, predictable systems without strict timing |
| ESP32 Dual-Core Support | Works efficiently on both cores | Works on both cores but relies on tasks to yield |
| Risk of Task Blocking | Low — high-priority tasks preempt lower ones | High — one long-running task can block others |
Choosing the Right Scheduling Mode for Your Application
Choosing between preemptive and cooperative scheduling depends on your ESP32 project:
- Use preemptive scheduling when tasks have critical timing requirements.
- Use cooperative scheduling for simpler systems with predictable task execution.
- Consider task priorities, CPU usage, and real-time constraints when deciding.
- For most ESP32 FreeRTOS applications, preemptive scheduling provides better responsiveness.
Time Slicing on ESP32 Dual-Core Processor
FreeRTOS allows multiple tasks of the same priority to share CPU time fairly. This process is called time slicing. Time slicing ensures that no single task hogs the CPU, improving ESP32 multitasking performance.
How Time Slicing Works in FreeRTOS
FreeRTOS divides CPU time into small, regular intervals called ticks. Each tick is generated by a hardware timer interrupt, typically at a frequency defined by the configuration constant:
#define configTICK_RATE_HZ 1000 // 1ms per tickWhen multiple tasks have the same priority, the scheduler:
- Chooses one task to run for a tick interval.
- After a tick interrupt, if time slicing is enabled (
configUSE_TIME_SLICING = 1), it moves to the next ready task of the same priority. - This continues in a round-robin manner, ensuring all tasks get equal CPU time.
This happens automatically when preemption is enabled (configUSE_PREEMPTION = 1).
Example: Equal Priority Tasks
Let’s assume you have three tasks:
| Task | Priority | Function |
|---|---|---|
| Task A | 2 | Handle network packets |
| Task B | 2 | Process sensor data |
| Task C | 2 | Update display |
Note that All tasks have priority 2.
Execution pattern (single core):
Tick 0 → Task A
Tick 1 → Task B
Tick 2 → Task C
Tick 3 → Task A
Tick 4 → Task B
...Even though they have equal priority, each one gets a fair time slot to execute. This ensures responsiveness and fairness in CPU usage.
Task Execution Across Both Cores (Core 0 and Core 1)
The ESP32 has two CPU cores. FreeRTOS can run one task on each core at the same time. You can assign tasks to specific cores using xTaskCreatePinnedToCore().
Tasks on separate cores run independently, but the scheduler still handles priority and time slicing on each core. This enables true parallel execution and improves the performance of multitasking ESP32 applications.
Example:
| Task | Priority | Pinned Core |
|---|---|---|
| Task A | 2 | Core 0 |
| Task B | 2 | Core 1 |
| Task C | 2 | Core 0 |
| Task D | 1 | Core 1 |
In this setup:
- Core 0 slices between Task A and Task C (equal priority = 2).
- Core 1 runs Task B (priority 2) and Task D (priority 1), where Task B preempts Task D due to higher priority.
This allows true parallelism — Core 0 and Core 1 execute different tasks simultaneously.
Setting Tick Rate and Its Impact on Task Timing
The tick rate determines how often the scheduler runs. It is defined in FreeRTOSConfig.h using configTICK_RATE_HZ.
A higher tick rate means tasks switch more frequently. This improves responsiveness but increases context switching overhead. A lower tick rate reduces overhead but may cause slower task reaction times.
| Tick Rate | Tick Duration | Typical Use Case | Impact |
|---|---|---|---|
| 1000 Hz | 1 ms | High responsiveness (e.g., control loops, fast I/O) | More context switches, higher CPU overhead |
| 100 Hz | 10 ms | General applications | Balanced performance |
| 10 Hz | 100 ms | Low power, slow systems | Lower overhead, slower responsiveness |
The diagram shows how FreeRTOS schedules tasks of the same priority across the ESP32’s dual cores.
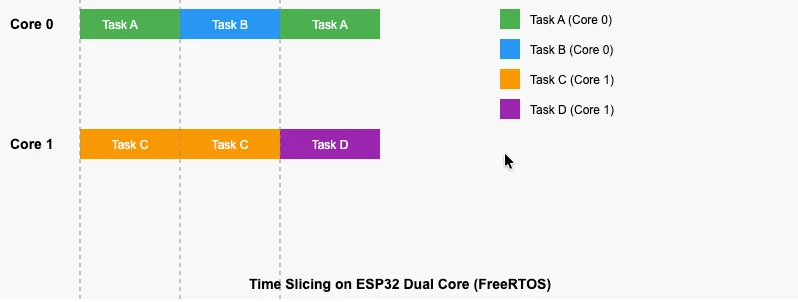
Each colored block represents a task executing on a core. Vertical dashed lines indicate tick interrupts, where the scheduler performs time slicing. Core 0 and Core 1 run their tasks independently, allowing true parallel multitasking.
Tick Interrupts and Priority Execution
The FreeRTOS scheduler runs continuously in the background. It uses tick interrupts to check task states and manage execution. The scheduler decides which task should run based on priority, state, and core assignment.
Tick Interrupt and Task Switching
A tick interrupt occurs at regular intervals defined by configTICK_RATE_HZ. Each tick allows the scheduler to update task states and perform context switching if needed. If a higher-priority task becomes ready, the scheduler preempts the running task immediately. This ensures that critical tasks get CPU time on schedule.
Priority-Based Scheduling on Dual Cores
The ESP32 has two cores, each capable of running tasks independently. FreeRTOS uses priority-based scheduling on each core. You can assign tasks to a specific core using xTaskCreatePinnedToCore(). The scheduler checks ready tasks on both cores and executes the highest-priority task on each core. This allows efficient multitasking and better CPU utilization.
Real Example of Scheduler Behavior
Imagine you have three tasks:
- Task A – high priority (sensor reading)
- Task B – medium priority (Wi-Fi communication)
- Task C – low priority (LED blinking)
When Task A becomes ready, the scheduler immediately preempts Task B or C. Task B runs only when Task A is blocked or delayed. Task C runs last, during idle CPU time.
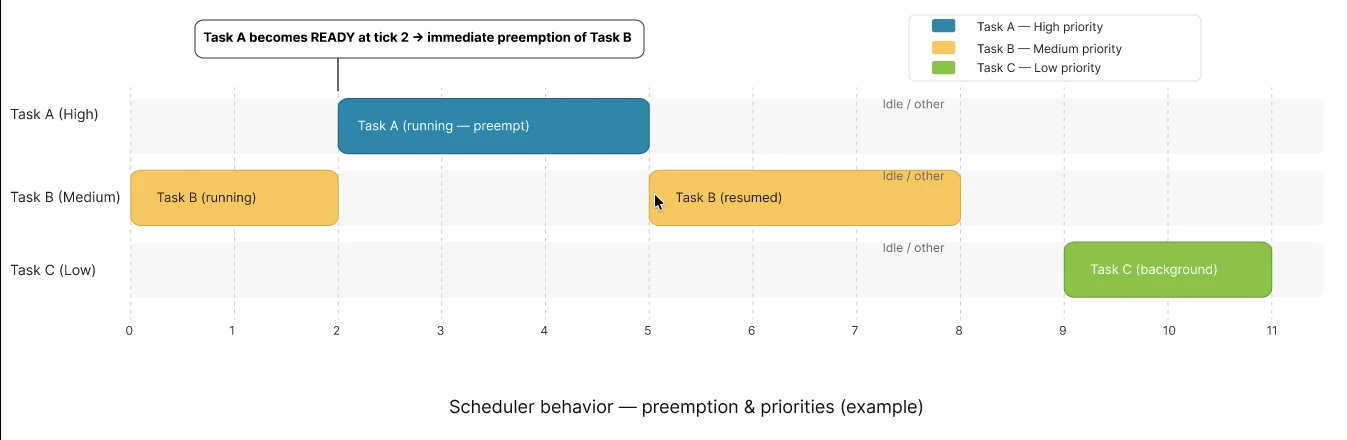
This diagram illustrates how the FreeRTOS scheduler manages tasks of different priorities on a single core. Task B (medium priority) starts running first. When Task A (high priority) becomes ready at tick 2, it immediately preempts Task B. Task A runs until it blocks, after which Task B resumes. Task C (low priority) runs only during CPU idle time when higher-priority tasks are not ready.
The vertical dashed lines represent system ticks, showing the timing of task switches. This visualization helps understand how FreeRTOS ensures high-priority tasks get CPU time immediately while lower-priority tasks run opportunistically.
Debugging FreeRTOS Tasks on ESP32: FAQs
Monitoring Tasks and Stack Usage
Efficient multitasking on the ESP32 depends on the scheduler running smoothly. Monitoring and debugging the scheduler is crucial to ensure tasks execute correctly, system resources are sufficient, and your application remains responsive.
Without proper monitoring, issues such as timing glitches, CPU overload, or stack overflows may go unnoticed, potentially causing crashes or unpredictable behaviour.
Using FreeRTOS Trace or ESP-IDF System View
FreeRTOS Trace and ESP-IDF SystemView are powerful tools to visualize task execution:
- FreeRTOS Trace:
- Records events like task creation, deletion, and state changes.
- Shows context switches and time spent in each task.
- Helps identify bottlenecks where tasks consume excessive CPU time.
- ESP-IDF SystemView:
- Provides a real-time timeline of task execution on the ESP32.
- Displays preemption events, interrupts, and tick timing.
- Allows detailed inspection of both cores on dual-core ESP32s.
Checking Task Runtime and Stack Usage
FreeRTOS offers built-in functions to monitor task health:
- Stack usage:
uxTaskGetStackHighWaterMark(TaskHandle_t xTask);- Returns the minimum remaining stack space.
- Helps detect tasks at risk of stack overflow.
- Task runtime stats:
vTaskGetRunTimeStats(char *pcWriteBuffer);- Shows CPU time consumed by each task.
- Useful for balancing task execution and identifying heavy CPU consumers.
Example: If a sensor reading task consumes 80% of CPU time while a display task gets 5%, you may need to adjust priorities or optimize code to maintain responsiveness.
Tips to Optimize Task Scheduling Performance
- Keep tasks short and efficient
- Avoid long loops or delays inside a task.
- Break long operations into smaller chunks to allow other tasks to run.
- Assign appropriate priorities
- Critical tasks like sensor reading or safety checks → high priority.
- Non-critical tasks like logging or LED updates → lower priority.
- Use time slicing wisely
- For tasks of the same priority, ensure that frequent context switching does not introduce excessive overhead.
- Avoid long blocking operations without yielding
- Use
vTaskDelay(),vTaskDelayUntil(), or wait on semaphores. - Blocking without yielding prevents other tasks from running, causing system sluggishness.
- Use
- Adjust tick rate carefully
- Higher
configTICK_RATE_HZ→ better responsiveness but more context-switch overhead. - Lower tick rate → less overhead but slower reaction times.
- Higher
- Regularly monitor with SystemView/Trace
- Detect subtle timing issues early.
- Ensure tasks are executing within their expected time budgets.
Practical Example
Imagine a project with:
- Task A: Reads sensors every 10 ms (high priority).
- Task B: Sends Wi-Fi data (medium priority).
- Task C: Updates LEDs (low priority).
Monitoring with SystemView shows:
- Task A preempts B and C correctly.
- Task B sometimes blocks too long → Wi-Fi packets delayed.
- Task C executes during idle CPU time.
From this, you might optimize Task B to break long operations into smaller chunks or adjust priority to improve performance.
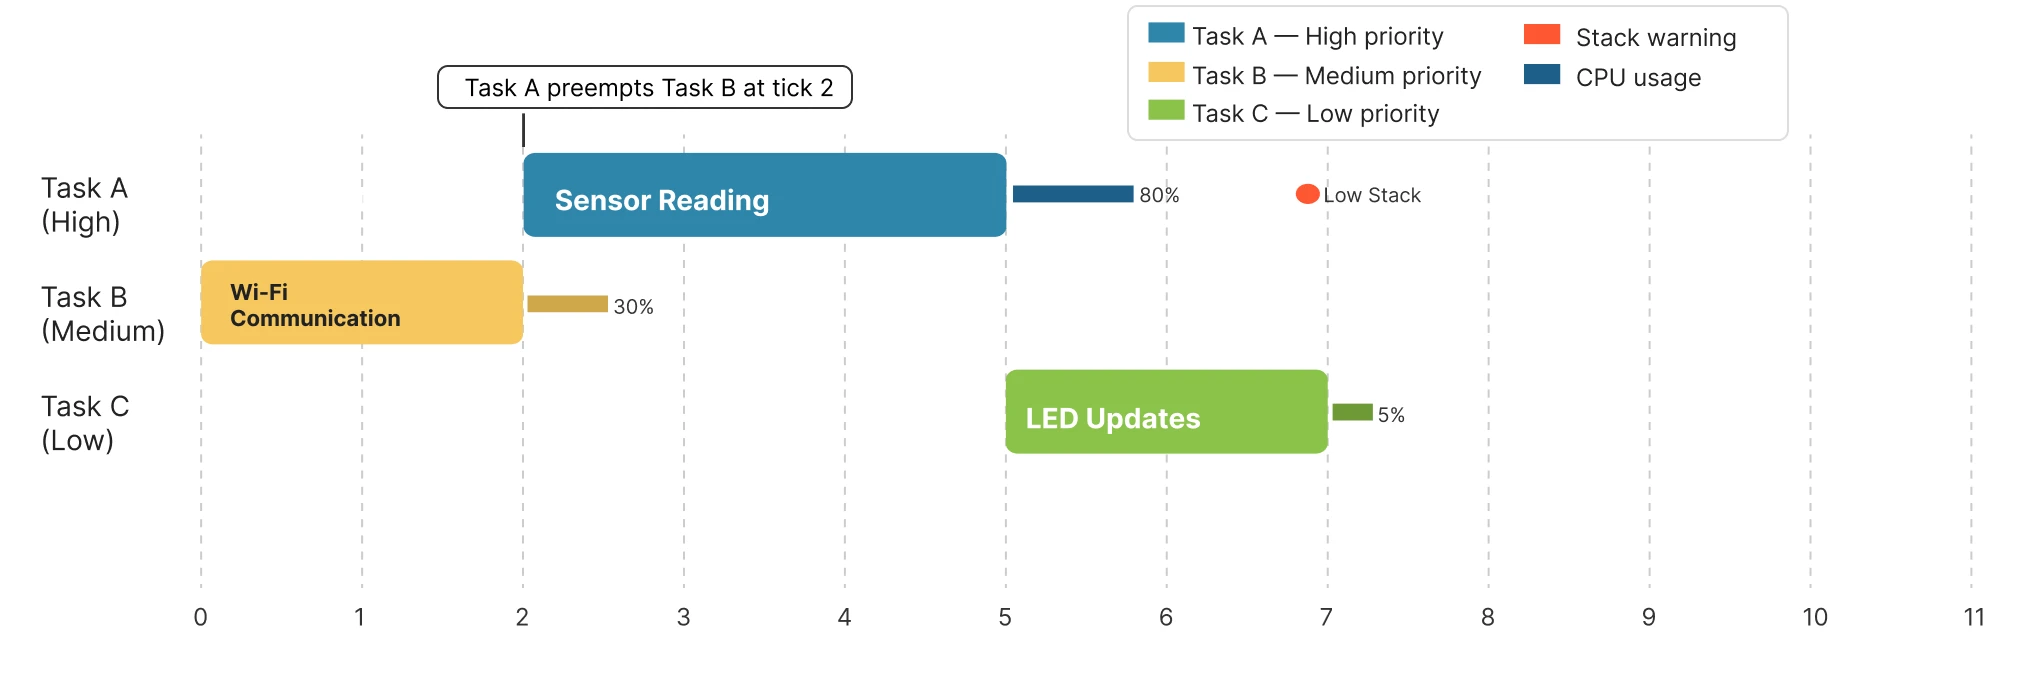
This diagram illustrates how FreeRTOS schedules tasks of different priorities on the ESP32 and how monitoring tools help identify performance issues. Each lane represents a task: Task A (high priority, sensor reading), Task B (medium priority, Wi-Fi communication), and Task C (low priority, LED updates). Coloured blocks show when each task is running.
The CPU usage bars indicate the percentage of processor time consumed by each task, while the stack warning icon highlights tasks at risk of stack overflow. The arrow shows a preemption event where Task A interrupts Task B. Monitoring task execution, CPU usage, and stack levels helps optimize system performance and prevent crashes.
Frequently Asked Questions
Conclusion
The scheduler is the part of FreeRTOS that makes multitasking real. It tracks every task's state, runs the highest-priority ready task, performs context switches in microseconds, and time-slices between equal-priority tasks so none of them starve. On ESP32 this all happens independently on both cores simultaneously.
The practical takeaway: a task that never calls vTaskDelay(), blocks on a queue, or gives up the CPU will prevent every lower-priority task from running. Design every task to spend most of its time in the blocked state — the scheduler will handle the rest.
In Part 3 we go deeper into task priority and stack management — how to assign priority values correctly, what happens when all tasks have the same priority, and how to size stacks without guessing.
Browse More ESP32 FreeRTOS Tutorials
ESP32 FreeRTOS Task Priority & Stack Size: Full Guide
ESP32 FreeRTOS Queues, Semaphores, Mutexes & Event Groups
ESP32 FreeRTOS Software Timers & Task Notifications
ESP32 FreeRTOS: Suspend, Resume & Delete Tasks (ESP-IDF)
ESP32 FreeRTOS Multitasking Project: ADC, UART & LED Tasks


excellent.