Home ▸ STM32 Tutorials ▸
Updated On: June 2, 2026
WavePlayer using STM32 Discovery
This tutorial will cover how to make WavePlayer using STM32 Discovery board. This player will be able to play the wave files from the USB device. The peripherals that we are going to use are as follows: I2S (Inter IC Sound), I2C, FATFS and USB HOST. The code Works alright for F4 Discovery board. You will get some error with PLLI2SN. Just comment out those 2 lines and it will be fine.
VIDEO TUTORIAL
You can check the video to see the complete explanation and working of this project.
CubeMX Setup
Below is the picture of the schematics of the Discovery board that I am using for this project. I will setup all the peripherals according to their connection with the CS43L22 IC

I2C Peripheral
First of all I am setting the I2C Peripheral as shown below
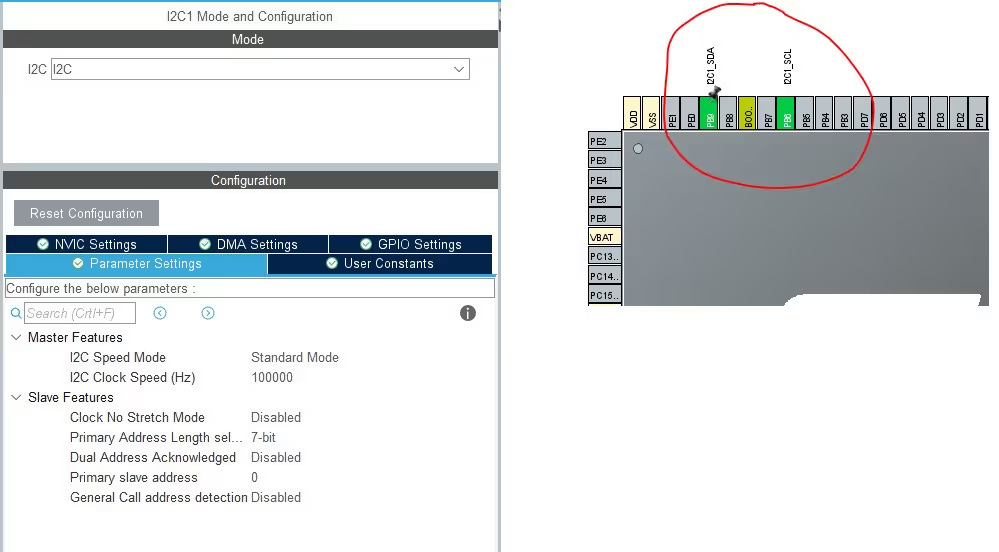
Here I needed to change the default SDA pin (PB7) to PB9, since that’s the one connected to the IC
I2S peripheral
After I2C, its time to setup the I2S peripheral

Make sure you select all the pins as shown in the schematics
- PC12 -> I2S3_SD
- PC10 -> I2S3_CK
- PC7 -> I2S3_MCK
- PA4 -> I2S3_WS
Here we also need to enable the DMA as shown below
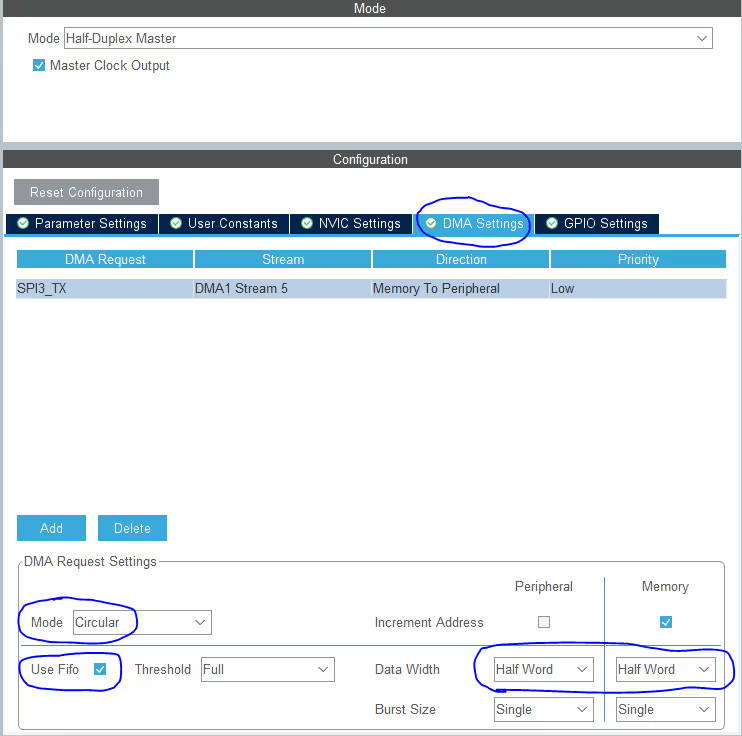
DMA is selected in circular mode, and Data Width is Half width since we will be dealing with 16 bits.
USB HOST
Next we need to enable the USB HOST, so that we can read the audio files from the USB
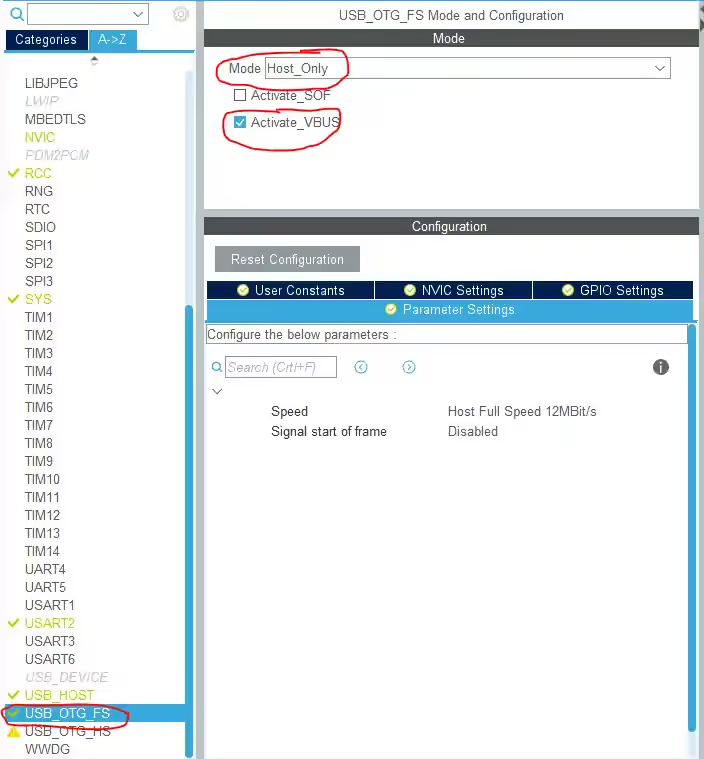
Also make sure you activate the VBUS, as the USB devices mostly don’t have the Power supply, and that’s why HOST is responsible to provide the required power to such devices.
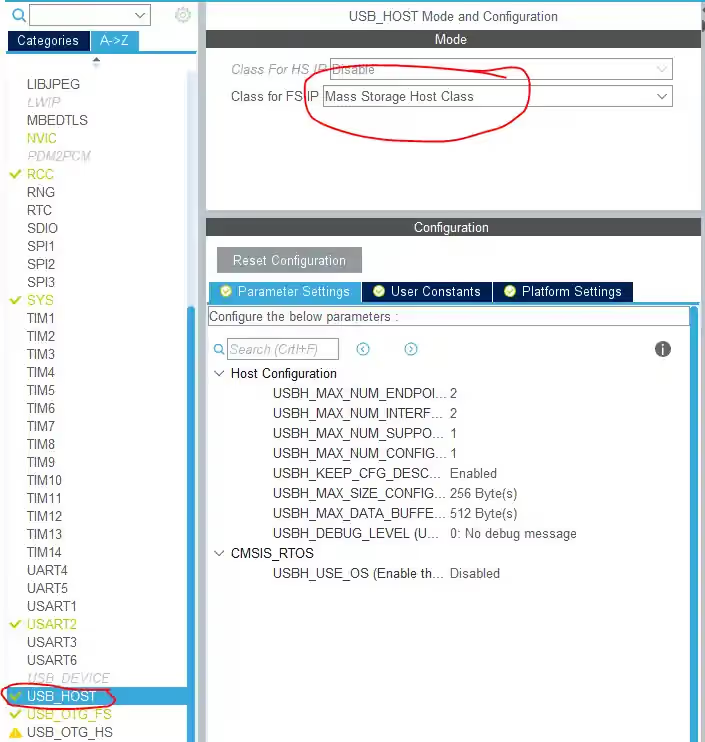
Next, select the USB_HOST and select the class as Mass Storage Class. Leave everything here to default.
And now we need to enable the voltage supply to the VBUS pin. To do that you need to look at the user manual for your board. I am using STM32F4 discovery board, and it have the following diagram for the USB
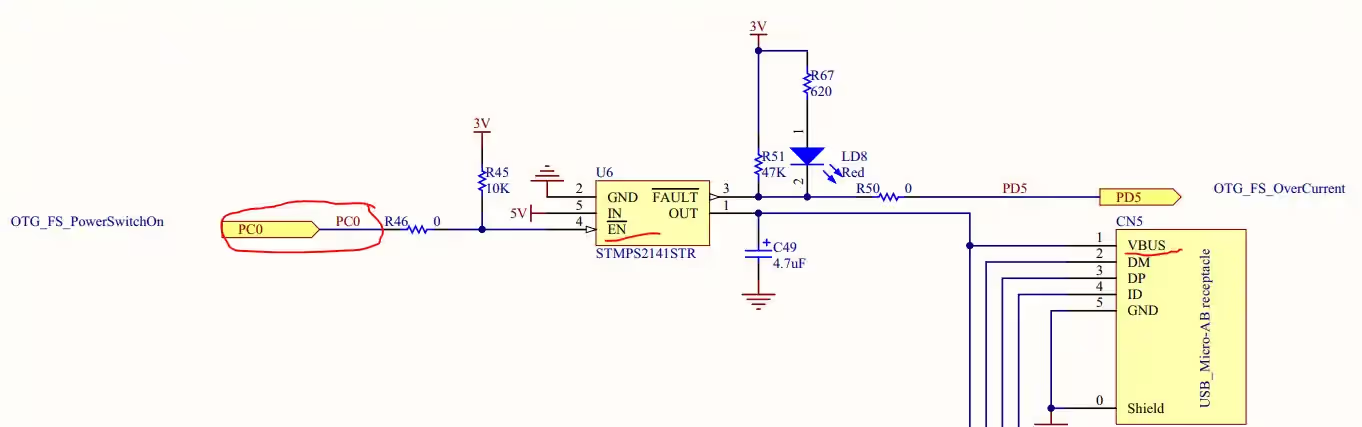
As you can see above, the VBUS is powered from the PC0 pin. But PC0 is connected to the EN Pin, which is an active Low pin. This means in order to supply the voltage to the VBUS, we must Pull down the PC0 Pin, or basically Set it LOW.
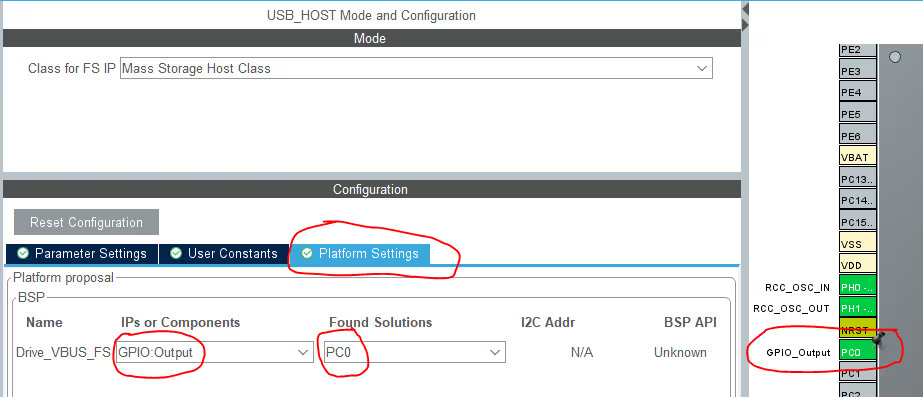
Also enable the PC0 in the Platform Settings as shown above
FAT File System
Now we will setup the FAT File System

Select the USB Disk Mode, and leave everything to default here. I have enabled the use of Long Filename just in case if I have files with long names
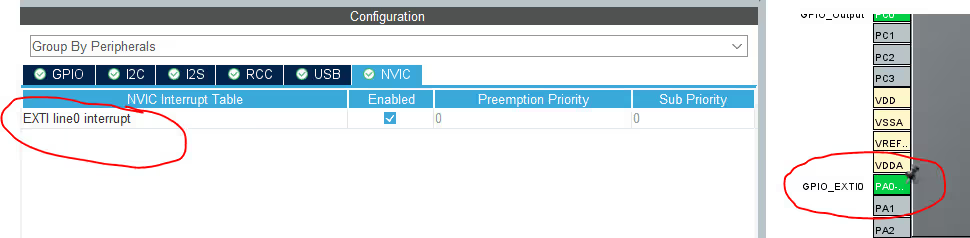
And finally I am using PA0 as the external interrupt key. This is to control the operations in Player like NEXT, PREVIOUS, PAUSE, RESUME etc
Some Insight into the CODE
We need to copy the respective library files into the src, and the inc folders. The final image of these libraries is shown below

The underlined files are the libraries that you need to include in your project. You can download them at the end of this post
Defines
First of all we need to include the header files in our main file. We will be using functions only from waveplayer.h and File_Handling.h files
/* Private includes ----------------------------------------------------------*/
/* USER CODE BEGIN Includes */

#include "waveplayer.h"
#include "File_Handling.h"

/* USER CODE END Includes */Next, we will define the functions to check the USB state, and the AUDIO state
extern ApplicationTypeDef Appli_state;
extern AUDIO_PLAYBACK_StateTypeDef AudioState;

int IsFinished = 0;ApplicationTypeDef Appli_state is the already defined in usb_host.c file, and that’s why we need to declare it as an extern. USB can have the following states
- APPLICATION_IDLE
- APPLICATION_START
- APPLICATION_READY
- APPLICATION_DISCONNECT
AUDIO_PLAYBACK_StateTypeDef AudioState is defined in the waveplayer.c file, and it have the following states
- AUDIO_STATE_IDLE
- AUDIO_STATE_WAIT
- AUDIO_STATE_INIT
- AUDIO_STATE_PLAY
- AUDIO_STATE_RECORD
- AUDIO_STATE_NEXT
- AUDIO_STATE_PREVIOUS
- AUDIO_STATE_FORWARD
- AUDIO_STATE_BACKWARD
- AUDIO_STATE_STOP
- AUDIO_STATE_PAUSE
- AUDIO_STATE_RESUME
- AUDIO_STATE_VOLUME_UP
- AUDIO_STATE_VOLUME_DOWN
- AUDIO_STATE_ERROR
Other then these, I have also define a variable IsFinished to check if the AUDIO playback is stopped.
Interrupt Callback
Now we will write an external interrupt callback for the button
void HAL_GPIO_EXTI_Callback(uint16_t GPIO_Pin)
{
	if (GPIO_Pin == GPIO_PIN_0)
	{
//		AudioState = AUDIO_STATE_NEXT;
		if (AudioState == AUDIO_STATE_PLAY)
		{
			AudioState = AUDIO_STATE_PAUSE;
		}

		if (AudioState == AUDIO_STATE_WAIT)
		{
			AudioState = AUDIO_STATE_RESUME;
		}
	}
}Here we can control what the button will do. In the code above, the button is programmed to PAUSE, and RESUME the audio
Main function
Our main code will be written inside the while loop
  while (1)
  {
    /* USER CODE END WHILE */
    MX_USB_HOST_Process();

    /* USER CODE BEGIN 3 */

    if (Appli_state == APPLICATION_READY)
    {
    	Mount_USB();
    	AUDIO_PLAYER_Start(0);

    	while (!IsFinished)
    	{
    		AUDIO_PLAYER_Process(TRUE);

    		if (AudioState == AUDIO_STATE_STOP)
    		{
    			IsFinished = 1;
    		}
    	}
    }
}In the code above, first we will continuously check if the USB is ready for communication. Once it is ready
- Mount the USB
- Start the Audio Player. The parameter is the index of the track (song) that you want to start playing with
- AUDIO_PLAYER_Process will keep processing the AUDIO until it is stopped. It takes the parameter “isLoop“, which means do you want the loop the AUDIO ? If set TRUE, the 1st track will play after the last track, or in case of FALSE, the player will stop after the last track
- If the AUDIO state is STOP, the IsFinished will be set to 1, and the processing will STOP
Other STM32 USB Tutorials
STM32 USB HID Gamepad: Configure STM32 as a Game Controller
STM32 as USB Mouse and Keyboard — HID Device Implementation
STM32 USB Mass Storage Class: Use SD Card as External Drive
STM32 USB Mass Storage Class with W25Q NOR Flash: External Drive over SPI
STM32 USB Composite Class: CDC + HID Gamepad on One USB Port

STM32 USB HID: Combine Mouse and Keyboard on One Port
STM32 USB Host MSC: Read & Write USB Flash Drive with FatFs and FreeRTOS


Hello! I am using f407. And when I try to run this code, when it comes to these lines
while (1)
{
/* USER CODE END WHILE */
MX_USB_HOST_Process();
/* USER CODE BEGIN 3 */
if (Appli_state == APPLICATION_READY){
LD7 stops lighting up and Appli_state == APPLICATION_DISCONNECT
What should I do?
Hello, I saw in the video that you did not connect the pins on the kit. I followed the instructions and plugged the headphones into the 3.5 jack on the kit but I can’t hear music. Can I ask if I2S module is needed to amplify the sound and do you have any solution for my problem?
Thank you.
Hi ,
do you have code example for I2S slave where it uses external clock (STM32F407) Disc board
think there is a minor issue in the code. In Audio.c, AUDIO_OUT_MspInit, the DMA is configured in normal mode, but I believe the DMA needs it to be in circular mode. I am guessing the only reason it works is that AUDIO_OUT_MspInit probably does not get called in AUDIO_OUT_Init due to the if statement checking if I2S is in reset state. Since the DMA is initialized in stm32f4xx_hal_msp.c into circular mode. Am I understanding this right?
I have an STM32F407-DISCOVERY board and as from what I checked is equal the pinout with the one you’re using… my question is if the code will work correctly?
Yes it does. I have had it tested.
You will get some error with PLLI2SN. Just comment those 2 lines and it will be fine.
Where you get these code because i won’t be able to download these codes
just above the comments you can see the download button…
Hello ,
how can i contact you ?
on email or ??
Thanks in advance.
goto contact us
or there is a discord link on the top right
sorry but i failed at error: ‘RCC_PLLI2SInitTypeDef {aka struct <anonymous>}’ has no member named ‘PLLI2SM’; did you mean ‘PLLI2SN’?
comment out those lines
Such a nice work u have done sir.
It would be more perfect if you make a tutorial of sound recording using STM32.
Love ur job