LOG Sensors data into SD card using FreeRTOS
We have already covered how to use ADC, DHT11, SD CARD, and FreeRTOS. Today in this tutorial, we will combine them all. We will read the data from Potentiometre, which is connected via ADC, also read from DHT11 temperature sensor, and we will write this data to the SD card. This entire process will take place in different tasks of FreeRTOS.
VIDEO TUTORIAL
You can check the video to see the complete explanation and working of this project.
Check out the Video Below
CubeMX Setup
Above is the setup for ADC, where we will use channel 1. TIM7 is used for microseconds delay, which will be needed for the DHT11 sensor to operate. TIM1 is used as a periodic delay, where an interrupt will be triggered every 2 seconds. We will use this interrupt to release a semaphore for DHT11 task to operate.
Other than the above setup, we also need to turn on the FATFS, FreeRTOS, and SPI. You can download the code and check the *.ioc file for more setup related information, or watch the video linked below for explanation of this setup used.
Some more Setup is required with the libraries, so i would advise you watch the video below.
Some insight into the CODE
uint16_t ADC_VAL;
int Temperature, Humidity;

xTaskHandle ADC_Task_Hnadler;
xTaskHandle DHT_Task_Hnadler;
xTaskHandle SDCARD_Task_Hnadler;


xSemaphoreHandle DHT_SEM;Above, i have created variables to store ADC and Temperature Data. Also, three task handlers have been defined along with 1 semaphore handler.
Mount_SD("/");
Format_SD();
Create_File("ADC_DATA.TXT");
Create_File("TEMP.TXT");
Unmount_SD("/");Inside the main function, I am creating the files, where the data will be updated later by the tasks.
DHT_SEM = xSemaphoreCreateBinary();

xTaskCreate(DHT_Task, "DHT", 128, NULL, 1, &DHT_Task_Hnadler);
xTaskCreate(ADC_Task, "ADC", 128, NULL, 2, &ADC_Task_Hnadler);
xTaskCreate(SDCARD_Task, "SD", 128, NULL, 3, &SDCARD_Task_Hnadler);

HAL_TIM_Base_Start(&htim7);  // us delay timer
HAL_TIM_Base_Start_IT(&htim1); // periodic delay timer

vTaskStartScheduler();Now we will create the semaphore, and the three tasks. Here, SDCARD_Task is given highest priority, because we don’t want any other task to preempt it, while the task is accessing the SD CARD. In that case, a failure of drive might occur.
Start the TIM7 normally, and TIM1 in interrupt mode. This is because the TIM1 will generate the periodic interrupt in every 2 seconds.
And finally we will start the scheduler.
void ADC_Task (void *argument)
{
	while (1)
	{
		HAL_ADC_Start(&hadc1);
		HAL_ADC_PollForConversion(&hadc1, 10);
		ADC_VAL = HAL_ADC_GetValue(&hadc1);
		HAL_ADC_Stop(&hadc1);

		vTaskDelay(500);
	}
}ADC_Task will run every 500 ms. Where it will store the ADC value in the variable (ADC_VAL) using PollForConversion method.
void DHT_Task (void *argument)
{
	while (1)
	{
		if (xSemaphoreTake(DHT_SEM, 2500) != pdTRUE)
		{
			HAL_UART_Transmit(&huart2, (uint8_t *) "Unable to acquire semaphore\n", 28, 100);
		}

		else
		{
			DHT11_Get_Data(&Temperature, &Humidity);
		}
	}
}DHT_Task will run only after acquiring the semaphore. The semaphore will be released by the TIM1 periodically every 2 seconds. After acquiring the semaphore, DHT11_Get_Data function will store the Temp and Rh values in the Temperature and Humidity variables.
The semaphore part is just to bring variation in this program. Ofcourse you can just use the vTaskDelay to run this task every 2 seconds.
void SDCARD_Task (void *argument)
{
	int indx=1;
	while (1)
	{
		char *buffer = pvPortMalloc(50*sizeof(char));
		sprintf (buffer, "%d. %u\n", indx,ADC_VAL);
		Mount_SD("/");
		Update_File("ADC_DATA.TXT", buffer);
		sprintf (buffer, "%d. Temp = %d C\t RH = %d \n",indx, Temperature, Humidity);
		Update_File("TEMP.TXT", buffer);
		vPortFree(buffer);
		Unmount_SD("/");

		indx++;

		vTaskDelay(1000);
	}
}SDCARD_Task will run every 1 second, and update the data in the files. indx variable is used for indexing.
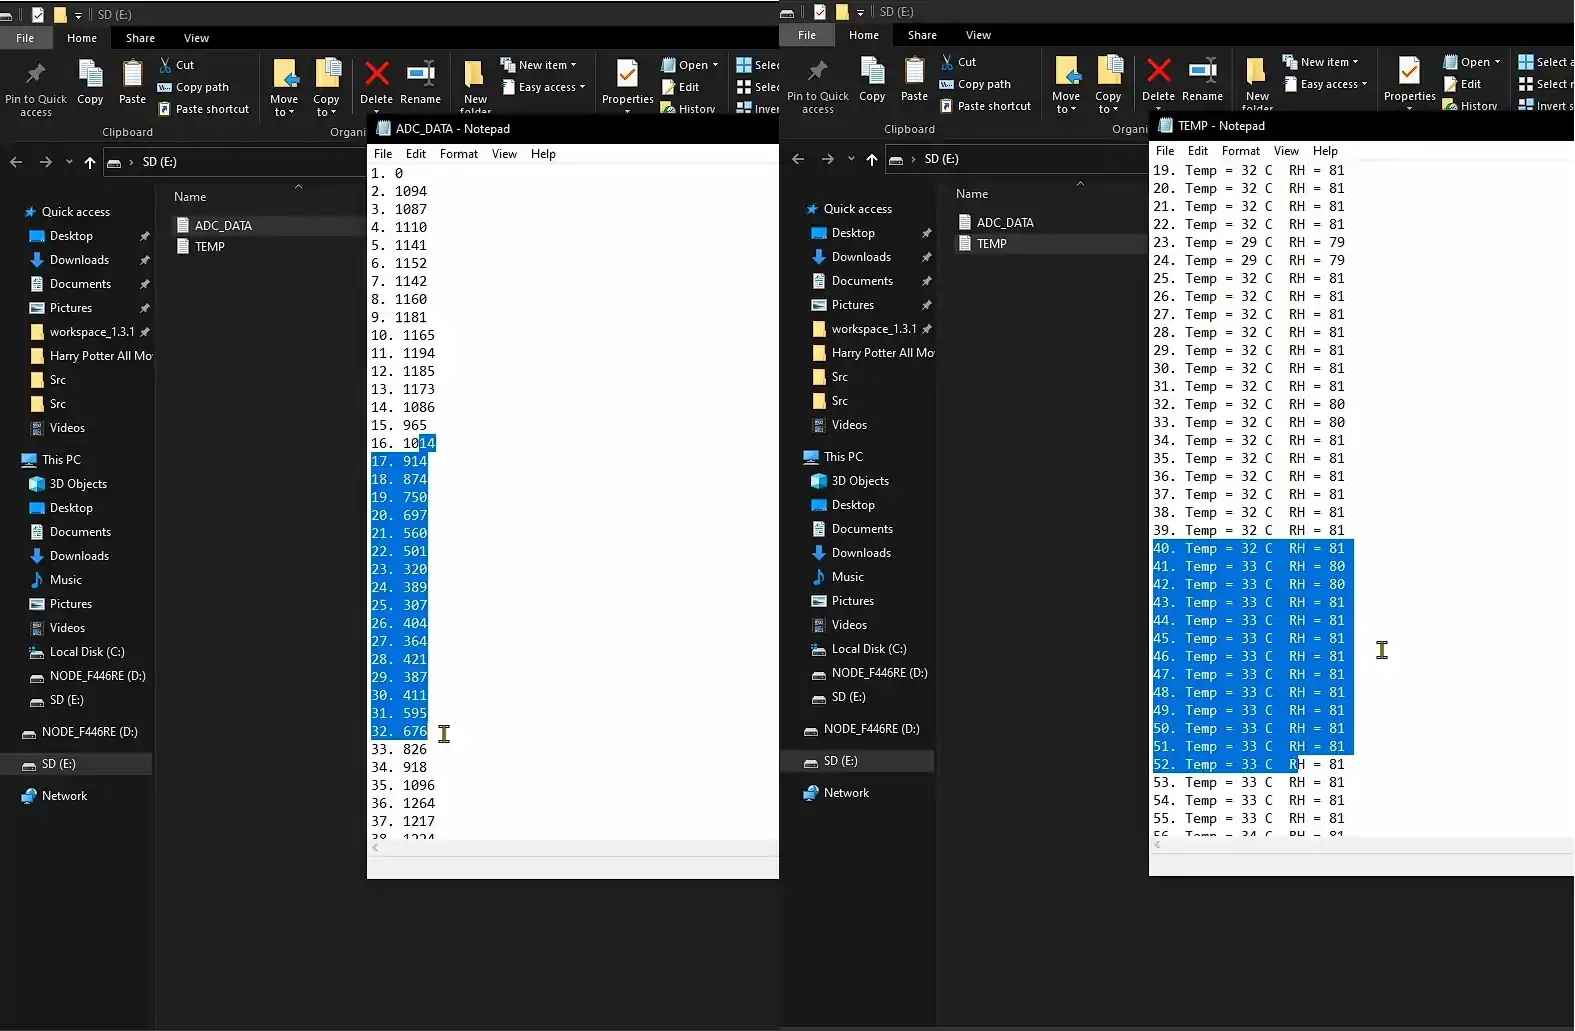
Result
You can see above that two files were created in the SD CRAD, and the recorded data is written to the files. For more details, watch the video below.
Info
You can help with the development by DONATING Below.
To download the project, click the DOWNLOAD button.


Hello, in am using an STM32H755 Nucleo and i want to use this method to store values on an sd card within an RTOS, but this code doesn’t work for me. The SD Card doesn’t mount and don’t write values. Which changes must be made to get this running, best regads.
Hello, I have a question, there is any limitation to using cmsis library in this example?
When the SD_TxDataBlock function is called from SD_disk_write in mode of writing multiple blocks with token 0xFD, the local variable “resp” has no value assigned and there may be an indeterminate result.
Please could you check it and inform us.
Thanks
DRESULT SD_disk_write(BYTE pdrv, const BYTE* buff, DWORD sector, UINT count)
{
…
…
if(!SD_TxDataBlock(0, 0xFD))
{
count = 1;
}
static bool SD_TxDataBlock(const BYTE *buff, BYTE token)
{
uint8_t resp, wc;
uint8_t i = 0;
/* SD waiting for card ready*/
if (SD_ReadyWait() != 0xFF)
return FALSE;
/* Token transfer */
SPI_TxByte(token);
/* For data tokens */
if (token != 0xFD)
 {
   wc = 0;

   /* 512 Byte data transfer */
   do
   {
     SPI_TxByte(*buff++);
     SPI_TxByte(*buff++);
   } while (--wc);

   SPI_RxByte();      /* CRC 무시 */
   SPI_RxByte();

   /* Receive Dating Responses */
   while (i <= 64)
   {
     resp = SPI_RxByte();

     /* Error response handling*/
     if ((resp & 0x1F) == 0x05)
       break;

     i++;
   }

   /* SPI 수신 버퍼 Clear */
   while (SPI_RxByte() == 0);
 }
if ((resp & 0x1F) == 0x05)
return TRUE;
else
return FALSE;
where is download from “file_handing_rtos, thd” file?
In terms of performance assuming we have a stm32 64MHz mcu. Would you recommend this method of catching sensor data –> sdcard using FreeRTOS. Or is it better/faster to use a superloop (catch with interrupts) with circular buffer and send to sdcard? Which way is more efficient?
hi,
am using stm32f103…am unable to update the values in new line every time…its updating in single line only..kindly help me…
thank u
you have to write “\n” at the end of data.
check how i have written data
i need the code if y has
Hi
the download link is down 🙁
how can i catch these files?
link is fine..
where is file_handing_rtos file?
THD11 file