SD card using SPI in STM32
You already know what are you looking for and that’s why probably you are here. So I am not going to waste your time with the facts that what is an SD card ? How does it work and all these..
In this tutorial we will interface a SD card with stm32 micro controller using SPI mode. I am using STM32F103C8 controller and SD card size is 1 GB. Also we will do some basic file handling operations such as creating a file, writing, reading, deleting etc.
Some advanced operations, i.e. directory related operations, will be covered in another tutorial. So let’s jump right into it.
UPDATE 1
The code has been updated with new libraries thanks to eziya https://blog.naver.com/eziya76/221188701172 SPI can work upto 10 Mbps
If getting FR_NOT_READY error, use some external 5V power source. Power from board seems to be not enough (it could be current required for the module)
To Know these errors, put a Breakpoint after f_mount and see the value of fresult.
UPDATE 2
If you are getting FR_NO_FILESYSTEM (mainly happening with LOW storage cards), then use the older library from https://controllerstech.com/wp-content/uploads/2020/07/SDCARD_SPI_OLD_F103.zip
To Know these errors, put a Breakpoint after f_mount and see the value of fresult.
HOW TO
Obviously first we need to create a project in CubeMx and make sure you follow the steps below.
Make sure you select the fatfs and I have left everything to default. I am also selecting uart in my project so that the data can be sent to the computer.
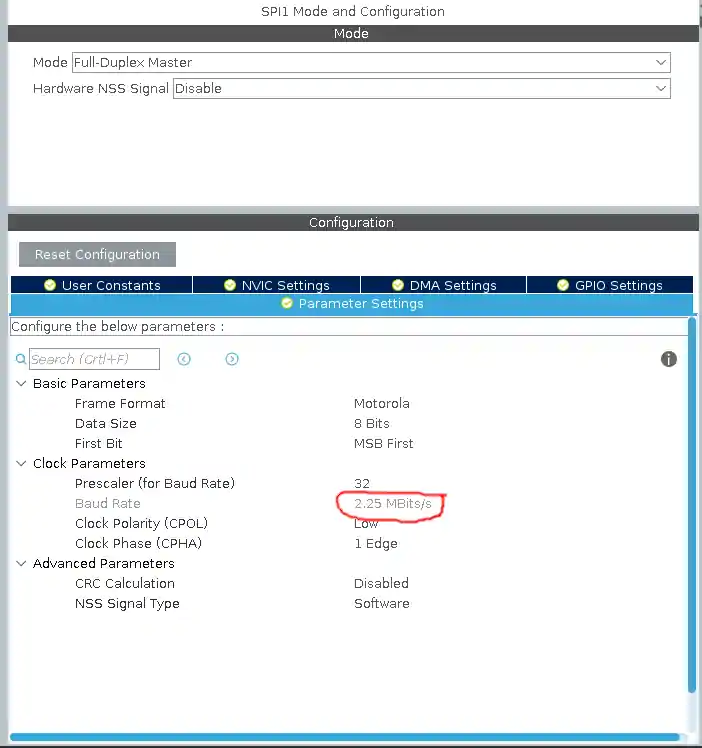
Also the SPI speed is kept at 2.25 MBits/s. This is important, make sure you keep your speed around it.
After the project is generated, open it and Now we need to copy some library files in the project folder.
copy the files fatfs_sd.c and fatfs_sd.h in the respective src and inc folders. After successfully copying, we need to do some basic defines and all.
First, open the fatfs_sd.c file and edit the following
/* defines for the CS PIN */
#define SD_CS_GPIO_Port GPIOB
#define SD_CS_Pin GPIO_PIN_0

/* manage your SPI handler below */
extern SPI_HandleTypeDef hspi1;
Next, in the user_diskio.c file, we have to make some changes and you can see them, once you download the code.
We also need to setup the Timer 1 and Timer 2 functions. These values should constantly decrease every 1 ms and that’s why we define them inside the interrupt handler, in the systick handler.
So, open the STM32f1xx_it.c and define the following:
volatile uint8_t FatFsCnt = 0;
volatile uint8_t Timer1, Timer2;

void SDTimer_Handler(void)
{
  if(Timer1 > 0)
    Timer1--;

  if(Timer2 > 0)
    Timer2--;
}

void SysTick_Handler(void)
{
  /* USER CODE BEGIN SysTick_IRQn 0 */

	  FatFsCnt++;
	  if(FatFsCnt >= 10)
	  {
	    FatFsCnt = 0;
	    SDTimer_Handler();
	  }

  /* USER CODE END SysTick_IRQn 0 */
  HAL_IncTick();
  /* USER CODE BEGIN SysTick_IRQn 1 */

  /* USER CODE END SysTick_IRQn 1 */
}
Some Insight into the CODE
f_mount will mount the SD card. “/” is the path, that we want to mount. fs is the pointer to the file system, which we need to define as a global definition, as we are going to use it a lot.
fresult = f_mount(&fs, "/", 1);
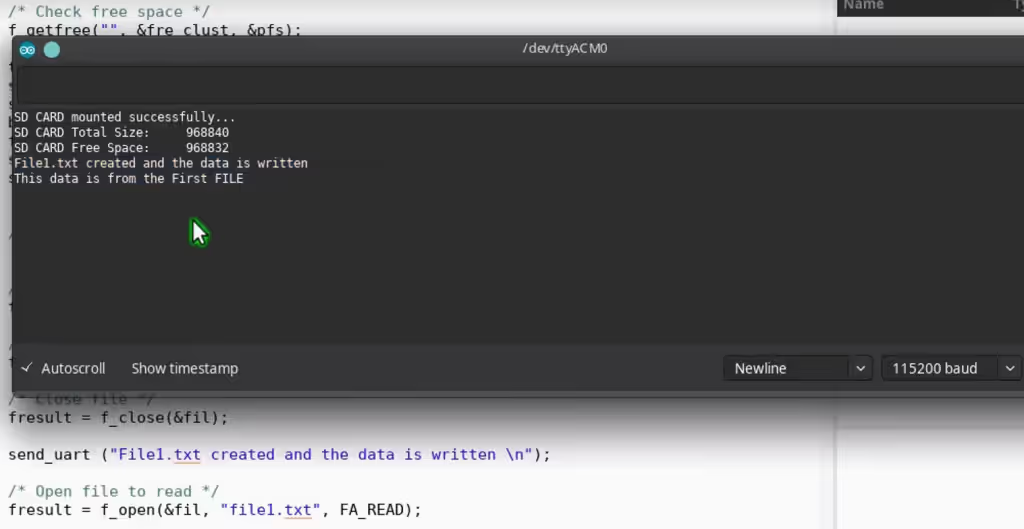
if (fresult != FR_OK) send_uart ("ERROR!!! in mounting SD CARD...\n\n");
else send_uart("SD CARD mounted successfully...\n\n");
Once the card is mounted, we will create a file and to do that, we will use the following function
/* Create second file with read write access and open it */
fresult = f_open(&fil, "file2.txt", FA_CREATE_ALWAYS | FA_WRITE);
If the file already exists, this will override it, and if it doesn’t exist, it will create a new file and than open it.
fil is the pointer to the file, which is also global.
“file2.txt” is the name of the file, that we want to create
the third parameter is the attributes given to the file. Below is the table for that
once the file is opened, we can write the data using the function below
/* Writing text */
strcpy (buffer, "This is File2.txt, written using ...f_write... and it says Hello from Controllerstech\n");

fresult = f_write(&fil, buffer, bufsize(buffer), &bw);
here bw is the variable to keep the count of the number of bytes written to the file.
buffer contains the string, that we want to write into the file.
After writing, it’s time to close the file, and to do that we can use
/* Close file */
f_close(&fil);
Now it’s time to read the data, that we just wrote into the file. So, let’s open it again with read attribute
/* Open second file to read */
fresult = f_open(&fil, "file2.txt", FA_READ);
if (fresult == FR_OK)send_uart ("file2.txt is open and the data is shown below\n");

/* Read data from the file
 * Please see the function details for the arguments
*/
f_read (&fil, buffer, f_size(&fil), &br);
send_uart(buffer);
send_uart("\n\n");

/* Close file */
f_close(&fil);
The file opened, read, and data from the file got saved into the buffer. bw is the count of the number of bytes read from the file.
Than we sent the buffer to the uart, and at last close the file.
To delete the above created file use the function below
fresult = f_unlink("/file2.txt");
if (fresult == FR_OK) send_uart("file2.txt removed successfully...\n");
so, f_unlink will delete the file.
“/file2.txt” is the path to the file that we want to delete
And finally we will unmount the CARD using the f_mount function again. But this time the file system pointer will be NULL.
/* Unmount SDCARD */
fresult = f_mount(NULL, "/", 1);
if (fresult == FR_OK) send_uart ("SD CARD UNMOUNTED successfully...\n");




Hello.
What is the MAX size of the memory that can be connected to STM32?
Is there any limitation about this?
Hello, can you help me when i use STM32F103 it work OK, but when i using STM32G431CBU6 it not work “FR_NOT_READY”
Hello,
Thank you for the video.
I am getting “FR_NOT_ENABLED” error when I try to open or create “file1.txtt”
Thank you very much for this tutorial.
I have both stmf103c8t6 and f407-Discovery kit.
The old version is working on f103, but neither work on both f103 and f407-discovery. I’m using same power setup on both microcontrollers. I’m always getting FR_NOT_READY on F407-Discovery. I’m also using 1000Hz timer for Timer1 and Timer2 on discovery. Prescaler for SPI is 64 on Discovery and 32 on f103, respectively.
I’ve read several tutorials and discussions, but I couldn’t make it work. Any help would be appreciated.
I had the same problem as you with SPI, wondering if you solved it
Hello, thank you very much for your tutorial.
Hi, currently playing around with almost same setup as yours. (my sd card holder works with 3.3v.)
However after several attempts I now can read sd card size but after running your example, no file has been created.
I debugged and opening the file did return FR_OK but when closing it, I get an FR_INVALID_OBJECT.
went on debugging and found that in f_puts(), the fil->fs-entries are cleared after the f_write() at buffer flushing here..
int f_puts (
const TCHAR* str, /* Pointer to the string to be output */
FIL* fp /* Pointer to the file object */
)
{
putbuff pb;
UINT nw;
pb.fp = fp; /* Initialize output buffer */
pb.nchr = pb.idx = 0;
while (*str) /* Put the string */
putc_bfd(&pb, *str++);
if ( pb.idx >= 0 /* Flush buffered characters to the file */
&& f_write(pb.fp, pb.buf, (UINT)pb.idx, &nw) == FR_OK
&& (UINT)pb.idx == nw) return pb.nchr;
return EOF;
}
didn’t go deeper inside f_write because it’s pretty complex with all these preprocessor options and i don’t have that much time..
Maybe someone has an idea what’s going on there?
I also had exactly same problem with this module.
https://ko.aliexpress.com/item/32968862796.html?spm=a2g0o.productlist.main.11.3e7836d5iHhdej&algo_pvid=9abe9530-3c20-43dd-a7c6-66e8089bac92&aem_p4p_detail=2023022700523616080255061446000012341375&algo_exp_id=9abe9530-3c20-43dd-a7c6-66e8089bac92-5&pdp_ext_f=%7B%22sku_id%22%3A%2266561007772%22%7D&pdp_npi=3%40dis%21KRW%21852.0%21811.0%21%21%21%21%21%40211be10916774879567327524d0702%2166561007772%21sea%21KR%212865204414&curPageLogUid=dV4O8zaovjpY&ad_pvid=2023022700523616080255061446000012341375_6&ad_pvid=2023022700523616080255061446000012341375_6
I changed SD card reader module. Then it worked.
https://ko.aliexpress.com/item/32530917432.html?gatewayAdapt=glo2kor
I download your code and don´t work in my blue pill and SD CARD external. When i do this with ARDUINO work very well. I think your code should be very wrong. I click in download and test. I see all the video and SD CARD total size shows 0. Something is wrong in your code because not work
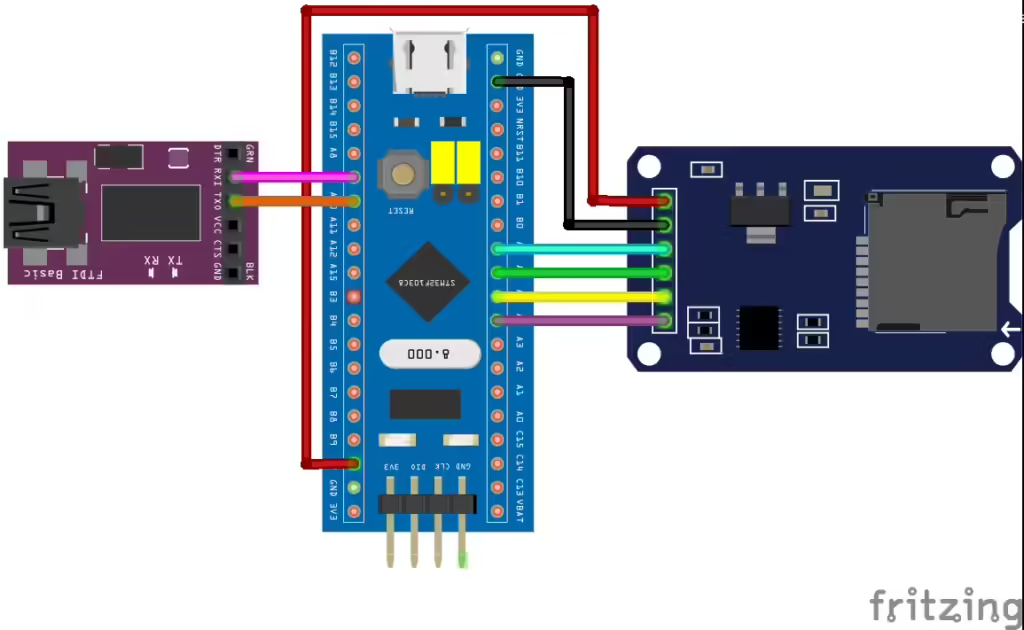
Hi. Thank you very much for useful tutorial. May you please check connection diagram – on mine STM I have SPI starting from A5 to A7, and PB0 used for CS. Also noted that I have message about successful mounting of card with no any card inserted into reader.
Hi,
I tried the same setup with STM32F407 Discovery Kit and a 16GB Sandisk Ultra microSDHC card.
The f_mount() throws FR_NOT_READY if using 1 (mount now) and f_open() throws FR_NOT_READY if using 0 (mount later) for f_mount().
As suggested, i have tried using an external 5V adapter to power it, but the problem perisits.
The same SD card and SD card module worked properly with PSOC 5LP (no problems whatsover).
NEED HELP!!!!
I had the same problem a few weeks before. The solution in my case was changing the cables and microSD. Tell us if it works.
im having the same issue and replacing these things didn’t help
did you find something , i am having the same errors using a f401
Can I use 8 GB SD card or is there any limit to the SD card size being used. I get the not ready error. Let me try with external 5V as suggested by you.
It did not work.
Hi,
under the block of code to read file
bw is the count of the number of bytes read from the file.
the bow should be “br”.
Thank you for nice tutorials.
I am connecting an SD-Card over the SPI to store some data in the file on SD card on STM32F407G (Disc1). I am also configuring internal RTC for the time tracking on internal clock, a 16×2 LCD connected via 4-bit mode and some push buttons.
The problem I am facing is, When the Code do file operation on SD card(i.e writing data in file) the RTC time becomes 0. If board powered-up without the SD-card on it, It just works fine. For debugging I tried to do SD-Card activity after some time of booting(i.e. 30 Sec), So during the first 30 sec the RTC date-time showing fine, as the SD-Card operation started after 30 sec, RTC time-date became 0.
CubeMx configuration of the project is as below;
USART2(PD5, PD6)- asynchronous mode UART
SPI1(PB3-Clk, PB4-Miso, PB5-Mosi, PA15-GPIO_Out for CS)
PC0 to PC7-GPIO Output for LCD
PE0 to PE5-GPIO Input for Push-buttons
FATFS-User defined
RTC-Internal clock
TIM1-Micro second delay
For RTC configuration I followed: https://controllerstech.com/internal-rtc-in-stm32/
Can you please help me to understand what I missed here and resolve the issue? Also Let me know if anymore information required.
Thanks
how you connected in stm32f4 dis the sd card spi
its mounting card but not creating file
code:
int WriteTo_SDHC(char buffer[])
{
printf(“inside SDHC\n”);
// buffer[100]=”hello sd card is writing no problem”;
if (f_mount(&FatFs, “”, 1) == FR_OK)
{
printf(“card mount\n”);
if( f_open(&fil, “file2.txt”, FA_CREATE_ALWAYS | FA_WRITE))
{
printf(“created file file\n”);
}
//Close file, don’t forget this!
f_close(&fil);
//Unmount drive, don’t forget this!
f_mount(0, “”, 1);
}
Hi! Exactly what’s the purpose for the timer1 and timer2? Can’t they be removed? Or how important are they when writing to SD?
they are used for the timeout.
Thank you very much for this 🙂
Helped me alot, and it worked straight away. Using this on a stm32g4.
Hi,
Thank you for your tutorial..
i am using stm32f103 to create excel sheet and updating the sensors data in new line for every 1 sec using timer…but i want to store the data in single line only means it needs to update in the particular location in same line only instead of going new line every time…i have used \r as end character but still am unable to update that …..
how can i fix the above condition?
thank you!!!
“\n” is a NEW LINE.
“\r” is a CARRIAGE RETURN, takes you back to the start of the line.
A file is a long array of bytes, so, if you’re writing to it and want to add data in the same line, you have to add “\n” (“\r\n” in Linux) ONLY after the last field you entered.
I mean, after every field and a separator you wont add anything in your string, and in the last one you will:
size = sprintf ((char *)buff, “%d,%d,” , field1 , field2);
{open in append mode and write to the SDCARD…}
size = sprintf ((char *)buff, “%d,%c,” , field3 , field4);
{open in append mode and write to the SDCARD…}
size = sprintf ((char *)buff, “%d,%d\n” , field5 , field6);
{open in append mode and write to the SDCARD…}
in this example you have the string to be written (buff) and its length (size).
“\n” is a character written in the file the same as other characters.
Hope it helped you ☺
Hi,
First of all thanks for the tutorial!
I managed to get it working and I measured the time it takes for the writing instructions. In my case is around 3-4 us, but after every 128 writing instructions, it takes 5ms to perform the next write.
Is this the expected behavior? or is there a workaround to fix this?
Thanks!
Hi, I have this problem too.
Can you find a solution ?
Hi, There is a buffer overflow error in fatfs_sd.c function:SD_RxDataBlock
This code will write data read 1 byte past the end of buff:
do {
SPI_RxBytePtr(buff++);
} while(len–);
The correct code is:
} while(–len);
Hi! I repeated everything as in the tutorial, but I get the error “ERROR !!! in mounting SD CARD …”. 2GB card. 100% working and formatted in FAT. Exactly the same MicroSD module. All connections have been tested with a multimeter. I tried to connect 3.3v and 5v to the power supply. No result. Also reduced the speed of the SPI. All without a positive result. Need help.
debug it and check value in fresult variable. That will precisely tell you what the error is
Thanks for the answer! I just inserted another card and everything works fine now!
Hi sir
I get 12 error like this
“SD\SD.axf: Error: L6406E: No space in execution regions with .ANY selector matching ff_gen_drv.o(.bss).”
what should I do?
Hello! Out of curiosity, where did the 2.25 mbps number come from? I’m using a different processor with a 64 MHz processor so my speed is looking more like it would be 2 or 4 mbps (I might be able to play with it to get it closer by making the clock frequency 36 MHz so it’s a multiple of 72 and playing with the dividers a bit.
I was hoping to understand where the number came from though, if possible, so I can determine the best way to approach this.
Also, while I’m here, which clock is it that’s used for SPI? Is it Sysclk? I can see SPI, I2C, USART, and USB specific clocks but I don’t see an SPI clock.
Thanks for all your help!
2.25 is not some particular requirement. Just keep the SPI speed low (around 2 mbps).The card seems to work with that speed. If you want, you can try higher speeds and check the limit for your card.
What clock is used for SPI ? well you check the timer diagram in the datasheet of your controller to find that out. SPI is clocked either from APB1, or APB2, so check that information in the datasheet
Yeah, interestingly enough, the clock diagram for the STM32WB55’s clock tree looks exactly like the one in the *.ioc file, which didn’t provide that info but I did find the info in the peripheral current consumption chart.
Thanks for the info! I appreciate it!
yeah saw that too and it’s sad. There must be information somewhere, maybe another pdf just for that purpose.
hi sir , thanks i have used the project above and tested for spi sd card on nucleo board upto 16GB it works fine. can you please share how to interface the spi sd driver with usb msc as well it would be helpful.
i need to work on that part.
hi thanks for the reply . i have merged the usb msc device code and sd spi card code to access the sd card from usb . it does not work.
Below i shared the write and read functions i have used in usbd_storage_if.c.
int8_t STORAGE_Read_FS(uint8_t lun, uint8_t *buf, uint32_t blk_addr, uint16_t blk_len)
{
SD_disk_read(0, (BYTE*) buf, (DWORD) blk_addr , (UINT) blk_len);
return (USBD_OK);
}
int8_t STORAGE_Write_FS(uint8_t lun, uint8_t *buf, uint32_t blk_addr, uint16_t blk_len)
{
SD_disk_write(0, (const BYTE*) buf, (DWORD) blk_addr, (UINT) blk_len) ;
return (USBD_OK);
}
don’t no what is going wrong in the usb msc side . suggestions will be helpful,Thanks.
Hey, this is amazing thanks so much for posting!
One qustion (of many!): what are the Timers for?
they are for timeout, in case the SPI don’t get desired results, the function can timeout and show error
hello sir,
i want ask you something. why we must reset stm32 after we opened the sdcard from sdcard module?
No. you connect the card, and run the code. It should work alright
i try to loop program and opened the sdcard then getting error and i put again sdcard to sdcard module but still getting error.
check this article again. I have added some updates
where is the las update sir?, and why after we open the sdcard we must restart the stm module so that the stm can detect the sdcard?
code is updated. I have uploaded the new code.
if problem occurs, check the update sections in the beginning.
If you are asking about removing the SD card, then yes we need to reset because this is not an interrupt based process. So when u remove SD card, the code executes all the commands and then runs the while loop. Now at this point, if u reinsert it, nothing is gonna happen because it is executing while loop, not the mount functions and all.
i just try make the code to while loop but must reset the stm because the code can’t detect sdcard sir while we removed sd card and reinsert again
you should use SDIO if your are looking for the run time support for SD card
i found something wrong sir why while we run fresult = f_unlink(“/file1.txt”) i get HardFault_Handler
I had a similar problem as you. In the market is a few type of SD card.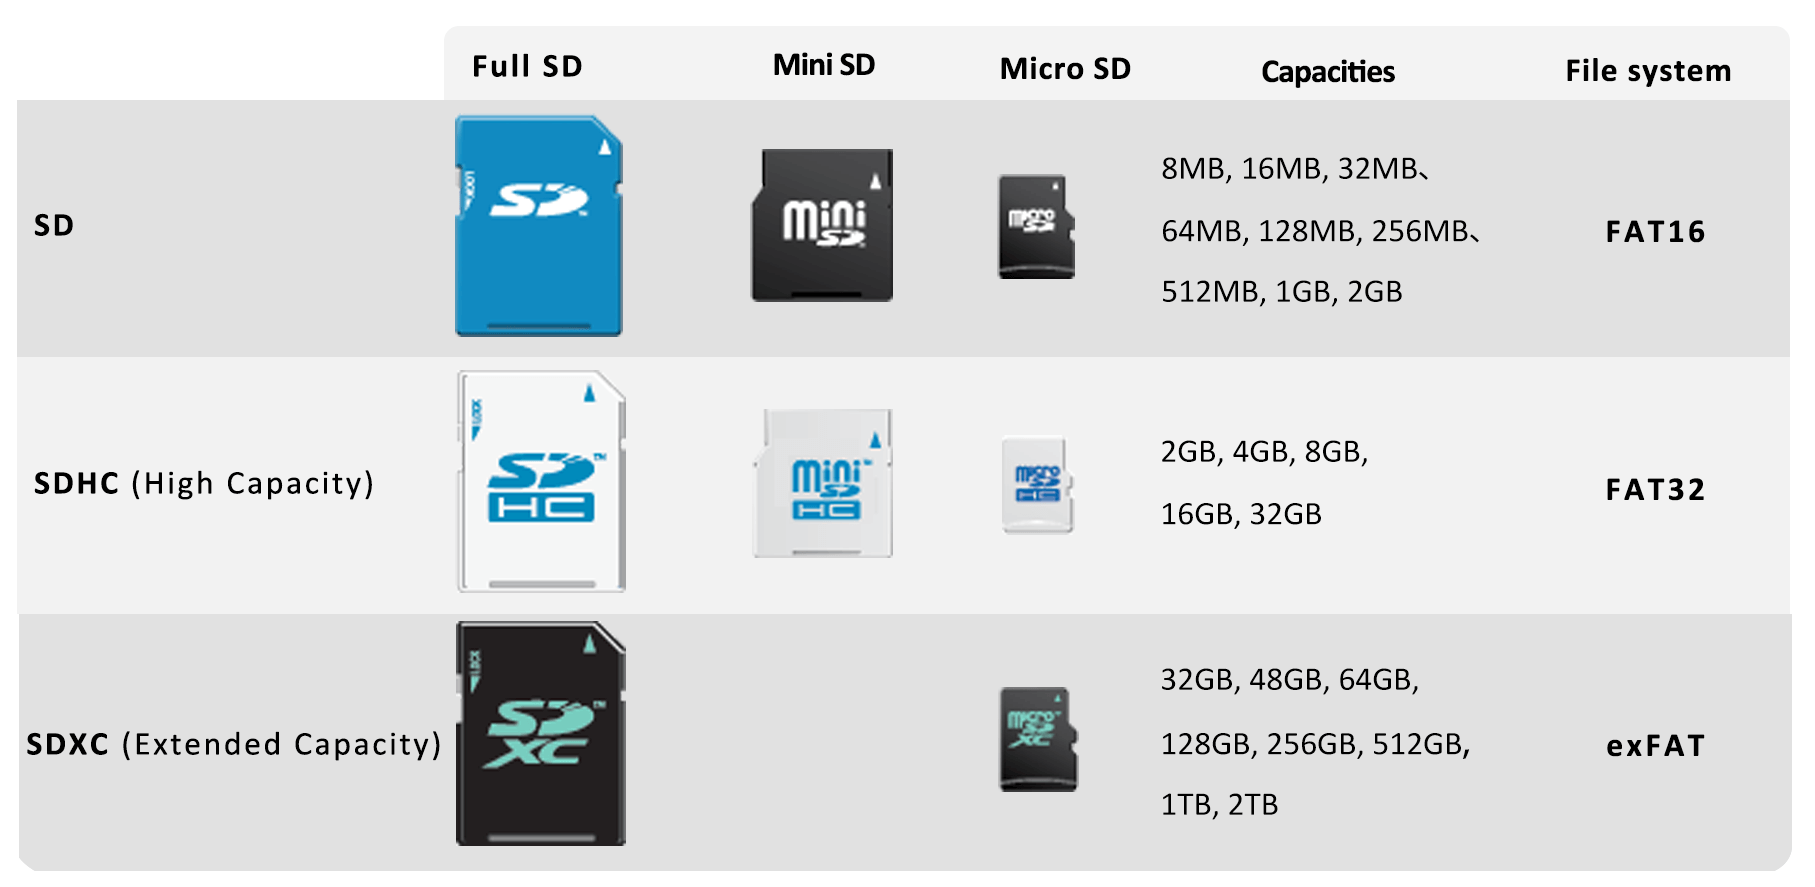

I have a one typical SD card ( look above link and row 1) and other HC type SD card. When I was using the typical card a microcontroler coudn’t find it, but when I changed the SD card to the HC type everything works great. Change your card to another and try it again. But, you have to has a card with HC in the name.
i use sdcard type hc but have some trouble after update string to file.txt and then while we want delete the file the program get hardfault
HI. i was working with mbed (stm f103C8) and everything was ok less the power consumption. i change to this example with CubeIDe+STM_HAl but im having HardFault_Handler when update a file. In my case the sd+spi works ok whit mbed but not wit hal =(
Sir,
Please explain any topic related to EMMC Operations.
In this tutorial If you explain how you write fatfs_sd.c file then it will be much better.
Estou criando um data logger e vou carimbar o rtc a cada evento, não estou conseguindo escrever na linha seguinte somente sobrepondo a linha já escrita o cube não declara FA_OPEN_APPEND .
Большое спасибо, очень долго мучился, не хотел использовать hal, оказалось не страшно (stm32f303)
Hi, I am using an STM32L476RG nucleo board. I am trying to interface it with a 8GB class 10 microSD card. I am able to mount the SD card successfully without errors but when I use the f_open function, fresult returns DISK_ERR. I am using STMcubeIDE1.1. If you could send me a similar project for the L476RG board, that would help a lot!
In SPI setting, make sure the data size id 8 bit. It’s 4 bit by default for your board, so change it to 8 bits.
Hello, I am using a nucleo-f446RE board and the same thing happens to me, the mount seems to go well but when i use fopen it gives the DISK_ERR, the data size is set to 8 bits as suggested
I had your same problem, turns out I used a lower capacity sd card and it worked, before I was using a 16GB microsd, then I switched to a 4gb micro sd and now it works fine!
Hi, I use the same board nucleo-stm32f446re but it returns an error “ERROR!!! in mounting SD CARD..”. I tried to use external power (through LM7805), old version of this project and also with different cards (2GB, 16GB, 32GB) from Noname, Sandisk, Intenso but still no hope. Could you please share your project and experience? Thanks in advance.
Apparently the latest version of the FatFs library generated from STMCubeMX doesn’t work with this tutorial. I replaced it manually with the version of the library included in the tutorial, and everything works fine. Tested on an STM32L476RG with SanDisk 16GB cards.
Ok thanks for informing. I will update the code soon.
Hey, I have tried running this program on my STM32L476RG nucleo board. I have hooked up a 8GB class 10 Sandisk SD card for this purpose. I have been able to mount the SD card but am not able to read or write files. On debugging, the fresult variable returns DISK_ERR when using the f_open function.
I am also trying to do the same with an 8GB sandisk card. I am working with STM32L476RG board . I am able to mount the SD card, but I haven’t been able to use the f_open function. The fr_result returns a DISK_ERR when trying to create or open an existing file. If you could share the cubeIDE project file that would be of great help.
me too. it’s not work, cannot read or write file.
Hi, when i built the project, it use 18.98KB (94.88%) of RAM and 28.34KB (44.28%) of flash, there is a way to reduce the memory usage? I just need to create the file and append some values. Tks!
configura o ss_max em 512 não em 4096
Thanks a lot 😊
This driver is overflowing my RAM by a whole lot. Are there any large memory allocations in it?