Home ▸ ESP32 Tutorials ▸ ESP32 IOT ▸
ESP32 MQTT Client Tutorial — Publish & Subscribe with Espressif IDE
In Part 1 of our ESP32 IOT Series, we used the ESP32 as an HTTP client to send data to ThingSpeak. Now, in Part 2, we’re switching to the MQTT protocol. MQTT is a lightweight, fast, and efficient way for IoT devices to talk to each other. Unlike HTTP, it allows real-time, two-way communication with very low latency, making it ideal for sensor data logging, smart home automation, and cloud-based projects. In this tutorial, you’ll learn how to connect your ESP32 to an MQTT broker, subscribe to topics, and publish data instantly.
In this ESP32 MQTT tutorial, you’ll learn how to:
- Connect your ESP32 to an MQTT broker.
- Subscribe to topics and receive messages.
- Publish data to MQTT topics.
Prerequisite:
In the PART1 of the ESP32 IOT series we covered how to configure the ESP32 in Wifi Station Mode and connect it to a Network. You must take a look at the previous project a we will continue using the ESP32 in Wifi Station mode.
ESP32 MQTT Video Tutorial
While the written guide below provides all the details and code for reference, sometimes a visual demonstration can make all the difference. I’ve created a complete video walkthrough that runs through the entire process in real-time. Follow the written steps here while watching the implementation in the video to solidify your understanding and catch any subtle details
Watch the VideoWhat is MQTT Protocol?
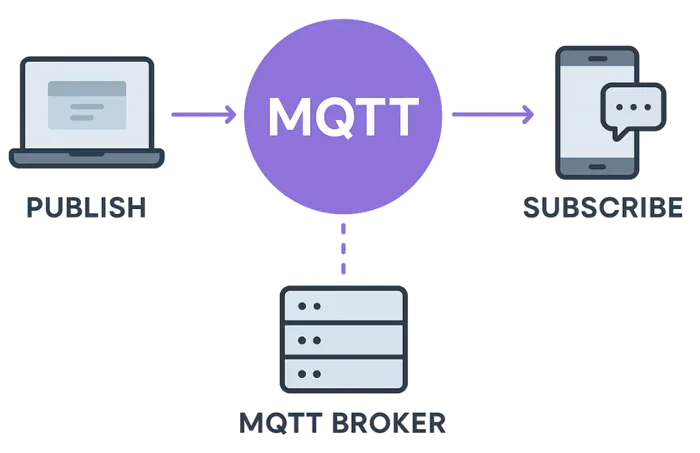
MQTT (Message Queuing Telemetry Transport) is a lightweight messaging protocol designed for devices that have limited power, memory, or network bandwidth. It works on a publish/subscribe model, where devices (clients) can send messages to topics (publish) or listen for messages from topics (subscribe) via an MQTT broker.
It is widely used in IoT applications because it’s fast, efficient, and works well even with unstable network connections.
Some of its important features are:
- Publish/Subscribe Model – Decouples senders and receivers, making the system more scalable.
- Lightweight – Very small data packets, which saves bandwidth and power.
- Quality of Service (QoS) Levels – Ensures reliable message delivery based on your needs.
- Last Will & Testament (LWT) – Notifies other clients if a device disconnects unexpectedly.
Why Do We Need to Use MQTT?
In IoT, many devices send small amounts of data frequently. MQTT is perfect for this because it keeps data transfer efficient and reliable, even on slow or unstable networks. It also makes it easy to connect hundreds or thousands of devices to the same system without overloading the network.
Advantages Over Other Protocols (like HTTP)
- Lower bandwidth usage – Sends less data compared to HTTP, saving network costs.
- Faster communication – Maintains an open connection, so no need to reconnect each time.
- Better for real-time data – Messages delivers instantly without waiting for a request.
- Works well in poor network conditions – Can store and forward messages until delivery is possible.
How MQTT Protocol works?
MQTT uses a publish/subscribe system with three main parts:
- Publisher – The device or program that sends data.
Example: A temperature sensor publishing the current room temperature. - Subscriber – The device or program that wants to receive data.
Example: A mobile app that shows the temperature reading. - Broker – The middleman (server) that connects publishers and subscribers.
Example: An MQTT broker like Mosquitto, HiveMQ, or EMQX.
Step-by-Step Flow:
- Connecting to the Broker
- Both publishers and subscribers connect to the MQTT broker using a lightweight network connection (often over TCP/IP).
- Publishing a Message
- The publisher sends a message to a specific topic (like a label or category).
- Example topic:
home/livingroom/temperature.
- Delivering to Subscribers
- The broker receives the message and sends it to all subscribers who have subscribed to that topic.
- Using QoS Levels
- Depending on the Quality of Service (QoS) level, the broker ensures the message is delivered at least once, exactly once, or just once without confirmation.
- No Direct Connections Between Devices
- Publishers and subscribers never talk directly — they only talk to the broker.
- This makes the system scalable and easier to manage.
ESP32 MQTT Project Requirements
Before we begin building our ESP32 WiFi MQTT project, let’s take a quick look at the tools and components you’ll need. This includes both hardware and software required for the project.
- Hardware:
- ESP32 development board
- USB cable
- Sensor (optional, e.g., DHT11, or simulated data)
- Software:
- Espressif IDE (ESP-IDF setup)
- MQTT Broker (I am going to use the HiveMQ Public broker for testing)
- MQTT Client (Optional us it for testing)
- Internet access
Testing the MQTT broker & client
Before we start with the project, let’s test the MQTT broker and client.
I am going to use the HiveMQ Public broker for this tutorial. Since it is a Public broker, do not send any sensitive information over it.
Although the ESP32 will act as a MQTT client, I am still going to use the MQTT Explorer for testing the connection with the broker.
The image below shows the MQTT Connection Settings for the HiveMQ Public Broker.
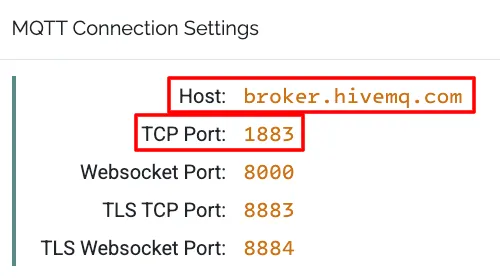
Host address is the address of the broker and We will use the simplest mode of connection, i.e using the TCP port 1883.
Download the MQTT explorer and open it in your computer.

- Give some random name for this connection and uncheck the “Validate Certificate” as we are not using any certificates.
- Provide the address of the broker in the Host field and set the port to 1883.
- Click on ADVANCED to configure the topic.
The image below shows how to add the subscription topic.
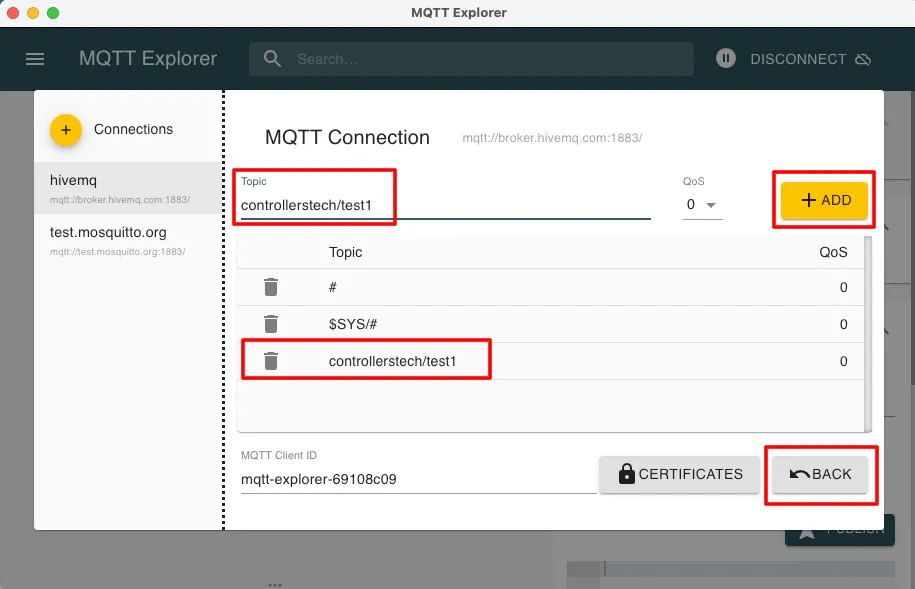
Enter the topic name in the Topic field and click ADD. The subscribed topic will appear in the list below. Make sure to choose a unique name for the topic. Since this is a public broker, general topic names are usually taken and it can interfere with your data.
Click the BACK button to go to the main screen and click Connect to connect to the broker.
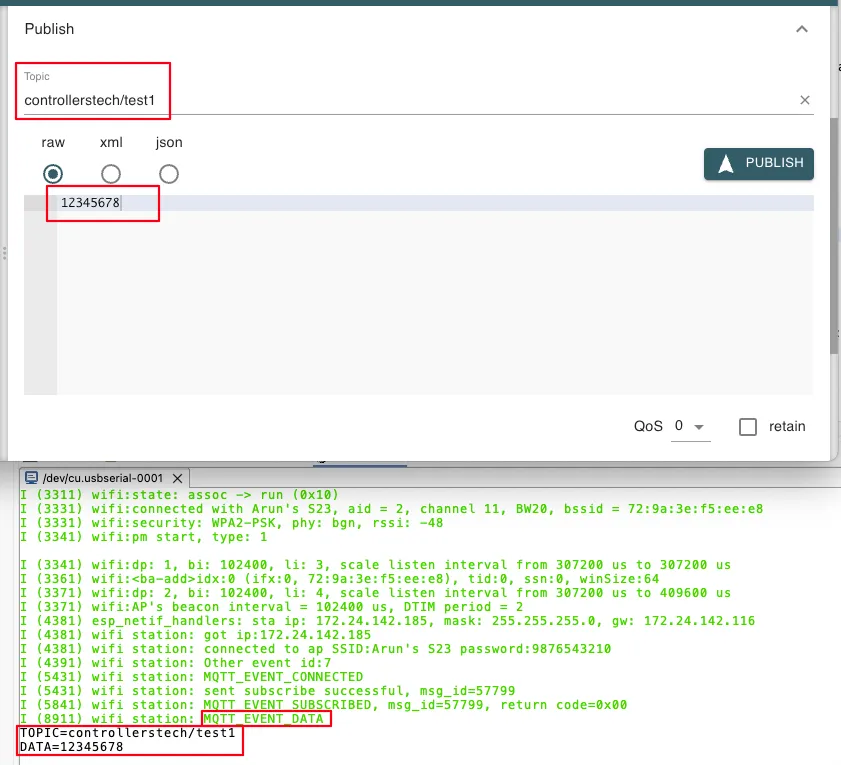
The image below shows the published and received data on the subscribed topic.
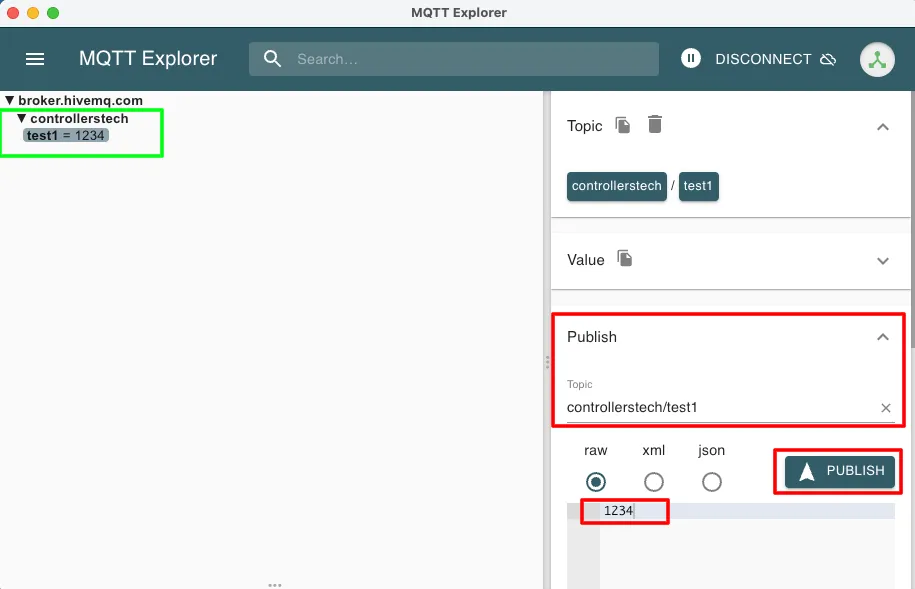
Under the Publish tab enter the topic name (controllerstech/test1). Next, enter the data to send (1234) and hit PUBLISH button.
You immediately see the data appear on the top left corner as it arrives on the subscribed topic.
This confirms that the connection to the broker is successful and we can proceed with the project.
ESP32 in STA Mode : Connect to a Wifi Network
We’ll begin by setting up the ESP32 in WiFi Station Mode, which allows it to connect to a known Wi-Fi network with internet access. We’ll use the station mode template project in the Espressif IDE to start with a pre-configured setup.
Create a new project
Let’s start by creating a new project in the Espressif-IDE. Below is the image showing the necessary steps to create the project from the template.
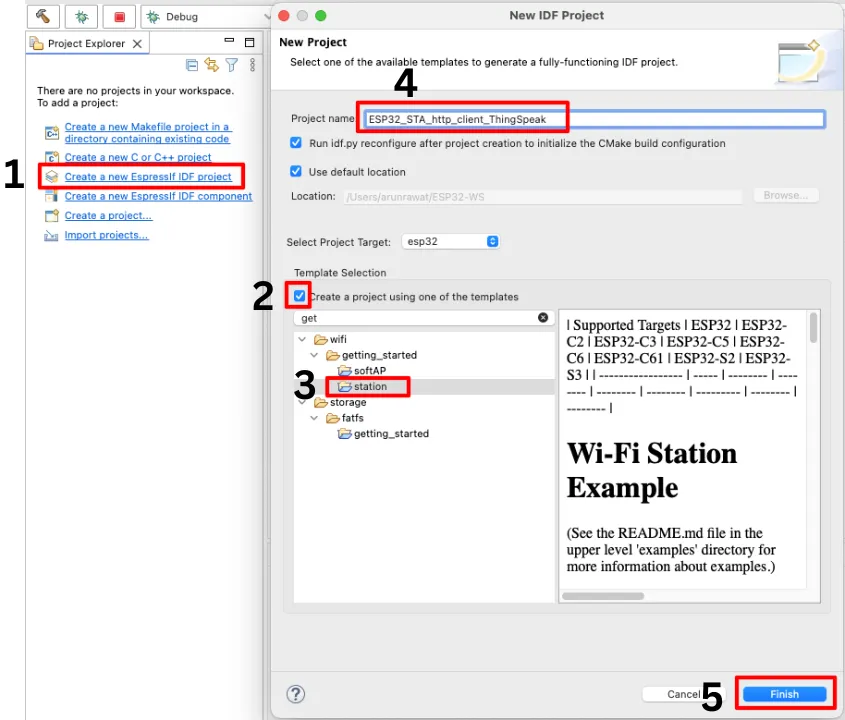
The steps below explains the Numbers on the page above.
- Create a new Espressif_IDF project.
- Check the box to create the project using predefined templates.
- Under the “getting-started” folder, select the station template.
- Give some name to this project.
- Click Finish to generate the project.
Modify the Template Project
We will begin by defining the Wi-Fi credentials of the access point that the ESP32 will connect to. Additionally, we will specify the maximum number of retry attempts the device should make in case the connection fails, ensuring a more robust and reliable connection process.
#define ESP_WIFI_SSID      "Arun's S23"
#define ESP_WIFI_PASS      "9876543210"
#define ESP_MAXIMUM_RETRY  5
#define THINGSPEAK_KEY "99SPL9EMHCX4EZZ2"I am creating a hotspot on my phone and above are the Wi-Fi credentials for it. Set the maximum retries to 5 and define the ThingSpeak Key for later use.
Since this is a template project, it comes preconfigured to use Wi-Fi credentials set through the project configuration menu. However, in this case, we will not be using the configuration menu. Instead, we’ve manually defined the ESP_WIFI_SSID and ESP_WIFI_PASS directly in the main source file for simplicity and better control.
To ensure the Wi-Fi driver uses our custom-defined credentials, rather than those set in the configuration menu, we need to update the following definitions accordingly.
- EXAMPLE_ESP_WIFI_SSID -> ESP_WIFI_SSID
- EXAMPLE_ESP_WIFI_PASS -> ESP_WIFI_PASS
- EXAMPLE_ESP_MAXIMUM_RETRY -> ESP_MAXIMUM_RETRY
That’s all the modification we need in this template project. You can now proceed to flash the firmware to your ESP32. Once the upload is complete, you should see a success message in the console logs, indicating that the ESP32 has connected to the specified Wi-Fi network successfully.
ESP32 Wifi Code Explained
Wifi Event Handler
Below is the function to handle the Wifi and IP Events.
int isConnected = 0;
static void event_handler(void* arg, esp_event_base_t event_base,
                                int32_t event_id, void* event_data)
{
    if (event_base == WIFI_EVENT && event_id == WIFI_EVENT_STA_START) {
        esp_wifi_connect();
    } else if (event_base == WIFI_EVENT && event_id == WIFI_EVENT_STA_DISCONNECTED) {
        if (s_retry_num < ESP_MAXIMUM_RETRY) {
            esp_wifi_connect();
            s_retry_num++;
            ESP_LOGI(TAG, "retry to connect to the AP");
        } else {
            xEventGroupSetBits(s_wifi_event_group, WIFI_FAIL_BIT);
        }
        ESP_LOGI(TAG,"connect to the AP fail");
        isConnected = 0;
    } else if (event_base == IP_EVENT && event_id == IP_EVENT_STA_GOT_IP) {
        ip_event_got_ip_t* event = (ip_event_got_ip_t*) event_data;
        ESP_LOGI(TAG, "got ip:" IPSTR, IP2STR(&event->ip_info.ip));
        s_retry_num = 0;
        isConnected = 1;
        xEventGroupSetBits(s_wifi_event_group, WIFI_CONNECTED_BIT);
    }
}The event_handler() function is a callback used to handle Wi-Fi and IP-related events in ESP32 Station Mode.
Here’s what it does:
- When the station starts, it attempts to connect to the configured Wi-Fi access point.
- If the connection fails, it retries until the maximum retry limit is reached. If all retries fail, it sets a failure flag.
- When the ESP32 successfully gets an IP address, it logs the assigned IP and sets a flag to indicate a successful connection.
⭐ The isConnected variable will act as a flag later for the http client. This flag Sets when the ESP32 connects to the Wifi network and it Resets when the connection is terminated.
Wifi Station Initialization
The main function will call the wifi_init_sta to initialize the Wifi in Station mode. Below is what this function does.
void wifi_init_sta(void)
{
    s_wifi_event_group = xEventGroupCreate();

    ESP_ERROR_CHECK(esp_netif_init());

    ESP_ERROR_CHECK(esp_event_loop_create_default());
    esp_netif_create_default_wifi_sta();

    wifi_init_config_t cfg = WIFI_INIT_CONFIG_DEFAULT();
    ESP_ERROR_CHECK(esp_wifi_init(&cfg));

    esp_event_handler_instance_t instance_any_id;
    esp_event_handler_instance_t instance_got_ip;
    ESP_ERROR_CHECK(esp_event_handler_instance_register(WIFI_EVENT,
                                                        ESP_EVENT_ANY_ID,
                                                        &event_handler,
                                                        NULL,
                                                        &instance_any_id));
    ESP_ERROR_CHECK(esp_event_handler_instance_register(IP_EVENT,
                                                        IP_EVENT_STA_GOT_IP,
                                                        &event_handler,
                                                        NULL,
                                                        &instance_got_ip));

    wifi_config_t wifi_config = {
        .sta = {
            .ssid = ESP_WIFI_SSID,
            .password = ESP_WIFI_PASS,
            /* Authmode threshold resets to WPA2 as default if password matches WPA2 standards (password len => 8).
             * If you want to connect the device to deprecated WEP/WPA networks, Please set the threshold value
             * to WIFI_AUTH_WEP/WIFI_AUTH_WPA_PSK and set the password with length and format matching to
             * WIFI_AUTH_WEP/WIFI_AUTH_WPA_PSK standards.
             */
            .threshold.authmode = ESP_WIFI_SCAN_AUTH_MODE_THRESHOLD,
            .sae_pwe_h2e = ESP_WIFI_SAE_MODE,
            .sae_h2e_identifier = EXAMPLE_H2E_IDENTIFIER,
        },
    };
    ESP_ERROR_CHECK(esp_wifi_set_mode(WIFI_MODE_STA) );
    ESP_ERROR_CHECK(esp_wifi_set_config(WIFI_IF_STA, &wifi_config) );
    ESP_ERROR_CHECK(esp_wifi_start() );

    ESP_LOGI(TAG, "wifi_init_sta finished.");

    /* Waiting until either the connection is established (WIFI_CONNECTED_BIT) or connection failed for the maximum
     * number of re-tries (WIFI_FAIL_BIT). The bits are set by event_handler() (see above) */
    EventBits_t bits = xEventGroupWaitBits(s_wifi_event_group,
            WIFI_CONNECTED_BIT | WIFI_FAIL_BIT,
            pdFALSE,
            pdFALSE,
            portMAX_DELAY);

    /* xEventGroupWaitBits() returns the bits before the call returned, hence we can test which event actually
     * happened. */
    if (bits & WIFI_CONNECTED_BIT) {
        ESP_LOGI(TAG, "connected to ap SSID:%s password:%s",
                 ESP_WIFI_SSID, ESP_WIFI_PASS);
    } else if (bits & WIFI_FAIL_BIT) {
        ESP_LOGI(TAG, "Failed to connect to SSID:%s, password:%s",
                 ESP_WIFI_SSID, ESP_WIFI_PASS);
    } else {
        ESP_LOGE(TAG, "UNEXPECTED EVENT");
    }
}
The wifi_init_sta() function is responsible for configuring the ESP32 in WiFi Station Mode, allowing it to connect to a specified Wi-Fi network. This is a crucial step when building an ESP32 WiFi data logging project or integrating with cloud platforms like ThingSpeak.
Here’s what the function does, step by step:
- Creates an event group to manage Wi-Fi connection status flags.
xEventGroupCreate(); - Initializes the TCP/IP stack and creates the default event loop.
esp_netif_init();andesp_event_loop_create_default(); - Sets up the default network interface for Station Mode.
esp_netif_create_default_wifi_sta(); - Initializes the Wi-Fi driver using default configuration settings.
esp_wifi_init(&cfg); - Registers event handlers for Wi-Fi events and IP address acquisition.
esp_event_handler_instance_register - Configures the Wi-Fi credentials by setting the SSID, password, and authentication settings manually in the code.
esp_wifi_set_config(WIFI_IF_STA, &wifi_config); - Sets the Wi-Fi mode to Station (STA) and applies the configuration.
esp_wifi_set_mode(WIFI_MODE_STA); - Starts the Wi-Fi driver, initiating the connection process.
esp_wifi_start(); - Waits for the connection result using an event group:
xEventGroupWaitBits- If connected successfully, it logs a confirmation message.
- If the connection fails after the maximum number of retries, it logs a failure message.
This function ensures that the ESP32 is properly configured to connect to a WiFi access point, which is essential for sending data to the cloud in any ESP32 ThingSpeak integration project.
Result of the Station Mode
The image below displays the console output generated when the project was executed successfully on the ESP32.
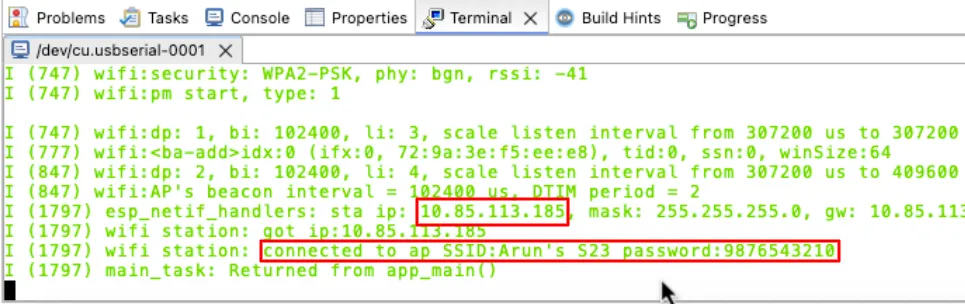
As highlighted in the red boxes, the ESP32 successfully connected to the mobile hotspot. It also obtained an IP address from the network, although the IP itself is not required for the scope of this project.
Configuring ESP32 as a MQTT client
We will now configure the ESP32 as an MQTT client so it can connect to a broker and subscribe and publish to a topic.
You can refer to another template project to configure the ESP32 as mqtt client using TCP.
Definitions and inclusions
We will start by including the required header file and defining some variables to be used in the project.
#include "mqtt_client.h"
esp_mqtt_client_handle_t mqttClient;We will include the mqtt_client.h to use the mqtt client functions.
The variable mqttClient will store the handle (basically a reference or pointer) to the MQTT client instance we create. We create this globally so that we can use this handle throughout the project.
MQTT_start Function
The mqtt_start() is used to initialize and start the MQTT client. The function is explained below.
static void mqtt_start(void)
{
    const esp_mqtt_client_config_t mqtt_cfg = {
        .broker = {
            .address.uri = "mqtt://broker.hivemq.com",
            .address.port = 1883
        },
    };

    esp_mqtt_client_handle_t client = esp_mqtt_client_init(&mqtt_cfg);
    mqttClient = client;
    /* The last argument may be used to pass data to the event handler, in this example mqtt_event_handler */
    esp_mqtt_client_register_event(client, ESP_EVENT_ANY_ID, mqtt_event_handler, NULL);
    esp_mqtt_client_start(client);
}This function mqtt_start() sets up and starts the MQTT client.
- First, it creates a configuration (
mqtt_cfg) with the broker’s address and port — here it’s usingmqtt://broker.hivemq.comon port1883. - Next, it initializes an MQTT client using that configuration and stores its handle in
mqttClient. - Then, it registers an event handler (
mqtt_event_handler) so the program can react when something happens, like connection success or receiving a message. - Finally, it starts the MQTT client so it can connect to the broker and begin communication.
MQTT Event Handler
The MQTT event handler function runs automatically whenever something important happens in the MQTT connection.
It’s like a “notification center” for MQTT — it tells our program about events such as:
- Connected to the broker
- Disconnected from the broker
- Subscribed to a topic successfully
- Received a new message from a topic
- Published a message successfully
- Errors during communication
static void mqtt_event_handler(void *handler_args, esp_event_base_t base, int32_t event_id, void *event_data)
{
    ESP_LOGD(TAG, "Event dispatched from event loop base=%s, event_id=%" PRIi32, base, event_id);
    esp_mqtt_event_handle_t event = event_data;
    esp_mqtt_client_handle_t client = event->client;
    int msg_id;
    switch ((esp_mqtt_event_id_t)event_id) {
    case MQTT_EVENT_CONNECTED:
        ESP_LOGI(TAG, "MQTT_EVENT_CONNECTED");;

        break;

    case MQTT_EVENT_DISCONNECTED:
        ESP_LOGI(TAG, "MQTT_EVENT_DISCONNECTED");
        break;

    case MQTT_EVENT_SUBSCRIBED:
        ESP_LOGI(TAG, "MQTT_EVENT_SUBSCRIBED, msg_id=%d, return code=0x%02x ", event->msg_id, (uint8_t)*event->data);
        break;

    case MQTT_EVENT_UNSUBSCRIBED:
        ESP_LOGI(TAG, "MQTT_EVENT_UNSUBSCRIBED, msg_id=%d", event->msg_id);
        break;

    case MQTT_EVENT_PUBLISHED:
        ESP_LOGI(TAG, "MQTT_EVENT_PUBLISHED, msg_id=%d", event->msg_id);
        break;

    case MQTT_EVENT_DATA:
        ESP_LOGI(TAG, "MQTT_EVENT_DATA");
        printf("TOPIC=%.*s\r\n", event->topic_len, event->topic);
        printf("DATA=%.*s\r\n", event->data_len, event->data);
        break;

    case MQTT_EVENT_ERROR:
        ESP_LOGI(TAG, "MQTT_EVENT_ERROR");
        if (event->error_handle->error_type == MQTT_ERROR_TYPE_TCP_TRANSPORT) {
            ESP_LOGI(TAG, "Last error code reported from esp-tls: 0x%x", event->error_handle->esp_tls_last_esp_err);
            ESP_LOGI(TAG, "Last tls stack error number: 0x%x", event->error_handle->esp_tls_stack_err);
            ESP_LOGI(TAG, "Last captured errno : %d (%s)",  event->error_handle->esp_transport_sock_errno,
                     strerror(event->error_handle->esp_transport_sock_errno));
        } else if (event->error_handle->error_type == MQTT_ERROR_TYPE_CONNECTION_REFUSED) {
            ESP_LOGI(TAG, "Connection refused error: 0x%x", event->error_handle->connect_return_code);
        } else {
            ESP_LOGW(TAG, "Unknown error type: 0x%x", event->error_handle->error_type);
        }
        break;

    default:
        ESP_LOGI(TAG, "Other event id:%d", event->event_id);
        break;
    }
}The MQTT Event handler does the following:
- It first logs which event was received.
- Then it checks the event type (
event_id) and runs the matchingcase. - Examples of events handled:
- MQTT_EVENT_CONNECTED → Logs that the client is connected.
- MQTT_EVENT_DISCONNECTED → Logs disconnection.
- MQTT_EVENT_SUBSCRIBED / UNSUBSCRIBED / PUBLISHED → Logs the message ID and status.
- MQTT_EVENT_DATA → Prints the topic and the data received from the broker.
- MQTT_EVENT_ERROR → Prints detailed error info depending on the type of error.
- If the event is not recognized, it logs it as “Other event”.
The MQTT event handler lets ESP32 react to changes or incoming data without constantly checking the connection manually. It’s the place where we will write code to handle each MQTT event.
MQTT Connection and Subscription Code
The main function will call the mqtt_start() to sets up and starts the MQTT client.
The main Function
Below is the implementation of the main function.
void app_main(void)
{
    //Initialize NVS
    esp_err_t ret = nvs_flash_init();
    if (ret == ESP_ERR_NVS_NO_FREE_PAGES || ret == ESP_ERR_NVS_NEW_VERSION_FOUND) {
      ESP_ERROR_CHECK(nvs_flash_erase());
      ret = nvs_flash_init();
    }
    ESP_ERROR_CHECK(ret);

    ESP_LOGI(TAG, "ESP_WIFI_MODE_STA");
    wifi_init_sta();

    if (isConnected) mqtt_start();
    while (1){
		vTaskDelay(pdMS_TO_TICKS(1000));
	  }
}The app_main() function is the main starting point of the program. Here’s what it does:
- It first initializes the NVS (Non-Volatile Storage), which is needed by the system to store Wi-Fi settings and other data. If there’s an issue, it erases and re-initializes it.
- Then it calls the
wifi_init_sta()function to connect the ESP32 to a Wi-Fi network in Station Mode. - After a successful connection, it will check for the
isConnectedflag, which is only Set when the ESP32 is connected to the Network.- If the flag is Set, it will call the function
mqtt_start()to sets up and starts the MQTT client.
- If the flag is Set, it will call the function
- The program will then enter a while loop that runs forever.
ESP32 Subscribes to a topic
We will subscribe to the topic from which we want to receive messages.
The subscription function should be invoked within the MQTT event handler to ensure it is executed when the client successfully connects to the broker.
static void mqtt_event_handler(void *handler_args, esp_event_base_t base, int32_t event_id, void *event_data)
{
  .....
  case MQTT_EVENT_CONNECTED:
       ESP_LOGI(TAG, "MQTT_EVENT_CONNECTED");
       msg_id = esp_mqtt_client_subscribe(client, "controllerstech/test1", 0);
       ESP_LOGI(TAG, "sent subscribe successful, msg_id=%d", msg_id);

       break;
  .....
} When the ESP32 successfully connects to the MQTT broker, the MQTT_EVENT_CONNECTED will trigger. Inside this event handler, we will:
- Log that the connection is established (
MQTT_EVENT_CONNECTED). - Then call
esp_mqtt_client_subscribe()to subscribe to the topic “controllerstech/test1” with Quality of Service level0. - The function returns a message ID (
msg_id), which is then printed to confirm that the subscription request was sent successfully.
When this project runs, the following log generates on the ESP32 console.
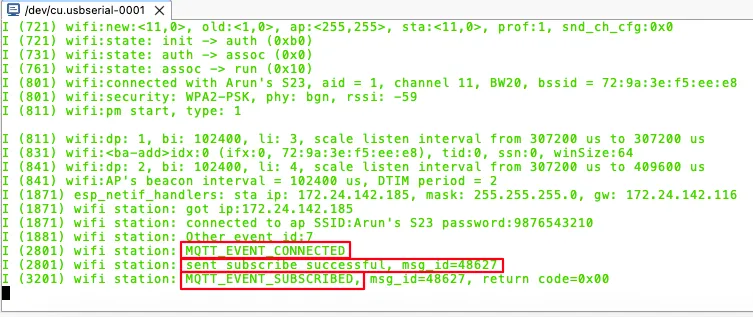
The image above shows the sequence when the ESP32 connects to the MQTT broker and subscribes to a topic:
- MQTT_EVENT_CONNECTED – The ESP32 has successfully connected to the MQTT broker.
- sent subscribe successful, msg_id=48627 – The device sent a subscription request to the broker for a topic, and this request has been assigned a unique message ID (
48627). - MQTT_EVENT_SUBSCRIBED, msg_id=48627, return code=0x00 – The broker confirmed the subscription for that message ID. A return code of
0x00means the subscription was accepted successfully.
We will now publish the data to the topic using another client (MQTT Explorer) and see the data received on the ESP32.
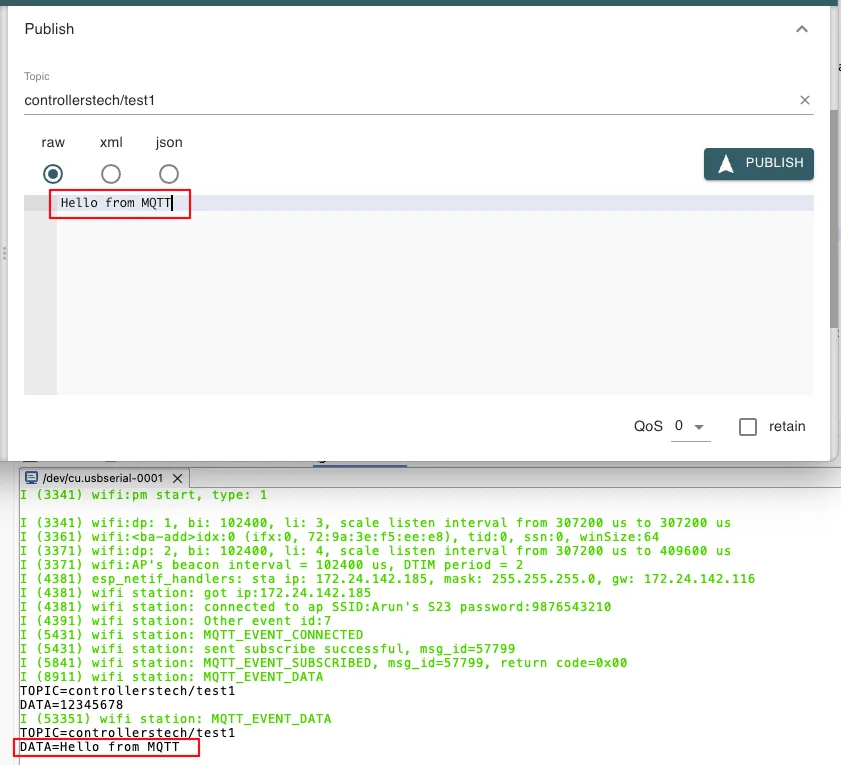
The image below shows the data published by MQTT Explorer and the data received by ESP32.
In MQTT Explorer, we define the topic under the Publish tab to publish messages. The ESP32, subscribed to the same topic, receives the same data as shown in the image above.
The image below shows another data published by the client and received by the ESP32.
ESP32 Publishes to a topic
We have successfully subscribed to a topic and received data published to it. Now we will see how to publish data to a topic using ESP32.
We can publish data in many ways, for eg- after receiving the data on the subscribed topic, or after receiving the data from the sensor etc. I want to publish periodically so I am going to create a separate task for publishing the data.
void mqtt_publish_task (void *pvParameters)
{
	char datatoSend[20];
	while (1){
		int val = esp_random()%100;
		sprintf(datatoSend, "%d", val);
		int msg_id = esp_mqtt_client_publish(mqttClient, "controllerstech/test1", datatoSend, 0, 0, 0);
		if (msg_id == 0) ESP_LOGI(TAG, "Sent Data: %d", val);
		else ESP_LOGI(TAG, "Error msg_id:%d while sending data", msg_id);
		vTaskDelay(pdMS_TO_TICKS(2000));
	}
}This mqtt_publish_task() will run every 2 seconds. It will first call the esp_random()%100; to generate a random integer value between 0 to 99. Then, it will convert the value to the character format using the function sprintf().
It will then call esp_mqtt_client_publish() to publish to the topic “controllerstech/test1” with Quality of Service level 0. The length of datatoSend is set to 0, so it is automatically calculated by the API.
Once the MQTT event handler ensures that the client is successfully connected to the broker, we will create the mqtt_publish_task to publish the data to the topic.
static void mqtt_event_handler(void *handler_args, esp_event_base_t base, int32_t event_id, void *event_data)
{
  .....
    case MQTT_EVENT_CONNECTED:
        ESP_LOGI(TAG, "MQTT_EVENT_CONNECTED");
		    xTaskCreate(mqtt_publish_task, "mqtt_publish_task", 4096, NULL, 5, NULL);

        break;
  .....
} When the ESP32 successfully connects to the MQTT broker, the MQTT_EVENT_CONNECTED will trigger. Inside this event handler, we will:
- Log that the connection is established (
MQTT_EVENT_CONNECTED). - Then create the
mqtt_publish_taskwith following parameters:mqtt_publish_task→ The function that will run as a FreeRTOS task."mqtt_publish_task"→ The name of the task (for debugging and monitoring purposes).4096→ The stack size for the task, in bytes.NULL→ The parameter passed to the task function. Here, no parameter is given.5→ Task priority. Higher numbers mean higher priority.NULL→ A pointer to store the task handle (reference to the task). Here, it’s not needed, so it’s set toNULL.
When this project runs, the following log generates on the ESP32 console.
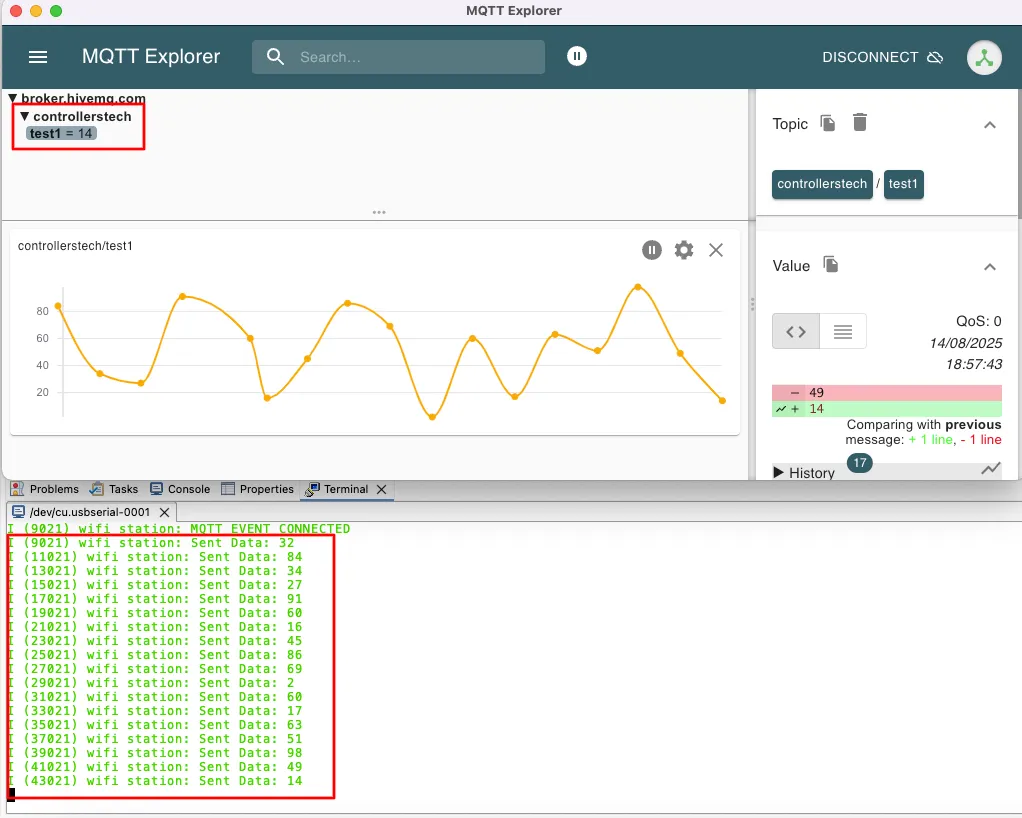
The logs shows the values published by ESP32 every 2 seconds. The MQTT Explorer is subscribed to the same topic, hence it receives those values.
The Red Box on the MQTT Explorer shoes the latest value received on the subscribed topic, whereas the chart shows the historical data over time.
Conclusion
In this tutorial, we learned how to set up and use the MQTT protocol with ESP32 using ESP-IDF. We began by including the MQTT library and creating a client handle, then configured the broker details and initialized the client.
The MQTT event handler was used to detect connection, subscription, incoming messages, and errors. Upon connecting, we subscribed to a topic and printed any received data.
Finally, we created a FreeRTOS task to handle message publishing.
With this setup, the ESP32 can easily send and receive MQTT messages, making it ideal for IoT applications that require real-time communication.
Browse More ESP32 IDF Tutorials
ESP32 UART Part 2: Control LED via UART + ESP‑IDF

How to Interface LCD1602 via I2C on ESP32 with ESP‑IDE
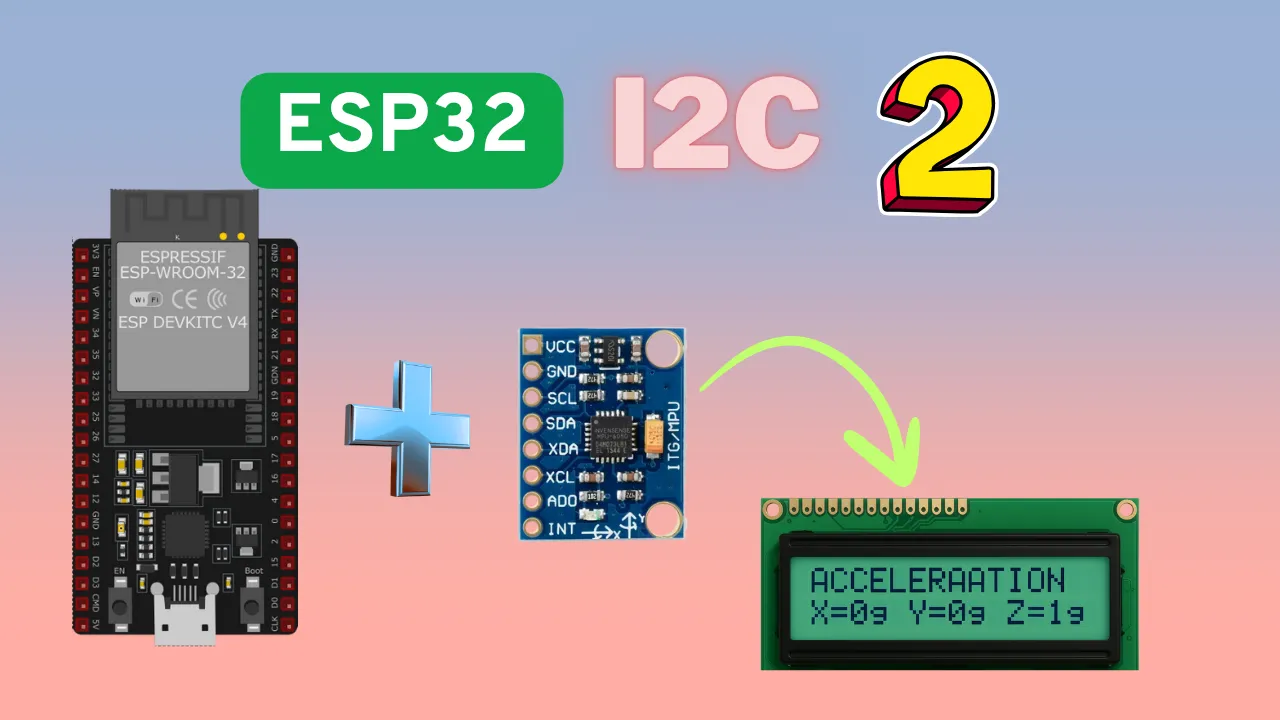
How to Read & Write MPU6050 with ESP‑IDE | I2C PART 2

ESP32 SPI Tutorial Part 1: Configure & Transmit
ESP32 SPI Tutorial Part 2: Read Data from Slave
ESP32 SPI Tutorial Part 3: W25Q Flash Read/Write Guide

ESP32 ADC One‑Shot Mode Tutorial – Read Multiple Channels
ESP32 MQTT Project Download
ESP32 MQTT Client Project FAQs
Subscribe
Login
0 Comments
Newest