Emulate STM32F103 as a MOUSE
This is another tutorial in the USB Series of STM32, and today we will see how to use STM32F103C8 as a mouse. This is not limited to F103C8, you can use any other STM32 Device, which have the user USB port available. Basically this tutorial is an example of USB HID DEVICE.
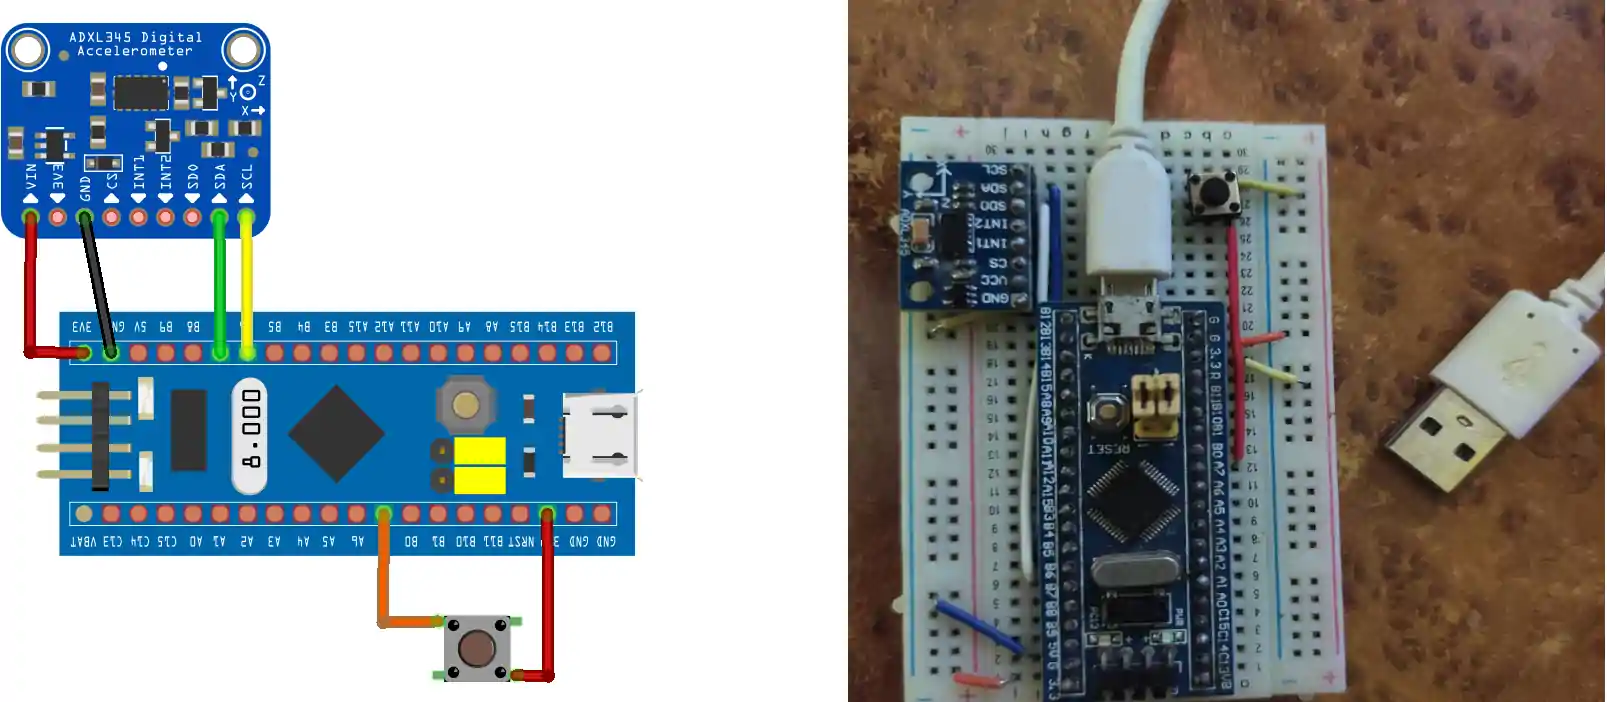
I will be using the ADXL345 accelerometer sensor to get the acceleration in x and y axis, and based on these acceleration values the mouse will move. I am going to attach one button on the breadboard, so that we can get the left click functionality. You can attach one more button for the right click if you want to. You can see the connections below
VIDEO TUTORIAL
You can check the video to see the complete explanation and working of this project.
Check out the Video Below
CubeMX Setup
I am creating this project in CubeIDE, and the following is the setup required in CubeMX
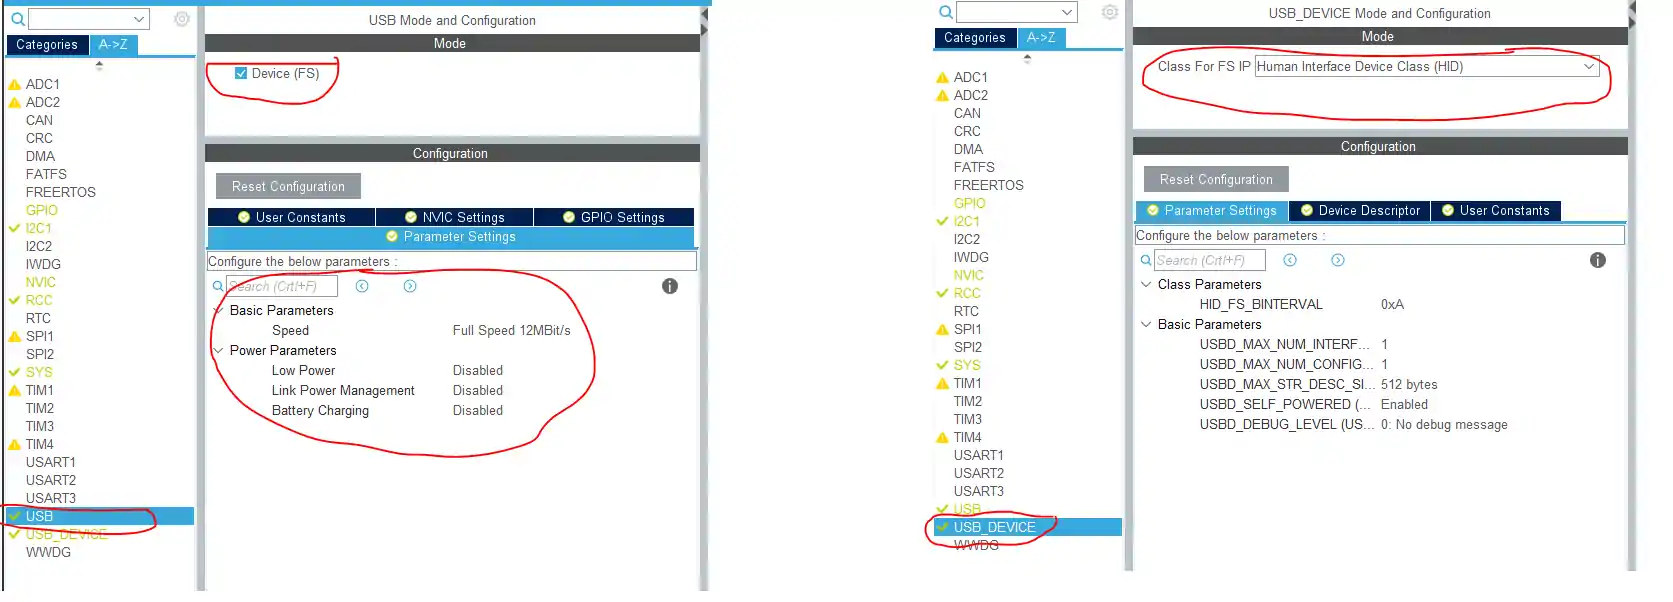
USB SETUP
In the picture above, I have selected the USB Device HID class. Everything else is kept default.
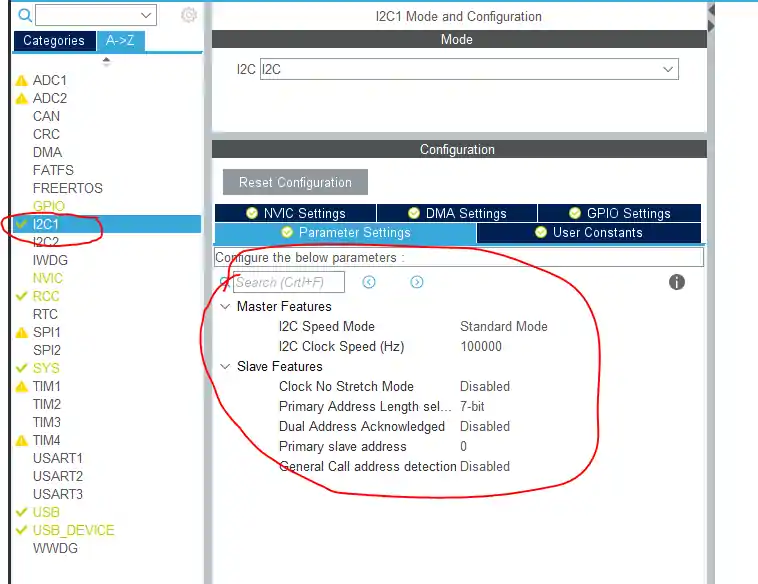
I2C Setup for ADXL345
I2C1 is selected for ADXL345, and rest is default setup
EXTI Setup
I have selected Pin PA7 for the button, and so using external interrupt here. Button is also connected to 3.3V supply, and that’s why I am using a pull down here.
Some Insight into the code
ADXL FUNCTIONS
#define ADXL_ADDRESS 0x53<<1

uint8_t Rx_Data[6];

int16_t x,y,z;

void Adxl_Write (uint8_t reg, uint8_t value)
{
	uint8_t data[2];
	data[0] = reg;
	data[1] = value;
	HAL_I2C_Master_Transmit (&hi2c1, ADXL_ADDRESS, data, 2, 100);
}

void Adxl_Read (uint8_t reg)
{
	HAL_I2C_Mem_Read (&hi2c1, ADXL_ADDRESS, reg, 1, (uint8_t *)Rx_Data, 6, 100);
}

void Adxl_Init (void)
{
	Adxl_Write (0x31, 0x01);  // data_format range= +- 4g
	Adxl_Write (0x2d, 0x00);  // reset all bits
	Adxl_Write (0x2d, 0x08);  // power_cntl measure and wake up 8hz

}Above are the ADXL related functions, and i have already covered them before. You can read more about them here
void Adxl_Calibrate (void)
{
	for (int i=0; i<50; i++)
	{
		Adxl_Read (0x32);
		x = ((Rx_Data[1]<<8)|Rx_Data[0]);
		y = ((Rx_Data[3]<<8)|Rx_Data[2]);
		z = ((Rx_Data[5]<<8)|Rx_Data[4]);
		min_xval = MIN(min_xval, x);
		max_xval = MAX(max_xval, x);
		min_yval = MIN(min_yval, y);
		max_yval = MAX(max_yval, y);
		HAL_Delay (100);
	}

	/* Turn On the LED to show the completion of calibration */
	HAL_GPIO_WritePin(GPIOC, GPIO_PIN_13, 0);
}Calibration is needed so that we can use the mouse in different orientations. Basically it will sample 50 values in 5 seconds, and then set the max and the min values. Once the calibration is complete, the LED on BluePill will turn ON.
USB MOUSE RELATED
extern USBD_HandleTypeDef hUsbDeviceFS;

typedef struct
{
	uint8_t button;
	int8_t mouse_x;
	int8_t mouse_y;
	int8_t wheel;
} mouseHID;
mouseHID mousehid = {0,0,0,0};I have created a structure here, to save the mouse parameters.
EXTI RELATED
uint8_t button_flag=0;

void HAL_GPIO_EXTI_Callback(uint16_t GPIO_Pin)
{
	if (GPIO_Pin == GPIO_PIN_7)
	{
		button_flag = 1;
	}
}In the EXTI Callback function, we will just update the flag. The rest of this processing will be done in the while loop.
While Loop
Adxl_Read (0x32);
x = ((Rx_Data[1]<<8)|Rx_Data[0]);
y = ((Rx_Data[3]<<8)|Rx_Data[2]);
z = ((Rx_Data[5]<<8)|Rx_Data[4]);

if (x < min_xval)
 {
   newxval = x - min_xval;
 }

else if (x > max_xval)
 {
   newxval = x - max_xval;
 }

if (y < min_yval)
{
  newyval = y - min_yval;
}

else if (y > max_yval)
{
 newyval = y - max_yval;
}

if ((newxval > 20) || (newxval <-20))
{
 mousehid.mouse_y = (newxval/3);
}

else mousehid.mouse_y = 0;
if ((newyval > 20) || (newyval <-20))
{
 mousehid.mouse_x= (newyval)/3;
}

else mousehid.mouse_x = 0;
if (button_flag==1)
{
 mousehid.button = 1;
 USBD_HID_SendReport(&hUsbDeviceFS, &mousehid, sizeof (mousehid));
 HAL_Delay (50);
 mousehid.button = 0;

 USBD_HID_SendReport(&hUsbDeviceFS,&mousehid, sizeof (mousehid));
 button_flag =0;
}

USBD_HID_SendReport(&hUsbDeviceFS,&mousehid, sizeof (mousehid));


HAL_Delay(10);Here is our while loop
Basically we read the RAW acceleration values from the sensor and then do the processing
- if the value is higher than the max value, or lower than the min value, we save it to the mouse structure
- in the end we send this structure as a part of the HID report.
- The sensitivity can be controlled by dividing the newval (newval/3). The higher the divisor, the less sensitive will be the mouse
- if the button is clicked, we send the button =1 report, and 50 ms later button =0 report to indicate the release of the button.
- you can modify this button to send button =2 for the right click.
Result
Other STM32 USB Tutorials
STM32 USB HOST MSC
STM32 USB HOST HID
How to use STM32 as a KEYBOARD
STM32 USB CDC Tutorial: Device and Host Example Using HAL + CubeMX
STM32 USB CDC Tutorial: Send & Receive Data Without UART
WavePlayer using STM32 Discovery
Info
You can help with the development by DONATING Below.
To download the project, click the DOWNLOAD button.





Hola Hermano, realice este proyecto con exito.
Gracias.
Tienes o conoces algun tutorial sobre emular un joystick?
Gracias
t
Hola Amigo, he configurado este proyecto con exito. Gracias por eso.
Tienes algún proyecto que emule un Joystic?
Hey Bro, thank you so much for this tuto. I got it working on Linux and Windows 10. But, on my Windows 7 it doesn’t work, the device was successfully identified as a HID but the buttons click does no worked. =/ Do have any hint?
hello, anyone can help me with this error while i’m using KeliC to do this project please ?
../Core/Src/main.c(223): error: #167: argument of type “mouseHID *” is incompatible with parameter of type “uint8_t *”
Please help me, my English is not good, sorry
make an array for the mouse values and then send
uint8_t mouseHid[3] = {0,0,0};
and update the values just like i did in the structure, but use mouseHID[0], or [1], or [2] instead of x y or button
Thank you for help me. I want to ask further that I want to use MPU6050 instead of ADXL345. But the mouse position is reversed. So can you show me how to fix this problem?
in the mouse HID, instead of yvalue, send xvalue
thanks for your help. So if i want to do wheel, so do you can suggest for me what to do first ?
do uint8_t mouseHid[4] = {0,0,0,0};
4th value is for wheel
Hello
Thank you for this tutorial.
I am trying to use STM32F103 as a touch HID. I can send x, y coordinates as pixels in my code and it works fine. But when I touch a different point on the display it drags from the previous point. How can I modify the code to just start from the new point?
Thanks in advance.
Amogha
i am not sure if that’s possible. Since it’s working as a mouse, it can’t start from a new point.
again i am not sure about this..
Thank you. Do you know of any touchscreen codes that can be used as HID?
Do you think I can modify your code to start from the new point after some time delay?
I really appreciate you replying. Have a nice day.
I am also eager to know how the wheel option works. I have tried it like this: mousehid.wheel = 50;
USBD_HID_SendReport(&hUsbDeviceFS, &mousehid, sizeof (mousehid));
HAL_Delay(50);
This does not seem to scroll by 50 units.
What am I doing wrong?
It’s working alright for me.
For example, to scroll down, if I input the value mousehid.wheel=-1; it scrolls the same amount as my regular mouse would scroll in 1 step.
hi, thanks for your tutorial , but i have problem with this:
Error[Pe167]: argument of type “mouseHID *” is incompatible with parameter of type “uint8_t *”
USBD_HID_SendReport(&hUsbDeviceFS, &mousehid, sizeof (mousehid));
I use IAR embeded workbench with stm32cubemx and I can’t debug or compile my code, please help me
make an array for the mouse values and then send
uint8_t mouseHid[3] = {0,0,0};
and update the values just like i did in the structure, but use mouseHID[0], or [1], or [2] instead of x y or button
I’ve tried to create an array for the mouse values but it still doesn’t work and I can’t debug or compile my code, please help me, would you like to write an update to the code for that problem, thanks a lot
what doesn’t work ?
what’s the error during compilation ?
use pastebin or something for code if you want to paste it
I have problem with this:
error: #167: argument of type “mouseHID *” is incompatible with parameter of type “uint8_t *”
USBD_HID_SendReport(&hUsbDeviceFS, &mousehid, sizeof (mousehid));
I’m using stm32cubemx and Keil MDK-ARM
show your code.
Use pastebin and send the link
Thank you for your toturial!
But, at “if ((newyval > 20) || (newyval <-20))
{
mousehid.mouse_x= (newyval)/3;" . Perhaps, you have missing. Replace "mouhid.mouse_x" to "mouhid.mouse_y" and several place.
actually it depends on how you hold the device. I have explained it in my video properly. From my prospective, the X and Y axis were flipped on the computer and that’s why i did that
Okay. Thank you!
very nice tutorial, can you please make a tutorial on nrf24l01 RF module with STM32 using HAL library. Thanks, your tutorials are really very nice.