Last Updated: March 23, 2026
Introduction to Real-Time Operating Systems in STM32
FreeRTOS is a powerful real-time operating system (RTOS) for STM32 microcontrollers, enabling multitasking with precise control over task scheduling. In this tutorial, you’ll learn how to set up STM32 FreeRTOS using STM32CubeMX, create tasks, assign priorities, and understand why using FreeRTOS in STM32 is better than bare-metal code for complex embedded projects.
This tutorial is the first installment in a comprehensive series and will focus on the following key topics:
- Setting up FreeRTOS using CubeMX – A step-by-step guide to configuring FreeRTOS in your project.
- Benefits of using an RTOS – Understanding why a real-time operating system is advantageous for embedded applications.
- Creating tasks with and without CubeMX – Exploring different approaches to task creation and management.
- Using priorities to address common issues – Leveraging task priorities to resolve scheduling and resource conflicts effectively.
What is FreeRTOS? (An Overview of Real-Time Operating Systems)
FreeRTOS, short for Free Real-Time Operating System, is a popular open-source RTOS designed specifically for microcontrollers like STM32. It is lightweight, efficient, and provides the tools necessary to manage multiple tasks simultaneously, ensuring your embedded applications run smoothly. FreeRTOS allows developers to implement task scheduling, inter-task communication, and real-time responsiveness, which are critical in modern embedded systems.
Using FreeRTOS on an STM32 microcontroller enables multitasking, meaning your sensors, communication modules, and other peripheral operations can run concurrently without interfering with each other. It also simplifies timing-related challenges, such as precise delays or coordinated execution of different processes, making your embedded projects more reliable and maintainable.
This tutorial is designed as a comprehensive introduction to RTOS for STM32 microcontrollers. You will learn how to:
- Set up FreeRTOS using STM32CubeMX.
- Create and manage multiple tasks.
- Implement task priorities to control which processes run first.
- Understand how using an RTOS improves program efficiency, responsiveness, and overall system stability.
Whether you are new to RTOS or looking to optimize your STM32 projects, this guide provides a solid foundation to manage complex multitasking scenarios effectively.
Key Features of FreeRTOS:
1. Multitasking
FreeRTOS allows you to run multiple tasks simultaneously on the same microcontroller without conflicts. Each task operates independently, enabling smooth operation of sensors, displays, and communication protocols all at once.
2. Task Priorities
You can assign different priorities to tasks to ensure that critical operations, like interrupt handling or data acquisition, run before less critical ones. This helps maintain system stability and responsiveness.
3. Predictable Timing
With a real-time operating system, tasks respond quickly and reliably. FreeRTOS ensures predictable execution times, which is essential for time-sensitive applications such as motor control, IoT devices, or communication stacks.
4. Inter-Task Communication
Tasks can safely exchange data using mechanisms like queues, semaphores, and mutexes. This ensures that multiple tasks can share resources without causing conflicts or data corruption.
5. Lightweight and Flexible
FreeRTOS is designed to be compact and efficient, making it ideal for microcontrollers with limited memory and processing power, like the STM32 series.
By the end of this tutorial, you will have a clear understanding of how to harness FreeRTOS to create robust, multitasking applications on STM32 microcontrollers, laying the groundwork for more advanced embedded projects.
STM32CubeMX FreeRTOS Configuration
The image below shows the configuration for the FreeRTOS.
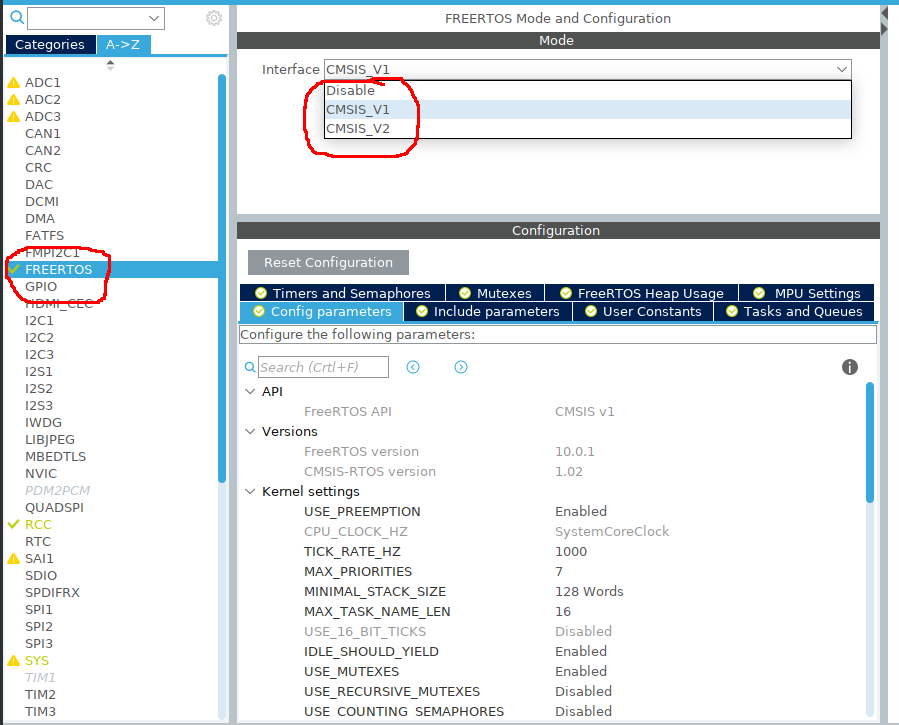
I am choosing version 1, because it is supported by majority of STM32 devices.
Open the ‘Tasks and Queues‘ tab. Here you will see a predefined default task. Open it to see more information about this task.
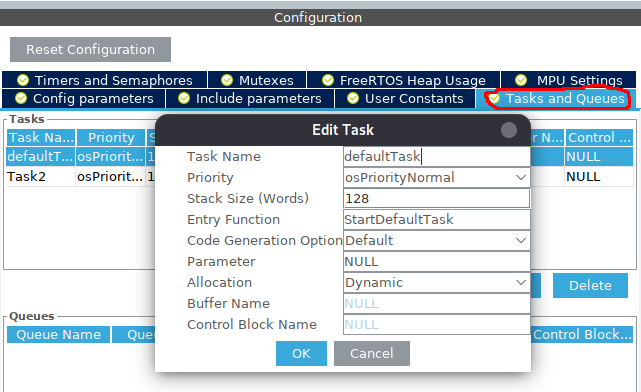
The Task details are explained below:
- Task Name:
defaultTask– This is just the name of the task. You use this name in your code to work with this task. - Priority:
osPriorityNormal– This decides how important the task is. Normal priority means it runs after high-priority tasks but before low-priority ones. It helps the CPU know which task to run first. - Stack Size (Words):
128– This is the memory the task can use for its variables and function calls. Think of it as the workspace for the task. - Entry Function:
StartDefaultTask– This is the function that will run when the task starts. You put the task’s code inside this function. - Code Generation Option:
Default– CubeMX will generate the task using its standard method. - Parameter:
NULL– If you wanted to give some information to the task when it starts, you could put it here. NULL means no information is passed. - Allocation:
Dynamic– Memory for the task is given at runtime. The other option is static, where memory is reserved before the program runs.
We will create another task for the test. Below is the image showing the task properties.
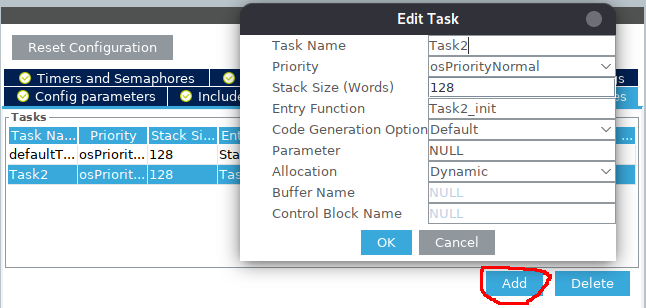
I am calling it Task2, with normal priority, 128 Stack Size and the entry function is defined as Task2_init. We will write this entry function in our code.
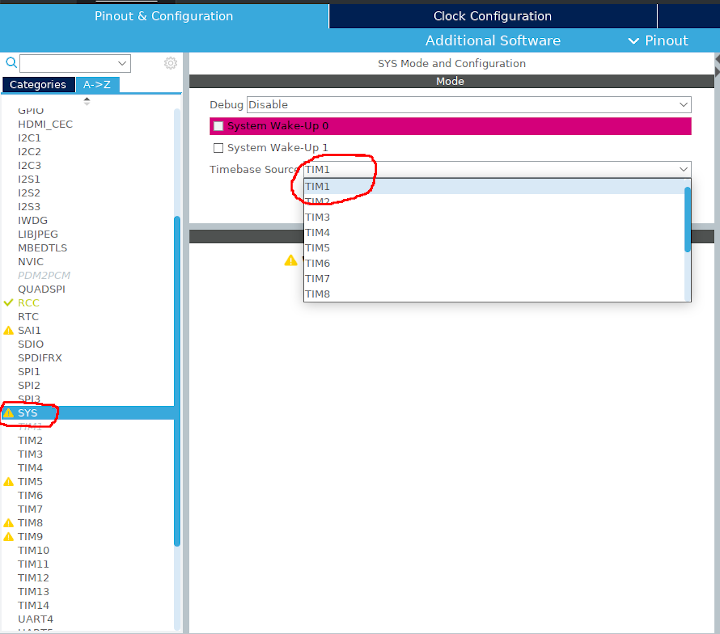
When using FreeRTOS, you cannot use the default SysTick timer for the system time base because FreeRTOS uses it internally to manage task switching and delays.
So, you need to choose a different timer as the time base for your system (like TIMx) in STM32CubeMX. This ensures the system clock keeps running correctly while FreeRTOS manages tasks.
Why to Use FreeRTOS in STM32 Projects
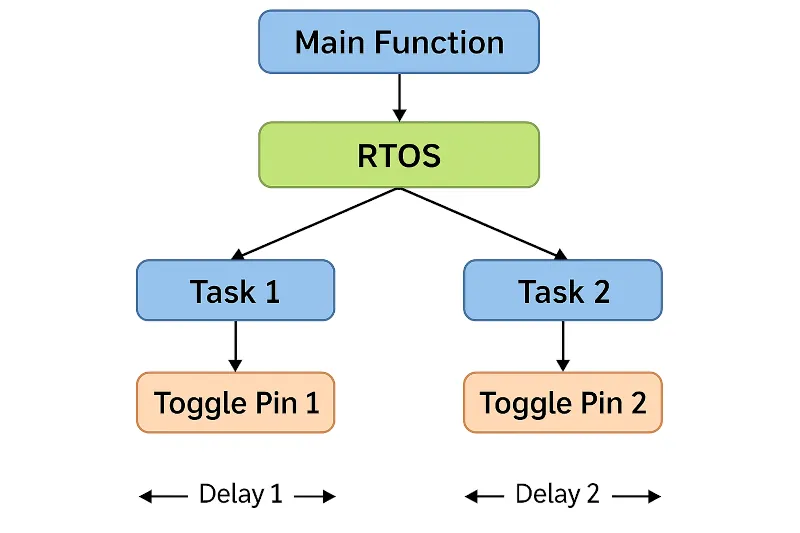
Imagine you want to toggle two pins at the same time, each with its own delay. With simple programming, this is hard because the microcontroller can only do one instruction at a time. So, the first pin has to finish toggling before the second one can start, even if both are inside a while loop.
This is where RTOS helps. By creating two separate tasks, each task can handle one pin independently. FreeRTOS will switch between the tasks quickly, making it appear as if both pins are toggling at the same time.
If you scroll down in the main.c file, you will see the entry functions for the tasks we defined in the cubeMX. These functions contain the code that runs for each task, one for each pin.
void StartDefaultTask(void const * argument)
{
  for(;;)
  {
      HAL_GPIO_TogglePin(GPIOA, GPIO_PIN_0);
      osDelay(1);
  }
}

void Task2_init(void const * argument)
{
  for(;;)
  {
	  HAL_GPIO_TogglePin(GPIOA, GPIO_PIN_1);
	  osDelay(1);
  }
}In this example, we toggle pin PA0 within the default task and pin PA1 within Task2. The FreeRTOS scheduler manages the execution, ensuring that both tasks receive sufficient CPU time to run properly.
The oscilloscope reading below shows the output when the above code was executed.

How to Create Tasks in STM32 FreeRTOS
In order to create a new Task, we have to follow some set of steps, and they are as follows:-
1.) Define a ThreadID for the task. This variable will store the unique ID of the task, once created. Later, all the operations will require this ID.
osThreadId Task3Handle;2.) Define the entry function for the task. This is the main function of the task. Your program will be written inside it. Remember that the tasks in the Free RTOS, are not designed to handle any return value. So, the entry function should always have an infinite loop, inside which, your whole program should be written.
void Task3_init (void const * argument)
 {
     while (1)
     {
         // do something
         osDelay (1000);  // 3 sec delay
     }
}3.) Inside our main function, we need to define the task first and than create it.
// define thread
   osThreadDef(Task3, Task3_init, osPriorityBelowNormal, 0, 128);
   //create thread
Task3Handle = osThreadCreate(osThread (Task3), NULL);- osThreadDef takes the parameters as the name of the task, the entry function, the priority, instance, and the stack size.
- After the task is defined, we can create it using osThreadCreate, and assign the ID to the Task3Handle
Task Priorities in STM32 FreeRTOS (with Code)
So far, we have seen how to perform multitasking using FreeRTOS. However, using multiple tasks can sometimes lead to certain challenges. One common issue arises when multiple tasks try to access the same resource at the same time.
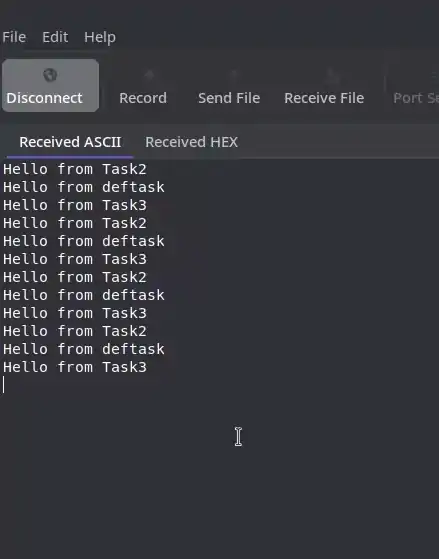
For example, consider sending data over UART from three different tasks simultaneously:
- When we write a program for this, the transmission will not happen exactly at the same time.
- Instead, each task will send its data one after another — the first task sends for 1 second, then the second task for another second, and so on.
- This occurs because the tasks are sharing the same resource (UART) and have the same priority.
- The second task has to wait for the first task to finish before it gets control, and similarly, the third task waits for the second.
To avoid these situations, we use different priorities for different tasks. That means we have to redefine our task priorities in the main function.
osThreadDef(defaultTask, StartDefaultTask, osPriorityNormal, 0, 128);
osThreadDef(Task2, Task2_init, osPriorityAboveNormal, 0, 128);
osThreadDef(Task3, Task3_init, osPriorityBelowNormal, 0, 128);- Now the Task2 have the highest priority, than Default task, and Task3 have the lowest.
- When the program runs, Task2 will execute first, than default task and at last the Task3.
- All three tasks will send the data at the same time, with Task2 sending the data first, then default task and at last the Task3.
Video Tutorial
STM32 FreeRTOS Video Tutorial
In this video, I demonstrate how to get started with FreeRTOS on STM32 microcontrollers. You will see how to create tasks, manage priorities, and implement multitasking in real-time applications. Follow along with the video while using the provided code to easily replicate every step.
Watch the STM32 FreeRTOS TutorialConclusion
In this tutorial, we explored the fundamentals of FreeRTOS and how it can transform the way you develop applications on STM32 microcontrollers. We learned that FreeRTOS enables multitasking, task prioritization, predictable timing, and safe communication between tasks, all of which are essential for building efficient, responsive, and reliable embedded systems.
As a next step, you can experiment with creating more tasks, using queues and semaphores, and managing task priorities to fully leverage the power of FreeRTOS in your embedded projects. Mastering FreeRTOS opens the door to professional-level STM32 programming, helping you build applications that are not only functional but also highly optimized and responsive.
Browse More STM32 FreeRTOS Tutorials
No post found!

Hello Master I’m new comer in FreeRTOS so I have one question.How to calculate the “stack size” in each Task?
https://www.freertos.org/FreeRTOS_Support_Forum_Archive/April_2014/freertos_Exact_task_stack_size_8c443f40j.html#:~:text=The%20stack%20is%20managed%20by,n%27%20bytes%20of%20stack%20space.
very useful!
Very good knowledge tutorial STM32F4 with FreeRTOS
your website is the best tutorial material I ever found.
thank you for the nice tutorial!
thank you for job!
Please make single pdf file for this excellent tutorial series on RTOS
voting system lies.. counting and result not matching… good job!..
Removing it
where is the code download? I installed chrome just to download your code.
sorry, i didn’t upload any code for it. This was a simple case. just set everything from cube mx and run it.
Could you help me to use modul NFC modul v3 for stm32cubemx and Keilc v5 thanks