Updated On: June 23, 2026
STM32 FreeRTOS Multiple Tasks, Task Priorities & Preemption with CMSIS-RTOS V2
In Part 1 of this series, we set up FreeRTOS on the STM32 and ran a single task that blinked an LED. That was a good starting point, but real embedded systems are never that simple.
In practice, your system needs to handle multiple jobs at the same time — reading a sensor, updating a display, communicating over UART, and managing a motor, all running together. That is exactly what an RTOS is built for.
In this tutorial, we are going to take things further. We will create four different FreeRTOS tasks on the STM32 Nucleo board, assign each one a different priority, and observe how the scheduler decides which task runs and when. We will also see preemption in action where a higher priority task can interrupt a lower priority one mid-execution. We will also use a Task to control the lifecycle of another task using suspend, resume, and terminate.
This is the Part 2 of the STM32 CMSIS-RTOS FreeRTOS series. You can go through the other parts of this series, here are the links:
- Part 1 — Configure CMSIS RTOS in STM32
- Part 3 — How to use Queues for inter-task communication
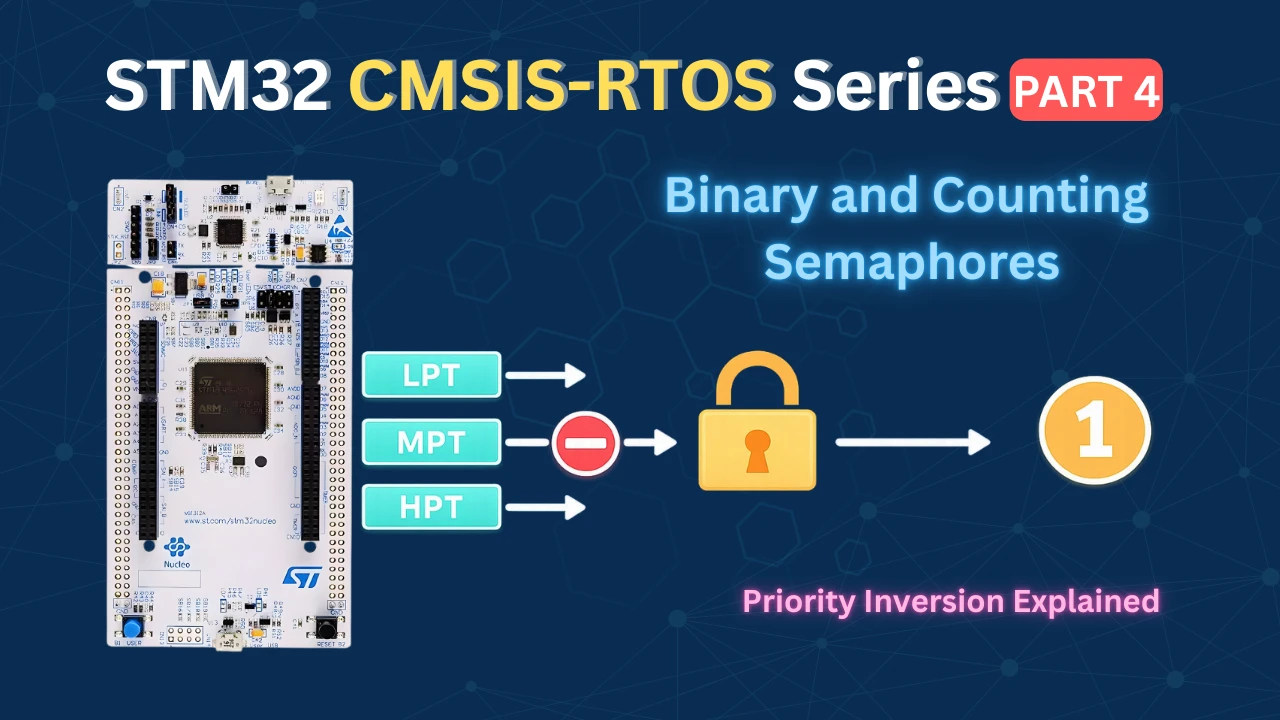
- Part 4 — Using Semaphores in CMSIS RTOS
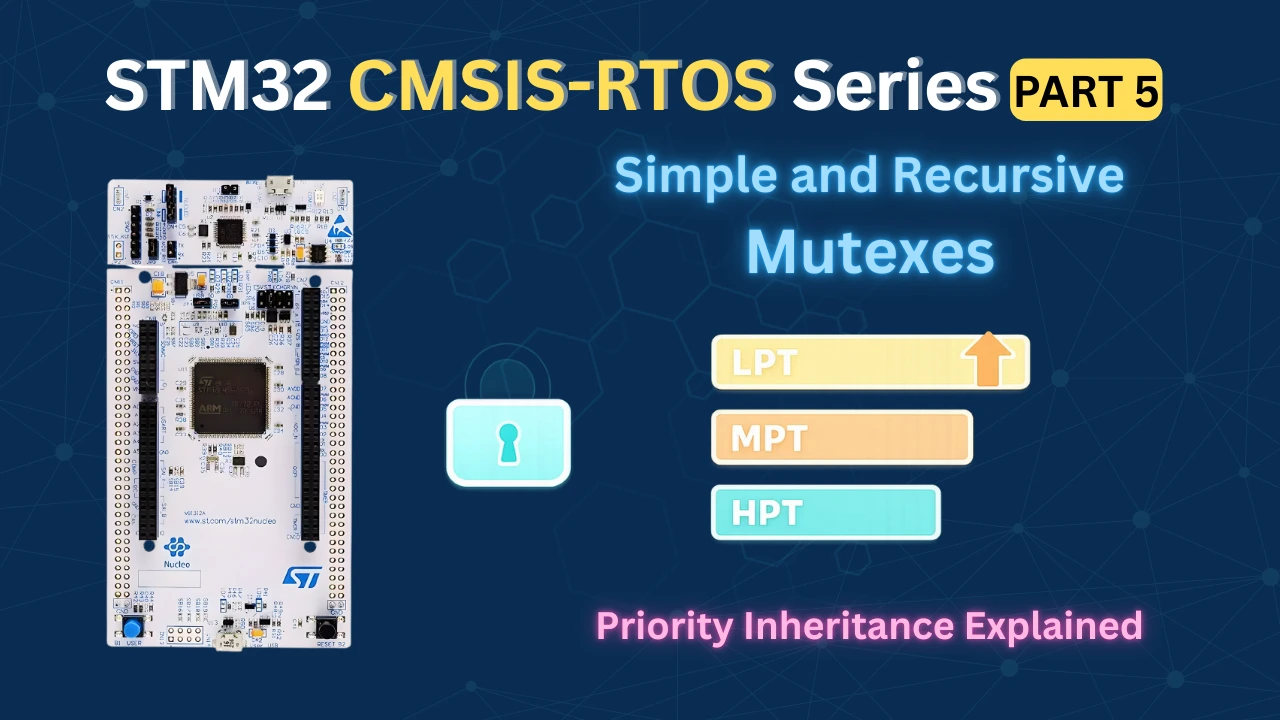
- Part 5 — Using Mutexes in CMSIS RTOS
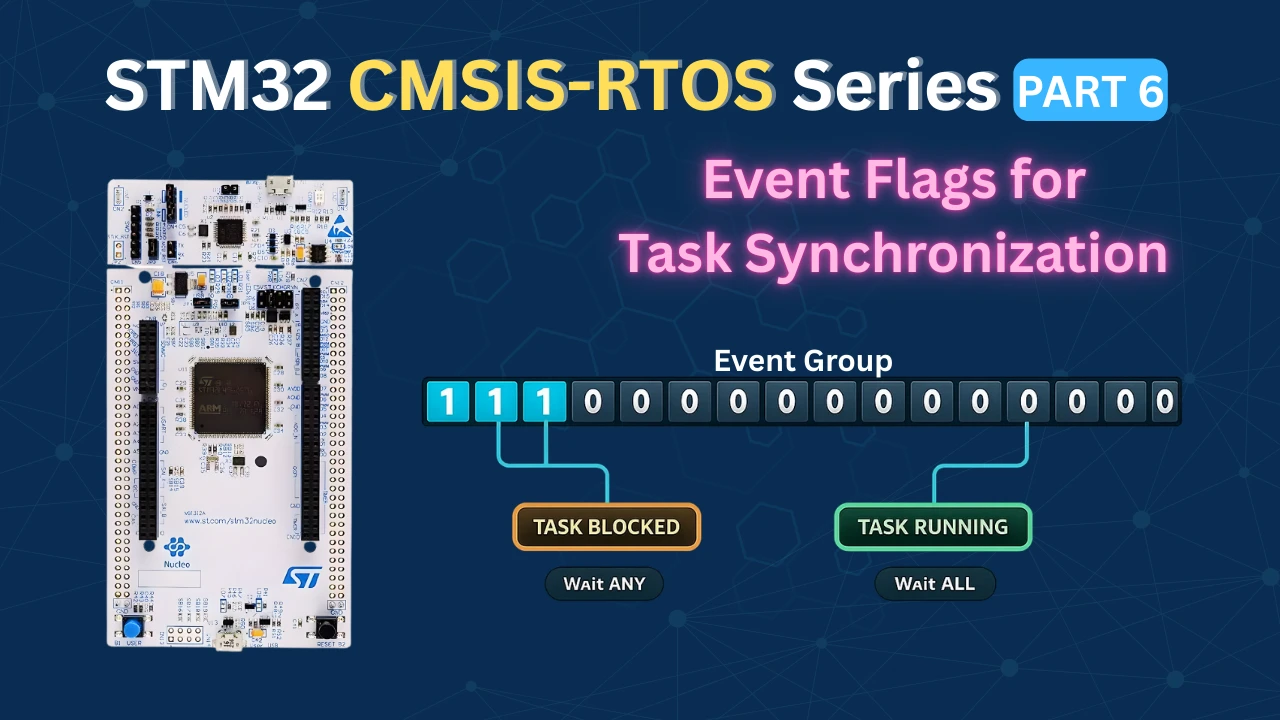
- Part 6 — Task Synchronization using Event Flags
- Part 7 — Software Timers in FreeRTOS
- Part 8 — FreeRTOS Stack Management
STM32 FreeRTOS CubeMX Project Setup
In this section, we will create a FreeRTOS project using CMSIS-RTOS V2 in STM32CubeMX. We will configure the clock, enable FreeRTOS, configure LED pins, and set up 4 different tasks with separate priorities.
I will use the STM32 Nucleo-L496ZG-P board for this tutorial.
Clock Configuration
We will start with the clock configuration. This Nucleo board does not use an external crystal for the main system clock. So we will use the internal oscillator.
The image below shows the clock configuration for this project.
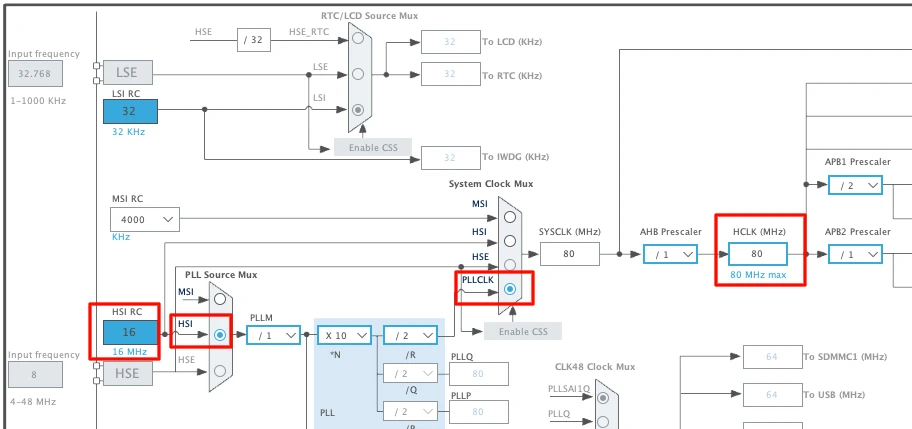
We will use the internal oscillator (HSI) and PLL to run the system at maximum 80MHz clock.
Enable CMSIS-RTOS V2 in Middleware
Now we will enable the CMSIS-RTOS. The configuration can be found in the Middleware section as shown in the image below.
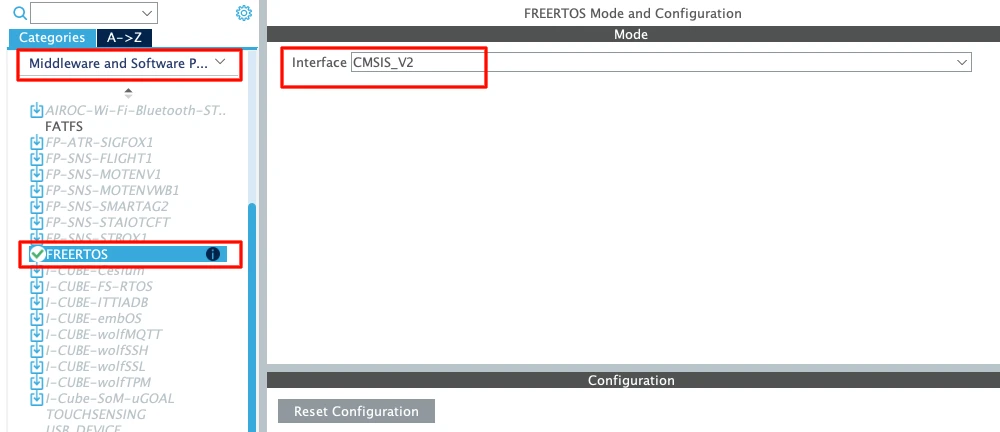
Always choose CMSIS-RTOS V2 for new projects. It is cleaner and more modern.
Let’s understand the basic parameters.
Tick Rate
The default tick rate is 1000 Hz.
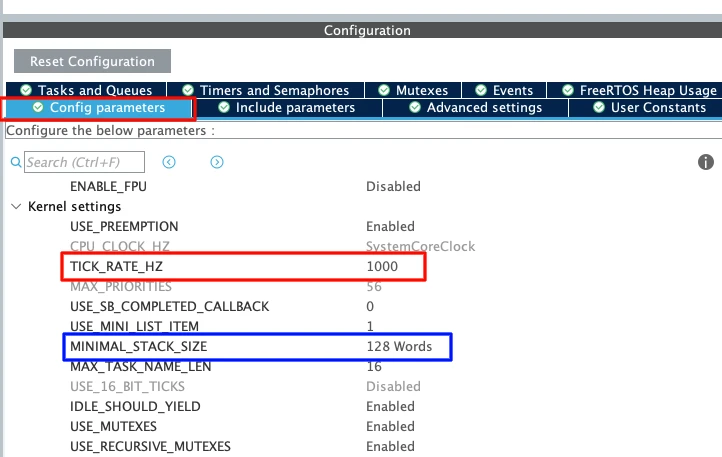
This means the sysTick interrupt runs 1000 times per second which provides 1 ms resolution.
So when we use osDelay(1) It delays approximately 1 millisecond.
Since the maximum tick rate is 1000 Hz, we cannot generate delays smaller than 1 millisecond in FreeRTOS.
Minimal Stack Size
The default value is 128 words.
Note that this is in words, not bytes. Since STM32 is a 32-bit MCU:
1 word = 4 bytes
128 words = 512 bytes
Each task has its own stack. If the stack is too small, the system may crash due to stack overflow. For now, 128 words is enough for a simple LED task.
Total Heap Size
The default heap size is around 3000 bytes.
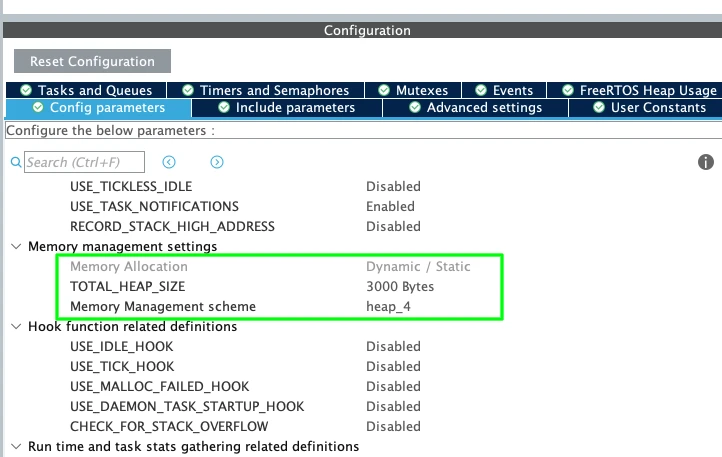
This heap is used for:
- Tasks
- Queues
- Semaphores
- Timers
- Other RTOS objects
When we create a new task, memory is taken from this heap. For this simple example, 3000 bytes is more than enough. Later, when we add more RTOS features, we may need to increase it.
Create Four FreeRTOS Tasks with Different Priorities
I am going to create 4 Tasks with 4 different priority levels. Task1, Task2 and Task3 will blink the LED at different rates, whereas the Task4 will control the lifecycle of one of the remaining Tasks.
The image below shows the 4 Tasks with different priorities.
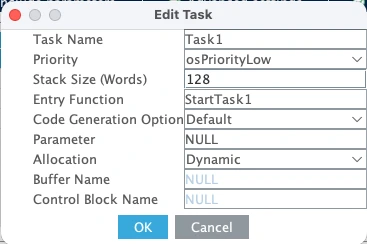

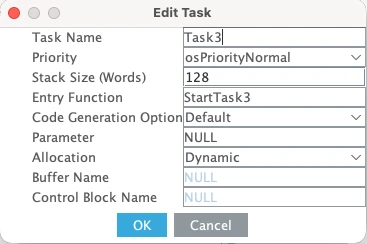
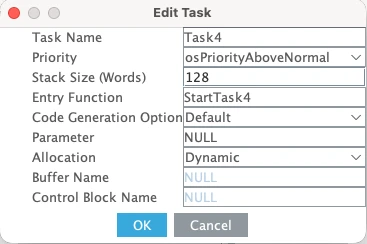
Here is a quick breakdown of what each task does:
- Task1 has the lowest priority — Low.
- Task2 priority is Below Normal, which is higher than Task1.
- Task3 runs at Normal priority, higher than both Task1 and Task2.
- Task4 has the highest priority of all four — Above Normal.
The stack size for all four tasks is kept at 128 words. Since we are only toggling LEDs and calling a few RTOS functions inside each task, 128 words is more than enough.
FreeRTOS Heap Usage — Verify Available Memory
Now let’s also look at the FreeRTOS Heap Usage before generating the code. The image below shows the heap consumption for all four tasks.
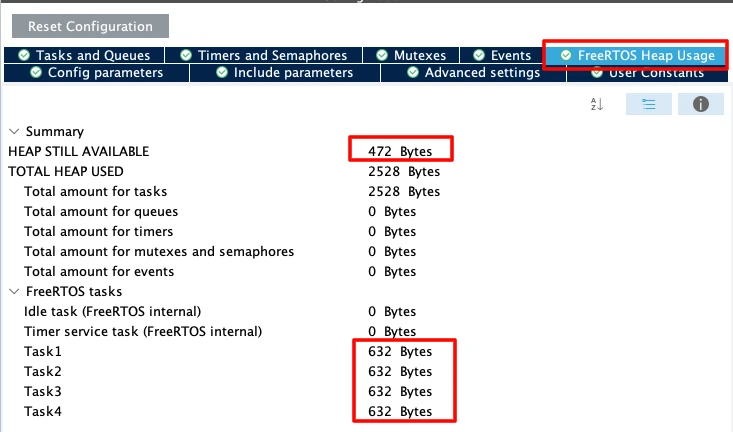
As you can see, all four tasks occupy the same amount of memory since they all share the same stack size. We still have 472 bytes remaining, which is sufficient for this project. So we don’t need to change anything here.
Separate SysTick from HAL — Move Time Base to TIM6
This step is very important in STM32 FreeRTOS projects. By default, STM32 uses SysTick as the HAL time base. But FreeRTOS also uses SysTick for its scheduler.
If both HAL and FreeRTOS share SysTick, it may create timing conflicts.
So we should dedicate:
- SysTick → FreeRTOS Scheduler
- TIM6 (or TIM7) → HAL Time Base

- Go to System Core → SYS
- Change Timebase Source from SysTick to TIM6 (or TIM7)
TIM6 and TIM7 are basic timers. They do not support PWM or advanced features. That is why they are ideal for this purpose.
Enable Newlib Reentrant for Thread Safety
Go to Middleware → FreeRTOS → Advanced Settings and Enable Use newlib reentrant.
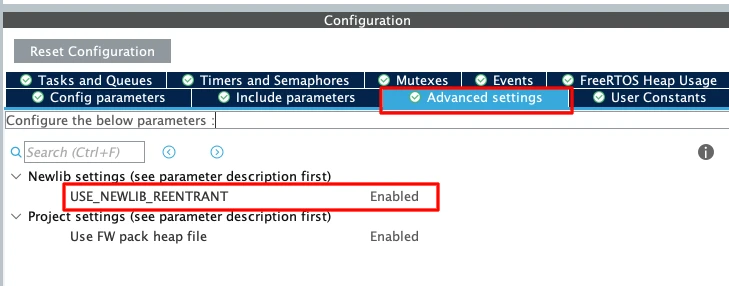
In an RTOS environment, multiple tasks may call functions like printf(); sprintf(); malloc(); etc. These standard C library functions are not thread-safe by default.
If two tasks call printf() at the same time, the output may get corrupted. Enabling newlib reentrant makes these functions safe in multitasking systems. It uses slightly more memory, but it prevents difficult debugging issues later.
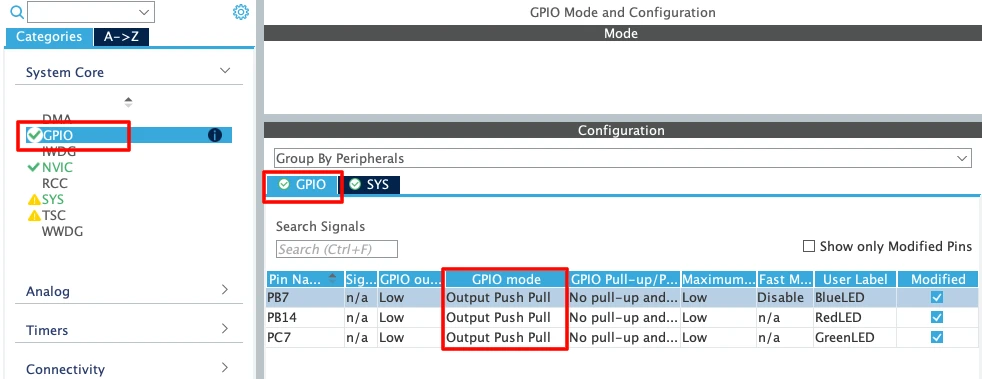
Configure GPIO for Three Onboard LEDs
Now we will configure the onboard LEDs. According to the board schematic, the LEDs on Nucleo-L496 are connected as shown below:
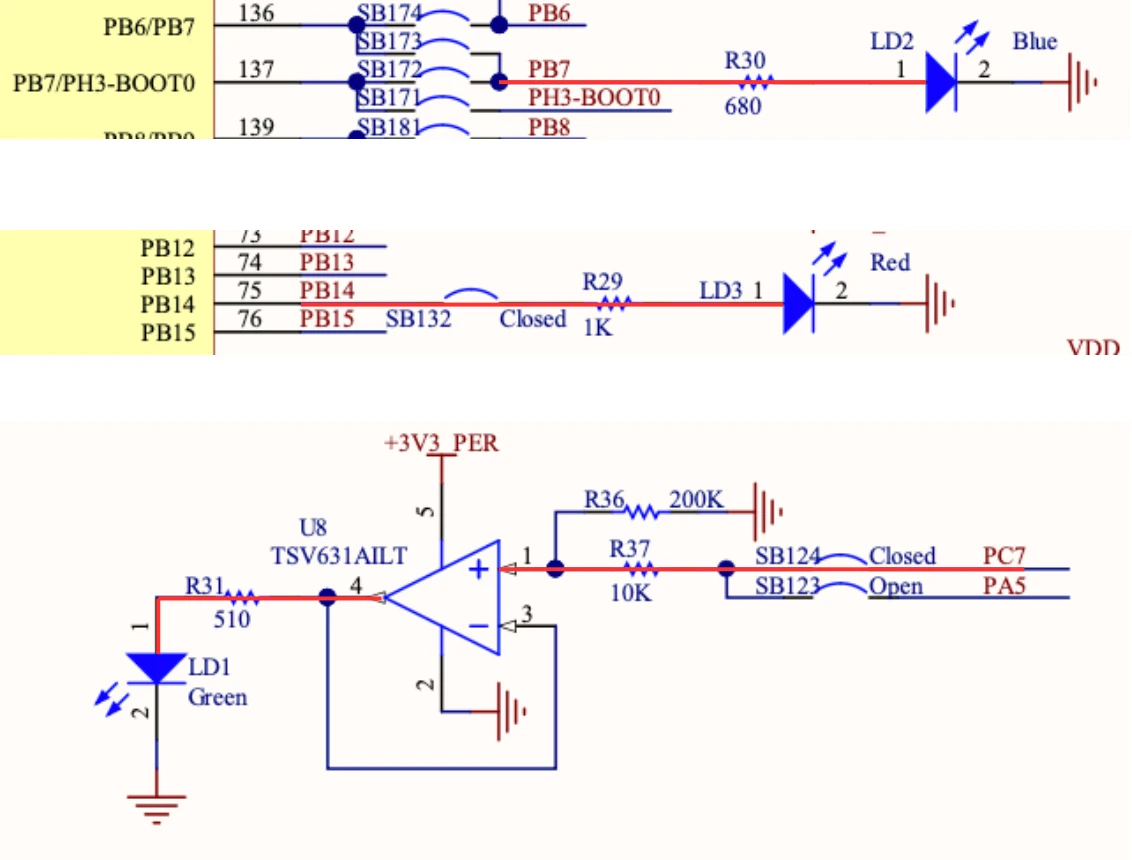
- Blue LED is connected to pin PB7
- Red LED is connected to pin PB14
- Green LED is connected to pin PC7
Therefore, we will configure the pins PB7, PB14 and PC7 in the output mode.
We do not need to change any other GPIO settings for this example. Later inside the task, we will toggle these pins using HAL_GPIO_TogglePin().
FreeRTOS Task Functions — LED Blink with osDelay()
Once the code is generated, open main.c in STM32CubeIDE. You will see that all four task functions have already been created by CubeMX at the bottom of the file. We just need to write the code inside them.
For toggling the LEDs, I am going to use HAL_GPIO_TogglePin(). It flips the pin state with every call, which is exactly what we need for blinking.
We will also use osDelay() to control the blink rate. This is important — osDelay() does not just waste time. It puts the task into the blocked state for the specified duration, which frees up the CPU for other tasks to run during that window.
Task1 — Red LED Blink at 1000 ms (Low Priority)
Task1 has the lowest priority. It toggles the Red LED and then calls osDelay(1000) to wait for 1 second before toggling again.
void StartTask1(void *argument)
{
  for(;;)
  {
    HAL_GPIO_TogglePin(RedLED_GPIO_Port, RedLED_Pin);
    osDelay(1000);
  }
}Task2 — Blue LED Blink at 500 ms (Below Normal Priority)
Task2 runs at Below Normal priority, which is higher than Task1. It toggles the Blue LED every 500 milliseconds.
void StartTask2(void *argument)
{
for(;;)
{
HAL_GPIO_TogglePin(BlueLED_GPIO_Port, BlueLED_Pin);
osDelay(500);
}
}Because Task2 has a higher priority than Task1, the scheduler will always run Task2 first whenever both tasks are ready at the same time.
Task3 — Green LED Blink at 200 ms (Normal Priority)
Task3 runs at Normal priority, which is higher than both Task1 and Task2. It toggles the Green LED every 200 milliseconds.
void StartTask3(void *argument)
{
for(;;)
{
HAL_GPIO_TogglePin(GreenLED_GPIO_Port, GreenLED_Pin);
osDelay(200);
}
}We will leave Task4 empty for now. We will come back to it in a later section when we cover task lifecycle control.
For now, let’s verify that all three LEDs are blinking correctly.
Output — All Three LEDs Blinking Independently
The GIF below shows all three LEDs blinking on the STM32 Nucleo board.

As you can see:
- The Red LED blinks every 1 second.
- The Blue LED blinks every 500 milliseconds.
- The Green LED blinks every 200 milliseconds.
All three tasks are running independently and blinking their LEDs at the correct rates. The FreeRTOS scheduler is handling the switching between them automatically based on their priorities and delay windows.
STM32 FreeRTOS Task Preemption Explained
What Is Preemption in FreeRTOS?
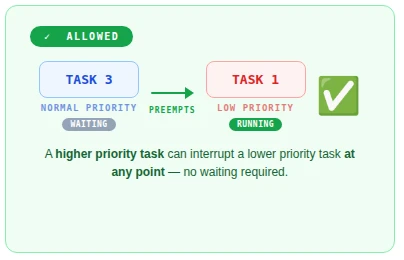
Preemption is one of the most important concepts in any RTOS. It is what allows a higher priority task to interrupt a lower priority one and take control of the CPU — without waiting for the lower priority task to finish.
In this section, we are going to test preemption hands-on. We will add a blocking while loop to different tasks and observe exactly how the scheduler responds. This will make the concept much easier to understand than just reading about it.
Test 1 — Blocking While Loop in Task1 (Low Priority)
Let’s start by adding a long blocking operation to Task1. Inside the for loop, after the osDelay(), we will declare a variable called wait, set it to 50 million, and run an empty while loop that keeps decrementing it until it hits zero.
void StartTask1(void *argument)
{
uint32_t wait;
for(;;)
{
HAL_GPIO_TogglePin(RedLED_GPIO_Port, RedLED_Pin);
osDelay(1000);
wait = 50000000;
while(wait--);
}
}This while loop does nothing useful. It just burns CPU cycles until the counter reaches zero. During this entire time, Task1 is hogging the CPU and not giving it up voluntarily.
Now we will see whether the Task2 and Task3 will be able to run freely or not. Since they have higher priorities, they should be able to preempt the Task1, while it is waiting inside the while loop.
Output
The GIF below shows the LED behaviour after adding the while loop to Task1.

You can see that the Red LED is now blinking slower than 1 second. That is because the while loop is adding extra time to every cycle of Task1. However, the Blue and Green LEDs are still blinking at their correct rates. Task2 and Task3 are completely unaffected.
This is preemption in action. When Task1 is stuck inside the while loop and Task2’s delay expires, Task2 simply interrupts Task1, blinks its LED, and goes back to blocking. The same happens with Task3. Neither of them waits for Task1 to finish.
This works because Task2 and Task3 have higher priorities than Task1. The moment their delay expires, the scheduler immediately hands them the CPU — regardless of what Task1 is doing.
Test 2 — Blocking While Loop in Task3 (High Priority)
Now let’s move that same while loop into Task3 and remove it from Task1. This time, the situation is very different because Task3 has the highest priority among the three LED tasks.
void StartTask1(void *argument)
{
  for(;;)
  {
    HAL_GPIO_TogglePin(RedLED_GPIO_Port, RedLED_Pin);
    osDelay(1000);
  }
}
void StartTask3(void *argument)
{
uint32_t wait;
for(;;)
{
HAL_GPIO_TogglePin(GreenLED_GPIO_Port, GreenLED_Pin);
osDelay(200);
wait = 50000000;
while(wait--);
}
}Output
The GIF below shows what happens when the while loop is inside Task3.

This time, all three LEDs appear to blink at the same rate and they seem to turn on and off together. This is very different from what we saw before.
Here is exactly what is happening. Task3 toggles the Green LED and calls osDelay(200). During that 200 millisecond window, Task1 and Task2 get their turn and toggle their own LEDs on. But Task3 has the shortest delay, so it wakes up first. It preempts Task1 and Task2 and immediately enters the while loop. Task1 and Task2 are now stuck waiting — they cannot toggle their LEDs off because Task3 is still executing and holds a higher priority.
Once Task3 finally finishes the loop, it toggles the Green LED off and calls osDelay(200) again. During that window, Task1 and Task2 finally get control and toggle their LEDs off. Then Task3 wakes up, preempts them both, and the whole cycle repeats.
The result is that all three LEDs appear to blink together — completely synchronised to Task3’s cycle.
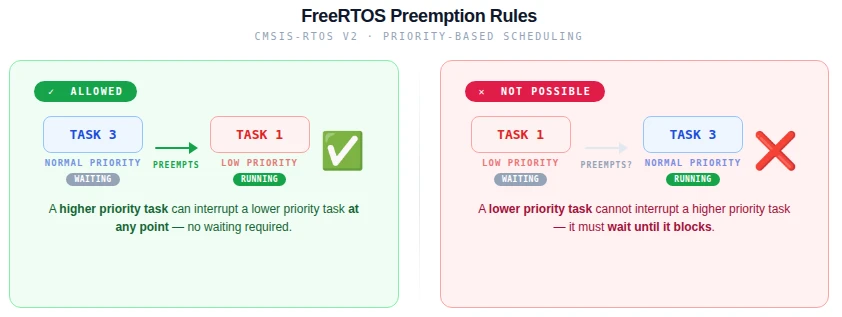
The Preemption Rule — Priority Decides Who Wins
What we just observed is the fundamental rule of preemptive scheduling in FreeRTOS:
A higher priority task can preempt a lower priority one at any point in time. But a lower priority task can never do the same in return.
When Task1 had the while loop, Task2 and Task3 could interrupt it freely because they outranked it. Task1 had no say in the matter. But when Task3 had the while loop, Task1 and Task2 were completely powerless. They could see that they had work to do — their delays had expired and they were ready to run — but the scheduler would not give them the CPU because Task3 was still running.
This is why priority assignment matters so much in an RTOS. A high priority task that runs a long blocking operation will delay every lower priority task behind it. In a real system, you always want to keep high priority tasks short and responsive, and use osDelay() generously so lower priority tasks get a chance to run.
The image below summarises this rule clearly.
FreeRTOS Task Suspend, Resume & Terminate on STM32
So far, we have seen how priorities and preemption work between tasks. Now let’s take things one step further. In this section, we are going to use Task4 to actively control when Task3 runs and when it does not — using the osThreadSuspend() and osThreadResume() functions from the CMSIS-RTOS V2 API.
Task4 — Control Task Lifecycle from a Higher Priority Task
Task4 has the highest priority of all four tasks. This means it can preempt any of the others at any time — including Task3, even while Task3 is running its while loop.
We are going to keep the while loop in Task3 from the previous section. Inside Task4, we will call osThreadSuspend() to suspend Task3, wait for 5 seconds using osDelay(), and then call osThreadResume() to bring it back.
But first, we need access to Task3’s thread handle inside Task4. CubeMX already creates these handles for us. At the top of main.c, you will find the handle declarations like this:
osThreadId_t Task3Handle;Now let’s write Task4:
void StartTask4(void *argument)
{
for(;;)
{
osDelay(1000);
osThreadSuspend(Task3Handle);
osDelay(5000);
osThreadResume(Task3Handle);
}
}That is all we need. Task4 suspends Task3, waits 5 seconds, resumes it, waits 1 second and suspends it again on the next loop iteration.
Since Task4 has a higher priority than Task3, it will preempt Task3 the moment it is ready to run — even if Task3 is right in the middle of its while loop.
How Task Suspension Affects Task1 and Task2
After flashing, observe the LEDs carefully.
Output
The gif below shows the LED behaviour with Task4 suspending and resuming Task3.

You can that the Green LED turns on and stays on for a long time. Here is exactly what is happening step by step.
Task3 toggles the Green LED on and enters osDelay(200). During that window, Task4 is also running. Task4 calls osThreadSuspend(Task3Handle), which immediately freezes Task3 — right in the middle of its execution. The Green LED stays on because Task3 never got a chance to toggle it off.
When a task is suspended, it is completely removed from the scheduler. It will not receive any CPU time at all. However, its stack and internal state are fully preserved inside the FreeRTOS kernel — so the task still exists in memory. It is just taken off the scheduling timeline until something explicitly resumes it.
With Task3 out of the picture, Task1 and Task2 are now completely free to run without any interference. You can see the Red and Blue LEDs blinking at their normal rates again — 1 second and 500 milliseconds respectively.
After 5 seconds, Task4 wakes up from its delay and calls osThreadResume(Task3Handle). Task3 is placed back into the scheduler and picks up exactly from where it was suspended. It finishes its current cycle, toggles the Green LED off, and starts the while loop again. Task4 then immediately preempts it and suspends it for another 5 seconds — and the whole cycle repeats.
The full code for all four tasks at this point looks like this:
void StartTask1(void *argument)
{
for(;;)
{
HAL_GPIO_TogglePin(RedLED_GPIO_Port, RedLED_Pin);
osDelay(1000);
}
}
void StartTask2(void *argument)
{
  for(;;)
  {
    HAL_GPIO_TogglePin(BlueLED_GPIO_Port, BlueLED_Pin);
    osDelay(500);
  }
}
void StartTask3(void *argument)
{
uint32_t wait;
for(;;)
{
HAL_GPIO_TogglePin(GreenLED_GPIO_Port, GreenLED_Pin);
osDelay(200);
wait = 50000000;
while(wait--);
}
}
void StartTask4(void *argument)
{
  for(;;)
  {
    osDelay(1000);
    osThreadSuspend(Task3Handle);
    osDelay(5000);
    osThreadResume(Task3Handle);
  }
}osThreadTerminate – When and Why to Use It
Alongside osThreadSuspend(), CMSIS-RTOS V2 also provides osThreadTerminate(). The difference between the two is significant.
When you suspend a task, it is paused but it still exists. Its memory is still allocated and it can be resumed at any time. When you terminate a task, it is permanently deleted. The memory is freed and the task is gone for good. You cannot resume a terminated task — you would have to call osThreadNew() to create it all over again from scratch.
Because of this, osThreadTerminate() is rarely used in practice. Suspension is almost always the better choice when you just want to stop a task temporarily.
However, there is one case where termination makes perfect sense — a one-time initialisation task. Imagine a task whose only job is to configure hardware peripherals at startup: initialise the UART, set up the SPI bus, load settings from flash, and signal the rest of the system that everything is ready. Once it has done all of that, it has nothing left to do. There is no reason to keep it alive and waste stack memory on it.
In that case, the task can simply terminate itself at the end:
void StartInitTask(void *argument)
{
  /* One-time hardware initialisation */
  MX_UART_Init();
  MX_SPI_Init();
  Sensor_Init();
  Flash_LoadSettings();
  SystemReady_SetFlag();

  /* Job is done — terminate this task */
  osThreadTerminate(osThreadGetId());
}After osThreadTerminate() is called, the task is removed from the system completely and its stack memory is freed. The other tasks continue running as normal — they are not affected at all.
CMSIS-RTOS V2 Thread Management API Reference
Other than what we used in this tutorial, CMSIS-RTOS V2 gives you a full set of thread management functions that let you inspect, control, and modify tasks at runtime. These are useful as your system grows more complex and you need more visibility into what each task is doing.
Let’s go through the key ones.
osThreadGetId and osThreadGetState
osThreadGetId() returns the ID of the currently running thread. You do not need to pass anything into it — it simply returns the handle of whichever task is calling it at that moment.
osThreadId_t currentId = osThreadGetId();This is particularly useful when a task needs to pass its own handle to another function. We already used it in the termination example:
osThreadTerminate(osThreadGetId());Without osThreadGetId(), the task would need to know its own handle in advance — which is not always convenient.
osThreadGetState() lets you query the current state of any thread. You pass in a thread handle and it returns the state that thread is currently in.
osThreadState_t state = osThreadGetState(Task1Handle);The three main states you will encounter are:
- Running — the task is currently executing on the CPU
- Ready — the task is ready to run but waiting for the CPU
- Blocked — the task is waiting for a delay or event to complete
This function is especially handy during debugging. If a task is not behaving as expected, you can call osThreadGetState() to check whether it is actually running, stuck in a blocked state, or waiting in the ready queue.
osThreadGetPriority and osThreadSetPriority
These two functions let you read and change a task’s priority while the system is running.
osThreadGetPriority() reads the current priority of any thread:
osPriority_t priority = osThreadGetPriority(Task1Handle);osThreadSetPriority() changes it:
osThreadSetPriority(Task1Handle, osPriorityAboveNormal);This is more powerful than it might seem. In a real embedded system, the importance of a task often needs to change depending on what the system is doing at a given moment.
For example, imagine a data logging task that normally runs at a low priority. If the system detects a critical fault, you might want to boost that task’s priority temporarily so it can write the fault data to flash before anything else happens. Once the fault is handled, you can lower the priority back to normal.
/* Boost priority during critical fault */
osThreadSetPriority(LogTaskHandle, osPriorityHigh);
LogFaultData();
osThreadSetPriority(LogTaskHandle, osPriorityLow);This kind of dynamic priority management gives you fine-grained control over how your system responds to different conditions at runtime — something that would be very difficult to achieve without an RTOS.
STM32 FreeRTOS Multiple Tasks & Preemption — Video Walkthrough
This video covers the complete STM32 FreeRTOS multi-task workflow: CubeMX setup for four tasks with different priorities, task code with osDelay() and HAL_GPIO_TogglePin(), live preemption tests using blocking while loops in low- vs high-priority tasks, and Task4 lifecycle control using osThreadSuspend(), osThreadResume(), and osThreadTerminate() on the STM32 Nucleo-L496ZG-P.
STM32 FreeRTOS Multiple Tasks — Frequently Asked Questions
Conclusion
Four tasks. Four priorities. One CPU. The FreeRTOS scheduler handled the switching so precisely that three LEDs blinked at their exact independent rates — 200 ms, 500 ms, and 1000 ms — even while one task was burning CPU cycles in a blocking while loop. The priority system is not an abstraction: you saw it work in hardware, saw it fail predictably when a high-priority task blocked, and understood exactly why.
The two preemption experiments reveal the most important design rule in RTOS programming: a high-priority task that blocks without yielding will stall every lower-priority task behind it. Your architecture should always keep high-priority tasks short, event-driven, and heavy with osDelay() calls. Low-priority tasks can afford to do more work per cycle — they will simply be interrupted whenever something more urgent becomes ready.
Task4's suspend/resume/terminate control adds the final dimension: tasks are not just parallel threads, they are manageable objects with a full lifecycle. One task can pause another, restart it, or destroy it entirely — all through the clean CMSIS-RTOS V2 thread API without touching any FreeRTOS-native calls.
The next step is Part 3 — FreeRTOS Queues, where tasks stop running independently and start communicating — passing structured data between them safely using the queue mechanism. After that, Part 4 — Semaphores introduces synchronisation: how tasks signal each other without shared variables or busy polling. Browse the full STM32 FreeRTOS series for all parts.
Download STM32 FreeRTOS Multi-Task Project Files
Complete STM32CubeIDE project for the STM32 Nucleo-L496ZG-P with four CMSIS-RTOS V2 tasks at different priorities: Task1 (Red LED, Low), Task2 (Blue LED, Below Normal), Task3 (Green LED, Normal), and Task4 (lifecycle control, Above Normal). Includes preemption test code variants and full osThreadSuspend/Resume/Terminate example. Free to download — support the work if it helped you.
Browse More STM32 FreeRTOS Tutorials
STM32 FreeRTOS Queue Tutorial: Inter-Task Communication with CMSIS-OS V2
STM32 FreeRTOS Semaphores: How to Use Binary and Counting Semaphores
STM32 FreeRTOS Mutex: Priority Inheritance & Recursive Mutex
STM32 FreeRTOS Event Flags: osFlagsWaitAll, WaitAny & ISR Callbacks

STM32 FreeRTOS Software Timers: Periodic & One-Shot with CMSIS-OS V2


The GIF in Part 2, all 3 LEDs blink at the same time. Shouldn’t the green LED blink every 200ms, blue LED blink every 500ms and red LED blink every 1000ms?
You are correct my mistake there. The first GIF should represent the LEDs blinking Independently. I have fixed the GIF https://controllerstech.com/stm32-freertos-multiple-tasks-priorities-preemption/?wpo_single_page_cache_purged=1#:~:text=Output%20%E2%80%94%20All%20Three%20LEDs%20Blinking%20Independently
Thank you for fixing it. Great tutorial.
Thank you for fixing it. Great tutorial.