Home ▸ ESP32 ▸ FreeRTOS Tutorials ▸
Updated On: April 26, 2026
ESP32 FreeRTOS Task Priority and Stack Management (ESP-IDF)
In the first tutorial, we learned the basics of task management — how to create, delete, and control tasks in FreeRTOS using the ESP-IDF. In Part 2, we explored the task scheduler, and saw how FreeRTOS switches between tasks to manage multitasking efficiently.
Now, in this part, we’ll dive deeper into Task Priority and Stack Management — two critical aspects that decide how your ESP32 handles multiple tasks at once.
You’ll learn how task priority affects scheduling, how to assign and change priorities, and how to manage stack size to ensure reliable performance. We’ll also discuss stack optimization, monitoring stack usage, and avoiding memory issues that can cause your program to crash.
This is Part 3 of the ESP32 FreeRTOS Series using ESP-IDF. You can check the other parts as well, here are the links:
- Part 1 — Intro to FreeRTOS: Tasks, Scheduler & xTaskCreate
- Part 2 — Understanding the FreeRTOS Scheduler
- Part 3 — Task Priority & Stack Management ← you are here
- Part 4 — Inter-Task Communication: Queues, Semaphores & Event Groups
- Part 5 — Software Timers & Task Notifications
- Part 6 — Task Control: Suspend, Resume & Delete
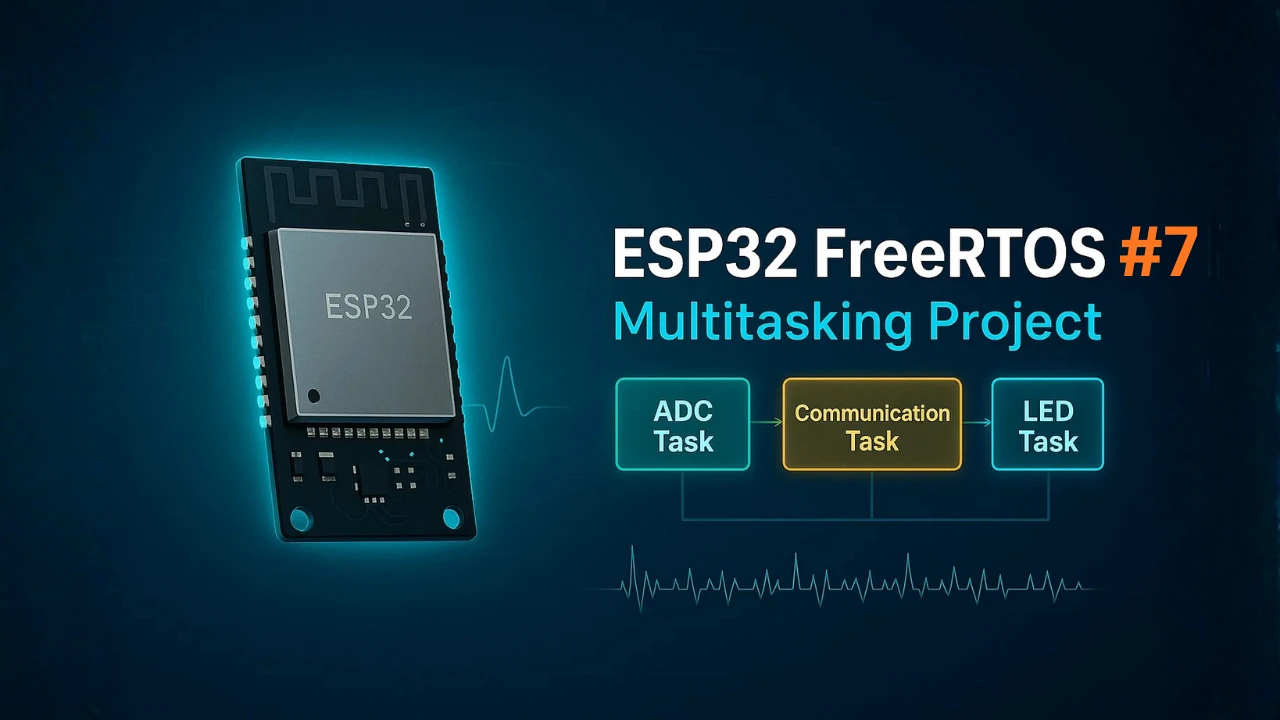
- Part 7 — Real-Time Multitasking Project (ADC, UART, LED)
Task Priority in ESP32 FreeRTOS: How It Works
When you create multiple tasks in FreeRTOS, all of them want the CPU’s attention. But the ESP32 can run only one task at a time on each core. So, how does FreeRTOS decide which task should run first?
That’s where task priority comes in.
Task priority helps the scheduler decide which task is more important and should get CPU time before others. Let’s understand how it works.
What is Task Priority?
Every task in FreeRTOS has a priority level, defined when you create the task using xTaskCreate() or xTaskCreatePinnedToCore().
- A higher number means a higher priority.
- A task with a higher priority will always run before a lower-priority task.
- If two tasks have the same priority, FreeRTOS will switch between them (time slicing).
Example:
If Task A has priority 2 and Task B has priority 1, the scheduler will always run Task A first — unless Task A is waiting or blocked.
In short, task priority defines which task gets more CPU time and attention.
How Task Priority Affects Scheduling
FreeRTOS uses a preemptive scheduling system. This means if a task with a higher priority becomes ready to run, it will immediately preempt (interrupt) any lower-priority task currently running.
Here’s what happens step-by-step:
- The scheduler checks all tasks that are ready to run.
- It selects the task with the highest priority.
- That task runs until it blocks (for example, waiting for a delay or queue).
- Then, the scheduler switches to the next-highest ready task.
This makes sure that important tasks like sensor reading, interrupt handling, or network operations get CPU time first — while less critical tasks like logging or LED blinking wait their turn.
Note:
Don’t give every task a high priority. It can cause lower-priority tasks to never run, leading to a system freeze or watchdog reset.
Default Priority Range in ESP-IDF (0–24)
In the ESP32 FreeRTOS environment, the priority range usually goes from 0 to (configMAX_PRIORITIES – 1).
By default:
- 0 → Lowest priority
- tskIDLE_PRIORITY (0) → Idle task
- Higher numbers (like 5, 10, etc.) → Higher priority
ESP-IDF sets configMAX_PRIORITIES to 25 by default, meaning you can assign priorities from 0 to 24.
Note:
The Idle Task always runs at priority 0. It runs only when no other task is ready to execute.
Priority in Action: Code Example & Result
Let’s look at a simple example with two tasks:
void Task1(void *pvParameters)
{
    while (1)
    {
        printf("Task 1 is running\n");
        vTaskDelay(1000 / portTICK_PERIOD_MS);
    }
}

void Task2(void *pvParameters)
{
    while (1)
    {
        printf("Task 2 is running\n");
        vTaskDelay(1000 / portTICK_PERIOD_MS);
    }
}

void app_main()
{
    xTaskCreate(Task1, "Task 1", 2048, NULL, 1, NULL);
    xTaskCreate(Task2, "Task 2", 2048, NULL, 2, NULL);
}In this example:
- Task2 has a higher priority (2) than Task1 (1).
- The scheduler will always run Task2 first.
- Task1 will only run when Task2 is in a delay or blocked state.
If both tasks had the same priority, FreeRTOS would time-slice them — giving each task CPU time in turns.
Below you can see the image showing the output of the above code on the ESP-IDE console.
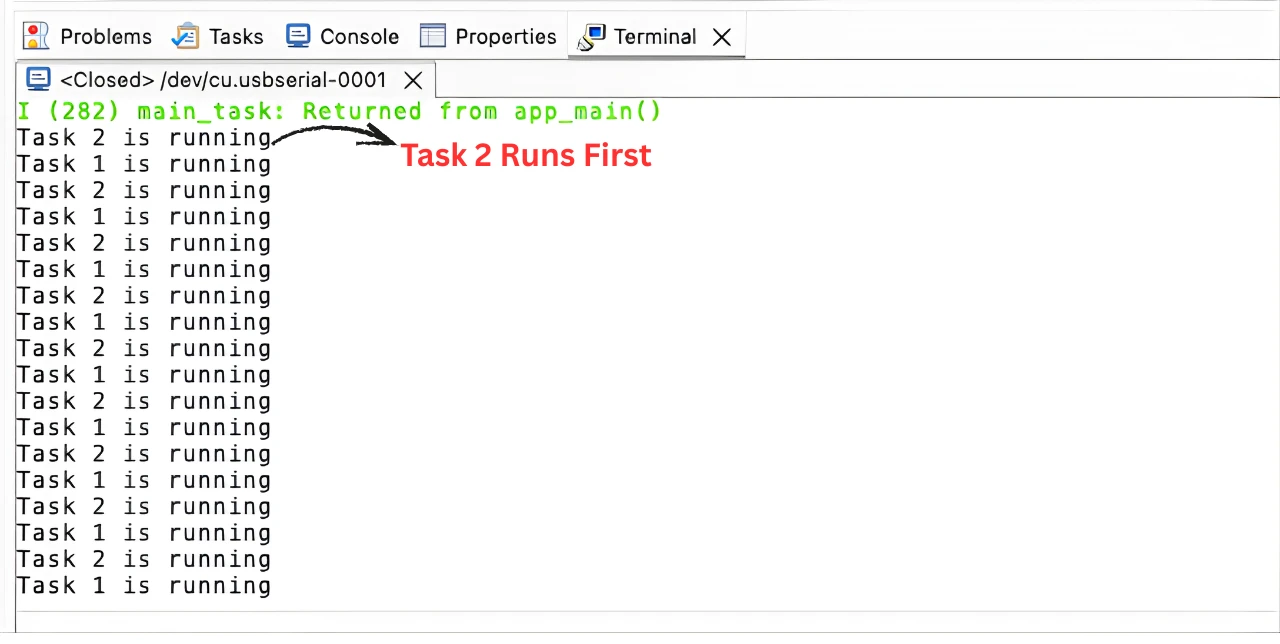
As shown in the image, the Task2 runs first followed by Task1.
This happens because Task2 has a higher priority (2) compared to Task1 (1). The FreeRTOS scheduler always gives the CPU to the task with the highest priority that is ready to run.
When Task2 goes into the delay state (vTaskDelay()), it becomes blocked for that duration. During this time, the scheduler looks for the next ready task — in this case, Task1 — and gives it CPU time.
Once Task2’s delay finishes, it becomes ready again, and since its priority is higher, it will preempt Task1 and start running immediately.
This simple example clearly shows how task priority controls the order of execution in FreeRTOS. Even though both tasks have the same delay, the task with higher priority always gets preference whenever it’s ready to run.
Setting & Changing Task Priorities at Runtime
In FreeRTOS, setting the right task priority helps your ESP32 handle multiple operations smoothly. You can assign a priority when creating a task and even change it later during runtime. Let’s see how it’s done.
Assigning Priority in xTaskCreate()
The most common way to assign a task priority is during task creation using the xTaskCreate() or xTaskCreatePinnedToCore() function.
Here’s the function format:
xTaskCreate(
    TaskFunction_t pvTaskCode,    // Function that implements the task
    const char * const pcName,    // Name of the task
    const uint16_t usStackDepth,  // Stack size in words
    void *pvParameters,           // Parameters passed to the task
    UBaseType_t uxPriority,       // Task priority
    TaskHandle_t *pxCreatedTask   // Handle to the created task
);The uxPriority parameter is what decides how important your task is.
Here’s an example:
xTaskCreate(Task1, "Task1", 2048, NULL, 1, NULL);
xTaskCreate(Task2, "Task2", 2048, NULL, 3, NULL);- Task2 has priority 3, which is higher than Task1 (1).
- The scheduler will always run Task2 first, and Task1 will only execute when Task2 is delayed or blocked.
If you’re using a dual-core ESP32, you can also pin a task to a specific core:
xTaskCreatePinnedToCore(Task1, "Task1", 2048, NULL, 2, NULL, 1);This creates Task1 on Core 1 with priority 2.
Changing Priority with vTaskPrioritySet()
Sometimes, you may want to change the task’s priority while the program is running. For example, a task may need higher priority when handling real-time data, but lower priority during idle operations.
You can do this easily using vTaskPrioritySet().
vTaskPrioritySet(TaskHandle_t xTask, UBaseType_t uxNewPriority);Here’s an example:
TaskHandle_t myTaskHandle;

void TaskA(void *pvParameters)
{
    while (1)
    {
        printf("Running Task A\n");
        vTaskDelay(2000 / portTICK_PERIOD_MS);
    }
}

void app_main()
{
    xTaskCreate(TaskA, "TaskA", 2048, NULL, 1, &myTaskHandle);

    // Change priority after 5 seconds
    vTaskDelay(5000 / portTICK_PERIOD_MS);
    vTaskPrioritySet(myTaskHandle, 3);
}In this example:
- TaskA starts with priority 1.
- After 5 seconds, its priority changes to 3, making it more important than other lower-priority tasks.
- The scheduler immediately re-evaluates and gives TaskA more CPU time.
Note:
When you increase a task’s priority, it may preempt currently running tasks if it becomes the highest priority ready task.
Best Practices for Assigning Priorities
To make your ESP32 FreeRTOS project stable and efficient, follow these priority management best practices:
- Use priorities based on importance
- High priority → Time-critical tasks (e.g., sensor read, communication).
- Medium priority → Regular operations.
- Low priority → Logging or background tasks.
- Avoid unnecessary high priorities
Giving every task a high priority can block other tasks and cause watchdog resets. - Keep the Idle Task free
The Idle Task (priority 0) handles background cleanup. Don’t block it with busy loops. - Monitor performance
Use debugging tools or FreeRTOS trace functions to ensure all tasks get enough CPU time. - Test with different priorities
Sometimes, small changes in priority can make your application more responsive.
Stack Management in ESP32 FreeRTOS
Every task in FreeRTOS needs its own stack memory to store temporary data, local variables, and function call information. If the stack is too small, your ESP32 can crash or behave unexpectedly. If it’s too large, you waste valuable RAM.
That’s why stack management is an important part of writing stable and efficient FreeRTOS applications. Let’s learn how it works and how you can monitor and optimize it.
What is Task Stack and Why Does It Matter?
In FreeRTOS, each task runs independently and has its own private stack. This stack holds:
- Local variables inside functions
- Return addresses during function calls
- Interrupt context and temporary data
If a task tries to use more stack than it was allocated, it causes a stack overflow — one of the most common reasons for system crashes in FreeRTOS.
How to Choose the Right Stack Size
When you create a task using xTaskCreate() or xTaskCreatePinnedToCore(), you must specify the stack size as one of the parameters.
xTaskCreate(Task1, "Task1", 2048, NULL, 1, NULL);Here, 2048 is the stack depth — the size of the stack in words, not bytes.
Since the ESP32 uses 4-byte words, this equals 2048 * 4 = 8192 bytes (8 KB of stack).
Note:
If your task uses large local variables, nested functions, or string buffers, it will need a bigger stack.
If it only performs small computations or prints data, you can keep the stack smaller.
You can start with 2048 words and adjust later based on stack usage monitoring.
Monitoring Stack Usage with uxTaskGetStackHighWaterMark()
FreeRTOS provides a very useful function to check how much stack your task has actually used — uxTaskGetStackHighWaterMark().
This function returns the minimum free stack that remained during the task’s lifetime. In other words, it tells you how close you are to a stack overflow.
Example:
void Task1(void *pvParameters)
{
    while (1)
    {
        printf("Task1 is running\n");

        // Check stack usage
        UBaseType_t watermark = uxTaskGetStackHighWaterMark(NULL);
        printf("Task1 Stack High Water Mark: %u words\n", watermark);

        vTaskDelay(2000 / portTICK_PERIOD_MS);
    }
}

void app_main()
{
    xTaskCreate(Task1, "Task1", 2048, NULL, 1, NULL);
}Here’s what this means:
- A large watermark value = you have plenty of unused stack (safe).
- A small watermark value = you’re close to running out of stack (danger).
Example
The image below shows the output of the above code.
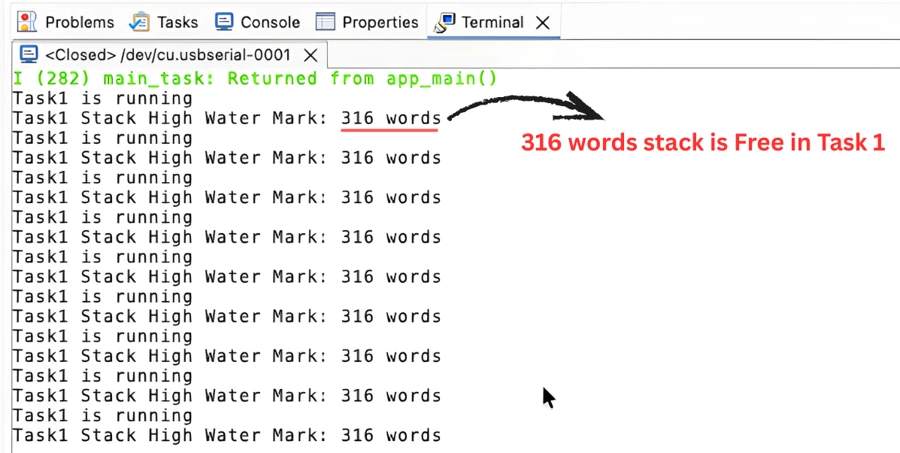
In the output above, we are monitoring Task1’s stack usage using uxTaskGetStackHighWaterMark().
- Each line shows the current “high water mark” of the stack:
Task1 Stack High Water Mark: 316 words - The high water mark indicates the minimum free stack space that has remained since the task started.
- In this case, 316 words are still free, meaning Task1 has plenty of stack memory left.
A large high water mark means the task is well within its allocated stack. If the number were very low or zero, it would indicate the task is close to overflowing its stack, and you would need to increase the stack size.
This method helps you optimize stack allocation, avoiding both crashes and wasted memory.
Optimizing and Avoiding Stack Overflow
Managing stack memory is one of the most important parts of building reliable FreeRTOS applications on the ESP32. A small mistake in stack allocation can lead to system crashes, random resets, or watchdog errors.
In this section, we’ll see how to calculate the right stack size, identify common stack-related issues, and follow best practices for efficient memory management in FreeRTOS.
How to Calculate Optimal Stack Size
Every task in FreeRTOS requires its own stack. The goal is to allocate just enough memory — not too large, not too small.
Here’s how you can find the optimal stack size for each task:
- Start with a reasonable default
For most simple tasks, start with a stack size of 2048 words (≈8 KB). - Run your application and monitor usage
Use the functionuxTaskGetStackHighWaterMark()to check the remaining stack for each task.UBaseType_t watermark = uxTaskGetStackHighWaterMark(NULL); printf("Task Stack Free Space: %u words\n", watermark);- If the watermark value is high, your stack is too large — you can safely reduce it.
- If it’s very low or zero, your stack is too small — increase it.
- Gradually tune your stack size
Adjust each task’s stack size until you reach a safe balance — enough headroom to avoid overflow, but not wasting memory.
Note:
Always leave at least 100–200 words of free stack space as a safety margin.
Common Stack Problems and How to Fix Them
Stack-related issues are common in FreeRTOS projects. Here are a few you might face and how to solve them:
1. Stack Overflow
Occurs when a task exceeds its allocated stack size.
Fix:
- Enable stack overflow checking using
configCHECK_FOR_STACK_OVERFLOW 2. - Use
vApplicationStackOverflowHook()to detect the overflow. - Increase the stack size for the affected task.
2. Watchdog Timer Reset
If a task runs too long or gets stuck, the watchdog may reset the ESP32.
Fix:
- Add
vTaskDelay()orvTaskDelayUntil()to give time to other tasks. - Avoid infinite loops without delays.
3. Heap or Memory Fragmentation
If you frequently create and delete tasks, the heap can fragment over time.
Fix:
- Avoid creating and deleting tasks repeatedly — use suspension instead (
vTaskSuspend()/vTaskResume()). - Use static task allocation when possible to reserve memory in advance.
4. Insufficient RAM for New Tasks
If there’s not enough heap memory, xTaskCreate() will fail.
Fix:
- Check available heap with
xPortGetFreeHeapSize(). - Reduce stack size of other tasks or increase heap in
menuconfig.
ESP32 FreeRTOS Priority & Stack: FAQs
Conclusion
Task priority and stack size are the two parameters you set once and forget — until something breaks. Priority determines which task the scheduler runs first; stack determines whether the task can safely execute its code. Both have the same failure pattern: the wrong value produces no immediate compiler error, but causes subtle runtime bugs that are hard to trace.
The practical rules: don't assign every task a high priority — reserve high priorities for genuinely time-critical tasks and let the scheduler do the rest. Size stacks generously during development, then use uxTaskGetStackHighWaterMark() to trim them before shipping.
In Part 4 we cover inter-task communication — the correct way for tasks to share data and coordinate actions without race conditions or data corruption.
Browse More ESP32 FreeRTOS Tutorials
FreeRTOS ESP32 Scheduler: Task States & Context Switching
ESP32 FreeRTOS Queues, Semaphores, Mutexes & Event Groups
ESP32 FreeRTOS Software Timers & Task Notifications
ESP32 FreeRTOS: Suspend, Resume & Delete Tasks (ESP-IDF)
ESP32 FreeRTOS Multitasking Project: ADC, UART & LED Tasks


top!!!!!!!!!!!