
Home ▸ STM32 Tutorials ▸
Updated On: March 23, 2026
Boot Application from Ext Flash || XIP
This is the 11th tutorial in the W25Q Flash series, and today we will see how to Boot an Application from external Flash on an H7 based MCU. Basically we will perform the Execute In Place (XIP).
We will create 2 projects in this tutorial. The first one will be loaded to the internal flash and it will make the control to jump to the external flash memory. The second project will contain the application and it will be loaded to the external flash memory. In today’s tutorial we will create a simple application for the external flash, where we will simply blink the LED on board.
VIDEO TUTORIAL
You can check the video to see the complete explanation and working of this project.
Connection
I am using the STM32H750 custom development board and it has the W25Q64 flash memory soldered on it. You can see the image of the board shown below.
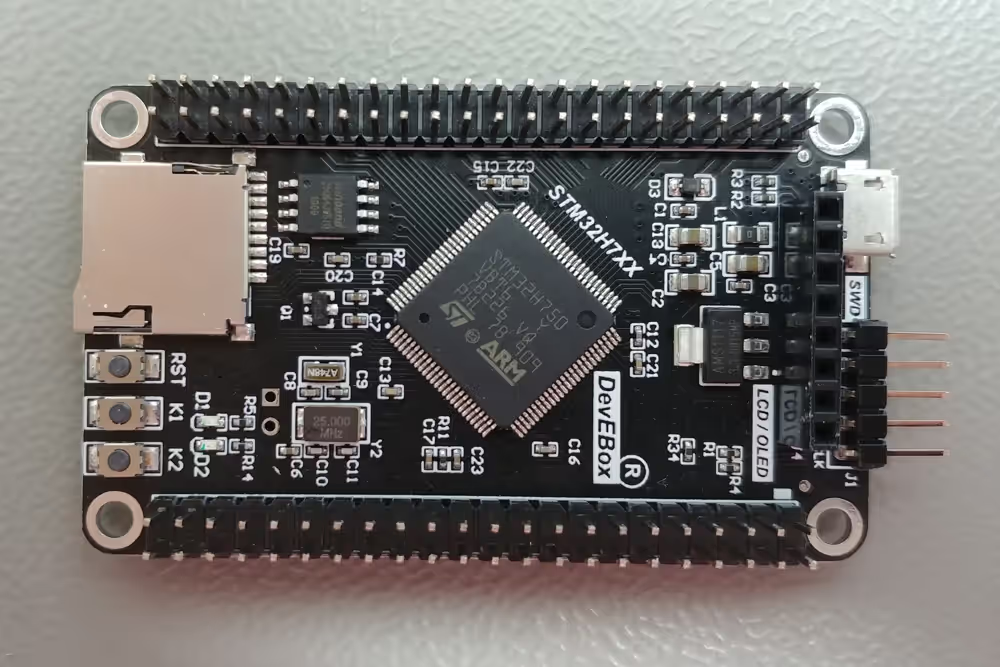
The schematic of this board shows how the flash memory is connected to the MCU.
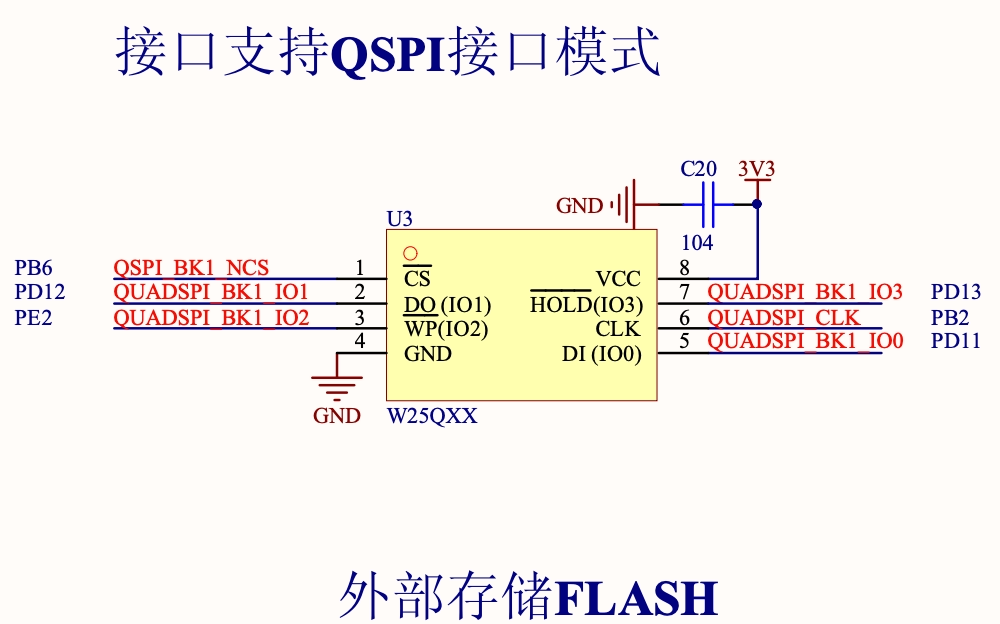
We will set up the cubeMX according to this diagram.
Project to make the Jump
CubeMX Configuration
The clock is configured as shown below.
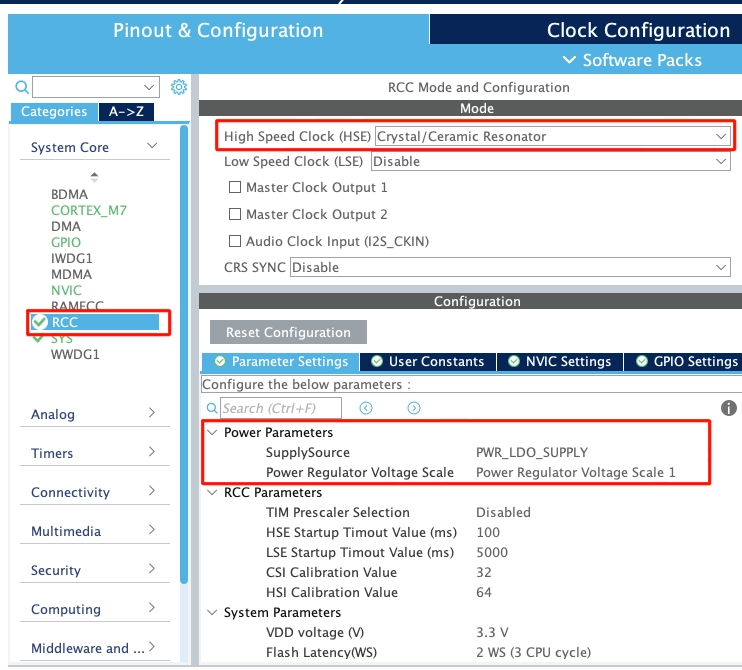
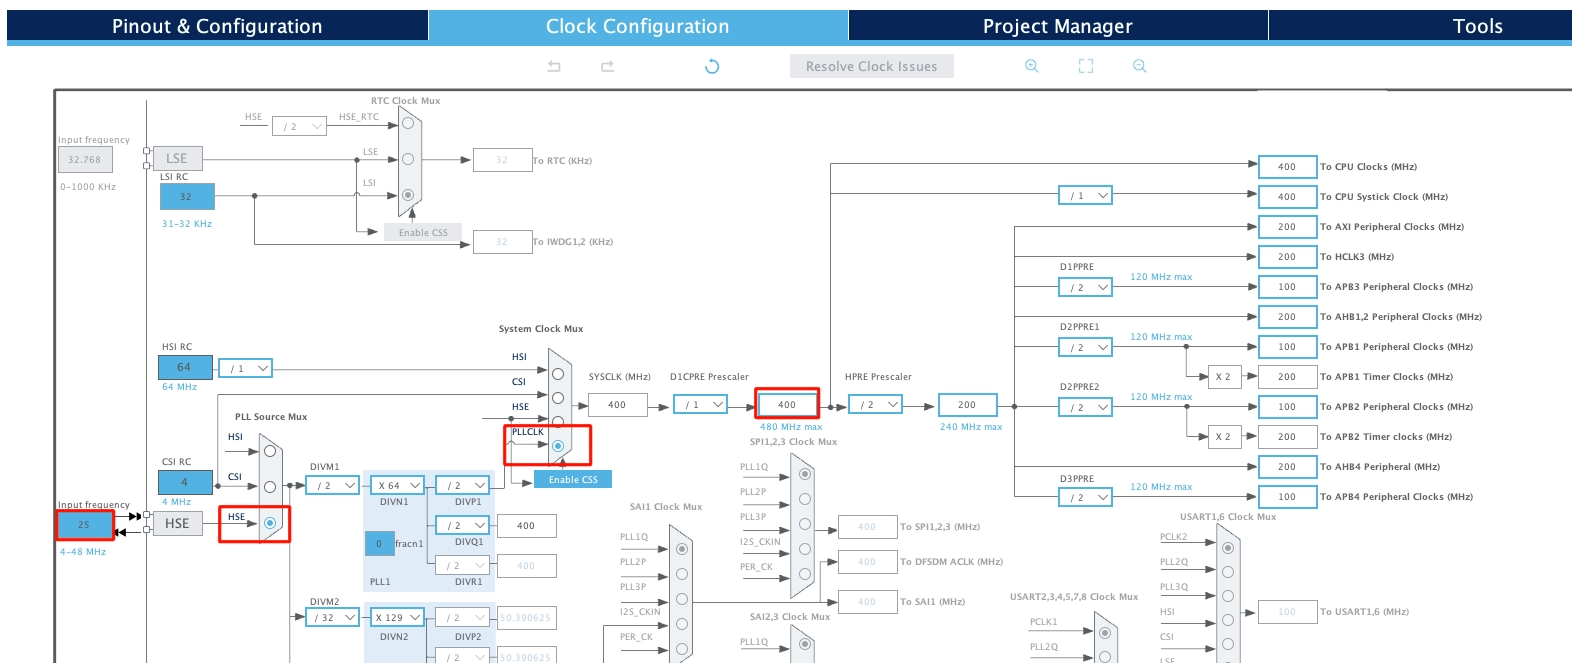
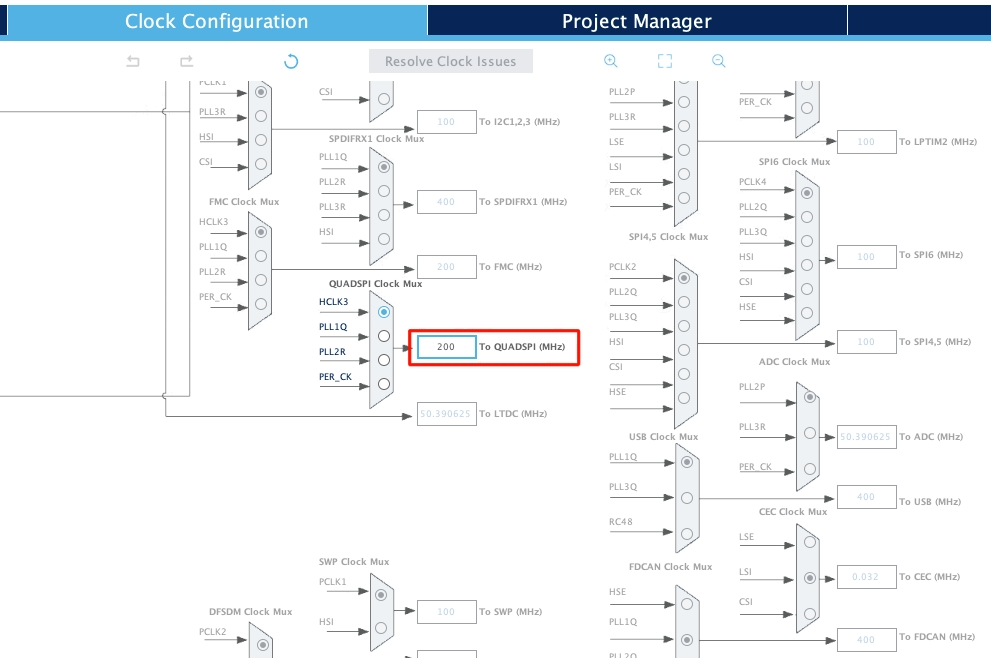
I have selected the external crystal for the clock. The board has 25MHz crystal on it and the board is configured to run at 400MHz clock. With this configuration the QuadSPI clock is running at 200MHz.
We will now configure the QuadSPI peripheral. Below is the image showing the QuadSPI configuration.
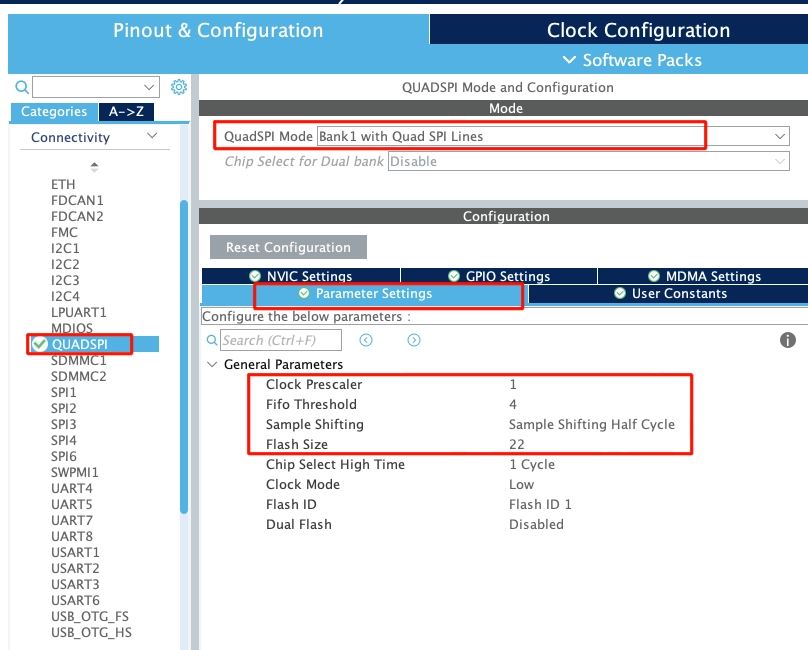
- The Prescaler of 1 (actually the value 2) will reduce the QuadSPI clock to 100MHz. (200MHz/2)
- Set the fifo threshold to 4, and the sample shifting to half cycle.
The flash size is based on the size of the external flash you are using. It can be calculated using the formula below.
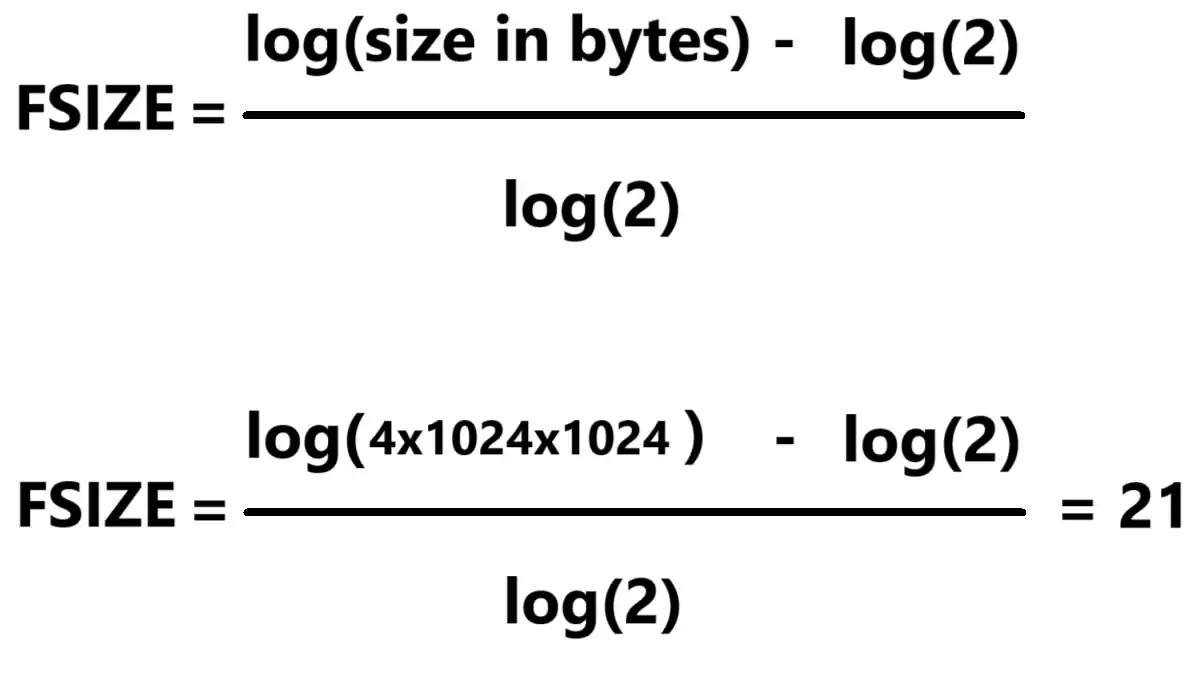
The board has the W25Q64 flash which is 8MB in size. As per the calculation, the Flash size will be 22.
The pins are configured as per the schematic, as I mentioned in the beginning of this tutorial.
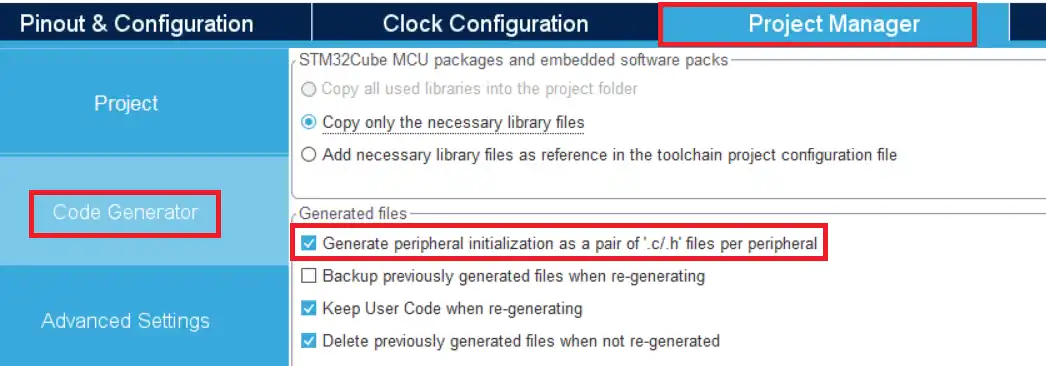
Also make sure to check the box shown below to generate the separate files for the peripherals.
Finally we will configure the MPU.
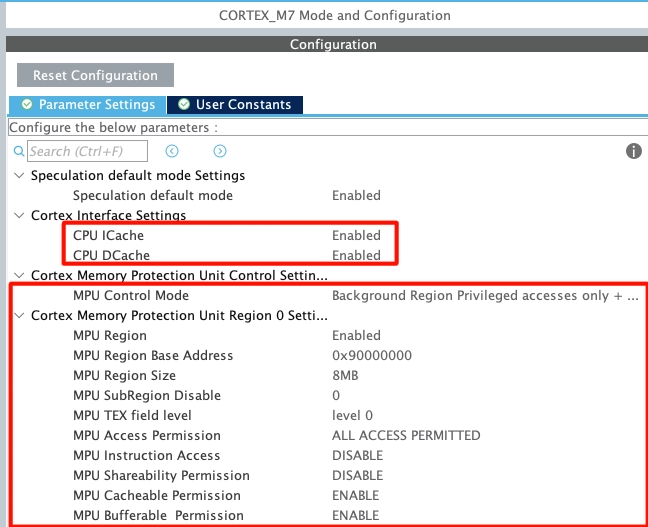
I have enabled both DCache and ICache. Enabling the cache is important as it improves the system performance by a significant amount.
The MPU is configured in the DEFAULT MODE.
- The Base Address for the first Region is set to 0x90000000 (QSPI address) with the region size of 8MB (The Memory Size).
- All access are permitted in this region with instruction access being disabled.
- The region is set as cacheable and bufferable, but not shareable.
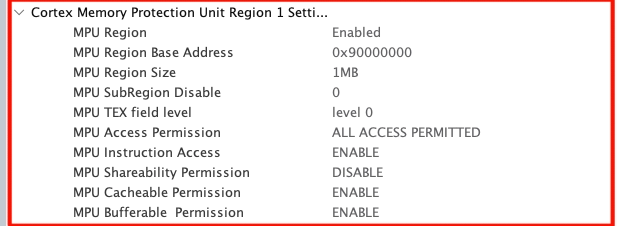
- We define another region of 1MB inside the first one, with the same start address 0x90000000.
- All access are permitted in this region with instruction access being Enabled.
- The region is set as cacheable and bufferable, but not shareable.
Some Additional Process
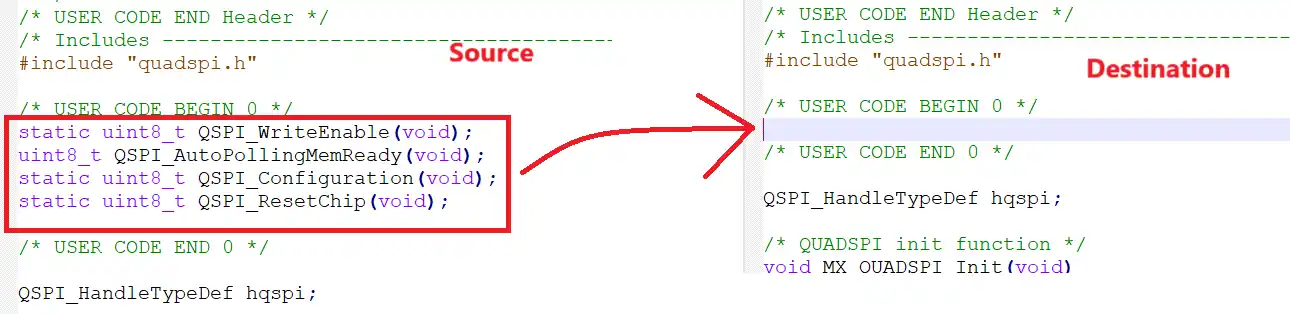
I have modified the ST’s quadSPI library files so that they can be used with the W25Q series nor flash memories. You can get the files by downloading the project at the end of this post.
You need to copy the code inside the /* USER CODE BEGIN 0 */ and /* USER CODE END 0 */ in the respective position in the quadspi.c file.
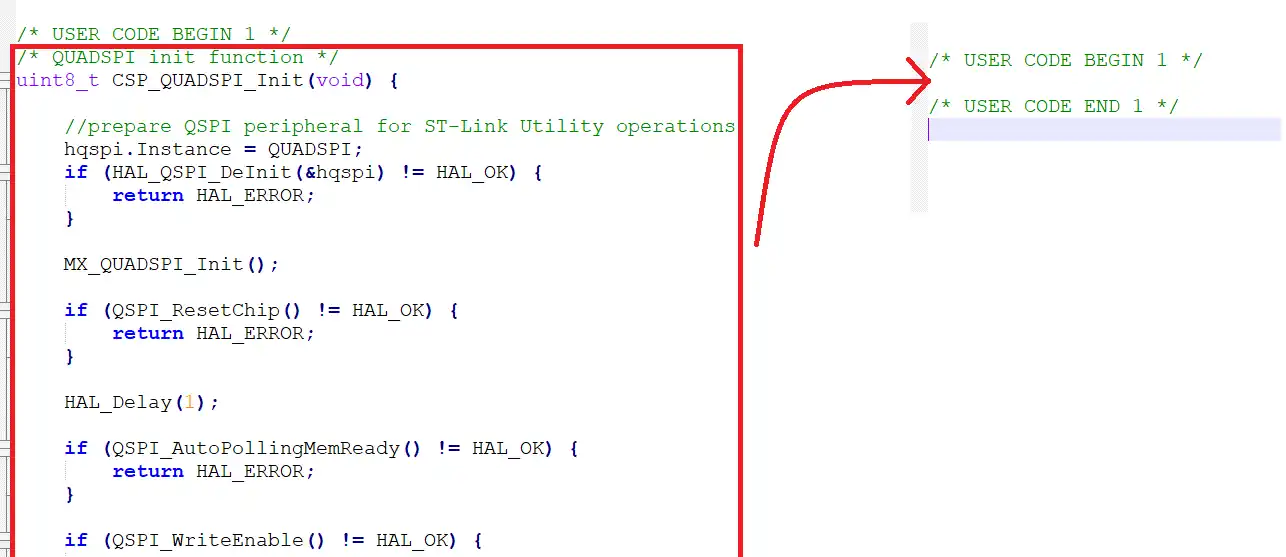
Similarly copy the code inside the /* USER CODE BEGIN 1 */ and /* USER CODE END 1 */ to the respective position.
Also replace the content of the quadspi.h file.
Since we are using W25Q64, we need to change the MEMORY FLASH SIZE to 8MB.

I have defined the MEMORY SIZE of 8MB for the W25Q64.
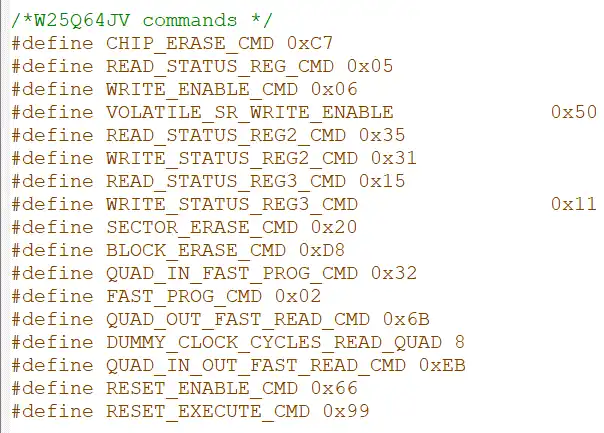
Also cross check the commands defined with the datasheet of the memory.
The Code
Below is the code from the main file.
/* USER CODE BEGIN 0 */
typedef  void (*pFunction)(void);
pFunction JumpToApplication;

#define APPLICATION_ADDRESS 0x90000000U
/* USER CODE END 0 */We first define the function that will make the jump to the external flash memory. The Application address is defined as 0x90000000. This is the address where the application is going to be stored and it should be the same address as the QSPI.
  /* USER CODE BEGIN 2 */
  CSP_QUADSPI_Init();
  CSP_QSPI_EnableMemoryMappedMode();

  // Disable the cache
  SCB_DisableDCache();
  SCB_DisableICache();

  // Disable the systick interrupt
  SysTick->CTRL = 0;

  /* Initialize user application's Stack Pointer & Jump to user application */
  JumpToApplication = (pFunction) (*(__IO uint32_t*) (APPLICATION_ADDRESS + 4));  // Reset Handler
  __set_MSP(*(__IO uint32_t*) APPLICATION_ADDRESS);   // stack pointer
  JumpToApplication();	  // make the jump
/* USER CODE END 2 */- Inside the main function we will initialize the QuadSPI and set the memory in the memory mapped mode.
- Then Disable the cache and also disable the SysTick interrupt.
- Then we will set the offset for the reset handler in he application address.
- Then set the stack pointer and finally call the JumpToApplication function to make the jump.
NOTE:- If you are debugging this project, after making the Jump the control should enter the Hardfault handler. This is obvious because there is no code in the external flash memory. Although if there is some application stored in the external flash, it will automatically start running.
Project running on External Flash
Now that we have made the jump to the external flash memory, let’s create another project that will run from this external flash. To keep the things simplified, I will make a simple project to blink the LED. This project will be stored in the external flash memory.
CubeMX Configuration
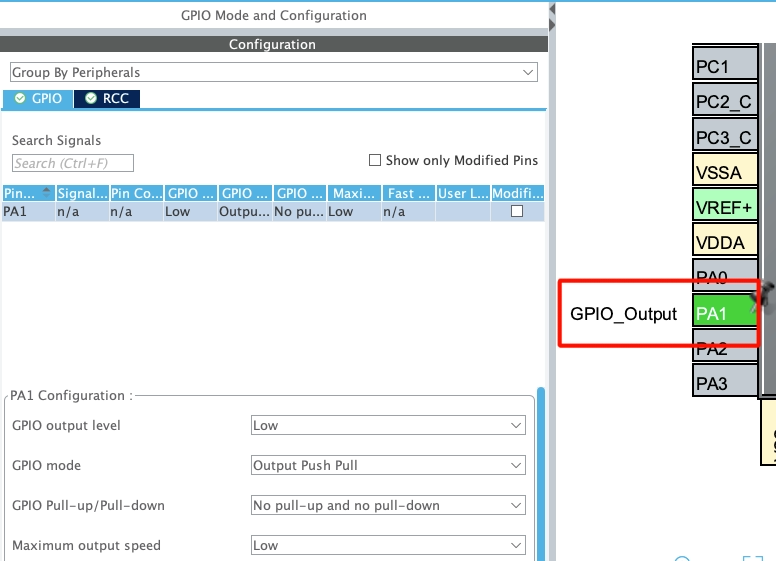
The LED on board is connected to the pin PA1, hence the PA1 is set as output.
The MPU should be configured the same as we did in previous project.
I have enabled both DCache and ICache. Enabling the cache is important as it improves the system performance by a significant amount.
The MPU is configured in the DEFAULT MODE.
- The Base Address for the first Region is set to 0x90000000 (QSPI address) with the region size of 8MB (The Memory Size).
- All access are permitted in this region with instruction access being disabled.
- The region is set as cacheable and bufferable, but not shareable.
- We define another region of 1MB inside the first one, with the same start address 0x90000000.
- All access are permitted in this region with instruction access being Enabled.
- The region is set as cacheable and bufferable, but not shareable.
Some Additional Configuration
Once the project is generated, open the ****_FLASH.ld file and modify the FLASH area as shown below.
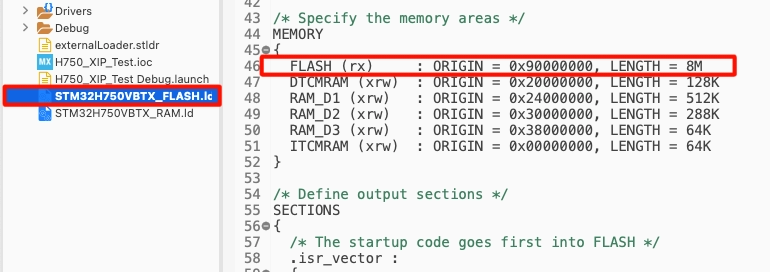
Here we will relocate the FLASH to QSPI (0x90000000) with the size equals to 8MB.
Now open the System_stm32H7xx.c file. Scroll down to SystemInit() function, and add the following at the end of the file.
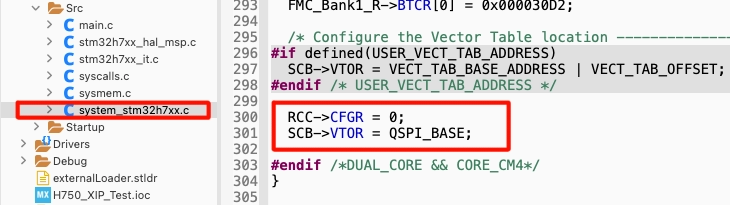
Here we will first reset the configuration register and then set the Vector Table Offset Register to the QSPI Address (0x90000000), this is where our FLASH is located now.
The Code
There is not much to do i the main function. We will simply toggle the LED every 1 second inside the while loop.
  while (1)
  {
    /* USER CODE END WHILE */

    /* USER CODE BEGIN 3 */
	  HAL_GPIO_TogglePin(GPIOA, GPIO_PIN_1);
	  HAL_Delay(1000);
}Result
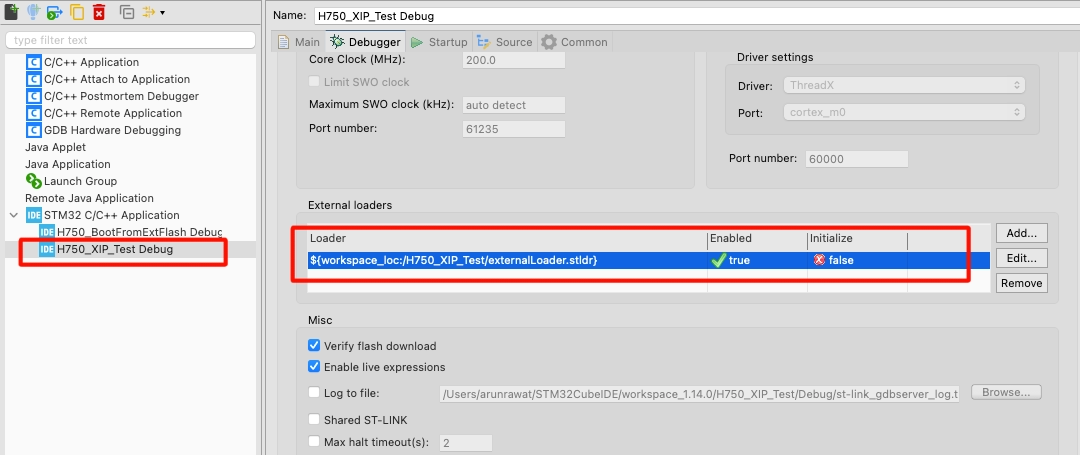
Since the FLASH is located in the external memory, we need the external loader to write the data to it. Make sure to add the external loader in the debug configuration.
Below is the gif file showing the LED blinking every 1 second.

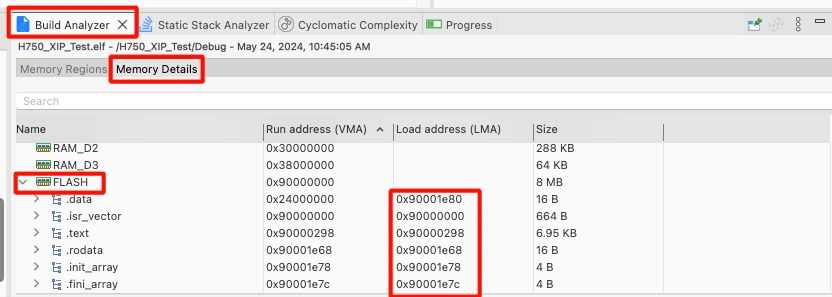
You can also check the memory details in the build analyzer. The FLASH contents has now been located to the address starting from 0x90000000.
STM32 W25Q Flash Tutorials Series
W25Q Flash Series Part 5 – how to update sectors

W25Q Flash Series Part 6 – Integers floats and 32bit Data

W25Q Flash Series Part 7 – QUADSPI Write, Read, Memory Mapped mode

W25Q Flash Series Part 8 – QUADSPI External Loader
W25Q Flash Series Part 9 – SPI Flash Loader

W25Q Flash Series Part 10 – QSPI & Ext Loader in H750

LVGL on STM32 || PART7 || Load LVGL from Ext Flash


Hi,
I am using the STM32H745I-DISCO board and trying to boot an application from the external QSPI flash (MT25QL512ABB).
For this purpose, I created two separate projects:
After building the application, I generated the .bin file and programmed it into the QSPI flash using STM32CubeProgrammer.
When I read back the contents from address 0x90000000 using CubeProgrammer, I can see valid data programmed in the flash (screenshot attached).
However, while debugging the bootloader, I observed the following issues:
I have attached the bootloader project, application project, and screenshots for reference.
Could you please review the projects and help identify the issue? This is an urgent requirement, and your assistance would be greatly appreciated.
Thank you.
Refer to this repo for STM32H745 XIP https://github.com/controllerstech/STM32-HAL/tree/master/QSPI/MT25TLxxx
I have prepared test projects. You can also download and check them..
https://cdn.shopify.com/s/files/1/0798/6901/8399/files/H745_QSPI_XIP.zip?v=1780738444
Hi, you did a great job! I have a question. I try to do a XIP project on the same board as you, but i have H743 MCU instead of H750. I have a problem with MPU. When I try to configure MPU like you and generate the code – WARNING appear (screenshot). I did all the steps as you did, but the program from the external memory does not start after reset. Perhaps the MPU configuration is to blame, since it does not allow executing code from the external memory area. At the same time, I am sure of the correctness of the external bootloader, since I checked it according to your previous lessons, and I can also see the filled bytes of the external memory via STM32CubeProgrammer. I really hope that you can suggest me a solution.
Seems like some parameters are not configured properly. Obviously the code will not run like this. Go back to cubeMX and see where is the warning sign being displayed.
The error message points to the CORTEX_M7 section. I configure it as in the picture. The message appears when I enable the second 1 MPU region. All other regions are disabled, MPU control mode default.
I want to add on the screenshot an error in region 0 subregion disable is 0 instead of 0x87. One way or another, the application from the external flash does not start after reset
configure both sub regions as 0
I still get a warning about incomplete or incorrect CORTEX_M7 configuration with these parameters.
I solved the problem with the warning by updating the software. But despite this, my program does not start. I checked the bootloader operation using STM32CubeProgrammer. Its working well. From the debug, it is clear that the reset handler is located in the external memory area, while the program does not go further and the IBUSERR bit = 0x1 in the CFSR register. Please can you give me any ideas to solve this problem.