
Home ▸ STM32 Tutorials ▸ LWIP Ethernet ▸
Published: September 4, 2021
Last Updated: March 26, 2026
Last Updated: March 26, 2026
How to Configure an STM32 TCP Client Using lwIP Raw API
This is Part 5 of the STM32 Ethernet series. In the last tutorial, we built a TCP Server where the STM32 sat and waited for a client to connect. Now we flip that around. This time, the STM32 is the TCP Client. It connects to a server, sends data periodically, and updates its state based on what the server replies.
We will use the lwIP Raw API again. Same callback-driven approach, but the flow is slightly different. Instead of binding and listening, we just create a PCB and call tcp_connect(). After that, the callbacks take over.
I am using Hercules on the PC as the TCP Server to test this. The STM32 connects to it, and every second it sends a message with an incrementing counter.
If you haven’t gone through the previous parts yet, I’d suggest starting from Part 1. The CubeMX setup and Ethernet configuration are all covered there.
What You Need Before Getting Started
Before we dive into the code, let me quickly cover what this tutorial assumes and what setup you need.
Prerequisites and Prior Tutorials
This tutorial is part of the STM32 Ethernet series. We build on top of what was already covered. So make sure you have gone through these first:
- Part 1 – Hardware setup and LWIP ping test
- Part 2 – UDP Server
- Part 3 – UDP Client
- Part 4 – TCP Server
You should already have a working Ethernet connection on your STM32 before starting here. If ping is not working, go back to Part 1 and sort that out first. The TCP server will not work if the basic connection is broken.
Also, make sure you are comfortable with how callbacks work in lwIP. The Raw API is entirely callback-driven. You do not call functions and wait for a response. Instead the lwIP calls your functions when something happens. We will see this in detail as we go through the code.
CubeMX Configuration for Ethernet and lwIP
The CubeMX setup is the same as the previous tutorials. I am not going to repeat it all here, check Part 1 for the detailed walkthrough.
The images below show the key settings you need to have in place.
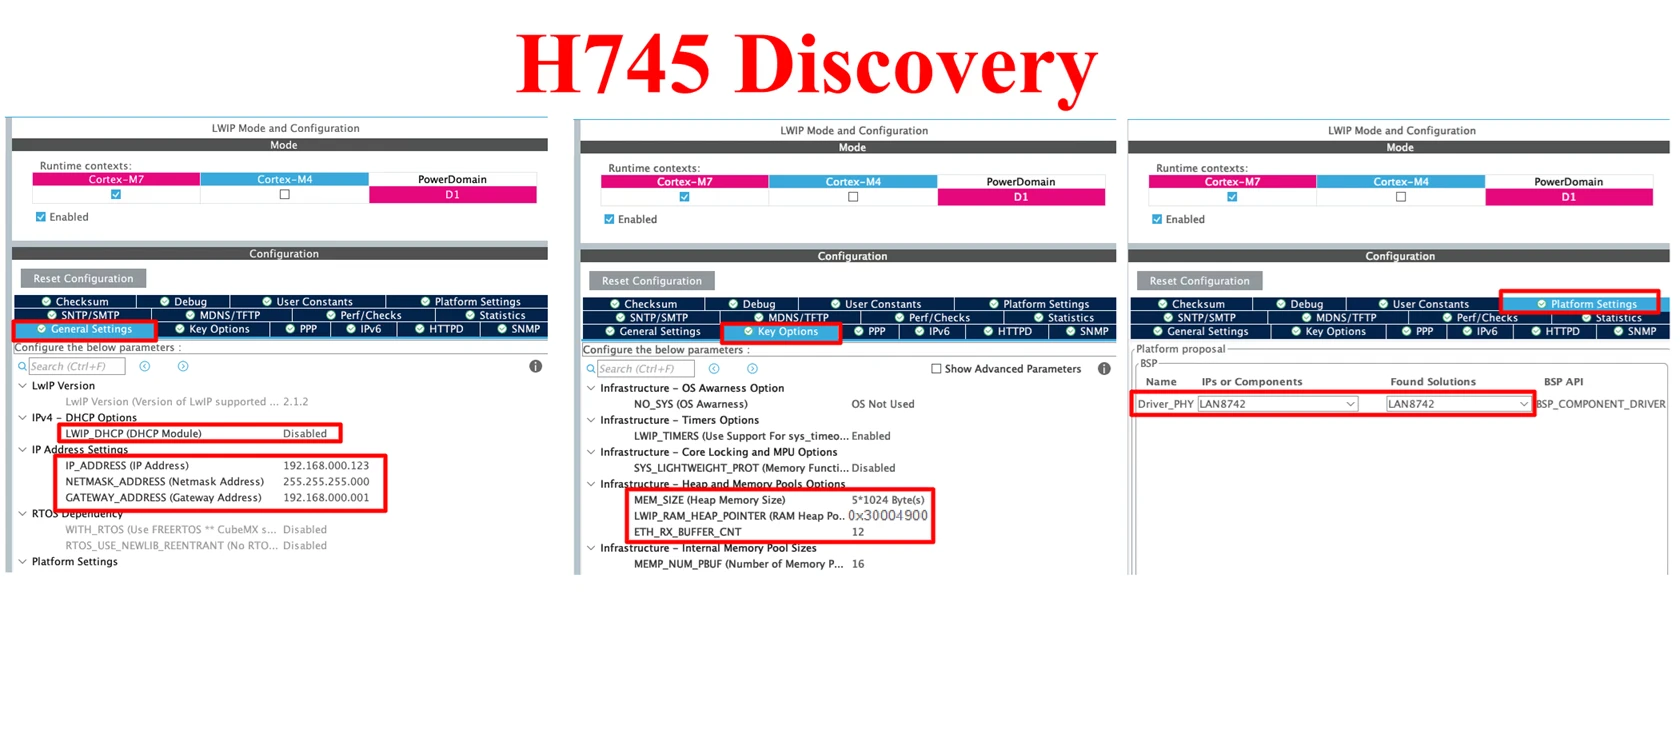
A few things to double-check before moving on. Make sure lwIP is enabled under Middleware, and the Ethernet peripheral is properly configured for your board. Also confirm your IP address settings. In our code, we will bind the server to 192.168.0.123 on port 7. So your CubeMX IP should match that.
How the STM32 TCP Client Works
The TCP Server needed four steps — create a PCB, bind, listen, and accept. The client is simpler. We only need two steps here. Create a PCB and connect to the server. No binding, no listening.
lwIP handles the TCP handshake in the background. When the connection is established, it calls our connected callback automatically.
Step 1 – Create a New TCP PCB
Every TCP connection in lwIP starts with a Protocol Control Block. The PCB is a structure that holds everything about the connection: the IP addresses, port numbers, state, callbacks, and more.
We create one like this:
struct tcp_pcb *tpcb;
tpcb = tcp_new();tcp_new() allocates a PCB and returns a pointer to it. We use this pointer in every step that follows.
This is identical to what we did in the TCP Server. The difference starts in the next step.
Step 2 – Connect to the Server
Instead of binding and listening, we call tcp_connect(). This is what makes the STM32 act as a client.
ip_addr_t destIPADDR;
IP_ADDR4(&destIPADDR, 192, 168, 0, 100);
tcp_connect(tpcb, &destIPADDR, 31, tcp_client_connected);Let’s break this down:
IP_ADDR4(&destIPADDR, 192, 168, 0, 100)— this sets the destination IP to192.168.0.100. That’s the PC running Hercules as a TCP Server in our test setup.31— this is the port number the server is listening on. We set Hercules to listen on port31.tcp_client_connected— this is the callback function lwIP will call once the three-way TCP handshake completes and the connection is established.
The function tcp_connect() is non-blocking. It sends the SYN packet and returns immediately. lwIP handles the handshake in the background and fires the callback when it’s done.
One thing worth noting — unlike tcp_bind(), there is no error check needed right here. If the connection fails (server not reachable, port closed, etc.), lwIP handles it through the error callback we register later. For now, we just fire the connect request and move on.
These two steps are the entire setup for the TCP Client. The rest of the work happens inside tcp_client_connected and the callbacks that follow.
Initializing the TCP Client in STM32 lwIP
The init function is where we put the two steps together. We create the PCB, set the destination IP and port, and call tcp_connect(). This function is called once at startup.
Writing the tcp_client_init() Function
We start by creating the PCB:
struct tcp_pcb *tpcb;
tpcb = tcp_new();Then we set the destination IP and connect, but before that we should also check if tcp_new() returned a valid pointer. If it returns NULL, there’s no point calling tcp_connect(). We add a simple check for that:
if (tpcb != NULL)
{
ip_addr_t destIPADDR;
IP_ADDR4(&destIPADDR, 192, 168, 0, 100);
tcp_connect(tpcb, &destIPADDR, 31, tcp_client_connected);
}Here is the full tcp_client_init() function:
void tcp_client_init(void)
{
/* 1. Create new TCP PCB */
struct tcp_pcb *tpcb;
tpcb = tcp_new();
/* 2. Connect to the server */
if (tpcb != NULL)
{
ip_addr_t destIPADDR;
IP_ADDR4(&destIPADDR, 192, 168, 0, 100);
tcp_connect(tpcb, &destIPADDR, 31, tcp_client_connected);
}
}We call this function once in main.c after the lwIP stack is initialized. As soon as tcp_connect() runs, lwIP sends the SYN packet to the server. When the server responds and the handshake completes, tcp_client_connected is called automatically.
Handling the Connected Callback in lwIP TCP Client
When the STM32 successfully connects to the server, lwIP calls tcp_client_connected. This is where we set up the rest of the callback chain and prepare the connection state structure.
Setting Up tcp_client_connected()
The first thing we do is allocate memory for tcp_client_struct. This structure holds everything we need to track the connection — the state, the PCB pointer, and the data buffer.
es = (struct tcp_client_struct *)mem_malloc(sizeof(struct tcp_client_struct));If the allocation succeeds, we fill in the fields:
es->state = ES_CONNECTED;
es->pcb = newpcb;
es->retries = 0;
es->p = NULL;We set the state to ES_CONNECTED right away. The p field is NULL for now — it gets filled when data arrives from the server. We also pass es as an argument to the PCB so all subsequent callbacks have access to it:
tcp_arg(newpcb, es);If the allocation fails, we close the connection and return ERR_MEM:
tcp_client_connection_close(newpcb, es);
ret_err = ERR_MEM;Registering the Receive, Poll and Sent Callbacks
After the structure is ready, we register three callbacks:
tcp_recv(newpcb, tcp_client_recv);
tcp_poll(newpcb, tcp_client_poll, 0);
tcp_sent(newpcb, tcp_client_sent);tcp_recv— lwIP calls this whenever data arrives from the server. This is where we handle incoming data.tcp_poll— lwIP calls this periodically. It handles retries and timeouts in the background.tcp_sent— lwIP calls this after our data is successfully acknowledged by the server.
We should leave tcp_poll and tcp_sent as they are. They handle internal lwIP mechanics. The only one we need to work with is tcp_recv.
After registering the callbacks, we call tcp_client_handle() immediately. This sends the first message to the server right after the connection is established.
tcp_client_handle(newpcb, es, NULL);Full Connected Callback Code
static err_t tcp_client_connected(void *arg, struct tcp_pcb *newpcb, err_t err)
{
err_t ret_err;
struct tcp_client_struct *es;
LWIP_UNUSED_ARG(arg);
LWIP_UNUSED_ARG(err);
/* Allocate structure to maintain connection info */
es = (struct tcp_client_struct *)mem_malloc(sizeof(struct tcp_client_struct));
if (es != NULL)
{
es->state = ES_CONNECTED;
es->pcb = newpcb;
es->retries = 0;
es->p = NULL;
/* Pass es structure to all subsequent callbacks */
tcp_arg(newpcb, es);
/* Register receive callback */
tcp_recv(newpcb, tcp_client_recv);
/* Register poll callback */
tcp_poll(newpcb, tcp_client_poll, 0);
/* Register sent callback */
tcp_sent(newpcb, tcp_client_sent);
/* Send the first message to the server */
tcp_client_handle(newpcb, es, NULL);
ret_err = ERR_OK;
}
else
{
/* Close connection on memory failure */
tcp_client_connection_close(newpcb, es);
ret_err = ERR_MEM;
}
return ret_err;
}Once this returns ERR_OK, the connection is fully set up. lwIP will now call tcp_client_recv every time the server sends data.
Receiving Data from the TCP Server
Every time the server sends data, lwIP calls tcp_client_recv. This function handles several different situations depending on the connection state and what arrived in the buffer.
Understanding the tcp_client_recv() Function
The function receives a pbuf *p argument. This carries the incoming data. The first thing we check is whether p is NULL. A NULL pbuf means the server closed the connection.
if (p == NULL)
{
    es->state = ES_CLOSING;
    if (es->p == NULL)
    {
        tcp_client_connection_close(tpcb, es);
    }
    else
    {
        tcp_sent(tpcb, tcp_client_sent);
        tcp_client_send(tpcb, es);
    }
    ret_err = ERR_OK;
}We set the state to ES_CLOSING. If there is no pending data left to send, we close the connection immediately. Otherwise we send the remaining data first, then close.
If p is not NULL but err is not ERR_OK, something went wrong. We free the buffer and return the error:
else if (err != ERR_OK)
{
if (p != NULL)
{
es->p = NULL;
pbuf_free(p);
}
ret_err = err;
}The important block is when the state is ES_CONNECTED and valid data arrives. This is the normal data receive path:
else if (es->state == ES_CONNECTED)
{
/* Acknowledge the received data */
tcp_recved(tpcb, p->tot_len); /* Handle the received data */
tcp_client_handle(tpcb, es, p); /* Free the received buffer */
pbuf_free(p); ret_err = ERR_OK;
}A few things to note here:
- We call
tcp_recved()to tell lwIP we have processed the data. This is important — it updates the TCP receive window. Skipping this will eventually cause the server to stop sending. - We pass the received buffer directly to
tcp_client_handle()for processing. This is the only function we need to modify for custom logic. - After processing, we free the buffer with
pbuf_free().
For any other state — like when the connection is already closing — we discard the incoming data and free the buffer:
else
{
tcp_recved(tpcb, p->tot_len);
es->p = NULL;
pbuf_free(p);
ret_err = ERR_OK;
}Full Receive Callback Code
static err_t tcp_client_recv(void *arg, struct tcp_pcb *tpcb, struct pbuf *p, err_t err)
{
struct tcp_client_struct *es;
err_t ret_err;
LWIP_ASSERT("arg != NULL", arg != NULL);
es = (struct tcp_client_struct *)arg;
/* Server closed the connection */
if (p == NULL)
{
    es->state = ES_CLOSING;
    if (es->p == NULL)
    {
        tcp_client_connection_close(tpcb, es);
    }
    else
    {
        tcp_sent(tpcb, tcp_client_sent);
        tcp_client_send(tpcb, es);
    }
    ret_err = ERR_OK;
}
/* Error on receive */
else if (err != ERR_OK)
{
    if (p != NULL)
    {
        es->p = NULL;
        pbuf_free(p);
    }
    ret_err = err;
}
/* Data received while connected */
else if (es->state == ES_CONNECTED)
{
/* Acknowledge the received data */
tcp_recved(tpcb, p->tot_len);
/* Handle the received data */
tcp_client_handle(tpcb, es, p);
pbuf_free(p);
ret_err = ERR_OK;
}
/* Any other state - discard data */
else
{
    tcp_recved(tpcb, p->tot_len);
    es->p = NULL;
    pbuf_free(p);
    ret_err = ERR_OK;
}
return ret_err;
}We should keep this function as it is and only put our custom logic inside tcp_client_handle(). We cover that in the next section.
Processing the Incoming Server Data
tcp_client_handle() is the function we customize. Everything before this — the init, the connected callback, the receive callback — is just setup. This is where we actually work with the data.
Writing the tcp_client_handle() Function
First, we extract the server’s IP address and port from the PCB:
ip4_addr_t inIP = tpcb->remote_ip;
uint16_t inPort = tpcb->remote_port;
char *remIP = ipaddr_ntoa(&inIP);The IP is stored as an integer inside the PCB. ipaddr_ntoa() converts it into a readable string like 192.168.0.100. This is useful for logging or debugging.
Next, we process the received data:
if (p != NULL)
{
memcpy(rx_buffer, p->payload, p->len);
rx_buffer[p->len] = '\0';
}The received data is available in p->payload. We copy it into a local buffer so we can use it later. This allows us to parse the data, compare it, or print it over UART.
Then, we store the PCB and the es structure into global variables:
esTx = es;
pcbTx = tpcb;We need these globally because the timer callback runs outside the lwIP callback chain. The timer needs access to the PCB and the structure to send data, and the only way to pass them there is through globals.
Finally, we increment the counter:
counter++;This counter is what we send to the server every second from the timer. It only increments when the server sends us data. So if the server stops responding, the counter freezes and the client keeps sending the same value. This gives us a simple way to see whether the server is actively communicating.
Full Handle Function Code
static void tcp_client_handle(struct tcp_pcb *tpcb, struct tcp_client_struct *es, struct pbuf *p)
{
/* Get the remote IP and port */
ip4_addr_t inIP = tpcb->remote_ip;
uint16_t inPort = tpcb->remote_port;
char *remIP = ipaddr_ntoa(&inIP);
/* store the received data for later use */
if (p != NULL)
{
    memcpy(rx_buffer, p->payload, p->len);
    rx_buffer[p->len] = '\0';
}
/* Store globally for use in the timer callback */
esTx = es;
pcbTx = tpcb;
/* Increment counter each time server sends data */
if (p != NULL)
{
counter++;
}
}This is the only function we need to modify when building on top of this example. The rest of the callback structure stays the same. If we want to send sensor readings, parse a command, or trigger a GPIO based on what the server sends — we do it here.
Sending Data to the TCP Server Periodically
We use a hardware timer to send data every second. The timer fires an interrupt, and inside the callback we build the message and send it to the server.
Using a Timer Callback to Send Data
We format the message first. We merge the counter value into a string using sprintf:
char buf[100];
int len = sprintf(buf, "Sending TCPclient Message %d\n", counter);Then we check if counter is not zero before sending. A zero counter means the client has not received anything from the server yet — so there is no valid esTx or pcbTx to use:
if (counter != 0)
{
    ...
}Inside the check, we allocate a pbuf, copy our string into it, send it, then free the buffer:
esTx->p = pbuf_alloc(PBUF_TRANSPORT, len, PBUF_POOL);
pbuf_take(esTx->p, (char *)buf, len);
tcp_client_send(pcbTx, esTx);Here is what each function does:
pbuf_alloc— allocates memory for the outgoing buffer. We usePBUF_TRANSPORTandPBUF_POOLfor TCP data.pbuf_take— copies our string into the pbuf payload.tcp_client_send— sends the pbuf to the server through the PCB.
Full Timer Callback Code
oid HAL_TIM_PeriodElapsedCallback(TIM_HandleTypeDef *htim)
{
    char buf[100];

    /* Format the message with the current counter value */
    int len = sprintf(buf, "Sending TCPclient Message %d\n", counter);

    if (esTx == NULL || pcbTx == NULL)
        return;

    /* Only send if the server has responded at least once */
    if (counter != 0)
    {
    	if (esTx->p != NULL) return;

        /* Allocate pbuf */
        esTx->p = pbuf_alloc(PBUF_TRANSPORT, len, PBUF_POOL);

        if (esTx->p == NULL) return;

        /* Copy data into pbuf */
        pbuf_take(esTx->p, (char *)buf, len);

        /* Send to server */
        tcp_client_send(pcbTx, esTx);
    }
}The counter only increments when the server sends data. So if the server goes silent, the counter stays the same and the client keeps sending the same value every second.
Calling the TCP Client from main.c
We call tcp_client_init() once after the lwIP stack is initialized. Then we keep calling MX_LWIP_Process() inside the main loop.
/* USER CODE BEGIN 2 */
tcp_client_init();
/* USER CODE END 2 */

while (1)
{
    /* USER CODE BEGIN 3 */
    MX_LWIP_Process();
    /* USER CODE END 3 */
}MX_LWIP_Process() drives the entire lwIP stack. It processes incoming and outgoing packets, handles retransmissions, and fires the callbacks. It must run continuously. Without it, nothing moves — the client will connect but never receive or send anything.
We also need to start the timer so the periodic send works. Add this before the main loop as well:
/* USER CODE BEGIN 2 */
tcp_client_init();
HAL_TIM_Base_Start_IT(&htim6);
/* USER CODE END 2 */Replace htim6 with whatever timer you configured in CubeMX. This starts the timer interrupt that drives HAL_TIM_PeriodElapsedCallback every second.
That is all we need in main.c. The callbacks handle everything else automatically.
Testing the STM32 TCP Client with Hercules
We use Hercules on the PC as the TCP Server. The STM32 connects to it, and we can see the messages coming in every second.
Setting Up Hercules as a TCP Server
Open Hercules and go to the TCP Server tab. Set it up as follows:
- Set Port to
31 - Click Listen
Hercules is now waiting for a connection. Flash the code to the STM32 and power it up. The STM32 runs tcp_client_init(), sends a SYN packet to 192.168.0.100 on port 31, and the connection is established.
At this point the timer is already running. But the client won’t send anything yet, remember the counter is still 0. The timer callback checks for that and skips the send.
To get the counter moving, we need to send something from Hercules to the STM32. Type any message in the send field and click Send. The STM32 receives it, tcp_client_recv fires, tcp_client_handle runs, and the counter increments to 1.
From that point, the client sends "Sending TCPclient Message 1" every second. Every time we send another message from Hercules, the counter goes up by one and the next messages reflect the new value.
Output
The image below shows the STM32 TCP Client communicating with Hercules acting as the TCP Server.
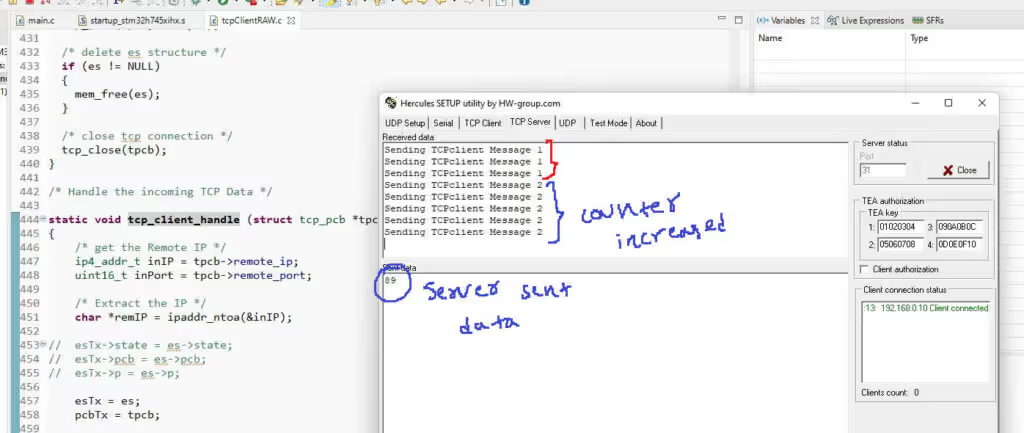
The client was sending the same counter value every second. As soon as Hercules sent data to the STM32, the counter incremented and the outgoing messages updated immediately.
Video Tutorial
STM32 TCP Client Video Tutorial
This STM32 TCP Client tutorial shows you the complete code and testing process in action. I walk you through the tcp_client_init function, the connected callback, the receive callback, and the handle function step by step. Watch the video and follow the written guide together to easily set up a TCP Client and test it with Hercules acting as the server.
Watch the TCP Client TutorialConclusion
In this tutorial, we built a TCP Client on STM32 using the lwIP Raw API. We covered the full setup — from creating the PCB and connecting to a remote server, to handling the connection through callbacks. We also wrote a timer-driven send function that pushes data to the server every second.
The key difference between the TCP Client and the TCP Server is how the connection starts. The server binds and waits. The client just calls tcp_connect() and lwIP handles the rest. The callback structure is very similar after that — the same pattern of registering tcp_recv, tcp_poll, and tcp_sent applies to both.
If you want to build on top of this, tcp_client_handle() and the timer callback are the two places to focus on. The handle function is where we process incoming server data, and the timer is where we decide what to send and when. Everything else stays the same. In the next tutorial, we will look at building a simple HTTP Web Server on the STM32.
Check out more STM32 Ethernet Tutorials

STM32 Ethernet PART 6.1 – Configure HTTP Webserver using SSI

STM32 Ethernet PART 6.2 – Configure HTTP Webserver using CGI

STM32 Ethernet PART 7 – UDP Server using LWIP NETCONN (RTOS)

STM32 Ethernet PART 8 – UDP Client using LWIP NETCONN (RTOS)

STM32 Ethernet PART 9 – TCP Server and Client using LWIP NETCONN (RTOS)

STM32 Ethernet PART 10 – HTTP Server (Basic) using LWIP NETCONN (RTOS)


Thanks a lot, this was too helpful.I just wanna point out one little issue with ur tcp_client_send, the fuction does not handle sending one message immediately.
For example, In a loop that goes from 0 to 9, it only sends 9 messages instead of 10, to overcome this issue, add the tcp_output() function call in case the next buffer is null.
Hello, thank you very much for the article. Can you give me advice on the 2 issues below?
1. I’m using freeRTOS, is there any problem using RawAPI? I know that the NetConn library needs FreeRTOS to run, but there is no documentation on whether RawAPI should run under FreeRTOS or not.
2. When my server disconnect with board and then reconnect again, client can’t connect. Why is that, what problem am I having?
Hope your answer from you.
Hi, what should I do for 8 different ports?
Hello, How can ı make with this code structure Modbus TCP client ? Thanks.
Hello, thank you for your tutorial. I have a qustion (maybe stupid, sorry for this) Where you apply ths functions,fro example tcp_client_recv() in main, if in cycle there is just
while (1)
{ethernetif_input(&gnetif);
sys_check_timeouts();
}
When we initialise the tcp_client (tcp_client_init ()), it basically binds the rest of the functions to their respective handles. Later the ethernet_if_input function calls the respective handle to handle the data.
Hello
I need to coming data from server. How can ı reach it
Thanks in advance
Thanks you so much
Thank you very much Sir.
Would you mind If I were to translate the information on your website into Thai language. for students to read together
sure. No problem
hi,not connect tcp client nucleof429zi?
5241 1885.190401 192.168.0.200 192.168.0.144 TCP 60 [TCP Retransmission] [TCP Port numbers reused] 52432 → 7 [SYN] Seq=0 Win=2144 Len=0 MSS=536
Hello, from where did you derive the TCPClientRAW code contained in this session?
ST’s examples provided along the firmware
Could you please provide an URL? Thanks in advance
URL for what ?