ST7735 1.8″ TFT Display with STM32
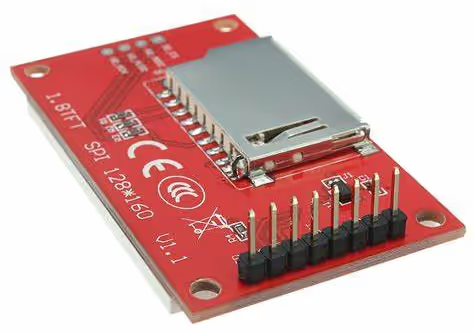
In this tutorial, I will cover how to interface ST7735 1.8″ TFT Display with STM32, and to do so, I will use the SPI peripheral of STM32.
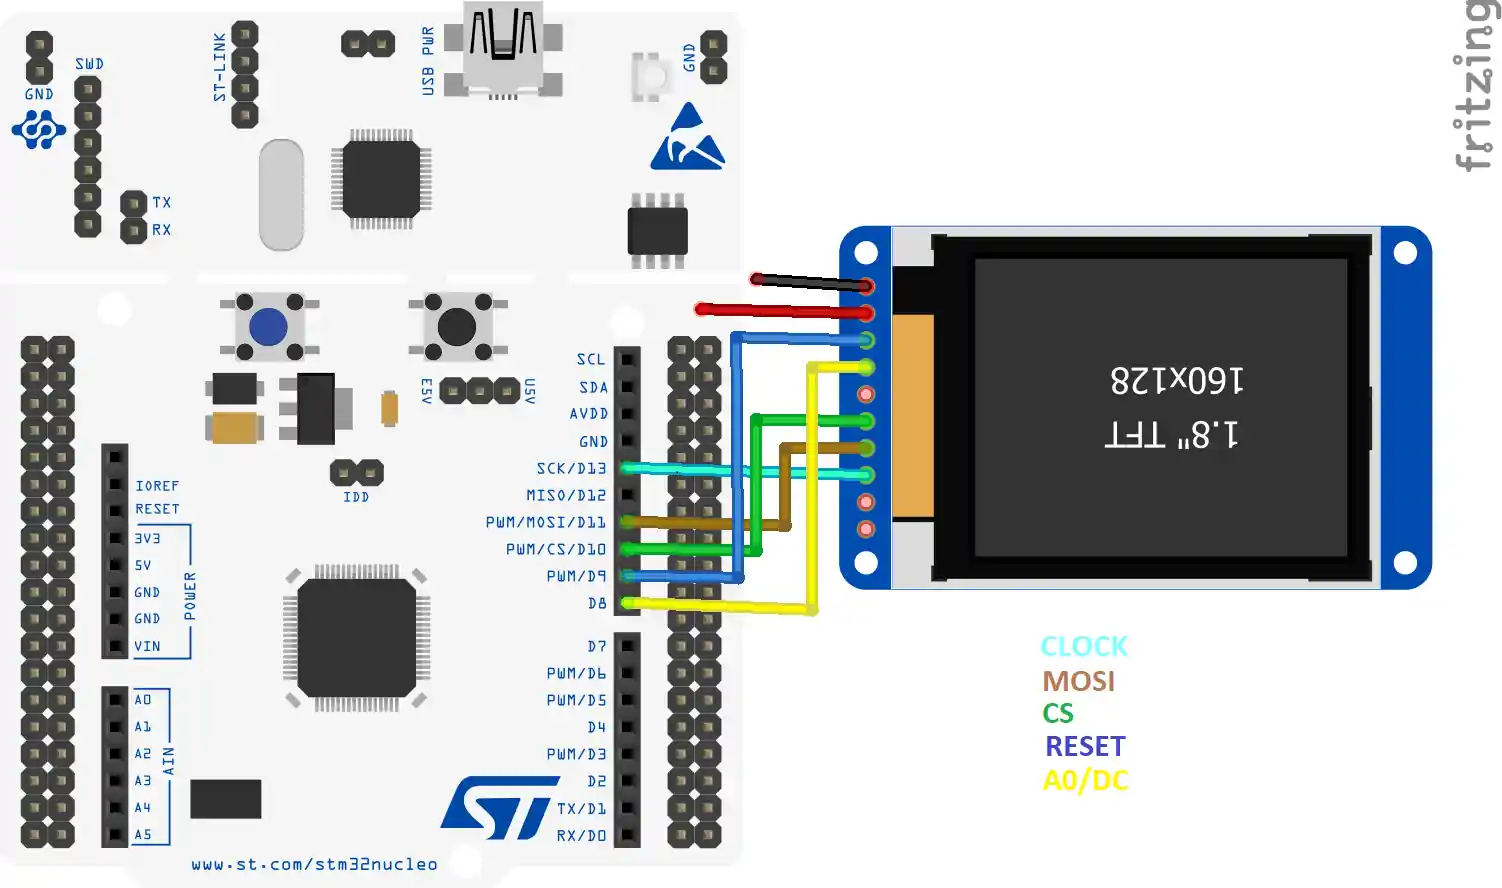
This particular display uses 8 pins for controlling the display, and the pins are shown below
1. LED :: Backlight -> Connect to 3.3V
2. SCK :: Serial clock input -> connect to SPI SCK pin
3. SDA :: Serial data input -> Connect to SPI MOSI pin
4. DC :: Data/Command selection -> Connect to PA9
5. RESET :: Reset -> Connect to PC7
6. CS :: Chip Select -> Connect to PB6
7. GND :: Ground -> GND
8. VCC :: Power Supply -> 3.3V
CubeMX Setup
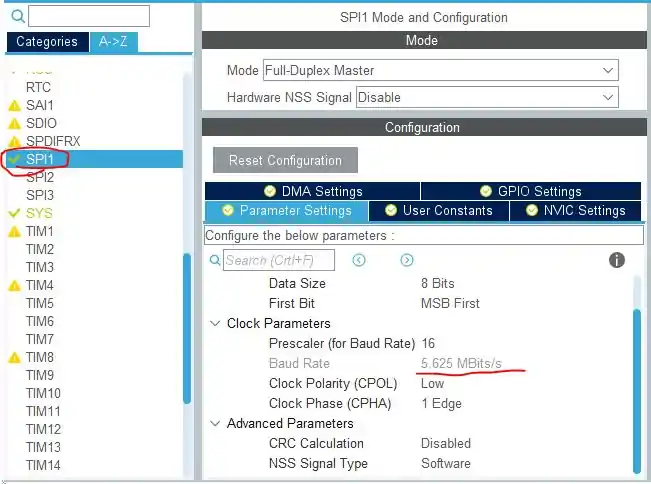
I have selected SPI for the purpose, and I am keeping the Baud Rate around 5 MB/s. You can test higher baud rates also.
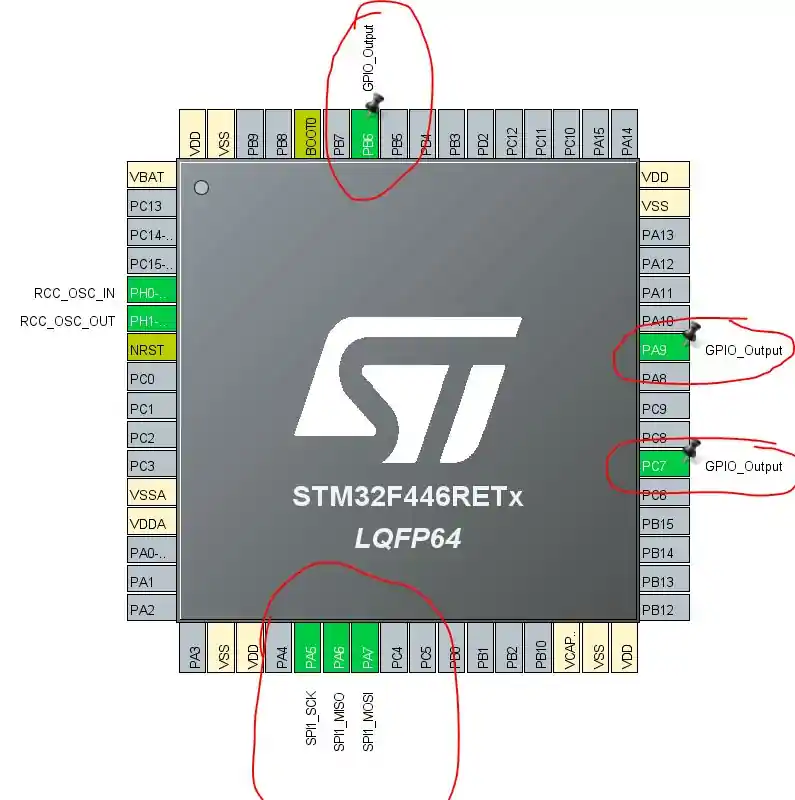
Other than SPI pins, we need to select three more pins as output. I have selected PB6 for CS, PC7 for RESET, and PA9 for DC. You are free to choose any other pins also, whatever suits the requirement
Other than this, you also need to include ST7735.h and ST7735.c in the project folder.
That’s all the setup needed here. Let’s take a look at some part of the code
Some Insight into the CODE
First of all we need to set the parameters according to our setup. All the changes needed to made are only in the ST7735.h file
extern SPI_HandleTypeDef hspi1;
#define ST7735_SPI_PORT hspi1
Change the SPI handler according to your setup
/****** PIN DEFINES ******/
#define CS_PORT GPIOB
#define CS_PIN  GPIO_PIN_6
#define DC_PORT GPIOA
#define DC_PIN  GPIO_PIN_9
#define RST_PORT GPIOC
#define RST_PIN  GPIO_PIN_7
If you are not using the default pins, Change them above
/****** TFT DEFINES ******/
//#define ST7735_IS_160X80 1
//#define ST7735_IS_128X128 1
#define ST7735_IS_160X128 1
#define ST7735_WIDTH  128
#define ST7735_HEIGHT 160
Also, if you have any other variant of ST7735, you need to uncomment the respective define above.
Change the width and the height parameters too
main function
int main ()
{
  HAL_Init();

  SystemClock_Config();

  MX_GPIO_Init();
  MX_SPI1_Init();

  ST7735_Init(0);
  fillScreen(BLACK);
  testAll();
  HAL_Delay(1000);

  while (1)
  {

  ST7735_SetRotation(0);
  ST7735_WriteString(0, 0, "HELLO", Font_11x18, RED,BLACK);
  HAL_Delay(1000);
  fillScreen(BLACK);

  ST7735_SetRotation(1);
  ST7735_WriteString(0, 0, "WORLD", Font_11x18, GREEN,BLACK);
  HAL_Delay(1000);
  fillScreen(BLACK);

  ST7735_SetRotation(2);
  ST7735_WriteString(0, 0, "FROM", Font_11x18, BLUE,BLACK);
  HAL_Delay(1000);
  fillScreen(BLACK);

  ST7735_SetRotation(3);
  ST7735_WriteString(0, 0, "ControllersTech", Font_16x26, YELLOW,BLACK);
  HAL_Delay(1000);
  fillScreen(BLACK);
  }
}
You can see the output of the above code in the result section

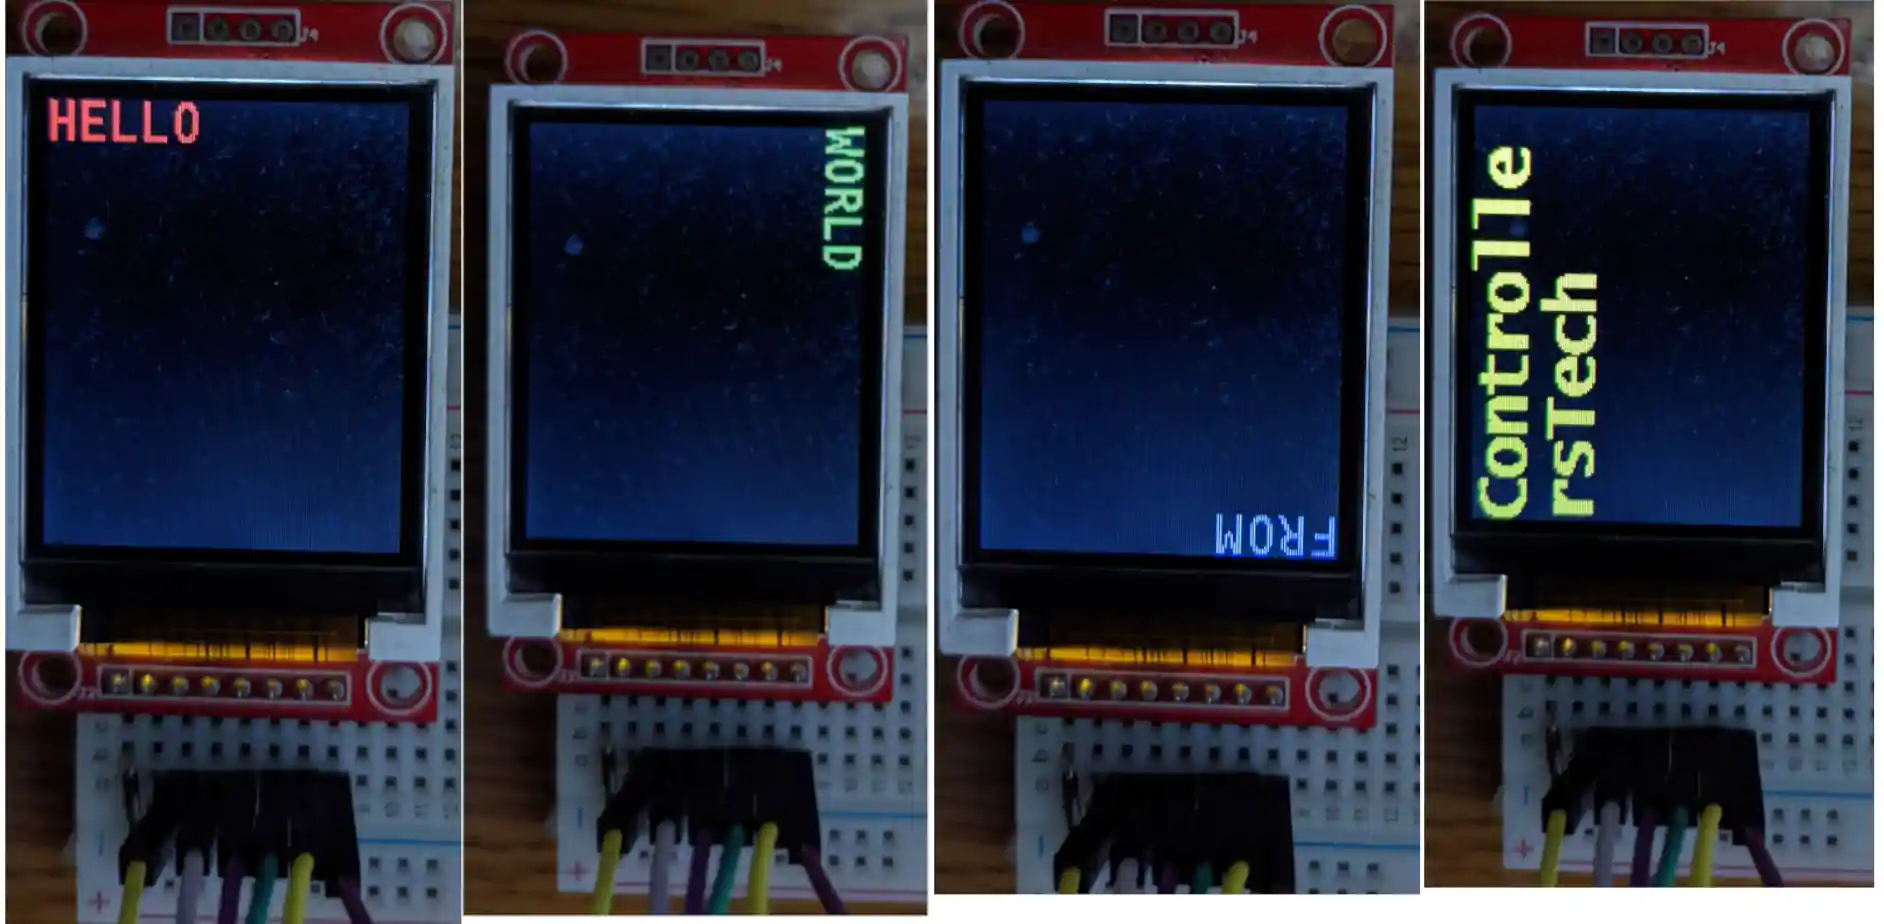


Hello,
is it possible to get the library to work with F746 board and 2,8″ ILI9341 display?
Canging #include to f7xx and display type in header file didn’t work out and I’m just getting white screen with some flickering.
Best regards
Hello,
i tried this library on the STM32F103C8T6 (bluepill) using SPI1 and Keil IDE, it has worked nicly.
For some reason i want to interface it with the bluepill but this time i am using SPI2 (SCK PB13, SDA PB15) but it does not work.
I have searched in the net for any solution i couldn’t find one.
Have you tried it on SPI2?
Hello, same Problem since 8 Month. It doesn’t work on ST32F103. ST7735.h:105: multiple definition of `_width’; and all other variables. Modified to #include “stm32f1xx_hal.h”
Hello. I hope you are doing well and thanks for your great job. I tried to use the ST7735 library for 0.96 inches or 80*160 TFT LCD. unfortunately when I use “#define ST7735_IS_160X80 1”, and change the “ST7735_WIDTH” to “80” and “ST7735_HEIGHT” to “160” the LCD showed nothing. surprisingly, when I use “#define ST7735_IS_160X128 1”, and change the “ST7735_WIDTH” to “128” and “ST7735_HEIGHT” to “160” the LCD showed the things but the position of things was wrong. for example when I run “test_all()” it showed the test but in wrong scales that it comes from the wrong LCD definition. please help me how can I fix it?
best regard.
because registers are different in different displays
I HAVE THIS ERROR , HELP PLEASE
Hi, thank you for all the great tutorials. When I try to run the TFT 1.8 ST7735 example code in a new project for an STM32F411RE the code works but only if I step through each line of the init function.
Any help to run the code without debugging mode would be amazing.
Hi,
I tried using your library with STM32F401CCU, apparently everything OK (HW and FW), but the screen didn’t work, just white screen. When I setup DMA to SPI1-TX, the screen started working.
Thank you.
Hey I also have the same probelm, no error but the screen is white. Can u tell me what u have done
Hello Seiji, could you please comment a lot on your interesting proposal? ( I have the same behaviour: white screen at startup – that all). Witch options should we choose : memory high priority for example,…?
hi sejii i am also facing same issue. please can you share you code where you changed..
I try Your library but I have error “multiple definition” in line
int16_t _width; ///< Display width as modified by current rotation
int16_t _height; ///< Display height as modified by current rotation
int16_t cursor_x; ///< x location to start print()ing text
int16_t cursor_y; ///< y location to start print()ing text
uint8_t rotation; ///< Display rotation (0 thru 3)
uint8_t _colstart; ///< Some displays need this changed to offset
uint8_t _rowstart; ///< Some displays need this changed to offset
uint8_t _xstart; uint8_t _ystart;
Hi, Michael, try this solution:
https://community.st.com/s/question/0D53W00001Pv3zASAR/multiple-definition-error-after-stm32cubeide-190-update
Solved to me.
Do u have ili9488 driver
hello, ı am using this 1.8 lcd with my stm32f100 series mcu,ı use spi2 .In the beginning everything okey but after 10 to 60 minutes,screen goes compeletly white but mcu can work without problem.Even ı reset the mcu after this error,it is still white.Do you have any idea what could be the resaon ?
Hi
I have similar problems with Keil, but in STMCubeIDE I get the following error message Error:
Cannot find the specified linker script. Check the linker settings in the build configuration.
make: *** [makefile:93: fail-specified-linker-script-missing] Error 2
make: *** Waiting for unfinished jobs….
Any body got any ideas what is wrong?
Thanks
Hi! this error because of cubemx if you set up on cubeide you dont get this but if firstly use cubemx and generate on cube ide you will get linker error.
In STM32CubeIDE everything is working, in Keil throws an error: Error: L6218E: Undefined symbol ST7735_Init (referred from main.o).
Hello, Can you share GFX_FUNCTIONS.h and GFX_FUNCTIONS.c files.
Hello,I want please with you how to make the font.h
contact with me : truonglocbkhn@gmail.com
Dear Sir,
Thanks for sharing your knowledge.
Iam understanding project and its functions.
Suppose, I have only 1.8″ TFT Display and code is not there in stm32. Then how can i write the code for “ST7735.h” , “font.h” files by seeing Arduino libraries.
well you read a line and write an equivalent for your mcu