Multiple DS18B20 sensors using UART
I have covered different one wire sensors in the past, including the DS18B20. If you recall, we used the method where we check if the pin is high for the given period of time, to identify if the bit is a ‘1’ or a ‘0’.
There seems to be another approach towards these one wire sensors, and that is using the UART.
This tutorial will cover how to interface DS18B20 sensor with STM32, but using the UART. Also we will see the working of the multiple DS18B20 sensors.
VIDEO TUTORIAL
You can check the video to see the complete explanation and working of this project.
Setting up
The CubeMX setup is as shown below
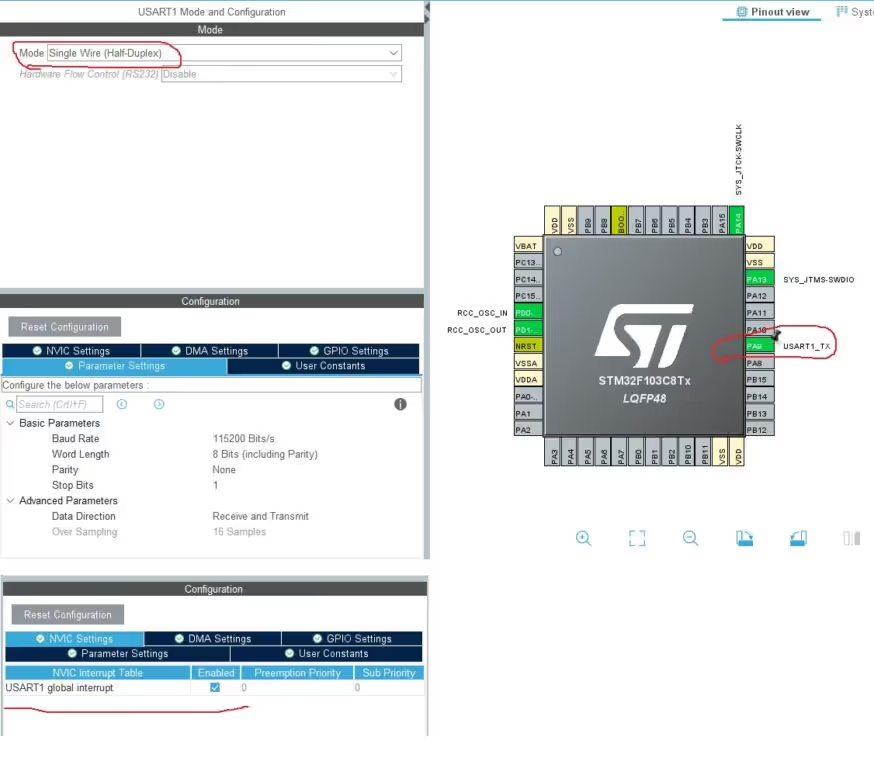
- As shown above, we need to use the Half Duplex Mode.
- Keep every parameter to default state.
- In the NVIC, enable the global interrupt.
NOTE:- It is recommended to use the USART instead of UART. I tried testing it with UART but it doesn’t seems to work.
This is all the setup needed in CubeMX.
After the code is generated, include the library files onewire.c and onewire.h
First of all we need to define the UART instance we are using

This is defined in the onewire.c file (line 23 onwards). Since I am using USART 1, I have defined it.
Next we will define the number of sensors we have connected to the single pin.

The number of devices needed to be defined in 2 different places. In the onewire.c file (line 26) and in onewire.h file (line 26).
I have connected 2 DS18B20 sensors, so I have defined 2.
This completes the setup process, now we will take a look at the code.
The CODE
/* USER CODE BEGIN 0 */

extern float Temp[MAXDEVICES_ON_THE_BUS];

/* USER CODE END 0 */

int main()
{
  ..............
  ..............
  ..............

  /* USER CODE BEGIN 2 */

  get_ROMid();

  /* USER CODE END 2 */

  /* Infinite loop */
  /* USER CODE BEGIN WHILE */
  while (1)
  {
    /* USER CODE END WHILE */

    /* USER CODE BEGIN 3 */
	  get_Temperature();
	  HAL_Delay (2000);
  }
}- First of all we will declare the external float array, Temp.
- This array is already defined in the onewire.c file, and this is why we need to define it as an external array here.
- This will basically store the temperature values from different sensors we have connected.
- Inside the main function, we will call the get_Romid()
- This function will scan for all the connected sensors, and sort them according to the ascending order of their IDs.
- Finally inside the while loop, we will call the get_Temperature()
- This will read the temperature from the connected sensors, and the values will be stored in the Temp variable.
- It is advised that you provide at least 1 second delay between two readings.
Result
Below is the image of the debugger with 2 sensors connected.
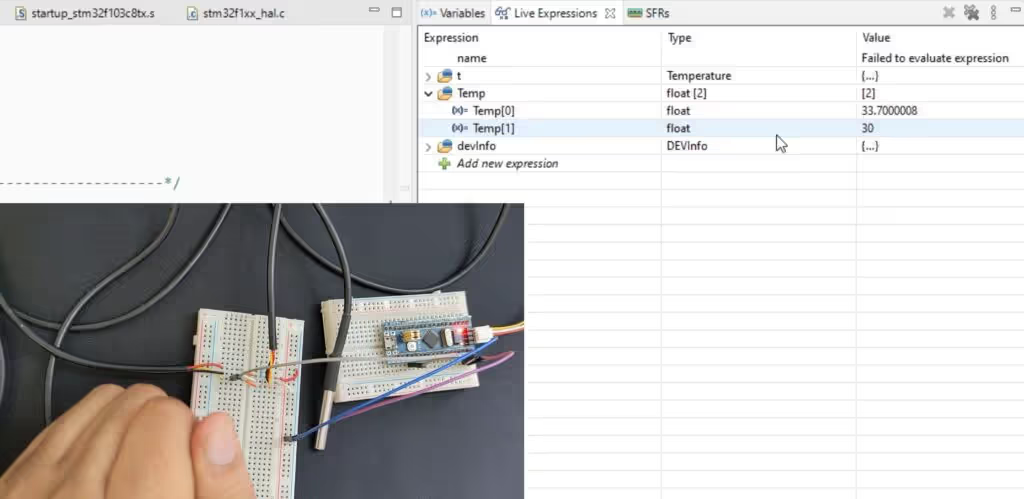
I am holding one of the sensors, and you can see the reading for both is slightly different.


Thanks You so much for my project
Good job. I tried with USART6 but it didn’t work. Do we need any config for USART6? Thank you
Same configuration will work with any UART. Make sure you set the UART instance in onewire.c file
Hello, could it work with an stm32 nucleo-wl55jc1 card in lorawan-end-node
Can you please let me know where can I download the modified one_wire.c&.h files
The download button is above the comment section
../Core/Src/OneWire.c:103:19: error: ‘USART_TypeDef’ has no member named ‘SR’; did you mean ‘ISR’?
??
hi!
when i debug This Code, crcOK is CRC ERROR and Temp is 0.
Nice video! Love your work 😉 Any clue with “multiple definition of `devInfo'” error?
Try downloading again.. It’s fixed now