Interface BMP180 with STM32
The BMP180 is a very ‘simple to use’ Pressure sensor, which senses the atmospheric Pressure. This Pressure can be used to calculate the Altitude from the sea level. BMP180 also have an integrated Temperature Sensor. It uses the I2C for the communication, and delivers the uncompensated values of pressure and temperature. For more information on the sensor, please read it’s datasheet.
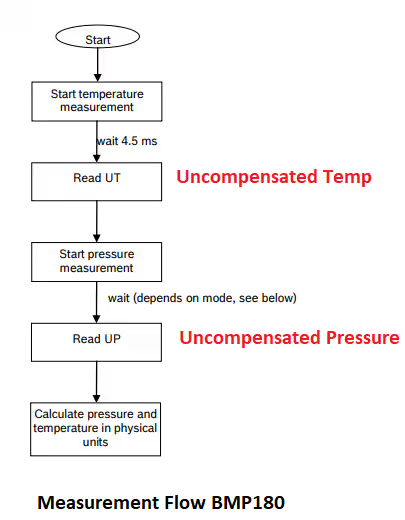
The measurement Flow chart is given below
VIDEO TUTORIAL
You can check the video to see the complete explanation and working of this project.
Check out the Video Below
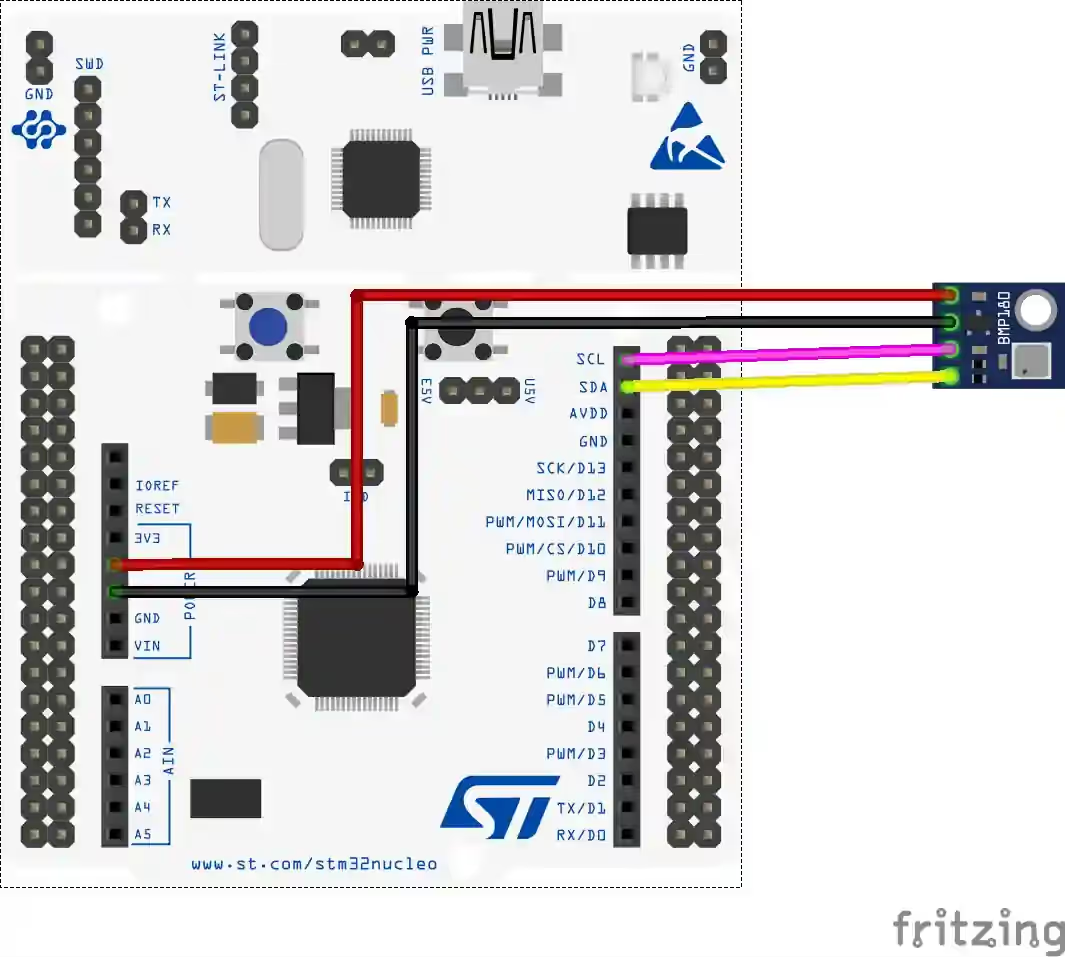
Connection
Connecting BMP180 is very simple. Just connect the SCL to SCL and SDA to SDA and you are good to go.
The I2C address of BMP180 is 0xEE as per it’s datasheet. It is shown below
How to actually do the measurement
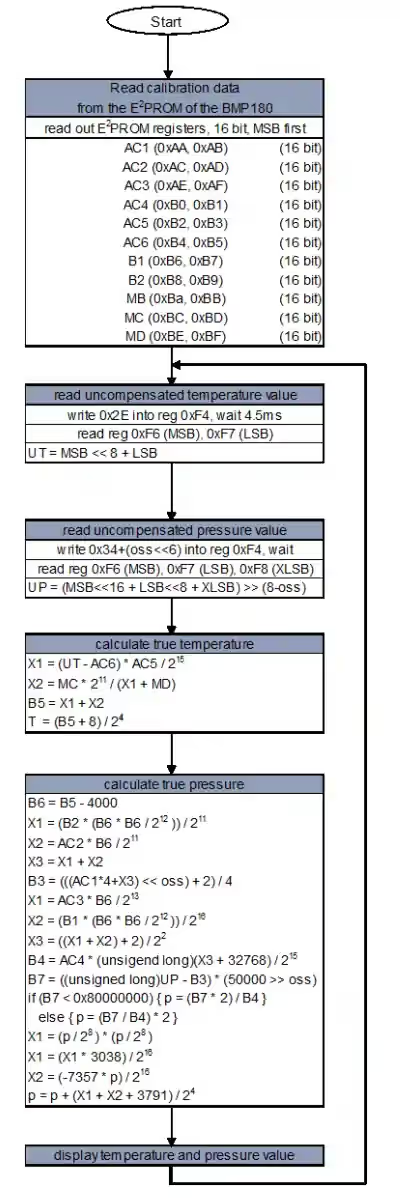
Well the answer for every “How to interface this” is in the device datasheet. If you look at page number 15 of the BMP180 Datasheet, there is an algorithm given to do all the necessary calculations. Below is the picture.
Here, first of all we need to read the calibration values from the EEPROM with starting address from 0xAA.
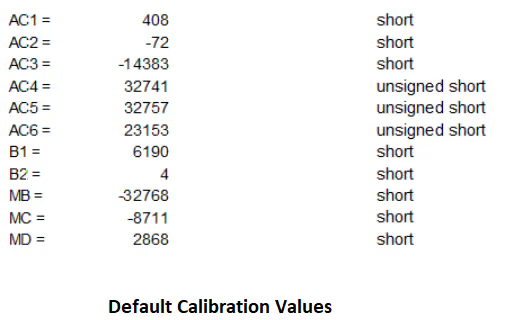
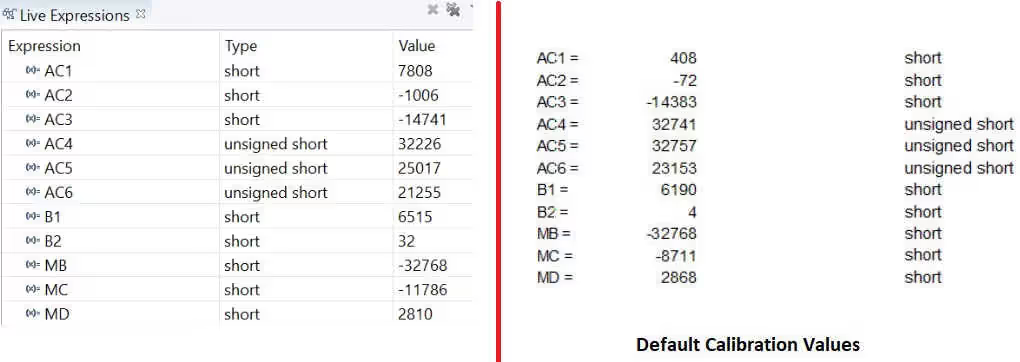
Every value i.e. AC1, AC2, AC3 etc is 16 bit in size. These values varies for every BMP180 sensor, but there are some defaults given in the datasheet.
Whatever calibration values you have, they should be somewhat around these default values.
They are as shown below
- Once the Calibration is read, we will start the reading for UT (Uncompensated Temperature). To do so, we need to read the Registers 0xF6, and 0xF7.
- Next in line is UP (Uncompensated Pressure). To read the UP, we need to read 0xF6, 0xF7 and 0xF8 registers.
- And finally we do the calculations as per the datasheet to get the Temperature and the Pressure.
Some Insight into the CODE
Read Calibration
void read_calliberation_data (void)
{
	uint8_t Callib_Data[22] = {0};
	uint16_t Callib_Start = 0xAA;
	HAL_I2C_Mem_Read(BMP180_I2C, BMP180_ADDRESS, Callib_Start, 1, Callib_Data,22, HAL_MAX_DELAY);

	AC1 = ((Callib_Data[0] << 8) | Callib_Data[1]);
	AC2 = ((Callib_Data[2] << 8) | Callib_Data[3]);
	AC3 = ((Callib_Data[4] << 8) | Callib_Data[5]);
	AC4 = ((Callib_Data[6] << 8) | Callib_Data[7]);
	AC5 = ((Callib_Data[8] << 8) | Callib_Data[9]);
	AC6 = ((Callib_Data[10] << 8) | Callib_Data[11]);
	B1 = ((Callib_Data[12] << 8) | Callib_Data[13]);
	B2 = ((Callib_Data[14] << 8) | Callib_Data[15]);
	MB = ((Callib_Data[16] << 8) | Callib_Data[17]);
	MC = ((Callib_Data[18] << 8) | Callib_Data[19]);
	MD = ((Callib_Data[20] << 8) | Callib_Data[21]);
}- As per the instructions in the datasheet, we will read the calibrations data first.
- The start address for the data to be read is 0xAA
- We need to read 22 Bytes totally
- The values for 16 bit AC1, AC2 etc.. are calculated by shifting the 8 bit values that we read
- HAL_I2C_Mem_Read function reads the entered number of registers from the given start address
Temp Calculation
// Get uncompensated Temp
uint16_t Get_UTemp (void)
{
	uint8_t datatowrite = 0x2E;
	uint8_t Temp_RAW[2] = {0};
	HAL_I2C_Mem_Write(BMP180_I2C, BMP180_ADDRESS, 0xF4, 1, &datatowrite, 1, 1000);
	HAL_Delay (5);  // wait 4.5 ms
	HAL_I2C_Mem_Read(BMP180_I2C, BMP180_ADDRESS, 0xF6, 1, Temp_RAW, 2, 1000);
	return ((Temp_RAW[0]<<8) + Temp_RAW[1]);
}

float BMP180_GetTemp (void)
{
	UT = Get_UTemp();
	X1 = ((UT-AC6) * (AC5/(pow(2,15))));
	X2 = ((MC*(pow(2,11))) / (X1+MD));
	B5 = X1+X2;
	Temp = (B5+8)/(pow(2,4));
	return Temp/10.0;
}In order to calculate the Temperature, we need to get the UT (Uncompensated Temperature) first. To do so, the following are the steps
- Write 0x2E (DATA) in the 0xF4 (Address)
- Now read the 2 Bytes of Data from the address 0xF4.
- convert these 2 Bytes into a single 16 bit value, and that will be the UT value
- Using this UT value, we will do the calculation for the Temperature as shown in the above code
- The formulas used are provided in the datasheet
Pressure Calculation
// Get uncompensated Pressure
uint32_t Get_UPress (int oss)   // oversampling setting 0,1,2,3
{
	uint8_t datatowrite = 0x34+(oss<<6);
	uint8_t Press_RAW[3] = {0};
	HAL_I2C_Mem_Write(BMP180_I2C, BMP180_ADDRESS, 0xF4, 1, &datatowrite, 1, 1000);
	switch (oss)
	{
		case (0):
			HAL_Delay (5);
			break;
		case (1):
			HAL_Delay (8);
			break;
		case (2):
			HAL_Delay (14);
			break;
		case (3):
			HAL_Delay (26);
			break;
	}
	HAL_I2C_Mem_Read(BMP180_I2C, BMP180_ADDRESS, 0xF6, 1, Press_RAW, 3, 1000);
	return (((Press_RAW[0]<<16)+(Press_RAW[1]<<8)+Press_RAW[2]) >> (8-oss));
}


float BMP180_GetPress (int oss)
{
	UP = Get_UPress(oss);
	X1 = ((UT-AC6) * (AC5/(pow(2,15))));
	X2 = ((MC*(pow(2,11))) / (X1+MD));
	B5 = X1+X2;
	B6 = B5-4000;
	X1 = (B2 * (B6*B6/(pow(2,12))))/(pow(2,11));
	X2 = AC2*B6/(pow(2,11));
	X3 = X1+X2;
	B3 = (((AC1*4+X3)<<oss)+2)/4;
	X1 = AC3*B6/pow(2,13);
	X2 = (B1 * (B6*B6/(pow(2,12))))/(pow(2,16));
	X3 = ((X1+X2)+2)/pow(2,2);
	B4 = AC4*(unsigned long)(X3+32768)/(pow(2,15));
	B7 = ((unsigned long)UP-B3)*(50000>>oss);
	if (B7<0x80000000) Press = (B7*2)/B4;
	else Press = (B7/B4)*2;
	X1 = (Press/(pow(2,8)))*(Press/(pow(2,8)));
	X1 = (X1*3038)/(pow(2,16));
	X2 = (-7357*Press)/(pow(2,16));
	Press = Press + (X1+X2+3791)/(pow(2,4));

	return Press;
}In this part we will calculate the Pressure. The steps are mentioned below
- Just like Temperature, here also we need to calculate the value of UP (Uncompensated Pressure) first
- Write 0x34+(oss<<6) into the Register 0xF4. Here oss is OverSampling Setting, you can read about it in the datasheet.
- Now we need to wait depending on what oss value you choose. I have used the oss as 0 in this code
- Then read 3 bytes of data starting from 0xF6
- Rearranging these Bytes gives the UP value
- Using the UP from the first function, we will calculate the Pressure
- The calculation shown above is as provided in the BMP180 datasheet.
Altitude Calculation
#define atmPress 101325 //Pa

float BMP180_GetAlt (int oss)
{
	BMP180_GetPress (oss);
	return 44330*(1-(pow(((float)Press/(float)atmPress), 0.19029495718)));
}Here we need to define the Standard Atmospheric Pressure first, as it will be needed in the calculation
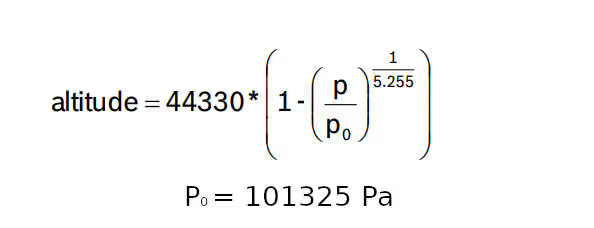
The Altitude can be calculated from the Pressure using the formula as shown below
Result
Let’s take a look the Calibration variables first
As you can see in the picture above, that the calibration results are almost the same as the default ones. I have too much variation in AC1 and AC2 but that’s okay.
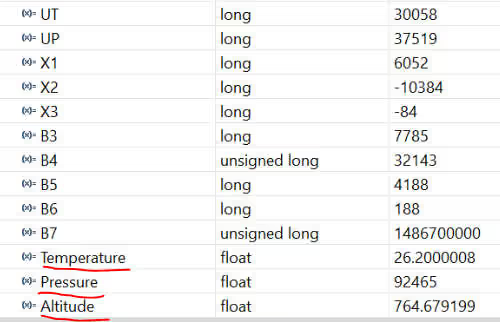
you can see above the rest of the variables values and based on these values, the Pressure, Temperature and Altitude is calculated.
Info
You can help with the development by DONATING Below.
To download the project, click the DOWNLOAD button.


Thanks for sharing, but missing the variable declarations. I saw that you have the variable Temperature in your debugger but why does the BMP180_GetTemp function have variable Temp?
Temp = (B5+8)/(pow(2,4));
return Temp/10.0;
is Temp getting stored somewhere for use in another code? or is
return (B5+8)/(pow(2,4))/10.0; valid as then we don’t have to declare the unknown variable Temp?
hi data is not coming in debug i used stmf103c8t please help
Greetings! Have you had any experience with CAN bus? Are there examples on the site?
no CAN bus yet… They will be available soon
Ok, Awesome!