Home ▸ ESP32 ▸ FreeRTOS Tutorials ▸
Updated On: April 26, 2026
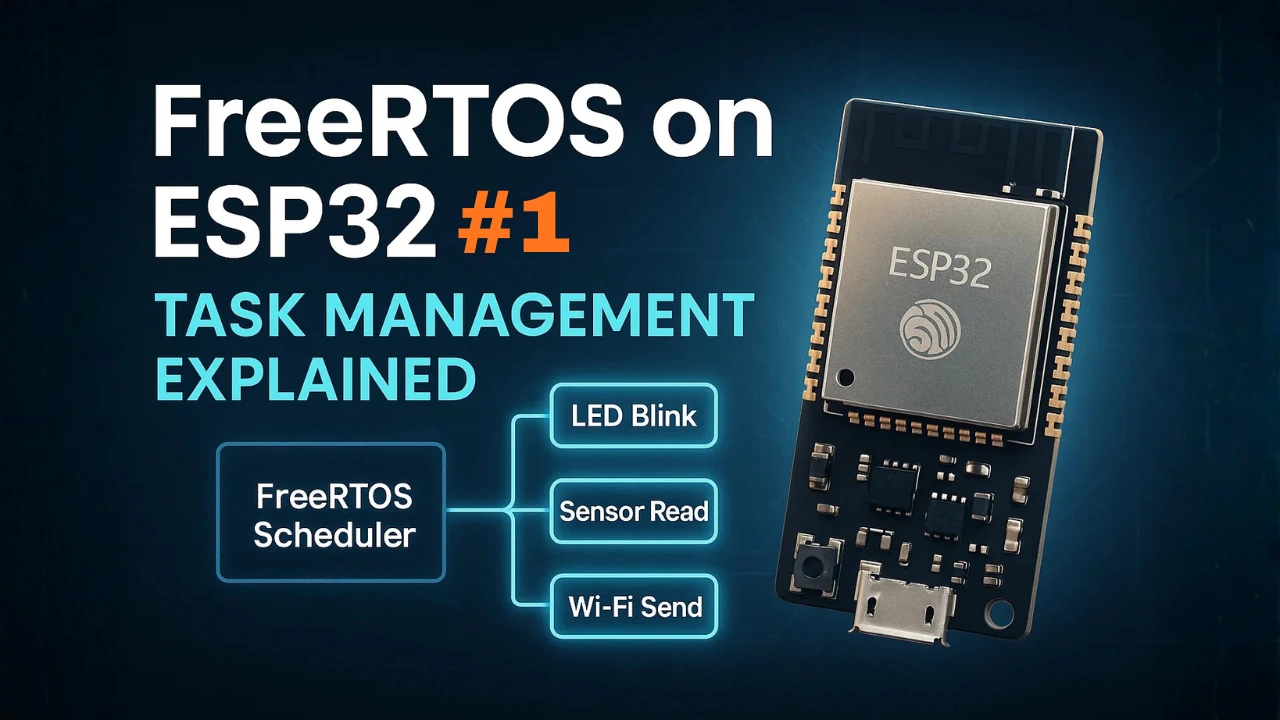
ESP32 FreeRTOS Inter-Task Communication: Queues, Semaphores, Mutexes & Event Groups
Tasks running in isolation are only half of FreeRTOS. The other half is what happens when tasks need to share data, signal each other, or coordinate around a shared resource. Without the right tools, tasks accessing the same variable simultaneously corrupt data silently — no crash, just wrong readings.
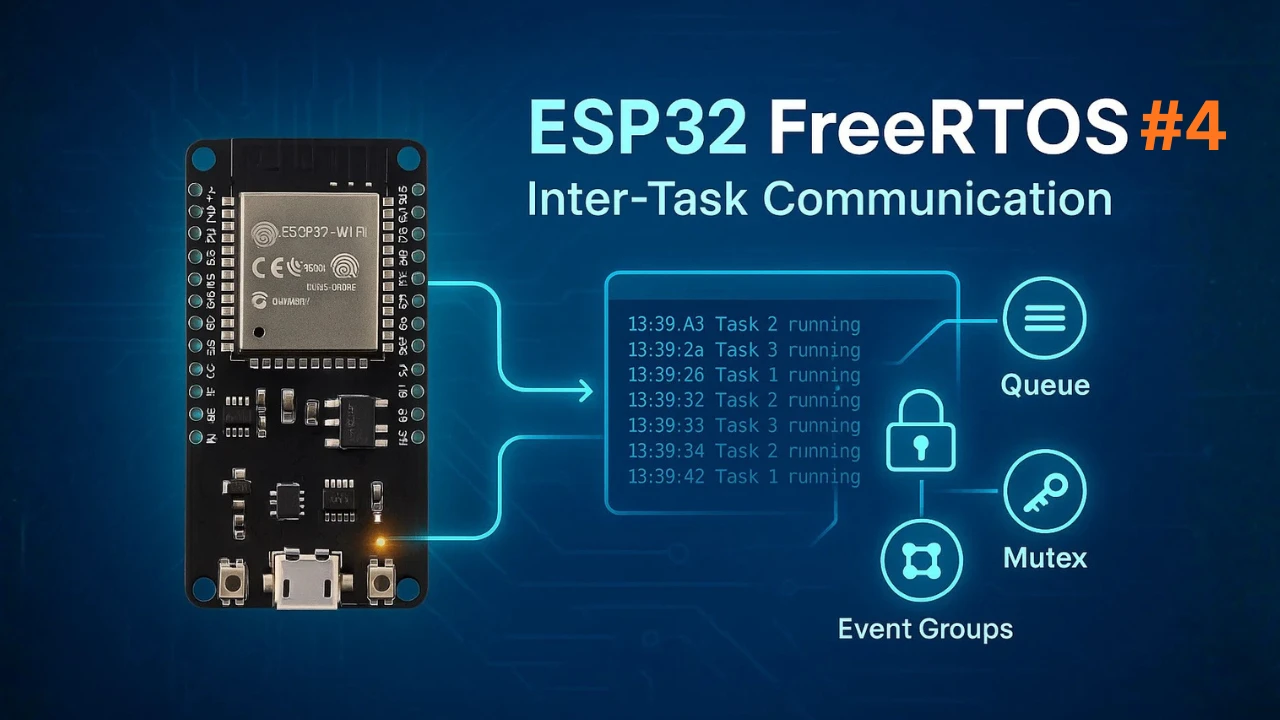
This is Part 4 of the ESP32 FreeRTOS Series. It covers four inter-task communication mechanisms: Queues for passing structured data between tasks in FIFO order, Binary and Counting Semaphores for signaling and synchronization, Mutexes for protecting shared resources from concurrent access, and Event Groups for coordinating multiple tasks around shared event flags. Each is demonstrated with a practical ESP-IDF code example.
This is Part 4 of the ESP32 FreeRTOS Series using ESP-IDF. You can check the other parts as well, here are the links:
- Part 1 — Intro to FreeRTOS: Tasks, Scheduler & xTaskCreate
- Part 2 — Understanding the FreeRTOS Scheduler
- Part 3 — Task Priority & Stack Management
- Part 4 — Inter-Task Communication: Queues, Semaphores & Event Groups ← you are here
- Part 5 — Software Timers & Task Notifications
- Part 6 — Task Control: Suspend, Resume & Delete
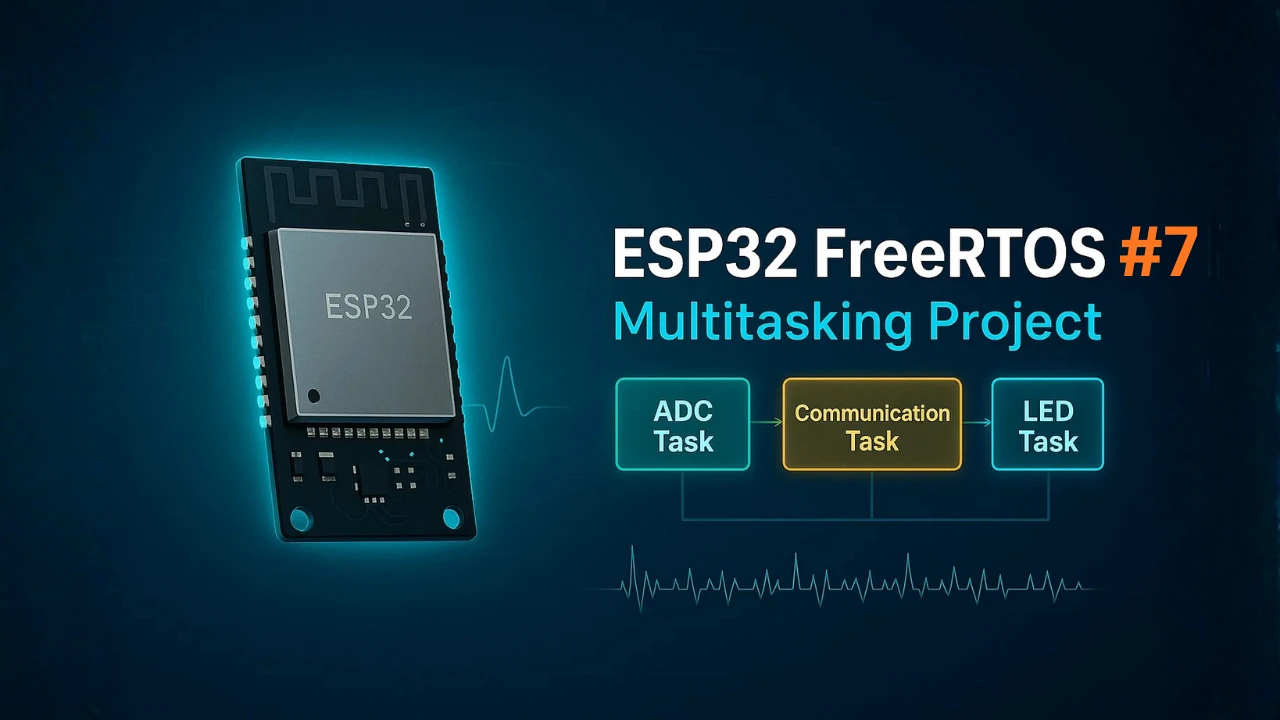
- Part 7 — Real-Time Multitasking Project (ADC, UART, LED)
Inter-Task Communication in FreeRTOS: Why It Matters
When working with FreeRTOS on ESP32, you often create multiple tasks to handle different parts of your application — for example, one task reads sensor values, another processes them, and a third task sends data over Wi-Fi or displays it on the screen.
But these tasks don’t exist in isolation. They frequently need to exchange information or coordinate actions with one another. This is where Inter-Task Communication (ITC) becomes essential.
Why Tasks Need to Communicate
In a multitasking system like FreeRTOS, each task runs independently. However, in real applications, tasks often depend on each other’s output.
For example:
- A Sensor Task collects temperature data.
- A Display Task shows the latest readings.
- A Logger Task saves data to an SD card.
To make this work, the sensor task must send its data to the other tasks in a reliable way. If each task worked alone without communication, your system would behave unpredictably — or worse, produce wrong results.
So, tasks need a safe way to share data, send signals, and stay synchronized.
Common Problems Without Synchronization
If two or more tasks try to access the same resource or variable at the same time, it can lead to serious issues:
- Data corruption – When one task writes data while another reads it simultaneously.
- Race conditions – When task execution order affects results, causing inconsistent behavior.
- Deadlocks – When two tasks wait for each other’s resource forever.
- Unpredictable crashes – Especially when shared memory or peripherals are accessed unsafely.
These problems are very common when beginners start using multiple tasks on the ESP32. Without proper synchronization, multitasking becomes unstable and hard to debug.
FreeRTOS ITC Tools at a Glance
FreeRTOS provides several built-in mechanisms to manage communication and synchronization between tasks safely. These include:
- Queues – For sending structured data between tasks.
- Semaphores – For signaling and task synchronization.
- Mutexes – For protecting shared resources like sensors, files, or serial interfaces.
- Event Groups – For managing event-based coordination between multiple tasks.
These tools ensure that only one task accesses shared data at a time, preventing conflicts and maintaining system stability.
FreeRTOS Queues on ESP32
One of the most common and reliable ways for tasks to share data in FreeRTOS is by using a Queue. Queues allow you to send and receive data safely between tasks, without worrying about timing conflicts or data corruption.
What is a Queue in FreeRTOS
A Queue in FreeRTOS is a FIFO (First In, First Out) buffer used to transfer data from one task to another. You can think of it as a mailbox where one task drops a message, and another task picks it up later.
For example, if a Sensor Task measures temperature, it can place that reading into a queue. A Display Task can then read from the same queue and update the screen.
Queues make sure that:
- Data is delivered in the same order it was sent.
- No two tasks access the data at the same time.
- Tasks can block (wait) until new data arrives.
Creating a Queue with xQueueCreate()
Creating a queue in ESP32 FreeRTOS is simple. You use the function xQueueCreate(), which takes two parameters:
- Queue length – How many items the queue can hold.
- Item size – Size (in bytes) of each item stored in the queue.
Here’s an example:
QueueHandle_t testQueue;

void app_main(void)
{
    // Create a queue with space for 5 integer values
    testQueue= xQueueCreate(5, sizeof(int));

    if (testQueue== NULL)
    {
        printf("Failed to create queue\n");
        return;
    }

    // Create tasks here...
}In this example, the queue (testQueue) can store 5 integers at a time. If a task tries to send more data than the queue can hold, it will block (wait) until there’s space available.
Sending and Receiving: xQueueSend() & xQueueReceive()
Once the queue is created, tasks can use the following functions:
xQueueSend()— Used by the producer task to send data to the queue.xQueueReceive()— Used by the consumer task to read data from the queue.
Here’s the basic syntax:
xQueueSend(testQueue, &dataToSend, portMAX_DELAY);
xQueueReceive(testQueue, &receivedData, portMAX_DELAY);- The third parameter defines how long the task should wait (in ticks) if the queue is full (for send) or empty (for receive).
- You can use
portMAX_DELAYto make the task wait indefinitely.
Example: Sensor Task → Display Task via Queue
Here’s a simple example to show how two tasks can communicate using a queue:
#include "freertos/FreeRTOS.h"
#include "freertos/task.h"
#include "freertos/queue.h"
#include <stdio.h>

QueueHandle_t testQueue;

void SenderTask(void *pvParameters)
{
    int SentValue = 0;
    while (1)
    {
        SentValue++;
        printf("Sender Task: Sending value %d\n", SentValue);
        xQueueSend(testQueue, &SentValue, portMAX_DELAY);
        vTaskDelay(pdMS_TO_TICKS(1000)); // Send every second
    }
}

void ReceiverTask(void *pvParameters)
{
    int receivedValue = 0;
    while (1)
    {
        if (xQueueReceive(testQueue, &receivedValue, portMAX_DELAY))
        {
            printf("Receiver Task: Received value %d\n", receivedValue);
        }
    }
}

void app_main(void)
{
    testQueue = xQueueCreate(5, sizeof(int));

    if (testQueue == NULL)
    {
        printf("Queue creation failed!\n");
        return;
    }

    xTaskCreate(SenderTask, "Sender Task", 2048, NULL, 1, NULL);
    xTaskCreate(ReceiverTask, "Receiver Task", 2048, NULL, 1, NULL);
}Explanation:
SenderTaskgenerates a new reading every second and sends it to the queue.ReceiverTaskwaits until a new value arrives, then prints it.- Both tasks run independently and communicate safely through the queue.
Queue Result and Output
The image below shows the logs printed on the ESP-IDF console when both tasks are running.
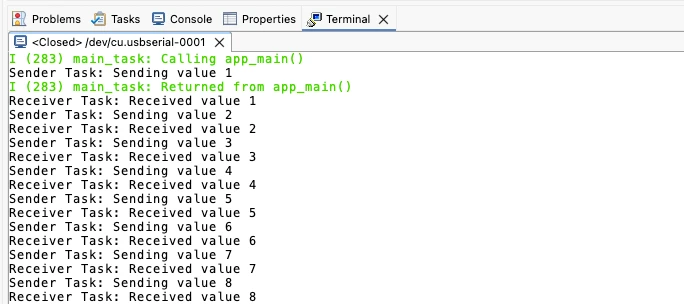
You can see that the queue is created successfully.
The Sender Task keeps sending incremental values, while the Receiver Task receives and prints them in order.
This confirms that the FreeRTOS Queue is working correctly — transferring data safely between the two tasks in real time.
Semaphores & Mutexes in ESP32 FreeRTOS
In multitasking systems like FreeRTOS on ESP32, multiple tasks often need to work together or access shared resources. For example, two tasks might use the same UART, SPI, or ADC peripheral.
If both try to use it at the same time, it can cause data corruption or timing issues.
To avoid this, FreeRTOS provides Semaphores, a synchronization tool that helps tasks coordinate access and maintain proper timing.
Binary vs Counting Semaphores in ESP32 FreeRTOS
FreeRTOS supports two main types of semaphores — Binary and Counting. Both are used for synchronization, but they serve slightly different purposes.
Binary Semaphore
- It has only two states — taken (0) or available (1).
- Commonly used for signaling between tasks or between an ISR (Interrupt Service Routine) and a task.
- For example, when an interrupt occurs, it can “give” a semaphore to unblock a waiting task.
Counting Semaphore
- Works like a counter that keeps track of how many resources are available.
- Useful when multiple instances of a resource exist (e.g., a pool of buffers).
- Each “give” increases the count, and each “take” decreases it.
| Type | Value Range | Typical Use Case |
|---|---|---|
| Binary Semaphore | 0 or 1 | Task or ISR synchronization |
| Counting Semaphore | 0 to N | Managing multiple identical resources |
Both types prevent resource conflicts and ensure that only one task at a time can access shared hardware or data safely.
How Semaphores Help Synchronize Tasks
Semaphores are mainly used to:
- Signal events from one task to another.
- Ensure order of execution between tasks.
- Protect access to shared resources like sensors or communication ports.
For example:
- A producer task can give a semaphore when new data is ready.
- A consumer task can wait for that semaphore before reading the data.
This avoids situations where a task tries to read data before it’s available, or two tasks try to write at the same time.
FreeRTOS provides simple APIs for this:
xSemaphoreTake(mySemaphore, portMAX_DELAY);
xSemaphoreGive(mySemaphore);These functions automatically handle task blocking and waking up, so you don’t need to manually manage timing.
Example: Synchronizing ADC Read with UART Transmission
Let’s say you have two tasks:
- ADC Task — Reads sensor data from an ADC channel.
- UART Task — Sends that data over serial communication.
We can use a Binary Semaphore to synchronize them. The UART task will wait until the ADC task gives the semaphore after completing a new reading.
#include "freertos/FreeRTOS.h"
#include "freertos/task.h"
#include "freertos/semphr.h"
#include <stdio.h>

SemaphoreHandle_t dataReadySemaphore;
int sensorData = 0;

void ADCTask(void *pvParameters)
{
    while (1)
    {
        sensorData++;
        printf("ADC Task: New data = %d\n", sensorData);

        // Signal UART task that new data is ready
        xSemaphoreGive(dataReadySemaphore);

        vTaskDelay(pdMS_TO_TICKS(1000)); // Read every second
    }
}

void UARTTask(void *pvParameters)
{
    while (1)
    {
        // Wait until data is ready
        if (xSemaphoreTake(dataReadySemaphore, portMAX_DELAY))
        {
            printf("UART Task: Sending data = %d\n", sensorData);
        }
    }
}

void app_main(void)
{
    dataReadySemaphore = xSemaphoreCreateBinary();

    if (dataReadySemaphore == NULL)
    {
        printf("Failed to create semaphore!\n");
        return;
    }

    xTaskCreate(ADCTask, "ADC Task", 2048, NULL, 1, NULL);
    xTaskCreate(UARTTask, "UART Task", 2048, NULL, 1, NULL);
}Explanation:
In this example, two tasks — ADCTask and UARTTask, work together using a Binary Semaphore to stay synchronized.
dataReadySemaphoreis created usingxSemaphoreCreateBinary().
It acts like a signal that lets one task notify another when new data is available.- The
ADCTasksimulates reading sensor data.
Each second, it incrementssensorDataand prints it. Then it gives the semaphore (xSemaphoreGive()), signaling that new data is ready. - The
UARTTaskwaits for that signal usingxSemaphoreTake().
When the semaphore is given, it unblocks and sends (prints) the latest data.
So, both tasks run independently but remain perfectly synchronized:
- ADC Task → reads and signals
- UART Task → waits and sends
This ensures that UART never transmits old or incomplete data. It’s a simple and safe way to coordinate task timing using a FreeRTOS Binary Semaphore.
Result: Output on ESP-IDF Console
The image below shows the logs printed on the ESP-IDF console.
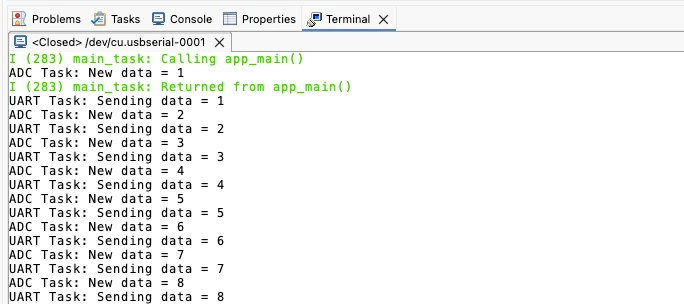
You’ll see that each time the ADC Task reads a new value, it gives the semaphore.
Immediately after that, the UART Task takes the semaphore and transmits the same value.
This confirms proper task synchronization using a Binary Semaphore.
Mutexes: Protecting Shared Resources
When multiple tasks share a common resource like I2C, SPI, or UART, it’s important to make sure that only one task accesses that resource at a time. Otherwise, data may get corrupted, or the system may behave unpredictably.
To handle such situations, FreeRTOS provides Mutexes (Mutual Exclusion objects). A mutex works like a “lock” — once a task takes the lock, others must wait until it’s released.
What is a Mutex and Why It’s Different from a Semaphore
At first glance, mutexes and binary semaphores may look similar — both allow only one task to access a resource at a time.
However, there are some key differences:
| Feature | Semaphore | Mutex |
|---|---|---|
| Purpose | Synchronization or signaling | Protecting shared resources |
| Ownership | No ownership — any task can give or take | Owned by the task that takes it |
| Priority Inheritance | Not supported | Supported |
| Typical Use | Task synchronization | Resource locking (e.g., I2C, SPI, UART) |
In short:
- Use a semaphore to signal or synchronize between tasks.
- Use a mutex to protect shared resources and prevent simultaneous access.
Priority Inversion and How Mutexes Handle It
When using semaphores in FreeRTOS, you may encounter a problem called priority inversion.
What is Priority Inversion?
Priority inversion happens when:
- A low-priority task holds a semaphore (or resource).
- A high-priority task needs the same semaphore to access the shared resource.
- A medium-priority task preempts the low-priority task, preventing the low-priority task from releasing the semaphore.
As a result, the high-priority task, despite having the higher priority, is blocked longer than expected. This is called priority inversion. It can lead to unexpected delays and can compromise the real-time performance of your system.
The image below shows the priority inversion while using semaphore.
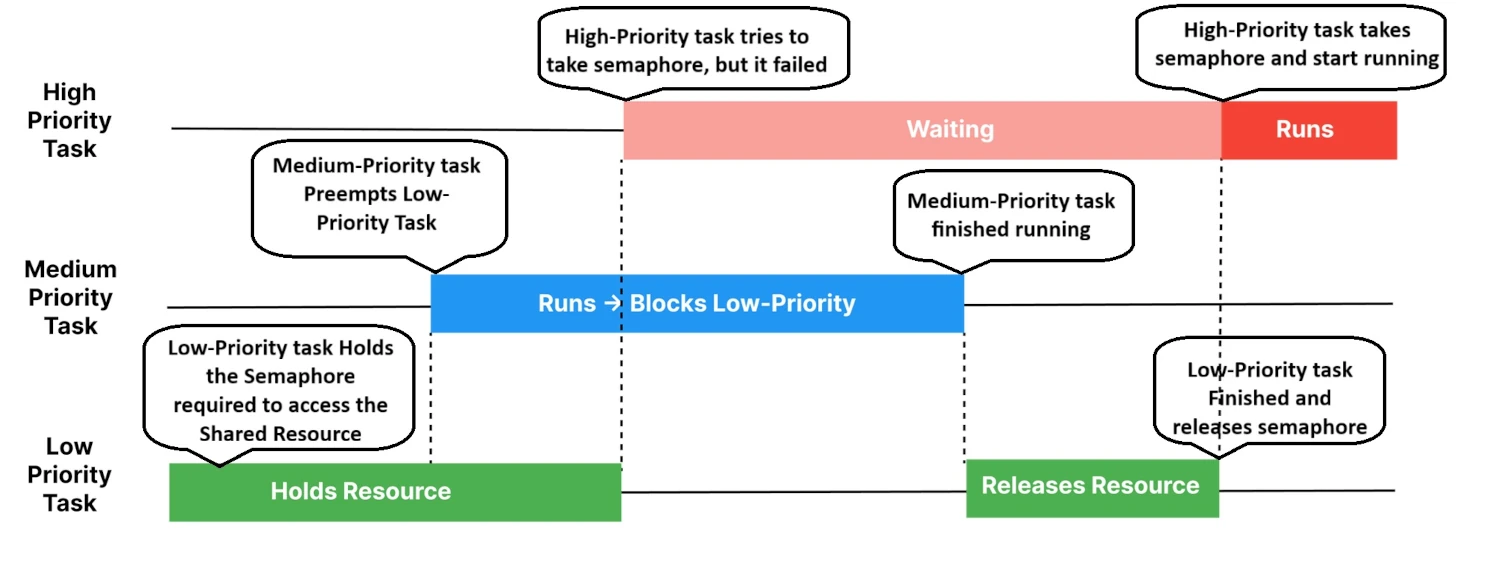
As shown in the image above, using semaphore can cause the higher priority task wait while the low priority task is running. The High-Priority task has to wait for the Medium-Priority task to finish its operation. This is called priority inversion.
We can use the mutex to solve this issue of priority inversion. Using Mutex ensures the priority inheritance, where the priority of Low-Priority Task increases to highest priority when it acquires the mutex.
Why Priority Inheritance is Important
Priority Inheritance solves this problem automatically:
- When a high-priority task tries to take a mutex already held by a low-priority task, FreeRTOS temporarily boosts the priority of the low-priority task.
- The low-priority task executes faster, releases the mutex, and then its priority returns to normal.
Benefits:
- Prevents high-priority tasks from waiting too long.
- Avoids priority inversion that can break real-time behavior.
- Ensures predictable and safe multitasking in ESP32 applications.
Example Scenario:
- Low-priority task holds an I2C mutex.
- High-priority task needs the same mutex.
- Medium-priority task runs normally.
- Without priority inheritance → High-priority task blocked until medium task finishes.
- With priority inheritance → Low-priority task temporarily gets high priority, finishes faster, releases mutex, and high-priority task proceeds immediately.
The image below shows the priority inheritance solving the priority inversion issue.
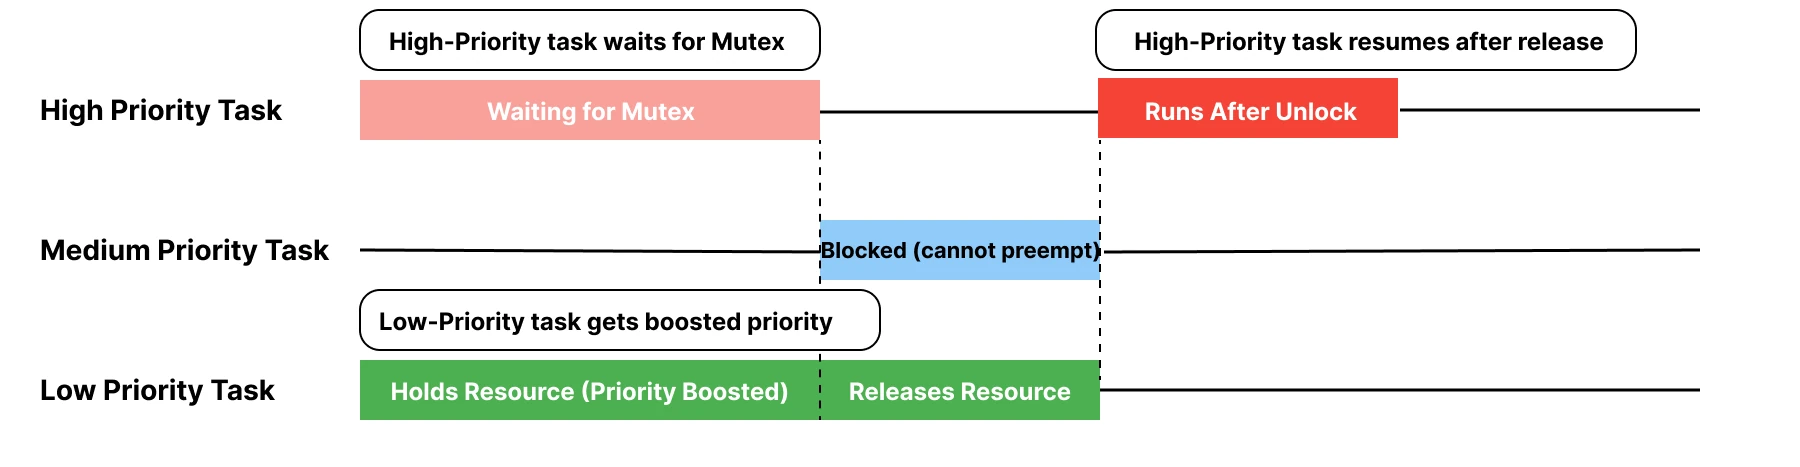
As you can see in the image, when the Low-priority task acquires mutex, it gets the priority of the highest waiting task. Therefore any other tasks can not preempt it. Other tasks can only run once the mutex is released, and the task waiting for it has finished its operation.
After releasing the mutex, the priority of the task returns to normal.
This mechanism is built into FreeRTOS mutexes and works automatically, so you don’t need extra code to handle it.
How Mutex Prevents Data Corruption
Imagine two tasks trying to write to the same I2C bus at the same time. Without protection, both could send data simultaneously, causing bus conflicts or corrupted communication.
A mutex ensures that:
- Only one task can access the resource at a time.
- Other tasks trying to use it must wait until the mutex is released.
- Once the task finishes, it gives back the mutex, allowing others to continue.
This prevents race conditions and keeps shared peripherals or variables safe.
FreeRTOS provides two simple APIs for mutex control:
xSemaphoreTake(xMutex, portMAX_DELAY);
xSemaphoreGive(xMutex);Example: Shared Resource Protection (I2C or SPI Bus)
Let’s see how two tasks can safely share an I2C bus using a mutex:
#include "freertos/FreeRTOS.h"
#include "freertos/task.h"
#include "freertos/semphr.h"
#include <stdio.h>

SemaphoreHandle_t sharedMutex;

void LowPriorityTask(void *pvParameters)
{
    while (1)
    {
        if (xSemaphoreTake(sharedMutex, portMAX_DELAY))
        {
            printf("LowPriorityTask: Holding shared resource  current priority: %u\n", uxTaskPriorityGet(NULL));
            vTaskDelay(pdMS_TO_TICKS(2000)); // Simulate long operation
            printf("LowPriorityTask: Releasing shared resource  current priority: %u\n", uxTaskPriorityGet(NULL));
            xSemaphoreGive(sharedMutex);
        }
        vTaskDelay(pdMS_TO_TICKS(500));
    }
}

void MediumPriorityTask(void *pvParameters)
{
    while (1)
    {
        printf("MediumPriorityTask: Doing background work\n");
        vTaskDelay(pdMS_TO_TICKS(500));
    }
}

void HighPriorityTask(void *pvParameters)
{
    while (1)
    {
        vTaskDelay(pdMS_TO_TICKS(1000)); // Let low task grab mutex first

        printf("HighPriorityTask: Needs shared resource\n");
        if (xSemaphoreTake(sharedMutex, portMAX_DELAY))
        {
            printf("HighPriorityTask: Got shared resource\n");
            vTaskDelay(pdMS_TO_TICKS(1000));
            printf("HighPriorityTask: Releasing shared resource\n");
            xSemaphoreGive(sharedMutex);
        }
    }
}

void app_main(void)
{
    sharedMutex = xSemaphoreCreateMutex();
    if (sharedMutex == NULL)
    {
        printf("Failed to create Mutex!\n");
        return;
    }

    // Priorities: High > Medium > Low
    xTaskCreate(LowPriorityTask, "LowPriority", 2048, NULL, 1, NULL);
    xTaskCreate(MediumPriorityTask, "MediumPriority", 2048, NULL, 2, NULL);
    xTaskCreate(HighPriorityTask, "HighPriority", 2048, NULL, 3, NULL);
}
The example above shows how priority inheritance works.
- LowPriorityTask:
Takes the mutex first and holds it for a while (simulating a long operation). - HighPriorityTask:
Later tries to take the same mutex — but must wait until the low-priority task releases it. - MediumPriorityTask:
Keeps running background work, which would normally preempt the low-priority task.
However, because the mutex uses priority inheritance, the low-priority task temporarily inherits the high task’s priority until it releases the mutex.
This prevents the medium task from starving the low one — resolving priority inversion automatically.
Result — Output on ESP-IDF Console
The image below shows the logs printed on the ESP-IDF console.
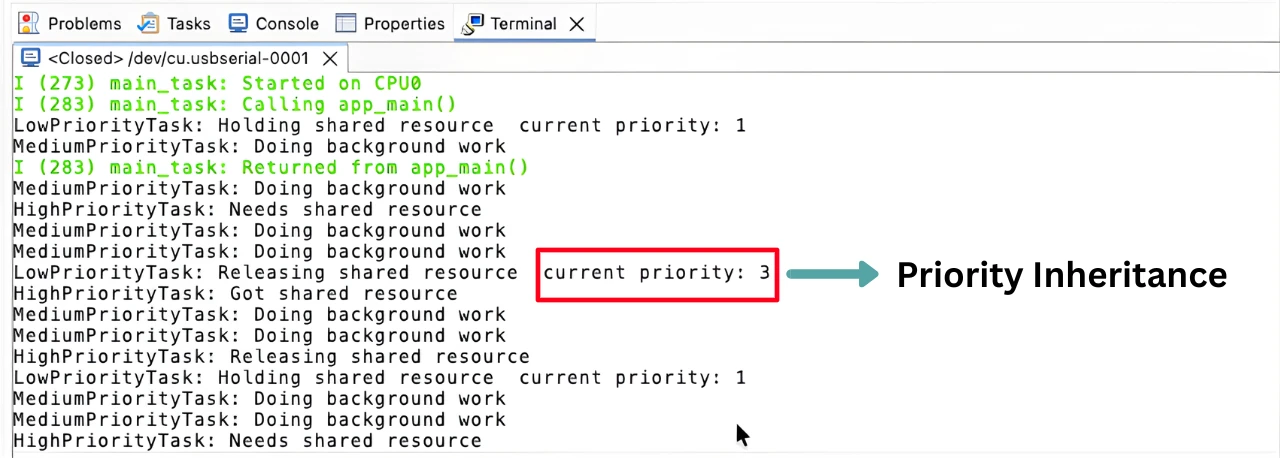
Here is what the image shows:
- LowPriorityTask starts first
The low-priority task acquires the mutex and begins using the shared resource at its normal priority (1). - MediumPriorityTask runs normally
Since the high-priority task hasn’t tried to use the mutex yet, the medium-priority task continues its background work and can preempt the low task. - HighPriorityTask requests the mutex
When the high task tries to access the same resource, it gets blocked because the mutex is still held by the low task.
At this moment, priority inheritance kicks in — the low-priority task’s priority is temporarily raised to match the high-priority task. - LowPriorityTask finishes with boosted priority
Notice that when it releases the resource, its printed priority is 3, confirming that priority inheritance is active.
The low task now runs ahead of the medium task to quickly finish and release the mutex. - HighPriorityTask resumes
As soon as the low task releases the mutex, the high task immediately gains access and proceeds with its work. - Normal priorities restored
After the mutex is released, all tasks return to their original priorities. The cycle then repeats.
This log clearly demonstrates how priority inheritance prevents priority inversion — ensuring the low-priority task can complete its critical section quickly once a higher-priority task is waiting on the same mutex.
FreeRTOS Event Groups in ESP32
In complex ESP32 applications, multiple tasks often need to work together or wait for certain events before continuing. FreeRTOS provides a powerful feature called Event Groups to handle this coordination efficiently.
Event Groups let tasks set, clear, and wait for specific event bits, making them ideal for multi-task synchronization without heavy data exchange.
What are Event Groups in FreeRTOS
An Event Group in FreeRTOS is like a collection of individual flags (bits) that represent different system events.
Each bit in the group can indicate a unique condition — for example:
- Bit 0 → Sensor1 data ready
- Bit 1 → Sensor2 data ready
- Bit 2 → Wi-Fi connected
Tasks can wait for one or more bits to be set before they continue execution. This allows for clean, efficient coordination between multiple tasks.
How to Create and Set Event Bits
- Create an Event Group using:
EventGroupHandle_t eventGroup = xEventGroupCreate(); - Set a bit (signal an event):
xEventGroupSetBits(eventGroup, BIT0); - Wait for bits (block until event occurs):
xEventGroupWaitBits(eventGroup, BIT0 | BIT1, pdTRUE, pdTRUE, portMAX_DELAY);
Here, a task waits for both BIT0 and BIT1 to be set, meaning both events have occurred.
Example: Coordinating Multiple Sensor Tasks
Imagine you have two sensor tasks that read data independently and one processing task that should start only after both sensors are ready.
- Sensor1 Task sets
BIT0when it finishes reading. - Sensor2 Task sets
BIT1when its reading is done. - Processing Task waits until both bits are set before starting data processing.
This method ensures all sensors have completed their jobs before moving forward, keeping your data consistent and synchronized.
Below is an example demonstrating this.
#include "freertos/FreeRTOS.h"
#include "freertos/task.h"
#include "freertos/event_groups.h"
#include <stdio.h>

EventGroupHandle_t sensorEventGroup;

#define SENSOR1_BIT (1 << 0)
#define SENSOR2_BIT (1 << 1)

void Sensor1Task(void *pvParameters)
{
    while (1)
    {
        printf("Sensor1: Reading data...\n");
        vTaskDelay(pdMS_TO_TICKS(1000)); // Simulate sensor delay
        printf("Sensor1: Data ready\n");

        xEventGroupSetBits(sensorEventGroup, SENSOR1_BIT);
        vTaskDelay(pdMS_TO_TICKS(2000)); // Wait before next cycle
    }
}

void Sensor2Task(void *pvParameters)
{
    while (1)
    {
        printf("Sensor2: Reading data...\n");
        vTaskDelay(pdMS_TO_TICKS(1500)); // Simulate different timing
        printf("Sensor2: Data ready\n");

        xEventGroupSetBits(sensorEventGroup, SENSOR2_BIT);
        vTaskDelay(pdMS_TO_TICKS(2000));
    }
}

void ProcessingTask(void *pvParameters)
{
    while (1)
    {
        printf("Processing Task: Waiting for both sensors...\n");

        // Wait for both Sensor1 and Sensor2 to signal readiness
        xEventGroupWaitBits(sensorEventGroup,
                            SENSOR1_BIT | SENSOR2_BIT,
                            pdTRUE,   // Clear bits after waiting
                            pdTRUE,   // Wait for both bits
                            portMAX_DELAY);

        printf("Processing Task: Both sensors ready! Processing data...\n");
        vTaskDelay(pdMS_TO_TICKS(1000));
    }
}

void app_main(void)
{
    sensorEventGroup = xEventGroupCreate();

    if (sensorEventGroup == NULL)
    {
        printf("Failed to create Event Group!\n");
        return;
    }

    xTaskCreate(Sensor1Task, "Sensor1", 2048, NULL, 1, NULL);
    xTaskCreate(Sensor2Task, "Sensor2", 2048, NULL, 1, NULL);
    xTaskCreate(ProcessingTask, "Processing", 2048, NULL, 2, NULL);
}This code shows how to use Event Groups in FreeRTOS to coordinate multiple tasks.
Two sensor tasks set event bits when their data is ready, and the processing task waits until both sensors have finished before processing the data. It ensures proper synchronization without using queues or semaphores.
Result: Console Output
The image below shows how each sensor task reads data and sets its bit, and once both bits are set, the Processing Task runs.
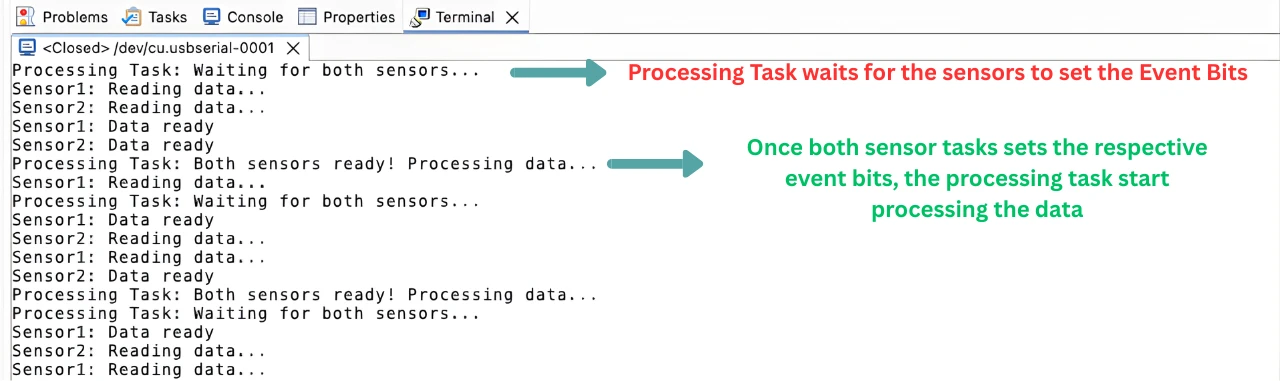
The image demonstrates that the processing task depends on two sensor tasks. It begins by waiting for both sensors to complete their readings before it starts processing.
Once both sensors indicate that their data is ready, the processing task detects this condition and immediately begins processing the combined sensor data.
This approach ensures that the processing task never runs prematurely with incomplete information and maintains proper coordination between tasks. The cycle then repeats, showing how tasks can efficiently synchronize in a real-time system without busy-waiting, preserving CPU resources and guaranteeing correct data handling.
When to Use Event Groups Instead of Queues
Use Event Groups when:
- You just need to signal states or events, not send actual data.
- Multiple tasks depend on common conditions.
- You want to wait for multiple events at once.
Use Queues when:
- Tasks need to exchange data (e.g., sensor readings, messages).
- You want to buffer multiple data items safely.
The table below shows the difference between FreeRTOS Queues and Event Groups.
| Feature | Event Groups | Queues |
|---|---|---|
| Purpose | Used for signaling and synchronization between tasks | Used for sending and receiving data between tasks |
| Data Handling | Only sets or clears bits (no actual data transfer) | Transfers actual data values or structures |
| Memory Usage | Very low (only a few bits) | Higher (depends on queue size and data type) |
| Direction | Typically many-to-one or one-to-many signaling | Usually one-to-one or one-to-many data transfer |
| Blocking Behavior | Tasks can wait for one or multiple bits to be set | Tasks can block while waiting for data or space |
| Use Case Example | Waiting for multiple tasks to finish (e.g., all sensors ready) | Passing sensor readings or messages between tasks |
| When to Use | When you only need to signal events or status flags | When you need to share data or messages between tasks |
Download ESP32 FreeRTOS Inter-Task Communication Project Files (Part 4)
Complete ESP-IDF project with queue, semaphore, mutex, and event group examples — includes sensor-to-display queue demo, binary semaphore sync, mutex-protected UART, and multi-task event group coordination — support the work if it helped you.
FreeRTOS Inter Task Communication: Frequently Asked Questions
Conclusion
FreeRTOS gives you four tools for inter-task communication, each with a specific role. Queues are for data — pass sensor readings, commands, or any structured value from one task to another safely. Binary semaphores are for signals — one task tells another that something happened. Mutexes are for protection — only one task can hold a mutex at a time, making shared peripherals like I²C or SPI safe to use from multiple tasks. Event groups are for coordination — wait for multiple events before proceeding.
Using global variables instead is the most common FreeRTOS mistake in ESP32 projects. It works until two tasks access the variable at the same time mid-write and the value becomes corrupted. Use a queue or mutex instead — always.
In Part 5 we cover software timers and task notifications — lighter alternatives to queues for periodic actions and simple task signaling.
Browse More ESP32 FreeRTOS Tutorials
FreeRTOS ESP32 Scheduler: Task States & Context Switching
ESP32 FreeRTOS Task Priority & Stack Size: Full Guide
ESP32 FreeRTOS Software Timers & Task Notifications
ESP32 FreeRTOS: Suspend, Resume & Delete Tasks (ESP-IDF)
ESP32 FreeRTOS Multitasking Project: ADC, UART & LED Tasks

Subscribe
Login
0 Comments
Newest
