Published: December 3, 2025
Last Updated: March 23, 2026
Last Updated: March 23, 2026
STM32 W5500 CGI Web Server: Control LED, PWM and Read Sensor Data
Building a web server on STM32 becomes more powerful when it can send and receive real-time data. In this part of the STM32 W5500 series, we will create a dynamic HTTP web server using CGI. With CGI, your STM32 board can exchange data with the browser, control hardware, and send sensor readings without changing pages.
In this tutorial, we will control an LED, adjust PWM brightness, and read live temperature, pressure, and humidity from a BME280 sensor. All the actions happen on a single webpage, and the data moves between the server and the browser through clean GET and POST requests.
This post explains the full setup step-by-step. We cover the hardware wiring, CubeMX configuration, CGI code, webpage script, and final testing. Whether you are new to CGI or already using W5500 Ethernet, this guide will help you build a smooth and responsive STM32 web interface.
Prerequisite:
This post continues from the Part 5, STM32 HTTP Webserver using W5500. Make sure to go through it before continuing with this one.
Introduction to CGI on STM32 W5500
In this part of the tutorial, we will look at how CGI works on the STM32 W5500 webserver. CGI is an important feature because it allows your web pages to show live data and also send control commands back to the microcontroller. This section explains what CGI is, why it matters, and how it helps your STM32 and browser talk to each other in real time.
What is CGI
CGI, or Common Gateway Interface, is a simple way for a web server to run small programs when a browser makes a request. These programs can read data, update hardware values, or build dynamic content before sending it back to the browser. Instead of showing only fixed HTML files, CGI lets the STM32 create responses on the fly.
Why CGI is useful in embedded projects
CGI is very helpful in embedded systems because it allows direct control over hardware from a web browser. You can turn LEDs on or off, change PWM values, or read sensor data without reloading pages or creating complex code. CGI keeps the web interface clean and flexible, while the STM32 handles the actions through simple request handlers.
How CGI helps exchange data between STM32 and browser
CGI creates a bridge between the STM32 and the browser. The browser sends GET or POST requests, and the STM32 reacts by providing new sensor data or processing control commands. This makes the webserver interactive. For example, sensor.cgi returns live temperature, humidity, and pressure values, while LED and PWM controls use POST requests to update hardware in real time.
Setting Up the HTTP Server Files for W5500
In this section, we will prepare all the files needed to run the HTTP server on STM32. The W5500 library already includes an HTTP server module, so we only need to add it to our project and make a few small adjustments. By the end of this section, your project will have all the required code to receive and process HTTP requests.
Adding the Wiznet HTTP Server Library
The Wiznet IO Library contains a complete HTTP server solution inside the internet folder. To use it:
- Open the Wiznet IO library that you downloaded in Part 1 of this series.
- Go to the internet directory.
- Find the folder named httpServer.
- Copy this entire folder into your STM32 project.
- Place it inside the ethernet folder you created for W5500 files.

This folder includes functions for creating sockets, parsing requests, and sending web pages, so you don’t need to write any low-level code yourself.
Copying Example HTTP Server Files
Along with the main library, we will use an example HTTP server that makes it easier to understand how everything works.
- Download the example project from the link provided in the end of the article.
- Copy the
http_server_example.cand.hfiles into your project. - These files include basic webpages and functions to bind each page to a specific URI.
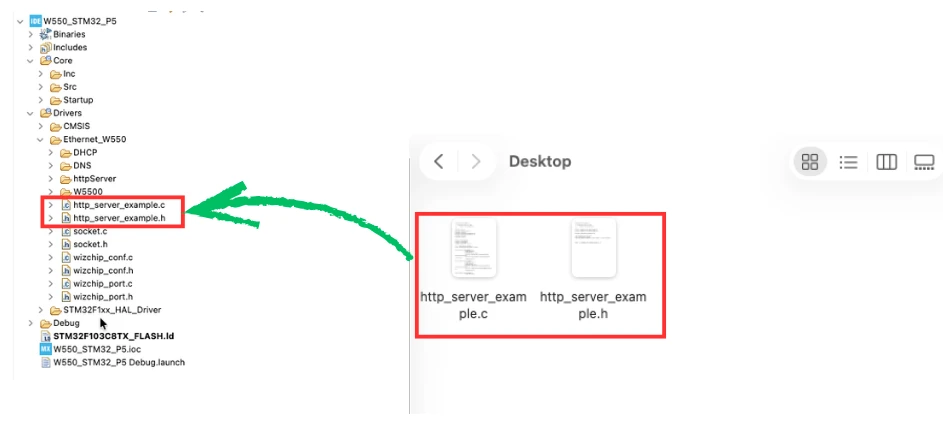
By adding these example files, you get a working structure that you can modify for your own application, such as controlling LEDs, motors, or sensors from a browser.
CGI Implementation in STM32 Project
In this section, we write the main logic that makes the web page communicate with the STM32. CGI is the bridge between the browser and the hardware. The browser sends GET or POST requests, and the STM32 responds by reading sensors, updating LEDs, or changing PWM values. Let’s go through each part of the CGI implementation based on the code used in this project.
Adding CGI handler files
The W5500 HTTP server uses built-in CGI support through httpServer, httpParser, and httpUtil. In this project, we include the main CGI handlers inside http_server_example.c.
At the top of the file, we import all the needed headers, including:
httpServer/httpServer.hhttpServer/httpParser.hhttpServer/httpUtil.h
We also declare the external functions:
extern void led_Control(uint8_t state);
extern void pwm_Set(int val);
extern void getBME (float temp, float pres, float hum);These functions are implemented on the user side, and the CGI handlers will call them whenever the browser sends a request.
Handling GET requests for sensor.cgi
GET requests are used when the browser wants to read data from the STM32. In our case, the web page uses a GET request every 5 seconds to update the temperature, humidity, and pressure values.
The GET handler is the function:
uint8_t predefined_get_cgi_processor(...)Inside it, we check if the request is for sensor.cgi:
if (strstr((char*)uri_name, "sensor.cgi"))If yes, we read sensor values by calling:
getBME(Temperature, Pressure, Humidity);Then we prepare a JSON string:
sprintf(buf, "{\"temp\": %.2f, \"hum\": %.2f, \"pres\": %.2f}", ...);This JSON response is what the browser uses to update the sensor values on the page. The handler sets the length and returns 1 to confirm the request was processed.
Handling POST requests for led.cgi
POST requests are used when the browser sends data to the STM32. The LED control section uses POST requests to turn the LED ON or OFF.
In the POST handler:
if(strcmp((char*)uri_name, "led.cgi") == 0)We extract the data string led=on or led=off:
char* p = strstr(uri, "led=");After reading the value:
- If the string is
"on"->led_Control(1) - If the string is
"off"->led_Control(0)
Then we send a simple response:
sprintf(buf, "ON");or:
sprintf(buf, "OFF");This text is displayed on the web page under the LED status section.
Handling POST requests for pwm.cgi
The PWM control slider also sends data using POST requests.
Each time the slider moves, the browser sends a request such as:
pwm=128In the CGI handler:
if(strcmp(uri_name, "pwm.cgi") == 0)We extract the PWM value:
int val = atoi(value + 4);This value is passed to:
pwm_Set(val);This updates the CCR register and changes the LED brightness. We return a simple response "Updated", although the page does not use it.
HTML and JavaScript for the STM32 CGI Webpage
The webpage plays an important role in this CGI project. It provides a simple user interface that sends requests to the STM32 and displays real-time sensor data. The page is created directly inside the firmware as a static HTML string. In this section, we will break down each part of the page and see how JavaScript interacts with the STM32 W5500 web server.
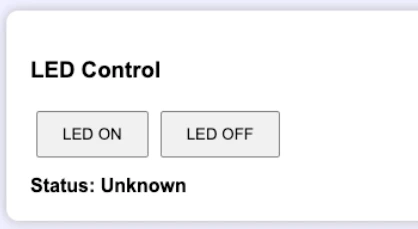
LED control buttons
The first section of the page includes two buttons: LED ON and LED OFF. These buttons call a JavaScript function named setLED() and pass either "on" or "off" as the value.
<button onclick="setLED('on')">LED ON</button>
<button onclick="setLED('off')">LED OFF</button>Inside the setLED function, we send a POST request to led.cgi:
fetch('led.cgi', {
   method: 'POST',
   headers: {'Content-Type':'application/x-www-form-urlencoded'},
   body:'led='+state
})The server reads the data string (led=on or led=off) and updates the GPIO pin through the led_Control() function. The server then responds with the text "ON" or "OFF", and we display this text on the web page:
.then(t => { document.getElementById('ledStatus').innerHTML = 'Status: ' + t; });This gives the user instant feedback about the LED status.
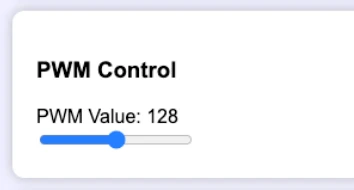
PWM slider implementation
The PWM slider creates a smooth and interactive way to control LED brightness.
The slider ranges from 0 to 255:
<input type="range" id="pwmSlider" min="0" max="255" value="128" oninput="sendPWM(this.value);">Each time the slider moves, JavaScript calls:
sendPWM(this.value);The function sendPWM() sends a POST request to pwm.cgi:
fetch('pwm.cgi', {
   method:'POST',
   headers:{'Content-Type':'application/x-www-form-urlencoded'},
   body:'pwm='+v
});The STM32 extracts the value and updates the timer through the pwm_Set() function. This changes the duty cycle, and the LED brightness varies immediately.
Reading BME280 values with periodic GET requests
The last section shows live sensor values: temperature, humidity, and pressure. These values are refreshed every 5 seconds.
We use the function updateSensors():
function updateSensors(){
   fetch('sensor.cgi')
   .then(r => r.json())
   .then(data => {
      document.getElementById('temp').innerHTML = data.temp;
      document.getElementById('hum').innerHTML = data.hum;
      document.getElementById('pres').innerHTML = data.pres;
   });
}The page sends a GET request to sensor.cgi, and the STM32 responds with JSON data:
{"temp":25.20,"hum":45.30,"pres":1008.45}JavaScript reads this data and updates the numbers on the screen. This gives the user a real-time sensor dashboard that works without refreshing the page.

Configuring the HTTP Server Functions in STM32
In this section, we will break down the important functions that make the HTTP server work. These functions define how many sockets the server will use, how the server starts, how pages are registered, and how the server runs inside the main loop. Understanding these functions will help you customize or expand the web server in your own projects.
Setting the Number of Sockets for the HTTP Server
Before starting the server, we must tell the W5500 how many sockets we want to use:
#define HTTP_MAX_SOCK 2
uint8_t sockList[] = {0, 1};Here:
- HTTP_MAX_SOCK = 2 means we are using two sockets for the HTTP server.
- sockList[] = {0, 1} tells the server to use socket 0 and socket 1.
Using multiple sockets allows the server to handle more than one client at a time and makes the web interface more responsive.
Note: W5500 provides 8 hardware sockets in total. out of these socket 7 is used by DHCP and socket 6 is used by DNS server in the part 1. Therefore, we can use only from 6 available sockets (0 – 5).
Understanding the httpServer_setup Function
The main setup function initializes the HTTP server and registers all static pages:
void httpServer_setup(void)
{
    httpServer_init(tx_buf, rx_buf, HTTP_MAX_SOCK, sockList);

    reg_httpServer_cbfunc(NVIC_SystemReset, NULL);

    /* Register Static pages */
    reg_httpServer_webContent((uint8_t*)"index.html", (uint8_t*)index_page);
}Here is what each part does:
httpServer_init()
This function initializes the server with:
- Transmit buffer
- Receive buffer
- Number of sockets
- Socket list
It prepares the W5500 so it can start accepting HTTP requests.
reg_httpServer_cbfunc()
This function is used to register two optional callback functions that the HTTP server can call internally:
- The first parameter is the MCU reset function.
By passingNVIC_SystemReset, we are allowing the HTTP server to trigger a system reset if needed (usually related to firmware update or recovery mechanisms). - The second parameter is a watchdog reset callback.
Since we do not use any watchdog functionality in this project, we passNULL.
Registering Static Pages
These lines bind each URI to its page:
reg_httpServer_webContent("index.html", index_page);Since we only have 1 static page (index.html), we will register that here.
Running the HTTP Server in the Main Loop
The server needs to keep processing requests, so we call this function inside the while loop:
void httpServerRun (void)
{
    for (int sn = 0; sn < HTTP_MAX_SOCK; sn++){
    	httpServer_run(sn);
    }
}Here’s how it works:
- The function loops through all sockets defined in
HTTP_MAX_SOCK. - httpServer_run(sn) handles everything for that socket, including:
- Accepting clients
- Parsing HTTP requests
- Matching URIs
- Sending the correct webpage
- Closing the socket if needed
You can call this function in:
- The main while loop, or
- Inside a FreeRTOS task
As long as it runs continuously, your web server stays active and responsive.
Hardware Setup for STM32 W5500 CGI Web Server
The hardware setup for this CGI-based web server is simple and uses common modules. The STM32 board communicates with the W5500 Ethernet module over SPI, while the BME280 sensor uses the I2C interface for environmental data. We also connect a basic LED for ON/OFF control and one PWM output to test brightness control from the browser.
The connection between STM32 and W5500 is already explained in the PART1 of this series, so we will just focus on the new components that are being added in this tutorial. The image below shows the wiring connection between BME280, LED1, LED2 and STM32F103C8.
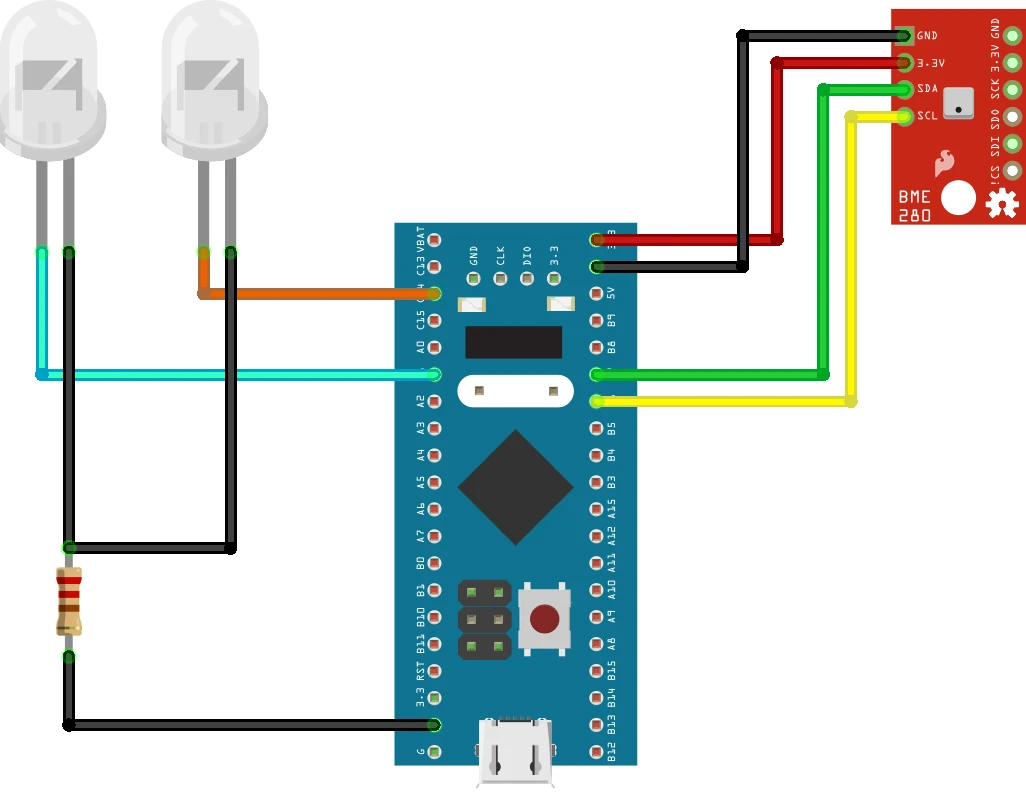
The table below lists all the connections clearly so you can wire everything without confusion.
| Component | STM32 Pin | Module Pin | Description |
|---|---|---|---|
| BME280 Sensor (I2C) | PB6 | SCL | I2C clock line |
| PB7 | SDA | I2C data line | |
| 3.3V | VCC | Sensor power | |
| GND | GND | Common ground | |
| LED (ON/OFF Control) | PC14 (or any GPIO) | LED + | Used to toggle LED state |
| GND | LED – | Current-limited LED output | |
| PWM Output LED | TIM2_CH2 pin (e.g., PA1) | LED + | PWM brightness control |
| GND | LED – | For dimming test |
STM32CubeMX Configuration for CGI Web Server
Before we compile the firmware, we must configure a few peripherals in STM32CubeMX. These settings allow the STM32 to talk to the W5500 module, read sensor values, and control the LEDs. The setup is simple, and each step prepares the microcontroller for the CGI features used in the project.
I2C setup for BME280
The BME280 uses the I2C interface. The image below shows the I2C1 configuration for BME280.
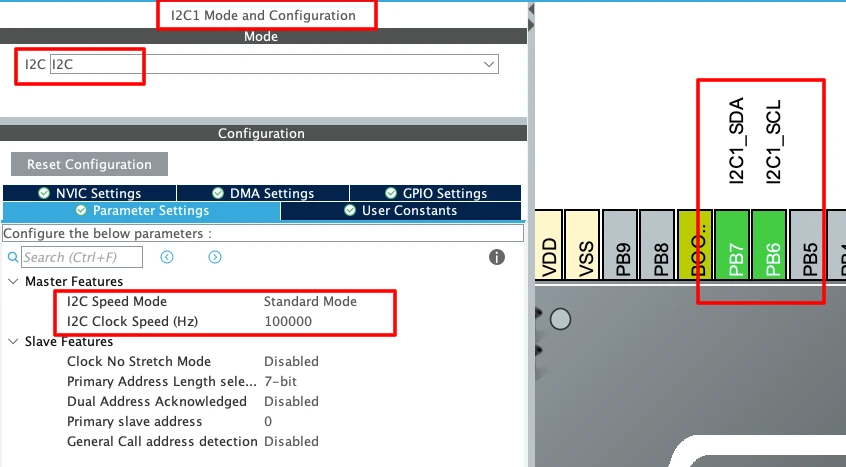
- Keep the default mode and timing settings because the sensor works well with the standard configuration.
- Make sure the assigned pins (PB6 for SCL and PB7 for SDA) match your board layout.
- This interface will be used to read temperature, pressure, and humidity values.
GPIO setup for on/off LED
Next, configure the GPIO pin that controls the LED. The image below shows the PC14 configuration for the LED.
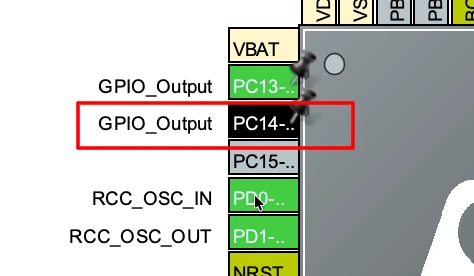
Set PC14 as GPIO Output. This pin will be toggled through the CGI POST request in led.cgi.
Timer and PWM configuration
For PWM control, enable Timer 2 and select Channel 2 in PWM mode.

- CubeMX will assign PA1 as the PWM output pin.
- Set the Prescaler to a suitable value (for example 100) to reduce the PWM frequency.
- Set the Auto-Reload value (ARR) to 255 so the PWM matches the slider range on the webpage.
- This allows the slider to send values from 0 to 255 and adjust the duty cycle smoothly.
Testing the STM32 CGI Web Server
Once the code is flashed and the hardware is connected, it’s time to test the CGI web server. During testing, you should expect to see the server responding to both GET and POST requests, updating hardware in real time, and sending sensor values back to the browser. This section will show what to look for and how to confirm that each feature works correctly.
Viewing logs in UART
Open your UART or serial monitor to view the debug messages.
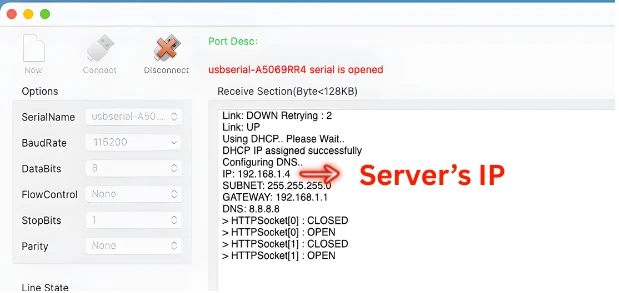
When the STM32 starts, you should see logs showing the W5500 initialization and the HTTP server status.
As the web page loads and sends requests, you will also see GET and POST activity printed in the logs. This is helpful for confirming that the server is receiving the correct CGI calls such as sensor.cgi, led.cgi, and pwm.cgi.
Checking LED control
Open a web browser and enter the IP address shown in the serial logs.
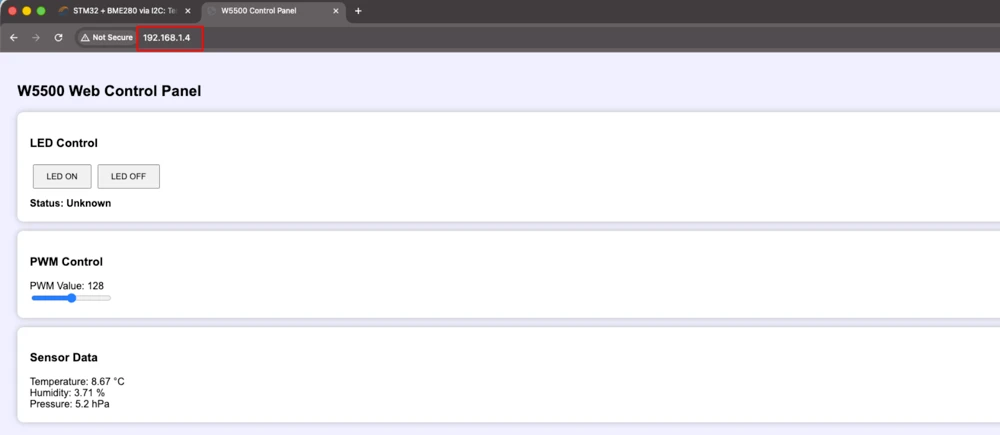
The index page will load with three sections, LED control, PWM setting and Sensor Data.
The gif below shows the working of LED control.

- As shown in the gif, when the LED ON button is pressed, the LED connected to the GPIO pin turns on right away.
- When the LED OFF button is pressed, the LED switches off.
- You can also see the status text on the webpage update to ON or OFF, based on the response sent by the STM32.
- This confirms that the POST request handled by led.cgi is working as expected.
Testing PWM output
The slider on the webpage can control the LED brightness directly. The gif below shows the LED brightness being controlled by the slider.

- As shown in the gif, when you move the slider left or right, the LED connected to the PWM pin changes its brightness smoothly based on the slider value.
- Each slider movement sends a POST request to pwm.cgi, and the
pwm_Set()function updates the duty cycle inside the STM32. - If the LED brightness responds instantly to the slider, it confirms that the PWM control is working correctly.
Confirming sensor updates
Finally, look at the sensor data section. The temperature, pressure and humidity values updates every 5 seconds.
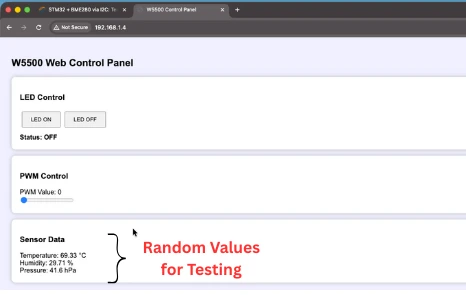
- Each update comes from a GET request sent to
sensor.cgi. - The STM32 responds with JSON data, and the webpage displays the new values.
- If you see fresh readings every few seconds, it means the GET handler and the sensor update logic are working properly.
Video Tutorial
STM32 W5500 CGI Web Server Video Tutorial
This video is part 6 of the STM32 W5500 Ethernet series and focuses on creating a dynamic CGI-based Web Server on the STM32. In this tutorial, you will learn how to handle GET and POST requests, control an LED, adjust PWM brightness, and read live BME280 sensor data directly from a browser. The video also explains how the CGI handlers work inside the firmware, how the webpage sends data using JavaScript, and how the STM32 responds with real-time values in JSON format. Watch the full video below.
Watch the STM32 CGI Web Server TutorialConclusion
In this tutorial, we created a complete CGI-based web server using STM32 and the W5500 Ethernet module. We covered every part of the setup, including CubeMX configuration, hardware wiring, CGI handlers for GET and POST requests, and the HTML/JavaScript code that runs the webpage. We also tested the system and confirmed that LED control, PWM output, and sensor data updates all work smoothly through real-time browser requests.
This setup is very useful for embedded applications that need interactive control and live data monitoring over a network. With CGI, your STM32 can talk directly to any browser without special software, making it ideal for home automation, sensor dashboards, or any project where remote access is required. This foundation also prepares us for more advanced protocols like MQTT, which we will explore in the next part of the series.
Browse More STM32 W5500 Tutorials
STM32 W5500 Ethernet Tutorial (Part 2): Create a TCP Server to Receive and Process Data
STM32 W5500 Ethernet Tutorial (PART 3): TCP Server with FreeRTOS
STM32 W5500 Ethernet Tutorial (Part 4): Connect STM32 to TCP Server Using DNS and Static IP
STM32 W5500 Ethernet Tutorial (Part 5): HTTP Webserver on STM32

STM32 W5500 Ethernet Tutorial (Part 7): STM32 as MQTT Client
STM32 W5500 HTTP Server Project Download
STM32 W5500 HTTP Server FAQs
Subscribe
Login
0 Comments
Newest
