Published: December 14, 2025
Last Updated: February 5, 2026
Last Updated: February 5, 2026
Arduino FreeRTOS Task Scheduling: Tasks, Priorities, and Scheduler Internals
FreeRTOS makes Arduino multitasking possible. But tasks alone are not enough. To build stable systems, you must understand task priorities, scheduler behavior, and time slicing. This becomes even more important on AVR boards like Arduino Uno, where RAM is limited to just 2 KB.
In this part of the FreeRTOS tutorial series, we focus on how tasks actually run. We will not use theory-heavy explanations. Instead, we will see the scheduler working in real time.
You will learn:
- How FreeRTOS tasks move between states
- How the FreeRTOS scheduler works on AVR
- How task priorities affect execution
- Why starvation happens
- How to fix scheduling problems correctly
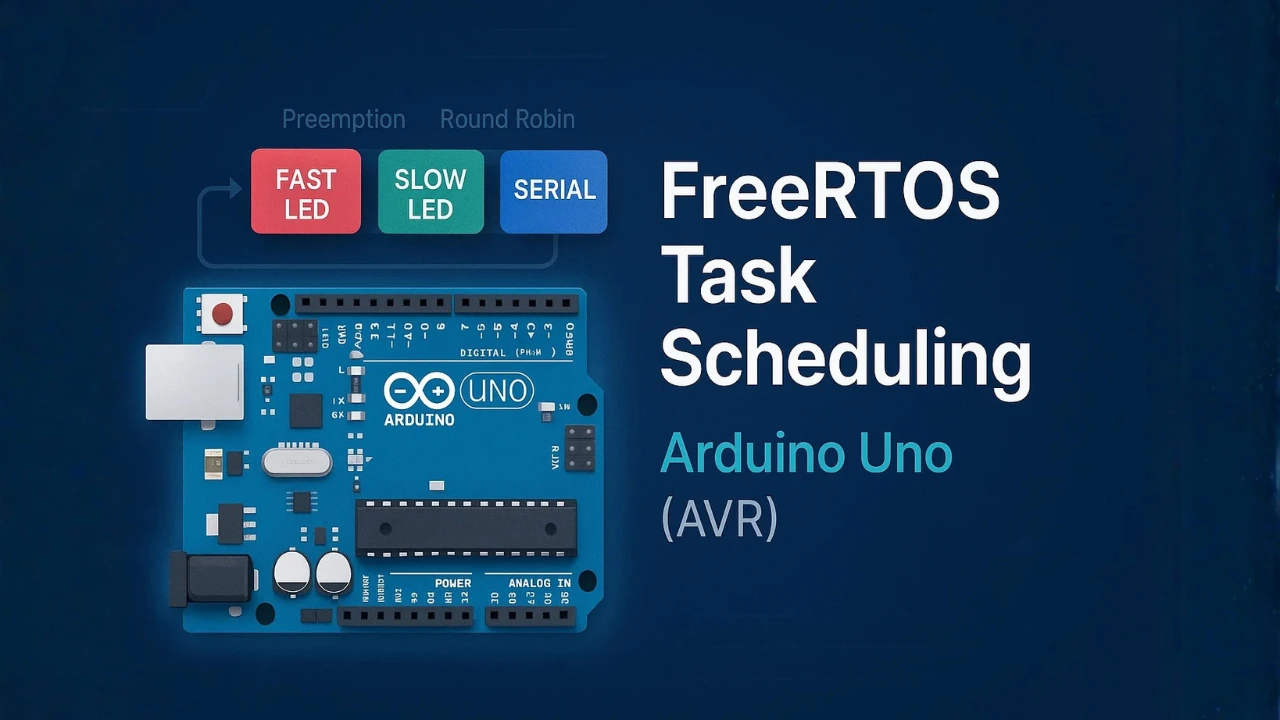
Table Of Contents
- Understanding FreeRTOS Tasks and Scheduler on Arduino
- How the FreeRTOS Scheduler Works on AVR
- Time Slicing and Round-Robin Scheduling in Arduino_FreeRTOS
- FreeRTOS Task Priorities Simplified
- Stack Size and Memory Usage on 2 KB AVR
- Hands-On FreeRTOS Task Scheduling Demo
- Demonstrating Priority Problems in FreeRTOS
- Complete FreeRTOS Arduino Example Code
- Conclusion
Understanding FreeRTOS Tasks and Scheduler on Arduino
FreeRTOS allows Arduino to run more than one task at the same time. Each task behaves like a small program with its own execution flow.
On AVR boards like Arduino Uno, this is even more important because the hardware is limited. To use FreeRTOS correctly, you must first understand what a task is and how the scheduler controls it.
What Is a FreeRTOS Task on AVR Arduino
A FreeRTOS task is a function that runs forever. It usually contains an infinite loop.
Unlike the loop() function in Arduino, a task:
- Has its own stack memory
- Has a priority level
- Is managed by the FreeRTOS scheduler
A basic FreeRTOS task looks like this:
void LedTask(void *pvParameters)
{
  while (1)
  {
    digitalWrite(LED_BUILTIN, HIGH);
    vTaskDelay(500 / portTICK_PERIOD_MS);
    digitalWrite(LED_BUILTIN, LOW);
    vTaskDelay(500 / portTICK_PERIOD_MS);
  }
}This task never exits. Instead, it yields control using vTaskDelay().
On AVR Arduino, FreeRTOS switches between tasks very fast. To your eyes, everything looks like it is running in parallel.
Task State Machine Explained (Ready, Running, Blocked, Suspended)
Every FreeRTOS task moves through a task state machine. The scheduler decides the state of each task at all times.
The main task states are:
- Ready: The task can run but is waiting for CPU time.
- Running: The task is currently executing on the CPU.
- Blocked: The task is waiting for something. This is usually a delay, timer, or resource.
- Suspended: The task is stopped manually and will not run until resumed.

A task changes state automatically based on what it does.
Example:
vTaskDelay(1000 / portTICK_PERIOD_MS);This line puts the task into the Blocked state. After 1 second, the task becomes Ready again. Only one task can be Running at a time on AVR.
How Task State Changes in Real Projects
In real Arduino projects, task state changes happen all the time.
Let’s take a simple example with two tasks:
- LED blink task
- Serial print task
When the LED task calls vTaskDelay():
- LED task → Blocked
- Serial task → Running
When the delay expires:
- LED task → Ready
- Scheduler decides who runs next
Here is a short example:
void SerialTask(void *pvParameters)
{
  while (1)
  {
    Serial.println("FreeRTOS is running");
    vTaskDelay(1000 / portTICK_PERIOD_MS);
  }
}Most well-written FreeRTOS tasks spend more time blocked than running. This is a good thing.
Blocking allows:
- Better CPU sharing
- Lower power usage
- Fair task execution
If a task never blocks, it can starve other tasks. We will demonstrate this problem later in this tutorial.
How the FreeRTOS Scheduler Works on AVR
The FreeRTOS scheduler is the heart of multitasking. It decides which task runs, when it runs, and for how long.
On AVR-based boards like Arduino Uno, the scheduler works within strict limits. There is only one CPU core, very little RAM, and limited processing power.
Yet, FreeRTOS still manages to run multiple tasks reliably.
What the Scheduler Does Internally
The scheduler constantly tracks all tasks in the system.
For each task, it knows:
- Current task state
- Task priority
- Delay or block time
- Stack pointer location
Internally, FreeRTOS keeps tasks in different lists:
- Ready list
- Blocked list
- Suspended list
When the scheduler runs, it follows a simple rule: Pick the highest-priority task that is in the Ready state.
If a task is blocked or suspended, the scheduler ignores it. This decision happens:
- On every system tick
- When a task blocks
- When a task unblocks
- When a higher-priority task becomes ready
On Arduino, this process happens so fast that it looks like tasks run together.
Preemptive Scheduling in Arduino_FreeRTOS
Arduino_FreeRTOS uses preemptive scheduling by default. Preemptive scheduling means:
- A higher-priority task can interrupt a running task
- The lower-priority task is paused automatically
- The CPU is given to the higher-priority task immediately
Example:
xTaskCreate(FastTask, "Fast", 128, NULL, 2, NULL);
xTaskCreate(SlowTask, "Slow", 128, NULL, 1, NULL);If FastTask becomes ready:
SlowTaskis preemptedFastTaskstarts running instantly
You do not need to stop or yield the slow task manually. The scheduler handles everything. This is why priority selection is critical in FreeRTOS systems.
Context Switching on 8-bit AVR
Context switching is how FreeRTOS pauses one task and resumes another. On 8-bit AVR, this process is carefully optimized.
During a context switch, FreeRTOS:
- Saves CPU registers of the current task
- Saves the stack pointer
- Restores registers of the next task
- Restores its stack pointer
All of this happens inside an interrupt. Usually, the SysTick timer triggers it.
Example trigger points:
- Tick interrupt
vTaskDelay()taskYIELD()
Even though AVR is slow compared to modern CPUs, context switching is fast enough. That is why LED blinking, serial printing, and sensor reading can run together smoothly. However, excessive context switching can waste CPU time. This is why proper delays and priorities matter.
Time Slicing and Round-Robin Scheduling in Arduino_FreeRTOS
FreeRTOS does not randomly switch between tasks. It follows clear scheduling rules. When tasks have different priorities, scheduling is simple. But when tasks share the same priority, FreeRTOS uses time slicing.
Understanding this behavior helps avoid confusion and timing bugs in Arduino projects.
What Is Time Slicing
Time slicing means sharing CPU time between tasks of the same priority. Each task runs for a short time slice. Then the scheduler switches to the next task.
On Arduino_FreeRTOS, the time slice is controlled by the RTOS tick. By default, this tick occurs every 1 ms.
If a task does not block and has the same priority as others:
- It runs until the next tick
- Then it may be switched out
This creates the illusion that multiple tasks run at the same time.
Same Priority Tasks and Round-Robin Behavior
When two or more tasks have the same priority, FreeRTOS uses round-robin scheduling.
This means:
- Task A runs
- Then Task B runs
- Then Task C runs
- Then back to Task A
Each task gets a fair chance to execute.
Example:
xTaskCreate(Task1, "T1", 128, NULL, 1, NULL);
xTaskCreate(Task2, "T2", 128, NULL, 1, NULL);Both tasks have priority 1. If neither task blocks:
- They alternate execution
- CPU time is shared evenly

This behavior works only when time slicing is enabled, which is true by default in Arduino_FreeRTOS.
When Time Slicing Actually Happens
Time slicing does not happen all the time. It happens only when:
- Tasks have the same priority
- Preemption is enabled
- More than one task is in the Ready state
If a task calls:
vTaskDelay(100 / portTICK_PERIOD_MS);That task becomes Blocked. The scheduler immediately switches to another ready task.
If one task has a higher priority, time slicing is ignored. The higher-priority task keeps running.
This is why FreeRTOS systems often use:
- Short delays
- Careful priority design
FreeRTOS Task Priorities Simplified
Task priority decides who gets the CPU first. FreeRTOS keeps this rule simple and strict. On Arduino AVR, understanding priorities is critical. One wrong priority value can block your entire system.
Let’s break it down in a practical way.
Highest Priority Always Wins
FreeRTOS always runs the highest-priority Ready task. If a higher-priority task becomes ready:
- The current task stops
- The higher-priority task starts immediately
Example:
xTaskCreate(LedTask, "LED", 128, NULL, 3, NULL);
xTaskCreate(SerialTask, "SER", 128, NULL, 1, NULL);If LedTask is ready:
SerialTaskwill not run- Even if
SerialTaskwas running before
This behavior is called preemption. On AVR, only one task runs at a time. Priority decides which one that is.
Starvation Explained with a Simple Example
Starvation happens when a task never gets CPU time.
This usually occurs when:
- A high-priority task
- Never blocks
- Runs inside an infinite loop
Example of a bad task:
void BadTask(void *pvParameters)
{
  while (1)
  {
    digitalWrite(LED_BUILTIN, !digitalRead(LED_BUILTIN));
  }
}If this task has the highest priority:
- Lower-priority tasks never run
- Serial output stops
- System appears frozen
This is a classic FreeRTOS beginner mistake. The scheduler is not broken, the priority design is.
Cooperative Fairness Using vTaskDelay()
Good FreeRTOS tasks cooperate with the scheduler. They do this by blocking themselves when work is done. The most common way is vTaskDelay().
Example:
void GoodTask(void *pvParameters)
{
  while (1)
  {
    digitalWrite(LED_BUILTIN, HIGH);
    vTaskDelay(100 / portTICK_PERIOD_MS);
    digitalWrite(LED_BUILTIN, LOW);
    vTaskDelay(100 / portTICK_PERIOD_MS);
  }
}Here is what happens:
- Task runs
- Task delays
- Task enters Blocked state
- Other tasks get CPU time
This creates cooperative fairness.
On Arduino FreeRTOS:
- Always add delays
- Always block when possible
- Use priorities carefully
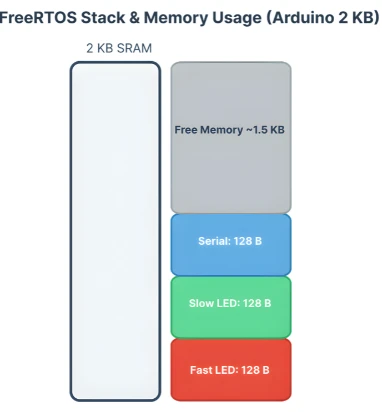
Stack Size and Memory Usage on 2 KB AVR
Arduino Uno has only 2 KB of SRAM. FreeRTOS must fit all task stacks, heap, and global variables inside this space. Because of this, stack size planning is not optional. It is mandatory.
Many FreeRTOS crashes on Arduino happen due to stack overflow, not logic errors.
Why Stack Size Matters on Arduino Uno
Every FreeRTOS task gets its own stack.
This stack stores:
- Local variables
- Function call data
- Return addresses
If the stack is too small:
- Memory gets overwritten
- Random crashes occur
- Tasks behave unpredictably
Example task creation:
xTaskCreate(LedTask, "LED", 128, NULL, 1, NULL);The value 128 means 128 words, not bytes.
On AVR:
- 1 word = 2 bytes
- 128 words = 256 bytes
Three tasks like this already use 768 bytes of RAM.
How FreeRTOS Allocates Stack Per Task
FreeRTOS allocates stack memory when the task is created. The memory comes from the FreeRTOS heap, not the Arduino heap.
Each task uses memory for:
- Stack
- Task Control Block (TCB)
The TCB stores:
- Task state
- Priority
- Stack pointer
Once allocated, this memory stays reserved for the task.
If memory runs out:
xTaskCreate() // fails silently if not checkedAlways check return values when creating tasks. For example:
BaseType_t status = xTaskCreate(LedTask, "LED", 128, NULL, 1, NULL);
if (status != pdPASS)
{
  Serial.println("LED task creation failed!");
}Common Stack Size Mistakes
Some common mistakes cause stack problems on AVR:
- Allocating very large stacks “just to be safe”
- Using
Serial.print()heavily in small stacks - Creating too many tasks
- Declaring large local arrays inside tasks
Example of a dangerous pattern:
void BadTask(void *pvParameters)
{
  char buffer[200];
  while (1)
  {
    // heavy processing
    vTaskDelay(100);
  }
}This single array can consume most of the stack.
Best practices:
- Keep stacks small
- Avoid large local variables
- Share buffers using global memory
- Use delays to reduce stack pressure
Hands-On FreeRTOS Task Scheduling Demo
Now it is time to see the FreeRTOS scheduler in action. Theory makes sense only when you can see the behavior on real hardware.
In this demo, we will run three FreeRTOS tasks on an Arduino AVR board. Each task has a clear purpose and different timing behavior. This setup will help us observe priorities, preemption, and fair scheduling.
Project Overview: 3 Tasks on Arduino
We will create three independent tasks:
- Fast LED blink task
- Slow LED blink task
- Serial logger task
Each task runs in its own infinite loop. Each task uses vTaskDelay() to cooperate with the scheduler.
Hardware used:
- Arduino Uno (or any AVR board)
- Built-in LED (pin 13)
- Serial Monitor
Task goals:
- LEDs show timing differences
- Serial output shows which task is running
- Scheduler behavior becomes visible
Fast LED Blink Task
This task blinks the LED very fast. It runs frequently and wakes up often.
Short delay means:
- Task becomes Ready very often
- Scheduler selects it frequently
Example task code:
void FastBlinkTask(void *pvParameters)
{
  pinMode(3, OUTPUT);

  while (1)
  {
    digitalWrite(3, HIGH);
    vTaskDelay(100 / portTICK_PERIOD_MS);

    digitalWrite(3, LOW);
    vTaskDelay(100 / portTICK_PERIOD_MS);
  }
}This task helps demonstrate preemption later when priorities change.
Slow LED Blink Task
This task blinks the LED slowly. It stays blocked for a longer time.
Long delays mean:
- Less CPU usage
- More idle time for other tasks
Example task code:
void SlowBlinkTask(void *pvParameters)
{
pinMode(2, OUTPUT);
while (1)
{
digitalWrite(2, HIGH);
vTaskDelay(1000 / portTICK_PERIOD_MS);
digitalWrite(2, LOW);
vTaskDelay(1000 / portTICK_PERIOD_MS);
}
}This task makes scheduling differences easy to see.
Serial Logger Task
This task prints messages to the Serial Monitor. It helps us observe task execution order.
Example task code:
void SerialTask(void *pvParameters)
{
Serial.begin(9600);
while (1)
{
Serial.println("Serial task running");
vTaskDelay(500 / portTICK_PERIOD_MS);
}
}Complete FreeRTOS Arduino Code
This is the full combined sketch for the demo.
#include <Arduino_FreeRTOS.h>
/* Task function prototypes */
void FastBlinkTask(void *pvParameters);
void SlowBlinkTask(void *pvParameters);
void SerialTask(void *pvParameters);
void setup()
{
Serial.begin(9600);
/* Create Fast Blink Task */
if (xTaskCreate(FastBlinkTask, "FastBlink", 128, NULL, 1, NULL) != pdPASS)
{
Serial.println("FastBlink task creation failed");
}
/* Create Slow Blink Task */
if (xTaskCreate(SlowBlinkTask, "SlowBlink", 128, NULL, 1, NULL) != pdPASS)
{
Serial.println("SlowBlink task creation failed");
}
/* Create Serial Logger Task */
if (xTaskCreate(SerialTask, "Serial", 128, NULL, 1, NULL) != pdPASS)
{
Serial.println("Serial task creation failed");
}
/* Scheduler starts automatically */
}
void loop()
{
/* Empty. FreeRTOS runs tasks */
}
/* ---------------- Task Definitions ---------------- */
void FastBlinkTask(void *pvParameters)
{
  pinMode(3, OUTPUT);

  while (1)
  {
    digitalWrite(3, HIGH);
    vTaskDelay(100 / portTICK_PERIOD_MS);

    digitalWrite(3, LOW);
    vTaskDelay(100 / portTICK_PERIOD_MS);
  }
}
void SlowBlinkTask(void *pvParameters)
{
  pinMode(2, OUTPUT);

  while (1)
  {
    digitalWrite(2, HIGH);
    vTaskDelay(1000 / portTICK_PERIOD_MS);

    digitalWrite(2, LOW);
    vTaskDelay(1000 / portTICK_PERIOD_MS);
  }
}
void SerialTask(void *pvParameters)
{
while (1)
{
Serial.println("Serial task running");
vTaskDelay(500 / portTICK_PERIOD_MS);
}
}Output
The gif below shows the Serial Monitor printing Serial task running every 500 ms, while the LED blinks at both fast and slow rates.

At this stage:
- All tasks run smoothly
- No task starves
- Scheduler shares CPU fairly
Demonstrating Priority Problems in FreeRTOS
This section shows what really goes wrong when priorities are misused. We do not change hardware or add complexity. We change only priorities and delays.
This makes scheduler behavior easy to observe and understand.
Showing Task Starvation
Starvation happens when a lower-priority task stays Ready but never runs.
Here is the setup:
- Fast LED task → priority 2
- Serial task → priority 1
- Both tasks use
vTaskDelay()
Task creation:
xTaskCreate(FastBlinkTask, "FastBlink", 128, NULL, 2, NULL);
xTaskCreate(SerialTask, "Serial", 128, NULL, 1, NULL);Fast task:
void FastBlinkTask(void *pvParameters)
{
while (1)
{
digitalWrite(3, !digitalRead(3));
vTaskDelay(1 / portTICK_PERIOD_MS);
}
}Serial task:
void SerialTask(void *pvParameters)
{
while (1)
{
Serial.println("Serial task running");
vTaskDelay(500 / portTICK_PERIOD_MS);
}
}What happens:
- FastBlink wakes up every 1 ms
- Serial task becomes Ready every 500 ms
- Scheduler always picks FastBlink first
The Serial task is Ready, but almost never runs. This is true priority-based starvation.
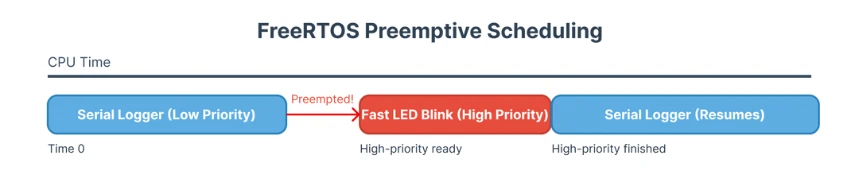
Showing Preemption in Action
Now we demonstrate preemption, not starvation.
Setup:
- Serial task starts Running
- FastBlink task has higher priority
- FastBlink wakes up later
Task creation:
xTaskCreate(SerialTask, "Serial", 128, NULL, 1, NULL);
xTaskCreate(FastBlinkTask, "FastBlink", 128, NULL, 2, NULL);Behavior:
- Serial task is Running
- FastBlink delay expires
- FastBlink becomes Ready
- Scheduler immediately switches tasks
This happens without Serial yielding. This is preemption.
Showing Cooperative Scheduling
Now we fix the system correctly. We use:
- Same priority for all tasks
- Proper delays in every task
Task creation:
xTaskCreate(FastBlinkTask, "FastBlink", 128, NULL, 1, NULL);
xTaskCreate(SlowBlinkTask, "SlowBlink", 128, NULL, 1, NULL);
xTaskCreate(SerialTask, "Serial", 128, NULL, 1, NULL);All tasks block using vTaskDelay().
Result:
- Tasks share CPU using round-robin
- No starvation
- Predictable behavior
Complete FreeRTOS Arduino Example Code
Now that we have learned about task creation, priorities, and scheduler behavior, it’s time to see everything together. Below is the full working FreeRTOS example for Arduino AVR, combining fast and slow LED blinking tasks with a Serial logger task.
This code demonstrates cooperative multitasking, proper delays, and fair CPU sharing.
Full Combined Source Code
#include <Arduino_FreeRTOS.h>
/* Task function prototypes */
void FastBlinkTask(void *pvParameters);
void SlowBlinkTask(void *pvParameters);
void SerialTask(void *pvParameters);
void setup()
{
Serial.begin(9600);
/* Create Fast Blink Task */
if (xTaskCreate(
FastBlinkTask,
"FastBlink",
128,
NULL,
2, // medium priority
NULL) != pdPASS)
{
Serial.println("FastBlink task creation failed");
}
/* Create Slow Blink Task */
if (xTaskCreate(
SlowBlinkTask,
"SlowBlink",
128,
NULL,
1, // low priority
NULL) != pdPASS)
{
Serial.println("SlowBlink task creation failed");
}
/* Create Serial Logger Task */
if (xTaskCreate(
SerialTask,
"Serial",
128,
NULL,
1, // same as slow task
NULL) != pdPASS)
{
Serial.println("Serial task creation failed");
}
/* Scheduler starts automatically */
}
void loop()
{
/* Empty. FreeRTOS runs tasks */
}
/* ---------------- Task Definitions ---------------- */
void FastBlinkTask(void *pvParameters)
{
pinMode(3, OUTPUT);
while (1)
{
digitalWrite(3, HIGH);
vTaskDelay(100 / portTICK_PERIOD_MS);
digitalWrite(3, LOW);
vTaskDelay(100 / portTICK_PERIOD_MS);
}
}
void SlowBlinkTask(void *pvParameters)
{
  pinMode(2, OUTPUT);

  while (1)
  {
    digitalWrite(2, HIGH);
    vTaskDelay(1000 / portTICK_PERIOD_MS);

    digitalWrite(2, LOW);
    vTaskDelay(1000 / portTICK_PERIOD_MS);
  }
}
void SerialTask(void *pvParameters)
{
  while (1)
  {
    Serial.println("Serial task running");
    vTaskDelay(500 / portTICK_PERIOD_MS);
  }
}Output and Behavior
The video below shows the expected behavior:
- Fast LED blinks every 100 ms.
- Slow LED blinks every 1000 ms.
- Serial Monitor prints
"Serial task running"every 500 ms.
Key Observations:
- All tasks run smoothly without blocking each other.
- Scheduler shares CPU fairly between same-priority tasks.
- The Fast LED task (higher priority) preempts other tasks as expected.
- No starvation occurs because all tasks use
vTaskDelay()for cooperative scheduling.
This is a complete working FreeRTOS multitasking example for Arduino Uno and other AVR boards.
Conclusion
In this tutorial, we explored FreeRTOS task scheduling on Arduino, focusing on practical multitasking with AVR boards. We learned what a FreeRTOS task is, how the task state machine works (Ready, Running, Blocked, Suspended), and how the scheduler manages tasks based on priority. After that We also covered preemptive scheduling, time slicing, and round-robin behavior for same-priority tasks, showing how the scheduler decides which task runs and when.
We then dove into hands-on examples, creating three tasks: Fast LED Blink, Slow LED Blink, and a Serial Logger. Through these examples, we demonstrated starvation, preemption, and cooperative fairness, emphasizing the importance of proper delays and priority assignment. We also discussed stack size and memory usage on the Arduino Uno, highlighting common mistakes and best practices for creating reliable FreeRTOS tasks.
Next, in Part 3 — Timing, we will explore the difference between vTaskDelay() and vTaskDelayUntil(), and introduce software timers. This will allow us to write tasks that run at precise intervals without drifting, and will open the door to more advanced timing control in Arduino FreeRTOS applications.
Browse More Arduino FreeRTOS Tutorials
FreeRTOS on Arduino (Part 3): vTaskDelay vs vTaskDelayUntil and Software Timers
FreeRTOS on Arduino (Part 4): Inter Task Communication with Queues
FreeRTOS on Arduino (Part 5): Semaphores and Mutex Explained with Practical Examples
FreeRTOS on Arduino (Part 6): Using Interrupts in FreeRTOS
FreeRTOS Tutorial on Arduino (Part 7): Event Groups | Multi-Event Synchronization
Arduino FreeRTOS Project Download
FAQs – FreeRTOS Basics on Arduino
Subscribe
Login
0 Comments
Newest
