Published: December 19, 2025
Last Updated: February 5, 2026
Last Updated: February 5, 2026
FreeRTOS Semaphores and Mutex Explained with Practical Examples
FreeRTOS makes Arduino far more powerful by allowing multiple tasks to run at the same time, which is extremely useful for building real-world embedded applications. However, once multitasking is introduced, new problems also start to appear, especially when different tasks try to access the same hardware or software resources.
When two or more tasks use a shared resource without proper control, the behavior becomes unpredictable. Serial output may get mixed or corrupted, button inputs may trigger multiple times, and in some cases the entire application may freeze or crash. These issues are very common when working with FreeRTOS for the first time.
This is where semaphores and mutex play a critical role. They provide a safe way for tasks to communicate with each other and to protect shared resources from being accessed at the same time. Without them, writing reliable FreeRTOS-based Arduino applications becomes very difficult.
In this tutorial, you will learn how FreeRTOS semaphores and mutex work on Arduino, explained in simple language and supported by practical examples. Instead of focusing on heavy theory, the goal is to show how these tools are actually used in real projects and why they are necessary.
Understanding Semaphores in FreeRTOS on Arduino
In FreeRTOS, tasks often need a way to coordinate with each other. Sometimes a task must wait for an event, and sometimes it needs a signal from another task or an interrupt. Semaphores provide this signaling mechanism. They help tasks work together without constantly checking conditions, which keeps the system efficient and responsive.
On Arduino, semaphores are especially useful when dealing with inputs like buttons, sensors, or interrupts. Instead of writing blocking code or using delays, FreeRTOS semaphores allow tasks to sleep until something important happens. This makes your application cleaner and more reliable.
What Is a Semaphore in FreeRTOS
A semaphore in FreeRTOS is a synchronization object used to signal events between tasks or between an interrupt and a task. It does not protect data by itself. Instead, it tells a task that something has happened and that it can continue execution.
Think of a semaphore as a flag or token. One part of the code “gives” the semaphore when an event occurs. Another task “takes” the semaphore and runs only after the signal is received. If the semaphore is not available, the task simply waits without wasting CPU time.
Binary Semaphore vs Counting Semaphore
FreeRTOS provides two main types of semaphores: binary semaphores and counting semaphores. The difference lies in how many signals they can store.
A binary semaphore can have only two states: available or unavailable. It is either given or taken. This makes it ideal for simple event signaling, such as detecting a button press or notifying a task that an interrupt has occurred.
A counting semaphore, on the other hand, can hold multiple counts. Each time the semaphore is given, its count increases. Each time it is taken, the count decreases. This is useful when multiple events may occur before a task gets a chance to handle them, such as counting pulses or tracking available resources.
The table below highlights the difference between Binary and Counting semaphore in FreeRTOS.
| Feature | Binary Semaphore | Counting Semaphore |
|---|---|---|
| Maximum count | 1 | Greater than 1 |
| States | Available or unavailable | Multiple counts |
| Purpose | Signal a single event | Track multiple events or resources |
| Typical use case | Button press, interrupt signal | Pulse counting, resource availability |
| Event storage | Can store only one event | Can store multiple events |
| Task behavior | Task waits until semaphore is given | Task waits until count is greater than zero |
| Common Arduino example | Button press notification | Counting sensor triggers |
| Missed events | Possible if given multiple times | No, events are counted |
| Complexity | Simple to use | Slightly more complex |
When Should You Use a Semaphore
You should use a semaphore when:
- A task needs to wait for an event instead of continuously checking for it in a loop. This avoids busy waiting and keeps the CPU free for other tasks.
- You want to improve system performance by allowing tasks to sleep until an event actually occurs.
- You are handling button inputs, where a task should run only when the button is pressed.
- You need to signal a task from an interrupt, such as a timer interrupt or external interrupt.
- You want to enable basic task-to-task communication, where one task notifies another that some work is ready.
Semaphores work best when the goal is event notification, not resource protection.
You should not use a semaphore when:
- You need to protect a shared resource like
Serial,I2C,SPI, or shared memory.
In such cases, a mutex is the correct solution. A mutex ensures exclusive access and supports priority inheritance. We will explore this difference in detail in the next section.
Hands-On: Using Binary Semaphore for Button Input
This section demonstrates event-based programming in FreeRTOS using a binary semaphore. A binary semaphore is ideal for signaling discrete events, such as a button press, from one task to another. Here, we’ll see how pressing a button can safely toggle an LED.
Creating a Binary Semaphore
A binary semaphore allows one task (or interrupt) to signal another task that an event has occurred. On Arduino, we create it like this:
#include <semphr.h>

SemaphoreHandle_t ButtonSemaphore;

ButtonSemaphore = xSemaphoreCreateBinary();Initially, the semaphore is empty. It will be “given” by the button task and “taken” by the LED task.
Button Task: Giving the Semaphore
The button task monitors a digital input and gives the semaphore whenever the button is pressed:
void ButtonTask(void *pvParameters) {
  const int buttonPin = 2;
  pinMode(buttonPin, INPUT_PULLUP);

  while (1) {
    if (digitalRead(buttonPin) == LOW) { // Button pressed
      xSemaphoreGive(ButtonSemaphore);
      vTaskDelay(150 / portTICK_PERIOD_MS); // Debounce delay
    }
    vTaskDelay(10 / portTICK_PERIOD_MS);
  }
}This simple debounce ensures the semaphore is only given once per press.
LED Task: Taking the Semaphore
The LED task waits for the semaphore. When it receives it, it toggles the LED:
void LEDTask(void *pvParameters) {
  const int ledPin = 13;
  pinMode(ledPin, OUTPUT);

  while (1) {
    if (xSemaphoreTake(ButtonSemaphore, portMAX_DELAY) == pdTRUE) {
      digitalWrite(ledPin, !digitalRead(ledPin)); // Toggle LED
    }
  }
}The task blocks until the semaphore is given, ensuring event-driven execution without busy-waiting.
Full Code: Binary Semaphore Example
#include <Arduino_FreeRTOS.h>
#include <semphr.h>

SemaphoreHandle_t ButtonSemaphore;

void ButtonTask(void *pvParameters);
void LEDTask(void *pvParameters);

void setup() {
  Serial.begin(9600);

  ButtonSemaphore = xSemaphoreCreateBinary();

  xTaskCreate(ButtonTask, "Button", 128, NULL, 2, NULL);
  xTaskCreate(LEDTask, "LED", 128, NULL, 1, NULL);

  vTaskStartScheduler();
}

void loop() {
  // Not used
}

void ButtonTask(void *pvParameters) {
  const int buttonPin = 2;
  pinMode(buttonPin, INPUT_PULLUP);

  while (1) {
    if (digitalRead(buttonPin) == LOW) {
      xSemaphoreGive(ButtonSemaphore);
      vTaskDelay(150 / portTICK_PERIOD_MS);  // debouncing
    }
    vTaskDelay(10 / portTICK_PERIOD_MS);
  }
}

void LEDTask(void *pvParameters) {
  const int ledPin = 13;
  pinMode(ledPin, OUTPUT);

  while (1) {
    if (xSemaphoreTake(ButtonSemaphore, portMAX_DELAY) == pdTRUE) {
      digitalWrite(ledPin, !digitalRead(ledPin));
    }
  }
}Output: Binary Semaphore
- Press the button once -> LED toggles once.
- Press the button again -> LED toggles again.
- The CPU remains free while waiting for the event.
The gif below shows the LED toggling in response to button presses, demonstrating event-driven communication using a binary semaphore.

Hands-On: Counting Semaphore with Multiple Tasks in FreeRTOS on Arduino
In this hands-on example, we use a counting semaphore to control access to a limited shared resource across multiple FreeRTOS tasks on Arduino. Unlike a binary semaphore, a counting semaphore allows more than one task to access the resource at the same time, up to a defined limit.
This example uses three tasks with different priorities competing for two shared resources.
Scenario Overview
- We have three tasks:
- High Priority Task (HPT)
- Medium Priority Task (MPT)
- Low Priority Task (LPT)
- We have two shared resources stored in an array:
int resource[2] = {111, 222}; - A counting semaphore with two tokens controls access to these resources.
Only two tasks can access the resource at the same time. Any additional task must wait until a token becomes available.
Creating the Counting Semaphore
The counting semaphore is created with a maximum count of 2 and an initial count of 0:
CountingSem = xSemaphoreCreateCounting(2, 0);At startup, the semaphore has no tokens, so no task can proceed until tokens are given.
Initializing the Semaphore Tokens
The High Priority Task (HPT) gives both semaphore tokens at the beginning:
xSemaphoreGive(CountingSem);
xSemaphoreGive(CountingSem);This makes two tokens available, matching the number of shared resources. From this point onward, tasks can start acquiring the semaphore.
Task Behavior: Acquiring the Semaphore
Each task follows the same pattern:
- Print entry message
- Check how many semaphore tokens are available
- Try to acquire the semaphore
- Access the shared resource
- Do not release the semaphore
Example from the HPT task:
Serial.println("Entered HPT Task\n About to ACQUIRE the Semaphore");
Serial.print("Tokens available are: ");
Serial.println(uxSemaphoreGetCount(CountingSem));
xSemaphoreTake(CountingSem, portMAX_DELAY);If no token is available, the task blocks automatically until one becomes free.
Accessing the Shared Resource
Once the semaphore is taken, the task accesses the resource array:
Serial.print("Leaving HPT Task\n Data ACCESSED is:: ");
Serial.println(resource[indx]);The index is then incremented and wrapped safely:
indx++;
if (indx > 1) indx = 0;This simulates controlled access to limited shared data.
Why the Semaphore Is Not Released
In this example, tasks do not give the semaphore back intentionally:
Serial.println("Not releasing the Semaphore");This is done to demonstrate how:
- Semaphore tokens get exhausted
- Lower-priority tasks get blocked
- Resource availability directly affects task execution
This behavior helps visualize how counting semaphores limit concurrency.
Task Priorities and Scheduling
Tasks are created with descending priorities:
xTaskCreate(HPT_TASK, "HPT", 128, NULL, 3, &HPThandler);
xTaskCreate(MPT_TASK, "MPT", 128, NULL, 2, &MPThandler);
xTaskCreate(LPT_TASK, "LPT", 128, NULL, 1, &LPThandler);- Higher-priority tasks run first
- Lower-priority tasks wait when tokens are unavailable
- FreeRTOS handles blocking and scheduling automatically
Full Code: Counting Semaphore Example on Arduino
#include <Arduino_FreeRTOS.h>
#include <semphr.h>
TaskHandle_t HPThandler;
void HPT_TASK (void *pvParameters);
TaskHandle_t MPThandler;
void MPT_TASK (void *pvParameters);
TaskHandle_t LPThandler;
void LPT_TASK (void *pvParameters);
// semaphore related
SemaphoreHandle_t CountingSem;
// resource related
int resource[2] = {111,222};
int indx = 0;
void setup()
{
Serial.begin(9600);
while (!Serial);
CountingSem = xSemaphoreCreateCounting(2,0);
if (CountingSem == NULL)
Serial.println("Unable to Create Semaphore\n\n");
else
Serial.println("Counting Semaphore created successfully\n\n");
xTaskCreate(HPT_TASK, "HPT", 128, NULL, 3, &HPThandler);
xTaskCreate(MPT_TASK, "MPT", 128, NULL, 2, &MPThandler);
xTaskCreate(LPT_TASK, "LPT", 128, NULL, 1, &LPThandler);
}
void loop() {}
void HPT_TASK (void *pvParameters)
{
// Give 2 semaphores at the beginning
xSemaphoreGive(CountingSem);
xSemaphoreGive(CountingSem);
while (1)
{
Serial.println("Entered HPT Task\n About to ACQUIRE the Semaphore");
Serial.print("Tokens available are: ");
Serial.println(uxSemaphoreGetCount(CountingSem));

xSemaphoreTake(CountingSem, portMAX_DELAY);
Serial.print("Leaving HPT Task\n Data ACCESSED is:: ");
Serial.println(resource[indx]);
Serial.println("Not releasing the Semaphore\n\n");
indx++;
if (indx > 1) indx = 0;
vTaskDelay(3000);
}
}
void MPT_TASK (void *pvParameters)
{
while (1)
{
Serial.println("Entered MPT Task\n About to ACQUIRE the Semaphore");
Serial.print("Tokens available are: ");
Serial.println(uxSemaphoreGetCount(CountingSem));
xSemaphoreTake(CountingSem, portMAX_DELAY);
Serial.print("Leaving MPT Task\n Data ACCESSED is:: ");
Serial.println(resource[indx]);
Serial.println("Not releasing the Semaphore\n\n");
indx++;
if (indx > 1) indx = 0;
vTaskDelay(3000);
}
}
void LPT_TASK (void *pvParameters)
{
while (1)
{
Serial.println("Entered LPT Task\n About to ACQUIRE the Semaphore");
Serial.print("Tokens available are: ");
Serial.println(uxSemaphoreGetCount(CountingSem));
xSemaphoreTake(CountingSem, portMAX_DELAY);
Serial.print("Leaving LPT Task\n Data ACCESSED is:: ");
Serial.println(resource[indx]);
Serial.println("Not releasing the Semaphore\n\n");
indx++;
if (indx > 1) indx = 0;
vTaskDelay(3000);
}
}Output
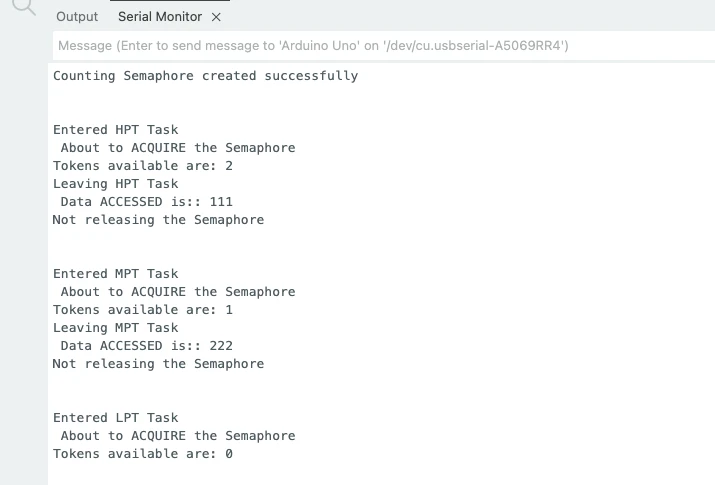
At the beginning, you will see:
Counting Semaphore created successfullyThen, as tasks run:
- Only two tasks at a time acquire the semaphore
- The third task blocks
- Token count decreases and eventually reaches zero
The image below shows how tasks enter, acquire tokens, access the resource, and block when no semaphore tokens are left.
What is a Mutex
A mutex is a special type of synchronization object used to protect shared resources. The word mutex comes from mutual exclusion, which means only one task can use the resource at a time. It prevents several tasks from accessing a resource mutually. It ensures that at one time, only one task have access to the resource.
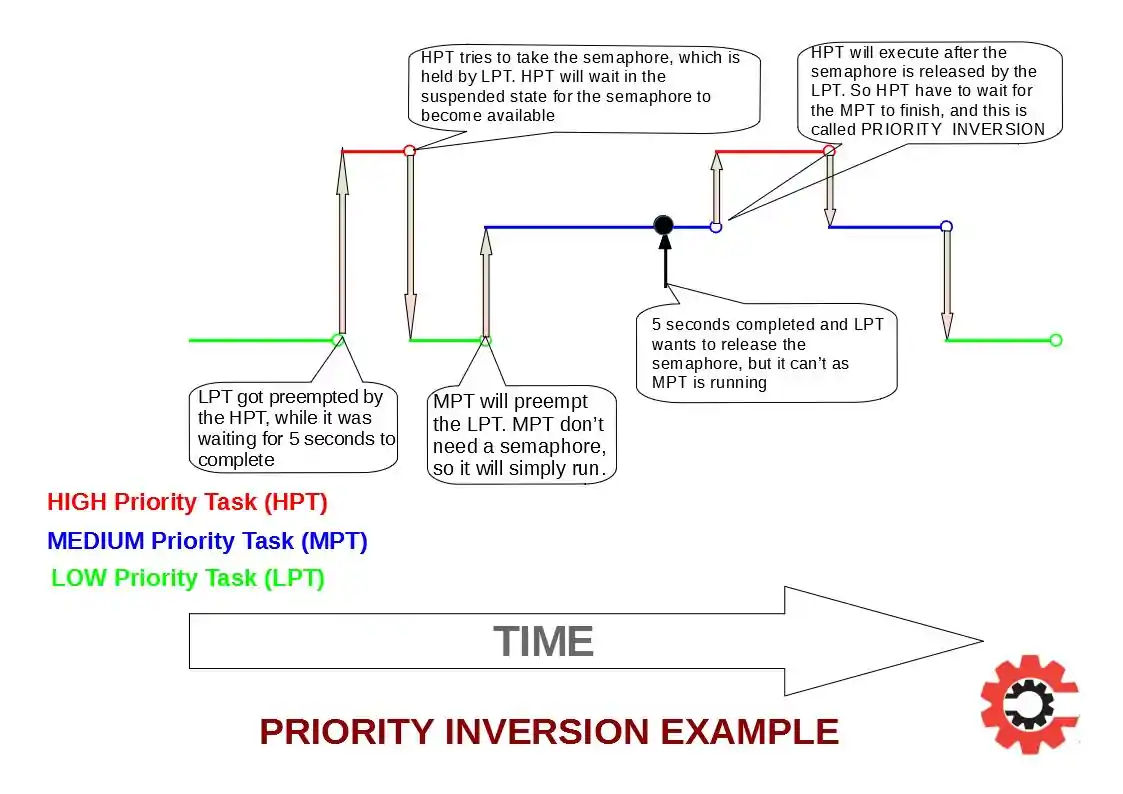
What Is Priority Inversion in FreeRTOS
In FreeRTOS, each task runs with a defined priority. A task with a higher priority should always preempt and run before a lower-priority task. This is how a real-time system guarantees predictable behavior. However, this rule can break down when multiple tasks share the same resource.
Priority inversion occurs when a low-priority task takes a shared resource, and a high-priority task later needs that same resource. Instead of running immediately, the high-priority task is forced to wait until the low-priority task releases it. At this point, the scheduling order is already inverted.
The situation becomes more serious when a medium-priority task is also present. While the high-priority task is blocked waiting for the resource, the medium-priority task continues to run and preempts the low-priority task. As a result, the low-priority task cannot finish its work and release the resource, and the high-priority task remains blocked for an unpredictable amount of time.
This behavior breaks real-time guarantees and is known as priority inversion. In real-time systems, this is a critical problem that must be handled correctly.
Priority Inversion Example on Arduino
The following Arduino FreeRTOS example demonstrates priority inversion clearly.
Three tasks are created with different priorities, and a binary semaphore is used to protect a shared resource. Since a binary semaphore does not support priority inheritance, priority inversion occurs.
Task Priorities
- Low Priority Task (LPT): Priority 1
- Medium Priority Task (MPT): Priority 2
- High Priority Task (HPT): Priority 3
Arduino FreeRTOS Code Demonstrating Priority Inversion
#include <Arduino_FreeRTOS.h>
#include <semphr.h>

SemaphoreHandle_t BinSemaphore;

void HPT_Task(void *pvParameters);
void MPT_Task(void *pvParameters);
void LPT_Task(void *pvParameters);

void setup()
{
  Serial.begin(9600);
  while (!Serial);

  BinSemaphore = xSemaphoreCreateBinary();
  xSemaphoreGive(BinSemaphore);

  xTaskCreate(LPT_Task, "LPT", 128, NULL, 1, NULL);
  xTaskCreate(MPT_Task, "MPT", 128, NULL, 2, NULL);
  xTaskCreate(HPT_Task, "HPT", 128, NULL, 3, NULL);

  vTaskStartScheduler();
}

void loop() {}

void LPT_Task(void *pvParameters)
{
  while (1)
  {
    Serial.println("Entered LPT and About to take Semaphore\r\n");
    xSemaphoreTake(BinSemaphore, portMAX_DELAY);

    Serial.println("IN LPT...........................\r\n");
    vTaskDelay(3000 / portTICK_PERIOD_MS);   // holds resource

    Serial.println("Leaving LPT\r\n");
    xSemaphoreGive(BinSemaphore);

    vTaskDelay(1000 / portTICK_PERIOD_MS);
  }
}

void MPT_Task(void *pvParameters)
{
  while (1)
  {
    Serial.println("In MPT*******************************\r\n");
    vTaskDelay(500 / portTICK_PERIOD_MS);
  }
}

void HPT_Task(void *pvParameters)
{
  while (1)
  {
    Serial.println("Entered HPT and About to take Semaphore\r\n");
    xSemaphoreTake(BinSemaphore, portMAX_DELAY);  // blocks here

    Serial.println("In HPT===========================\r\n");

    Serial.println("Leaving HPT\r\n");
    xSemaphoreGive(BinSemaphore);

    vTaskDelay(1000 / portTICK_PERIOD_MS);
  }
}What Happens in This Example
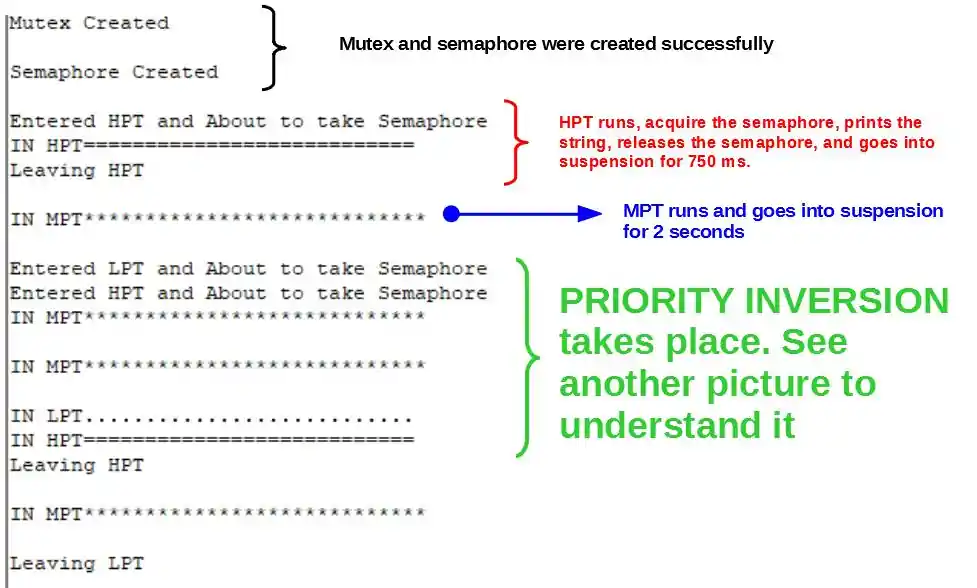
First, the low-priority task takes the semaphore and starts using the shared resource. While it is holding the resource, the high-priority task becomes ready and tries to take the semaphore. Since the resource is already locked, the high-priority task blocks and waits.
At the same time, the medium-priority task continues to run repeatedly. Because it does not need the semaphore and has a higher priority than the low-priority task, it keeps preempting it. This prevents the low-priority task from running and releasing the resource.
As a result, the high-priority task remains blocked even though it has the highest priority. This is true priority inversion, caused by using a synchronization mechanism that does not support priority inheritance.
Output
The images below shows that the medium-priority task keeps printing messages while the high-priority task waits. The low-priority task takes a long time to release the resource, creating unexpected delays and breaking real-time behavior.
In the next section, we will fix this exact problem using a mutex and see how priority inheritance completely removes priority inversion.
Priority Inheritance in FreeRTOS
Priority inheritance is the mechanism FreeRTOS uses to solve priority inversion. It works only with a mutex, not with a normal semaphore. When a mutex is used, FreeRTOS automatically adjusts task priorities to make sure high-priority tasks are not blocked for long periods.
In this section, we will use almost the same code as before. The only difference is that we replace the binary semaphore with a mutex. This small change completely fixes the problem.
How Priority Inheritance Works
When a low-priority task holds a mutex and a high-priority task tries to take it, FreeRTOS temporarily raises the priority of the low-priority task to match the high-priority task. This prevents any medium-priority task from preempting it.
Once the low-priority task releases the mutex, its original priority is restored automatically. The high-priority task then runs immediately.
This behavior ensures predictable timing and stable real-time performance.
Priority Inheritance Arduino Example Using Mutex
This example shows how priority inheritance works in practice. We create three tasks with different priorities that all interact with a shared resource protected by a mutex. When the high-priority task requests the mutex, FreeRTOS temporarily raises the priority of the low-priority task so it can finish quickly and release the resource.
Arduino Code for Priority Inheritance
#include <Arduino_FreeRTOS.h>
#include <semphr.h>

SemaphoreHandle_t sharedMutex;

// ---------------- LOW PRIORITY TASK ----------------
void LowPriorityTask(void *pvParameters)
{
  while (1)
  {
    if (xSemaphoreTake(sharedMutex, portMAX_DELAY))
    {
      Serial.print("LowPriorityTask: Holding resource | Priority: ");
      Serial.println(uxTaskPriorityGet(NULL));

      // Simulate long critical section
      vTaskDelay(2000 / portTICK_PERIOD_MS);

      Serial.print("LowPriorityTask: Releasing resource | Priority: ");
      Serial.println(uxTaskPriorityGet(NULL));

      xSemaphoreGive(sharedMutex);
    }

    vTaskDelay(500 / portTICK_PERIOD_MS);
  }
}

// ---------------- MEDIUM PRIORITY TASK ----------------
void MediumPriorityTask(void *pvParameters)
{
  while (1)
  {
    Serial.println("MediumPriorityTask: Doing background work");
    vTaskDelay(500 / portTICK_PERIOD_MS);
  }
}

// ---------------- HIGH PRIORITY TASK ----------------
void HighPriorityTask(void *pvParameters)
{
  while (1)
  {
    // Let Low Priority Task grab mutex first
    vTaskDelay(1000 / portTICK_PERIOD_MS);

    Serial.println("HighPriorityTask: Needs shared resource");

    if (xSemaphoreTake(sharedMutex, portMAX_DELAY))
    {
      Serial.println("HighPriorityTask: Got shared resource");

      vTaskDelay(1000 / portTICK_PERIOD_MS);

      Serial.println("HighPriorityTask: Releasing shared resource");
      xSemaphoreGive(sharedMutex);
    }
  }
}

void setup()
{
  Serial.begin(9600);
  while (!Serial);

  sharedMutex = xSemaphoreCreateMutex();
  if (sharedMutex == NULL)
  {
    Serial.println("Failed to create mutex!");
    while (1);
  }

  // Priority: High > Medium > Low
  xTaskCreate(LowPriorityTask, "LowTask", 128, NULL, 1, NULL);
  xTaskCreate(MediumPriorityTask, "MediumTask", 128, NULL, 2, NULL);
  xTaskCreate(HighPriorityTask, "HighTask", 128, NULL, 3, NULL);
}

void loop() {}How This Example Shows Priority Inheritance
At first, the low-priority task acquires the mutex and enters a long critical section. While it holds the mutex, the high-priority task wakes up and requests the same resource. Normally, the high-priority task should run first, but it cannot because the resource is locked.
At this point, priority inheritance kicks in. FreeRTOS temporarily raises the priority of the low-priority task to match the high-priority task. This prevents the medium-priority task from preempting it. As a result, the low-priority task finishes faster, releases the mutex, and then returns to its original priority.
Without priority inheritance, the medium-priority task would keep running, delaying the low-priority task and blocking the high-priority task indefinitely. This example clearly shows why mutexes are essential for protecting shared resources and why semaphores alone are not enough in real-time systems.
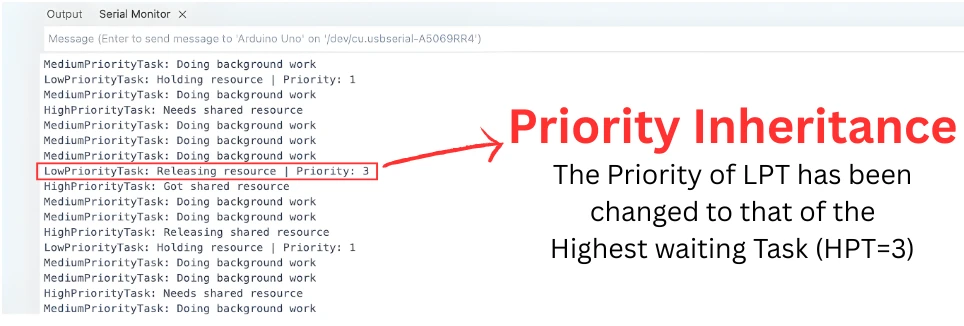
Output
The image below shows that when the high-priority task requests the mutex, the low-priority task’s reported priority temporarily increases. The medium-priority task stops interfering during this time, proving that priority inheritance is working correctly.
Semaphore vs Mutex in FreeRTOS
Mutex and semaphore are both synchronization tools in FreeRTOS, but they are designed to solve different problems. They may look similar in code, yet using the wrong one can easily break real-time behavior. This section explains the difference in simple terms and helps you decide which one to use in your Arduino FreeRTOS projects.
What a Semaphore Is Used For
A semaphore in FreeRTOS is mainly used for signaling events. It allows one task, or an interrupt, to notify another task that something has happened. Semaphores do not represent ownership of a resource. Any task can give or take a semaphore. Because of this, semaphores do not support priority inheritance.
Common examples include button presses, interrupts, and task-to-task notifications.
What a Mutex Is Used For
A mutex is designed specifically for protecting shared resources. Only one task can own a mutex at a time, and the same task must release it after use. The key feature of a mutex is priority inheritance. If a low-priority task holds a mutex and a high-priority task requests it, FreeRTOS temporarily raises the priority of the low-priority task. This prevents priority inversion and ensures predictable execution.
Mutexes should always be used when tasks share hardware or software resources such as Serial, I2C, SPI, or global data.
Why Mutex and Semaphore Are Not the Same
Although both mutex and semaphore are created using the FreeRTOS API, they behave very differently internally.
A semaphore is about events.
A mutex is about ownership.
Using a semaphore to protect a shared resource may work in simple cases, but it can cause priority inversion and unstable timing as the system grows more complex. This is why FreeRTOS strongly recommends using a mutex for resource protection.
Mutex vs Semaphore in FreeRTOS: Comparison Table
| Feature | Semaphore | Mutex |
|---|---|---|
| Primary purpose | Event signaling | Resource protection |
| Ownership | No ownership | Owned by one task |
| Priority inheritance | No | Yes |
| Can be used in ISR | Yes | No |
| Used for interrupts | Yes | No |
| Prevents priority inversion | No | Yes |
| Typical Arduino use | Button, ISR, task signaling | Serial, I2C, SPI |
| Recommended for shared resources | No | Yes |
When to Use a Semaphore
You should use a semaphore when:
- A task needs to wait for an event to occur
- You are signaling from an interrupt to a task
- You are handling button presses or sensor triggers
- Tasks need simple notification, not resource locking
Semaphores are ideal for event-driven programming.
When to Use a Mutex
You should use a mutex when:
- Multiple tasks share a critical resource
- Resource access must be exclusive
- Task priorities are different
- Predictable timing is important
Mutexes are the correct tool for resource protection.
Hands-On: Using Mutex for Serial.print() in FreeRTOS
Even though short Serial.println() calls often work fine on Arduino, Serial is still a shared resource. If multiple FreeRTOS tasks access it simultaneously, especially with longer messages, multiple consecutive prints, or more complex task scheduling, unprotected access can lead to unpredictable timing or issues in more complex projects.
Using a mutex guarantees safe access, ensures priority inheritance, and makes your system predictable.
Problem Without Mutex: Why It Matters
Consider two tasks printing to Serial:
Serial.println("Task 1: Start of message");
Serial.println("Task 2: Another message");Even if the output appears fine, both tasks are competing for the same resource. If your project grows with longer messages, multi-part prints, or high-frequency tasks, the unprotected access may lead to:
- Messages appearing out of order
- Unexpected timing delays
- Potential conflicts with other hardware (I2C, SPI)
So the “problem” is theoretical on short prints, but practical in real projects.
Creating a Mutex for Serial Port
Before accessing Serial, create a mutex:
SemaphoreHandle_t SerialMutex;
SerialMutex = xSemaphoreCreateMutex();This ensures only one task at a time can use Serial, and FreeRTOS will apply priority inheritance automatically if a high-priority task requests the mutex.
Two Tasks Printing Safely Using Mutex
Each task should take the mutex before printing and release it afterward:
xSemaphoreTake(SerialMutex, portMAX_DELAY);
Serial.print("Task 1: Safe printing");
Serial.println(" - end");
xSemaphoreGive(SerialMutex);Similarly, Task 2:
xSemaphoreTake(SerialMutex, portMAX_DELAY);
Serial.print("Task 2: Safe printing");
Serial.println(" - end");
xSemaphoreGive(SerialMutex);Even though short prints may look fine without a mutex, this approach prevents conflicts when tasks become more complex or use other shared resources.
Conclusion
In this tutorial, we covered how semaphores and mutexes work in FreeRTOS on Arduino, focusing on why they are essential in real multitasking systems. We began by understanding semaphores, including the difference between binary and counting semaphores, and learned how they help tasks wait for events efficiently instead of wasting CPU time. Then we explored mutexes, their role in protecting shared resources, and why they are different from semaphores when mutual exclusion is required.
We also discussed priority inversion, a real problem in real-time systems, and explained how priority inheritance in mutexes solves it. Through practical Arduino examples, we saw how tasks with different priorities interact when accessing shared resources. The hands-on sections showed how a mutex keeps Serial.print() access safe and predictable, how a binary semaphore enables clean event-driven designs such as button handling, and how a counting semaphore manages limited resources shared by multiple tasks.
Overall, this knowledge helps you design stable, responsive, and scalable FreeRTOS applications on Arduino. By choosing the correct synchronization mechanism, you can avoid timing issues, protect critical resources, and build systems that behave reliably even as complexity grows. These concepts form a strong foundation for any real-world embedded project that uses FreeRTOS.
Browse More Arduino FreeRTOS Tutorials
FreeRTOS on Arduino (Part 2): Task Scheduling on Arduino – Tasks, Priorities & Time Slicing
FreeRTOS on Arduino (Part 3): vTaskDelay vs vTaskDelayUntil and Software Timers
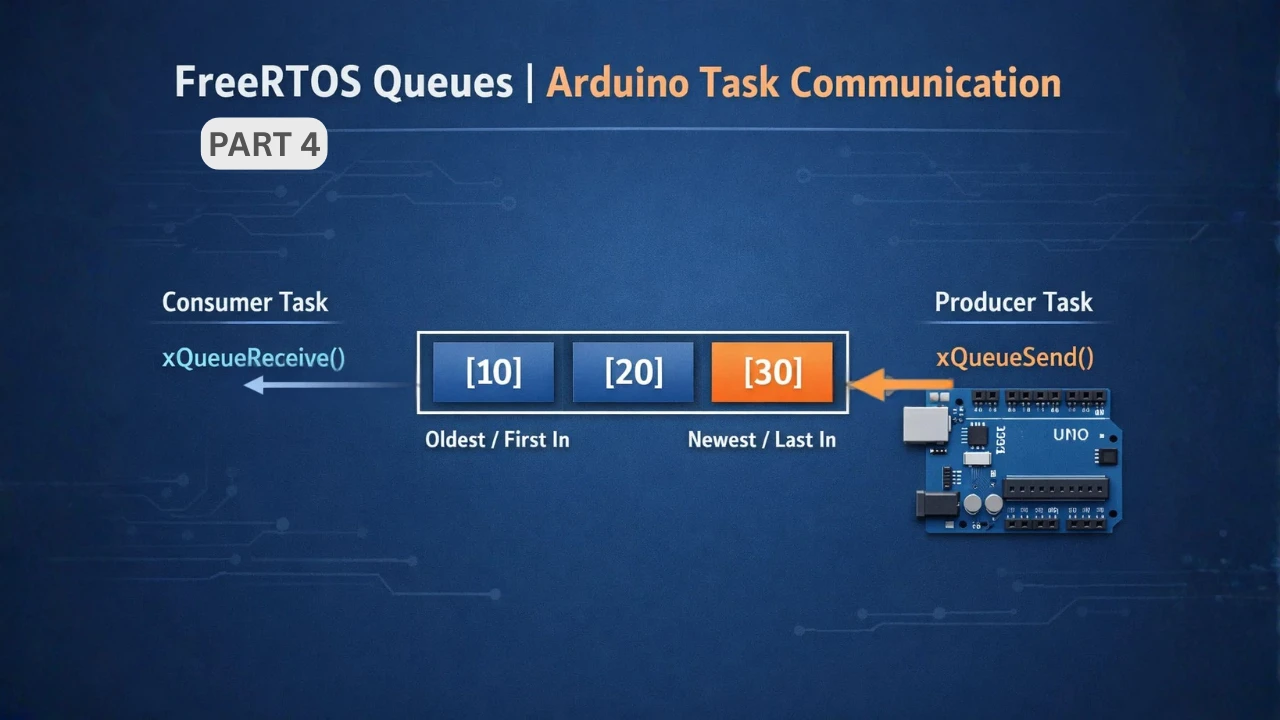
FreeRTOS on Arduino (Part 4): Inter Task Communication with Queues
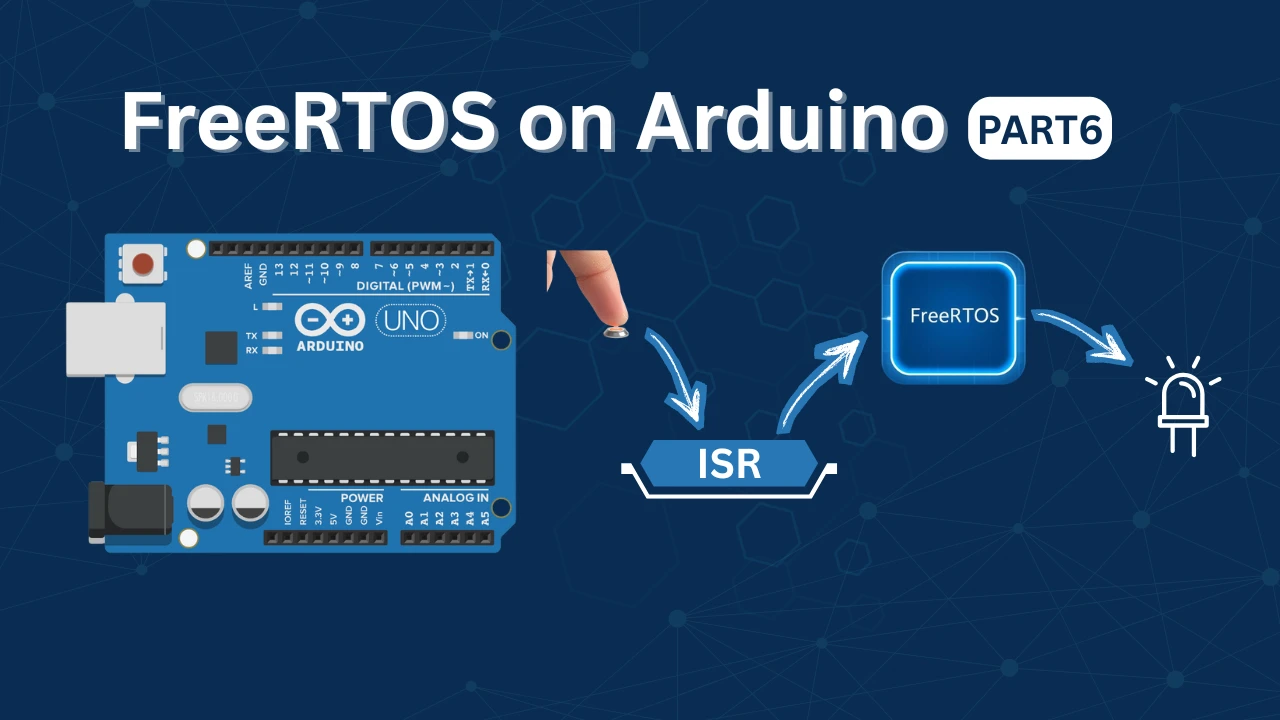
FreeRTOS on Arduino (Part 6): Using Interrupts in FreeRTOS
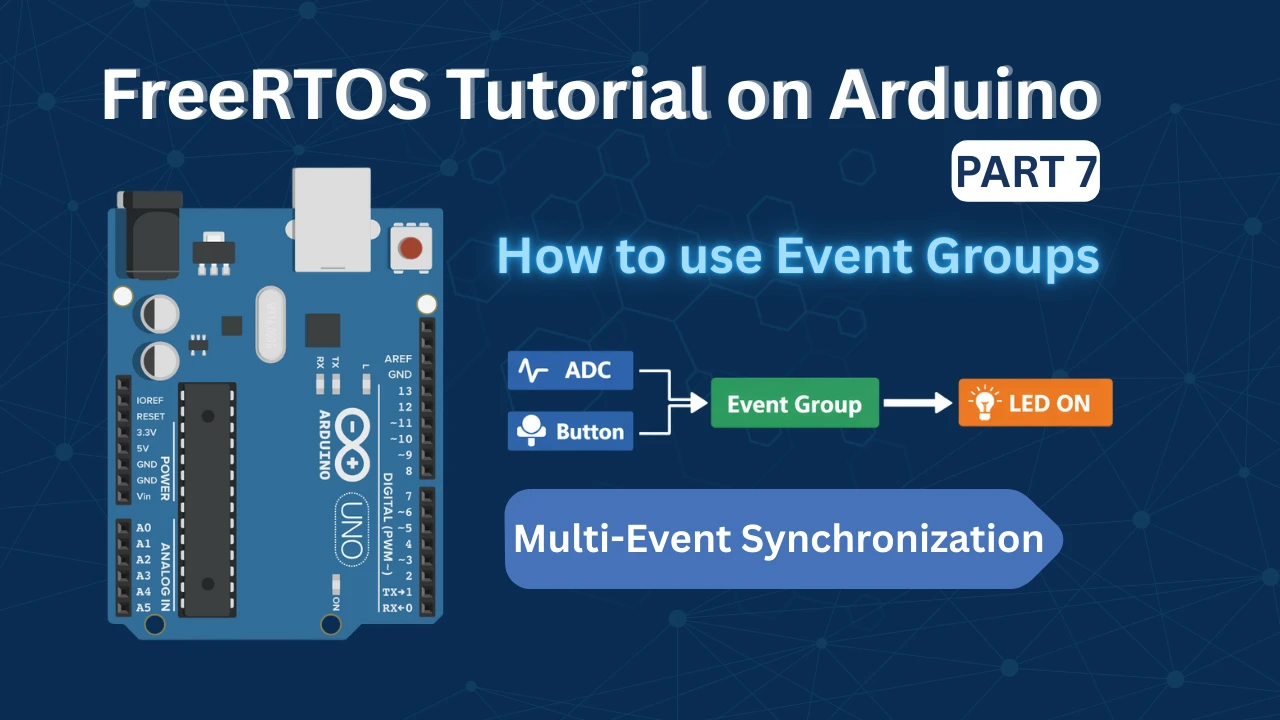
FreeRTOS Tutorial on Arduino (Part 7): Event Groups | Multi-Event Synchronization
Arduino FreeRTOS Project Download
FAQs – FreeRTOS Semaphore & Mutex
Subscribe
Login
0 Comments
Newest
