
Home ▸ STM32 Tutorials ▸ STM32 IoT ▸
Updated On: February 6, 2026
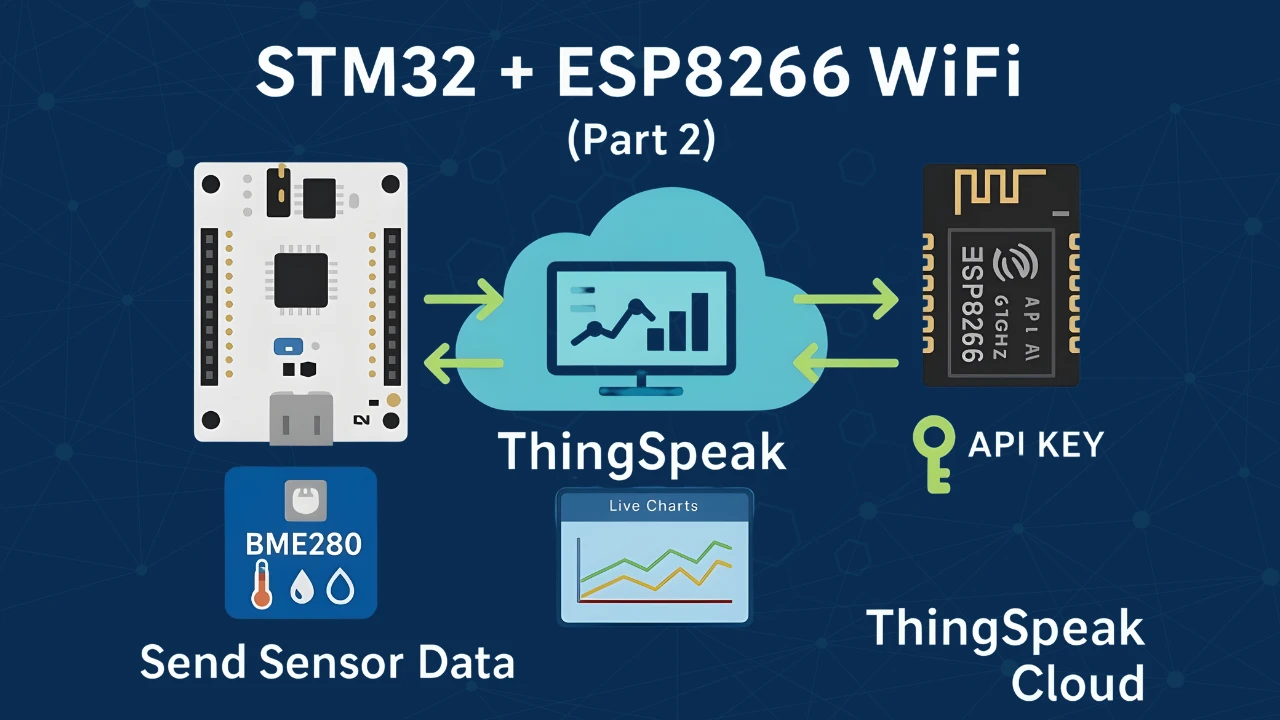
STM32 ESP8266 ThingSpeak Tutorial – Send Sensor Data to Cloud
In the previous tutorial, we connected the STM32 with ESP8266 WiFi module and successfully obtained the IP address. That was the first step toward building an IoT project. In this part of the series, we will go further and learn how to use the STM32 ESP8266 ThingSpeak tutorial to send real-time sensor data to the cloud. For this project, we will use the BME280 sensor to measure temperature, pressure, and humidity, and then upload the values to ThingSpeak for visualization.
To send the data, we will use the HTTP GET request with ESP8266 AT commands. The request contains the ThingSpeak API key along with the sensor values for each field. For example:
GET /update?api_key=API_KEY&field1=temperature&field2=pressure&field3=humidityThis makes it very easy for STM32 to send sensor data to ThingSpeak via ESP8266. Once the data is uploaded, we can log it, plot it in graphs, and access it online through the ThingSpeak cloud dashboard, which is a great step toward building complete IoT solutions.
STM32 ESP8266 ThingSpeak Integration Overview
When we combine STM32, ESP8266, and ThingSpeak, we get a complete IoT setup that can read sensor data and send it to the cloud for real-time monitoring. The STM32 reads the values from the BME280 sensor (temperature, pressure, and humidity), and the ESP8266 WiFi module uploads this data to the ThingSpeak cloud using HTTP GET requests. This is the simplest and most common method in any STM32 ESP8266 ThingSpeak integration.
Here’s how the integration works step by step:
- STM32 microcontroller → Reads sensor data through its ADC or I2C interface.
- BME280 sensor → Provides accurate temperature, pressure, and humidity readings.
- ESP8266 WiFi module → Connects STM32 to the internet using AT commands.
- ThingSpeak API STM32 → Uses the Write API key and fields to update data online.
- HTTP GET request → Sends sensor values like:
GET /update?api_key=API_KEY&field1=temp&field2=press&field3=hum - ThingSpeak Data Logging → Stores the values and displays them as graphs on the cloud dashboard.
This integration allows you to build real-time monitoring systems, IoT dashboards, and data logging projects with very little extra setup. The best part is that the whole process uses only ESP8266 AT commands, which makes it simple and efficient for beginners.
Requirements for STM32 ThingSpeak Example
Before we begin with the project, let’s look at the hardware and software needed for this STM32 ESP8266 ThingSpeak tutorial. Each part of the setup plays an important role in sending sensor data to the cloud.
- STM32F446 Dev Board
- ST-Link V2
- ESP8266-01 WiFi transceiver
- ESP-01 Adapter
- FT232 USB to TTL Converter
- BME280 Sensor
- Jumper Wires
- ThingSpeak Account
- STM32CubeIDE
Configure ThingSpeak Channel for STM32 ESP8266 Project
To send data from STM32 to ThingSpeak using ESP8266, we first need to set up a channel on the ThingSpeak cloud. This channel will act as the storage and visualization space for our sensor readings. Each field inside the channel can hold one type of data, such as temperature, pressure, or humidity from the BME280 sensor.
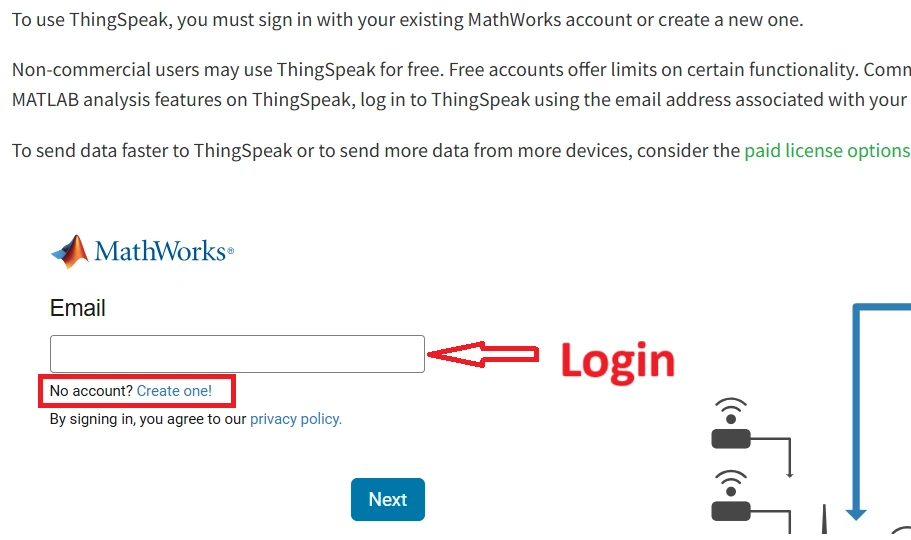
Logging in
Open the page https://thingspeak.mathworks.com/login?skipSSOCheck=true. If you do not have an account with mathworks you need to create one here. Otherwise Login using the email and password.
Create a Channel
We will create a new channel to log the data into. The image below shows how to create the channel.
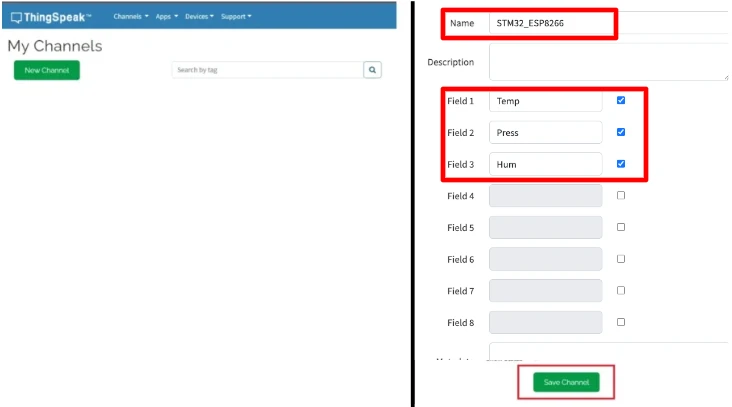
Go to https://thingspeak.mathworks.com/channels and click on “New Channel” to create one.
- Enter a channel name:
- In the “Name” field, type something meaningful like
STM32_ESP8266. - This helps you identify the channel when you have multiple projects.
- In the “Name” field, type something meaningful like
- Set up your data fields:
- Enable Field 1 and name it
Tempfor temperature data. - I am using Field 2 for pressure display, so named it
Press. - Similarly, Field 3 is used for Humidity, so its name is Hum.
- You can add more fields if needed for additional data. One channel supports up to 8 Fields.
- Enable Field 1 and name it
- (Optional): Leave the rest of the configuration to default.
- Click “Save Channel” to complete the setup.
Channel Sharing
You can choose to keep the channel private for personal use or configure it for public access. ThingSpeak provides flexible sharing options, allowing you to control who can view or interact with your channel data.

API Keys
The API Keys section provides secure access credentials that allow you to interact with your channel programmatically. The Write API Key is used to send data to the channel, typically from devices like the STM32, while the Read API Key allows external applications or devices to retrieve stored data.
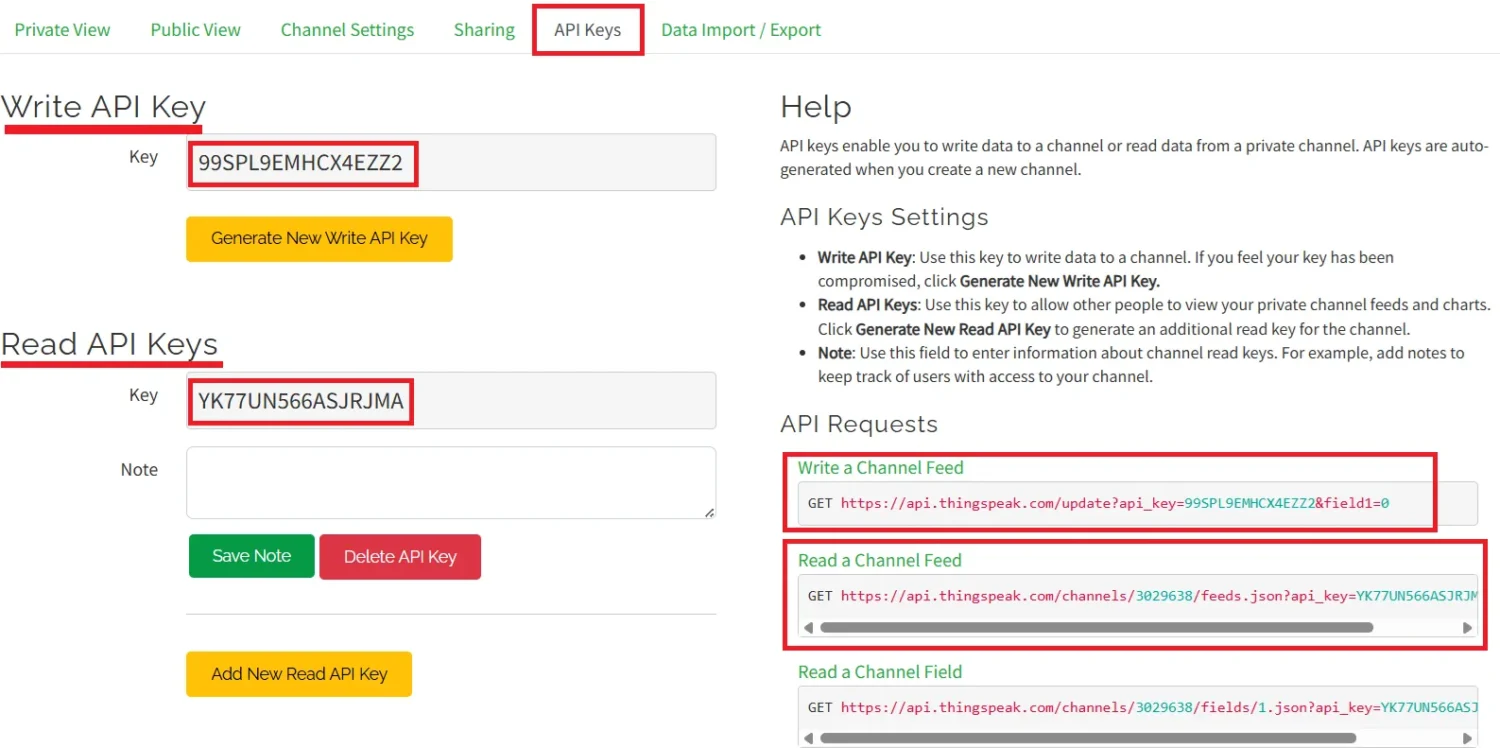
The API Keys section also provides with the url (in red box on the right) to write or read the feed from this channel. We are going to use the Write url to write the data into the channel Field.
The ESP8266 WiFi module can send data using a simple HTTP GET request. For example:
GET /update?api_key=API_KEY&field1=25.6&field2=1005&field3=65This will upload the BME280 sensor readings directly to the ThingSpeak cloud, where you can see them plotted as live graphs.
Wiring STM32, ESP8266, and BME280
To connect the ESP8266 WiFi module with STM32, we use the UART pins for communicating with the module. Along with the basic connections (power, TX, RX, and GND), adding a USB to TTL converter is very handy for debugging and logging, so you can easily see what’s happening during the STM32 WiFi setup.
Connecting STM32 Directly to ESP8266 Module
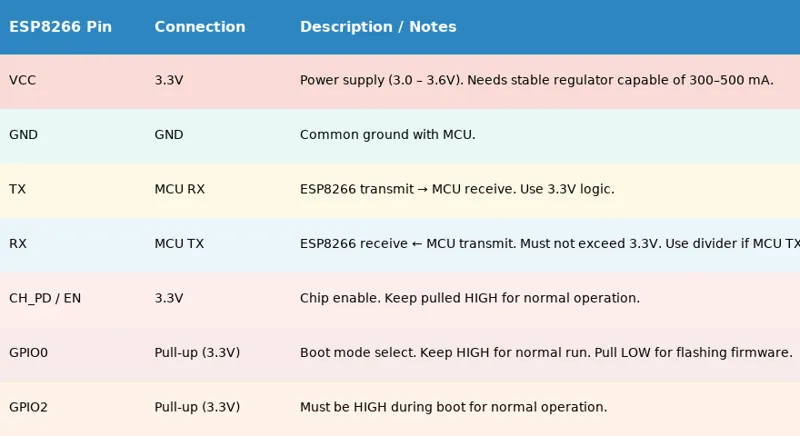
The ESP8266-01 module has 8 pins that need to be connected to the MCU. If you are wiring it directly, the table below shows the correct pin connections.
Connecting STM32 to ESP8266 using the ESP-Adapter
I’m going to use an ESP-01 Adapter to connect STM32 with the ESP8266-01 module. This adapter makes things easier by reducing the connections from 8 pins to just 4. The image below shows how the module is connected using the adapter.
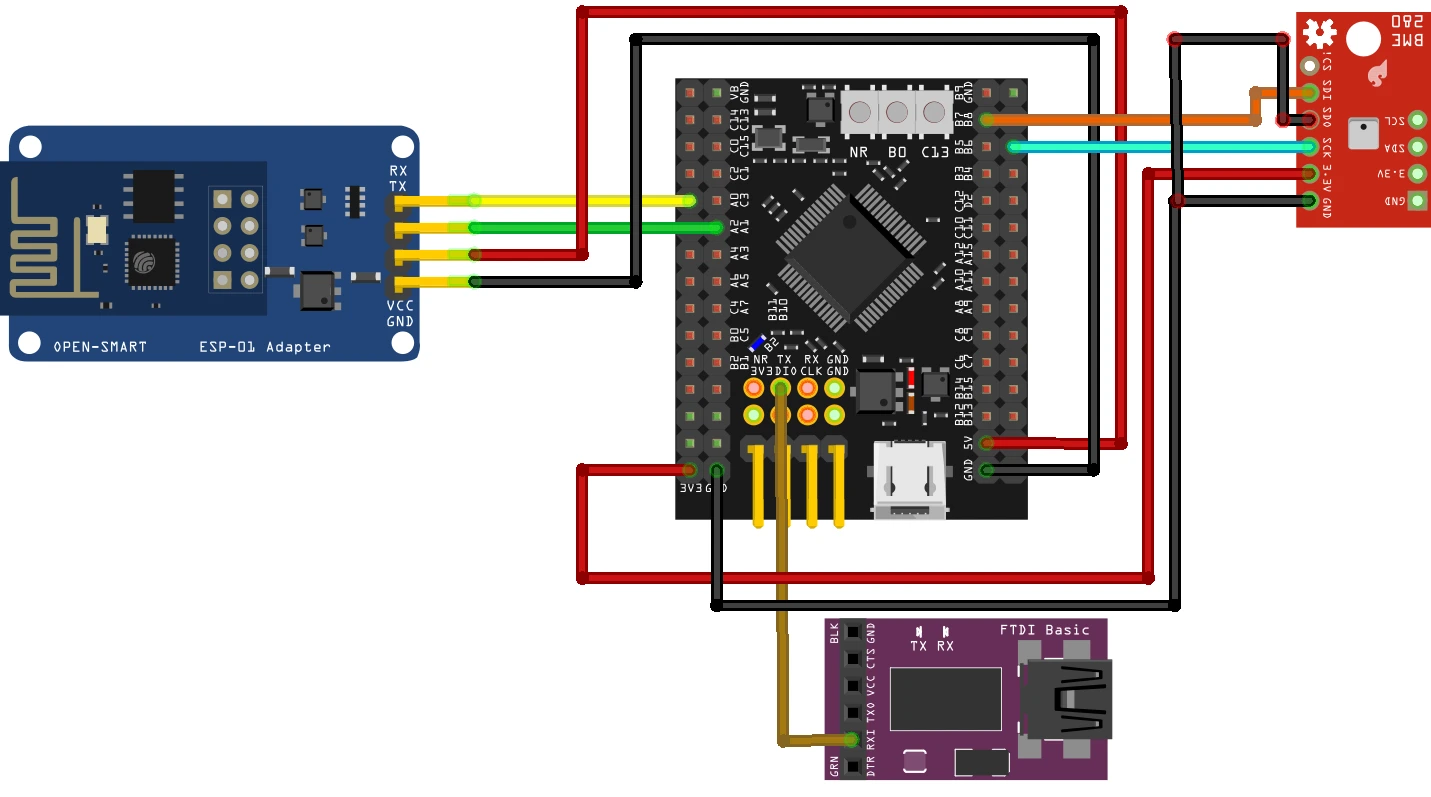
Always make UART connections in a cross pattern: connect TX to RX and RX to TX.
- Connect the TX pin from the Adapter to PA0 (UART4_RX) and the RX pin to PA1 (UART4_TX).
- Power the Adapter with 5V from the MCU. The ST-Link provides only 3.3V, so connect the USB cable to the dev board to supply 5V.
The Adapter’s onboard voltage regulator converts 5V to 3.3V for the ESP8266-01 module. If you use an external power supply for the module, ensure the supply and STM32 dev board share a common ground.
STM32 BME280 Sensor Connection
The BME280 sensor is connected via the I2C1. The pin connection is as follows:
- VCC → 3.3V
- GND → GND
- SDI/SDA → PB7 (I2C1_SDA)
- SCL → PB6 (I2C1_SCL)
- SDO → GND (To keep the slave address = 0xEC). If this pin is not present, just ignore it.
For more details about how to interface BME280 Sensor with STM32 using I2C, please check out the Tutorial on it.
STM32 FTDI Module Connection
We use the FTDI module to view logs from the STM32 on the serial console. The communication is one-way, since STM32 only sends data to the FTDI.
- Connect PA10 (UART1_TX) on STM32 to the RX pin of the FTDI module.
- No connection is required from the FTDI TX pin back to STM32.
Configuring STM32CubeMX for ThingSpeak Project
We will now configure STM32CubeMX to enable UART for ESP8266 and I2C for BME280, so the STM32 can read sensor data and send it to the ThingSpeak cloud.
UART4 (ESP8266) Configuration
The image below shows the UART4 configuration for ESP8266.
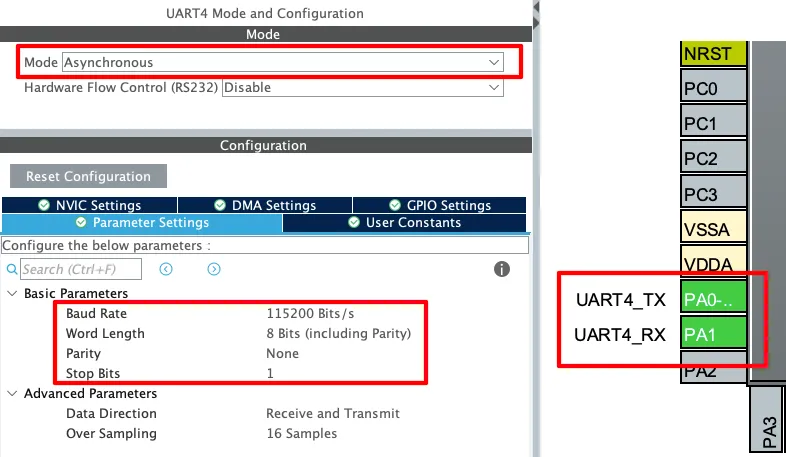
The UART must be configured in the Asynchronous mode. Leave the Parameter configuration to default, with 8 bits Word Length, no Parity and 1 Stop bit. The pins PA0 and PA1 are configured as the UART TX and RX pins.
The Baud Rate configuration here should match the Baud Rate of the ESP8266 Module. The default baud rate of ESP8266-01 is 115200, but you should still test it prior connecting to the MCU.
You check the video to see how to test the module to find the correct baud rate.
I2C1 (BME280) Configuration
The BME280 sensor communicates with STM32 over the I2C bus. We need to configure I2C1 in STM32CubeMX to establish this connection. The image below shows the I2C1 configuration.
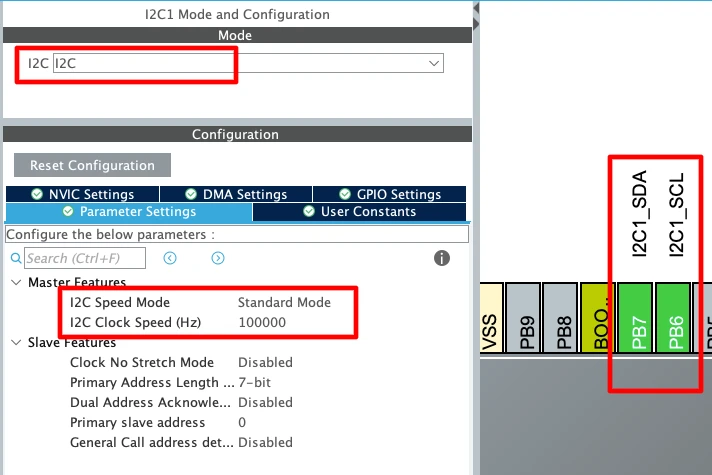
Configure the I2C1 in the standard mode with the clock speed of 100KHz. The pins PB6 and PB7 are configured as the I2C pins. We will connect the BME280 Sensor with these pins.
UART1 (FT232) Configuration
As I mentioned earlier, the user interactive logs will be sent through UART1 to the FT232, which will then be displayed on the serial console. The image below shows the UART1 configuration.
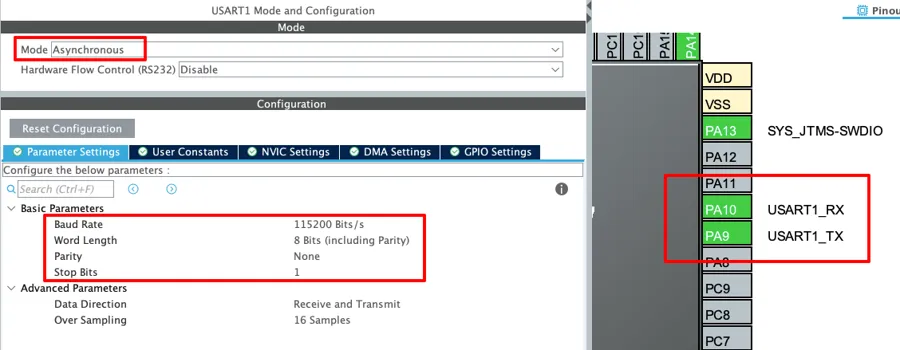
The UART1 is configured in the Asynchronous mode. The Baud rate is set to 115200 Bits/s with 8 Bits of word length, No parity and 1 Stop bit. We can configure this however we want, but this is an optimal configuration.
The pins PA9 and PA10 are configured as the UART1_TX and UART1_RX pins respectively. Since we only need to transmit data to the FTDI, PA9 (UART1_TX) is connected to FTDI RX as mentioned in the wiring diagram.
Adding the ESP32 and BME280 Library Files
After downloading the project from the link provided at the end of this post, you can extract the ESP8266_STM32.c and BME280_STM32.c files from the src folder and ESP8266_STM32.h and BME280_STM32.h files from the inc folder. You need to copy these files in the exact same folders inside your project.
Configure ESP8266 Library
You can customize the UART instance in the ESP8266_STM32.h file as shown below.
/* ------------ USER CONFIG ------------- */
#define ESP_UART       huart4   // UART connected to ESP8266

// Enable/Disable logs
#define ENABLE_USER_LOG   1
#define ENABLE_DEBUG_LOG  0
/* -------------------------------------- */I am using the UART4, so it is configured as the ESP_UART. If you are using some other instance, define it here.
You should enable USER_LOGS to see the main process messages on the serial console. If something goes wrong while initializing or connecting to WiFi, you can turn on DEBUG_LOGS to get detailed step-by-step information about what caused the error.
Configure BME280 Library
Open the BME280_STM32.c file and define the I2C instance as shown below.
extern I2C_HandleTypeDef hi2c1;
#define BME280_I2C &hi2c1

#define BME280_ADDRESS 0xEC // SDIO is grounded, the 7 bit address is 0x76 and 8 bit address = 0x76<<1 = 0xECI am using I2C1 for the BME280, so the same instance is defined in the code. The default slave address of the BME280 is 0xEC. If your sensor uses a different address, make sure to define that instead.
STM32 Function to send data to Thingspeak
In the previous tutorial, we already learned how to send AT commands to the ESP8266, connect it to WiFi, and obtain the IP address. We will not repeat those steps here. Instead, in this part, we will focus on the function that sends sensor data from STM32 to the ThingSpeak cloud.
The STM32 sends sensor data to ThingSpeak using ESP8266 AT commands in a structured process: connect → prepare request → send → check response. The function below handles this process step by step.
ESP8266_Status ESP_SendToThingSpeak(const char *apiKey, float val1, float val2, float val3)
{
    char cmd[256];
    ESP8266_Status result;

    USER_LOG("Connecting to ThingSpeak...");

    // 1. Start TCP connection (HTTP port 80)
    snprintf(cmd, sizeof(cmd), "AT+CIPSTART=\"TCP\",\"api.thingspeak.com\",80\r\n");
    result = ESP_SendCommand(cmd, "CONNECT", 5000);
    if (result != ESP8266_OK) {
        USER_LOG("TCP connection to ThingSpeak failed.");
        return result;
    }

    // 2. Build HTTP GET request
    char httpReq[256];
    snprintf(httpReq, sizeof(httpReq),
             "GET /update?api_key=%s&field1=%.2f&field2=%.2f&field3=%.2f\r\n", apiKey, val1, val2, val3);

    // 3. Tell ESP how many bytes we will send
    snprintf(cmd, sizeof(cmd), "AT+CIPSEND=%d\r\n", (int)strlen(httpReq));
    result = ESP_SendCommand(cmd, ">", 2000);
    if (result != ESP8266_OK) {
        USER_LOG("CIPSEND failed.");
        return result;
    }

    // 4. Send actual request and wait for ThingSpeak response
    result = ESP_SendCommand(httpReq, "SEND OK", 5000);
    if (result != ESP8266_OK) {
        USER_LOG("Failed to send HTTP request.");
        return result;
    }

    // 5. Parse ThingSpeak reply in esp_rx_buffer
    char *ipd = strstr(esp_rx_buffer, "+IPD,");
    if (ipd) {
        char *colon = strchr(ipd, ':');
        if (colon) {
            int entryId = atoi(colon + 1);  // convert server reply to int
            USER_LOG("ThingSpeak entry ID: %d", entryId);

            if (entryId > 0) {
                USER_LOG("Update successful!");
                return ESP8266_OK;
            } else {
                USER_LOG("ThingSpeak returned invalid entry ID.");
                return ESP8266_ERROR;
            }
        }
    }

    USER_LOG("No valid ThingSpeak response found.");
    return ESP8266_ERROR;
}The function ESP_SendToThingSpeak is responsible for sending three sensor values from STM32 to the ThingSpeak cloud through the ESP8266 WiFi module.
It works in the following steps:
- Start TCP connection
- The function first sends
AT+CIPSTART="TCP","api.thingspeak.com",80to the ESP8266. - This opens a TCP connection with the ThingSpeak server on port 80.
- If the connection fails, the function stops and returns an error.
- The function first sends
- Build HTTP GET request
- It creates a GET request string in the format:
GET /update?api_key=API_KEY&field1=value1&field2=value2&field3=value3 - Here,
apiKeyis the ThingSpeak Write API key, andval1,val2,val3are the sensor values (temperature, pressure, humidity). - You can add or remove fields in this command. For example: In case of only 1 field, use
&field1=value1and remove the rest of them. Similarly, in case of 4 fields you can add&field4=value4ad the end of the url.
- It creates a GET request string in the format:
- Tell ESP8266 how many bytes to expect
- The function calculates the length of the GET request and sends
AT+CIPSEND=<length>to the ESP8266. - The ESP replies with a ‘
>‘ prompt if it is ready to receive the data.
- The function calculates the length of the GET request and sends
- Send the actual HTTP request
- The GET request is sent to ThingSpeak.
- The function waits for a
SEND OKresponse from the ESP8266 to confirm successful transmission.
- Check ThingSpeak response
- The ESP8266 forwards the ThingSpeak reply into its receive buffer.
- The code looks for
+IPD,(which indicates incoming data) and then extracts the entry ID from the server response. - If the entry ID is greater than zero, the upload was successful.
- If not, it means ThingSpeak did not accept the data.
- Return status
- If all steps succeed, the function returns
ESP8266_OK. - Otherwise, it logs the error and returns
ESP8266_ERROR.
- If all steps succeed, the function returns
Example Code for Sending Data to Thingspeak
The main() function below shows how to read the data from the BME280 sensor and send it to the Thingspeak cloud.
#include "ESP8266_STM32.h"
#include "BME280_STM32.h"

#define API_KEY	"0IABUZRYXNZW8Q94"
float temp, press, hum;

int main()
{
  ....

  if (ESP_Init() != ESP8266_OK){
	  USER_LOG("Failed to initialize... Check Debug logs");
	  Error_Handler();
  }

  if (ESP_ConnectWiFi("Arun_Rawat", "arun@321", ip_buf, sizeof(ip_buf)) != ESP8266_OK){
	  USER_LOG("Failed to connect to wifi... Check Debug logs");
	  Error_Handler();
  }

  if (BME280_Config(OSRS_2, OSRS_16, OSRS_1, MODE_NORMAL, T_SB_0p5, IIR_16) != 0)
    {
  	  Error_Handler();
    }

  while (1)
  {
	  BME280_Measure(&temp, &press, &hum);
	  press = (float)press/1000.0;  // change press to KPa
	  if (ESP_ConnState == ESP8266_CONNECTED_IP){
		  ESP_SendToThingSpeak(API_KEY, temp, press, hum);
	  }
	  HAL_Delay(15000);
  }
}First of all include the ESP8266_STM32.h and BME280_STM32.h files to include the respective libraries. Next, define the API_KEY (Get it from Thingspeak Channel Write API KEY) and the variables to store the temperature, pressure and humidity data.
Inside the main() function, Initialize the ESP8266 module and connect it to a WiFi network. Next, configure the BME280 sensor with oversampling, mode, standby time, and filter settings.
Inside the infinite loop, the function performs the following operations:
- Reads temperature, pressure, and humidity from the BME280.
- If the ESP8266 is connected to WiFi, it sends the sensor values to ThingSpeak using the API key.
- Waits 15 seconds before sending the next update (ThingSpeak free accounts allow updates every 15 seconds).
Viewing Sensor Data on ThingSpeak dashboard
After uploading the code to STM32 and powering the setup, the BME280 sensor values are sent to the ThingSpeak cloud through the ESP8266. You can open your ThingSpeak channel and check the live graphs on the dashboard.
The image below shows the result obtained on the Thingspeak dashboard.
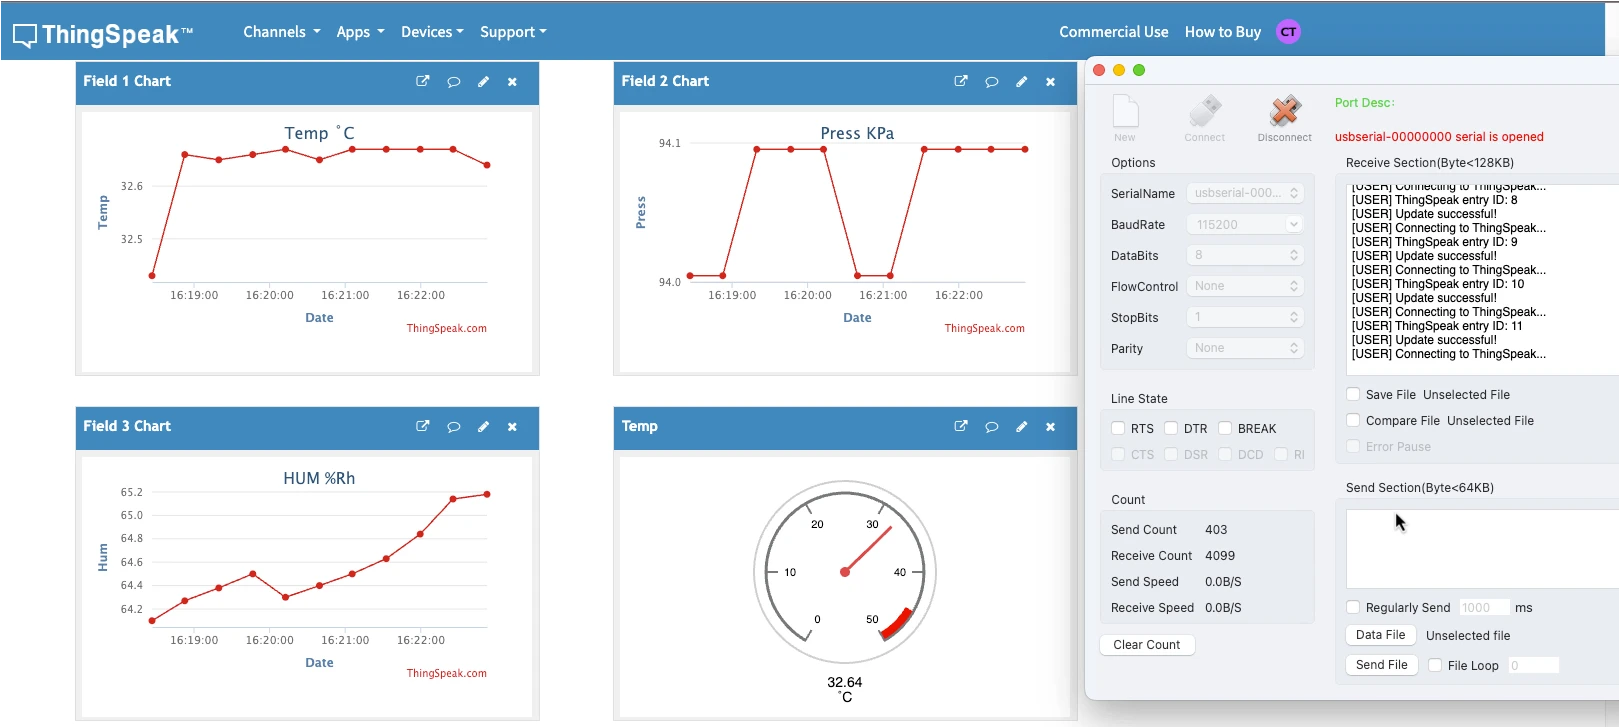
As you can see in the image above, the ThingSpeak dashboard is showing live graphs of real-time temperature, pressure, and humidity data obtained from STM32 with ESP8266 and BME280 sensor. We also have the serial console logs of successful updates. Notice the Entry ID shown in the logs. It indicates the number of updates successfully received by the ThingSpeak channel.
Common Errors and Troubleshooting STM32 ThingSpeak Connection
When working with STM32, ESP8266, and ThingSpeak, you may run into some common issues. Below are the frequent errors and their possible solutions:
- WiFi Connection Failed
- Cause: Wrong SSID or password, weak WiFi signal, or router not allowing new devices.
- Fix: Double-check your WiFi credentials in the code. Place the ESP8266 closer to the router. Make sure the router has DHCP enabled.
- ESP8266 Initialization Error
- Cause: Incorrect baud rate or faulty UART connection.
- Fix: Ensure UART pins (TX, RX, GND, VCC) are properly wired. Match the baud rate in STM32CubeMX with the ESP8266 default baud rate.
- CIPSEND Failed
- Cause: The module is not ready to send data or the TCP connection was lost.
- Fix: Increase timeout values in the code. Confirm that
AT+CIPSTARTsuccessfully connects beforeAT+CIPSEND.
- ThingSpeak Entry ID Not Updating
- Cause: Data not sent correctly or ThingSpeak rejecting requests.
- Fix: Make sure you are using the correct Write API Key. Check that you are respecting the 15-second update interval for free ThingSpeak accounts.
- No Response from ThingSpeak Server
- Cause: Network issues or firewall blocking the ESP8266.
- Fix: Test your API request in a web browser to confirm it works. Try using another WiFi network to rule out local restrictions.
- Incorrect Sensor Data
- Cause: BME280 not configured properly or wrong I2C address.
- Fix: Check the I2C address of your BME280 module (0xEC or 0x76/0x77 in 7-bit format). Verify the oversampling and filter configuration.
Video Tutorial
STM32 ESP8266 ThingSpeak Video Tutorial
This written guide explains all the steps, wiring, CubeMX setup, and code required to send BME280 sensor data from STM32 to ThingSpeak using ESP8266. However, watching the process in action can make it even clearer. I’ve created a complete video walkthrough where I demonstrate the configuration, coding, and live data upload to ThingSpeak. Follow the written instructions here while watching the video to better understand each step and avoid common mistakes.
Watch the VideoConclusion
In this tutorial, we successfully connected STM32 and ESP8266 to the ThingSpeak cloud and sent real-time sensor data from the BME280. We first covered the wiring and CubeMX configuration, then wrote the code to initialize the ESP8266, connect to WiFi, and upload temperature, pressure, and humidity values using ThingSpeak’s API. Finally, we viewed the live results on the ThingSpeak dashboard.
This setup shows how easy it is to build an IoT project with STM32, ESP8266, and ThingSpeak. You can extend the same approach to add more sensors, log data over longer periods, or create smart monitoring systems for home and industrial applications.
If you haven’t seen Part 1 of this series, check it out to understand the basics of STM32 and ESP8266 communication. Also, don’t forget to watch the video tutorial for a complete walkthrough of this project in action.
STM32 IoT Tutorial Series
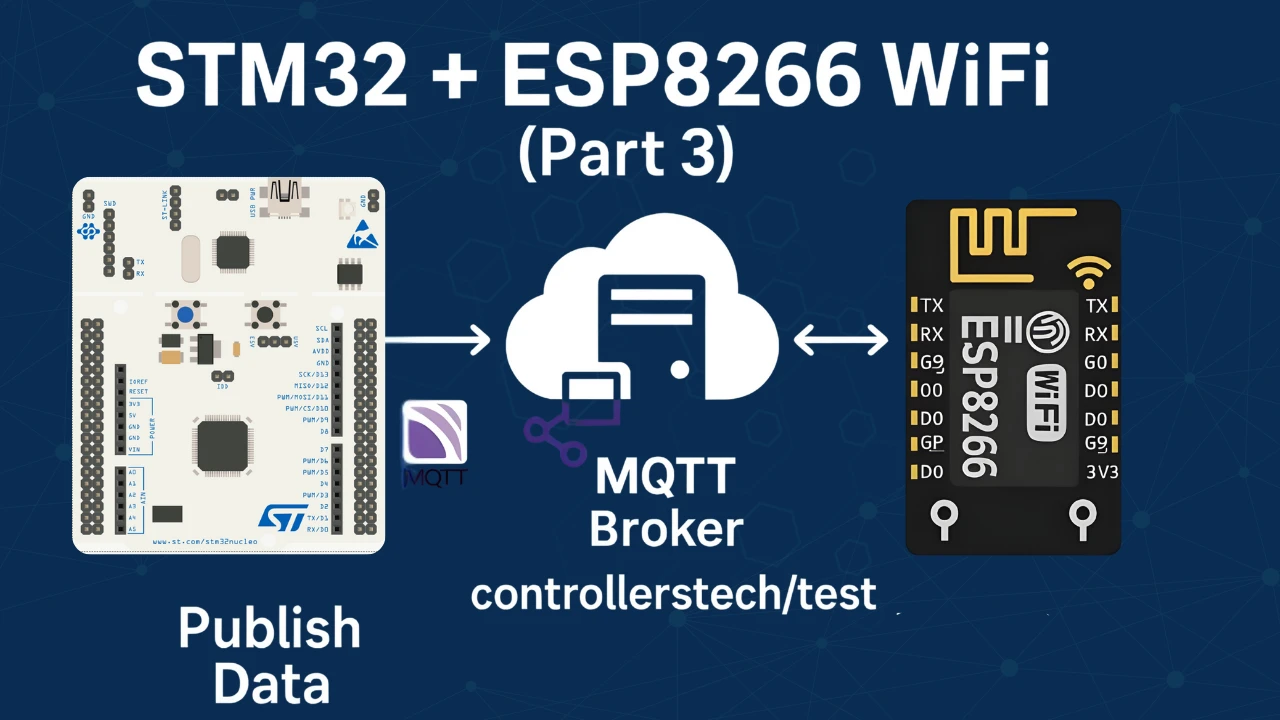
STM32 IoT with ESP8266 (Part 3): MQTT Connect and Publish messages
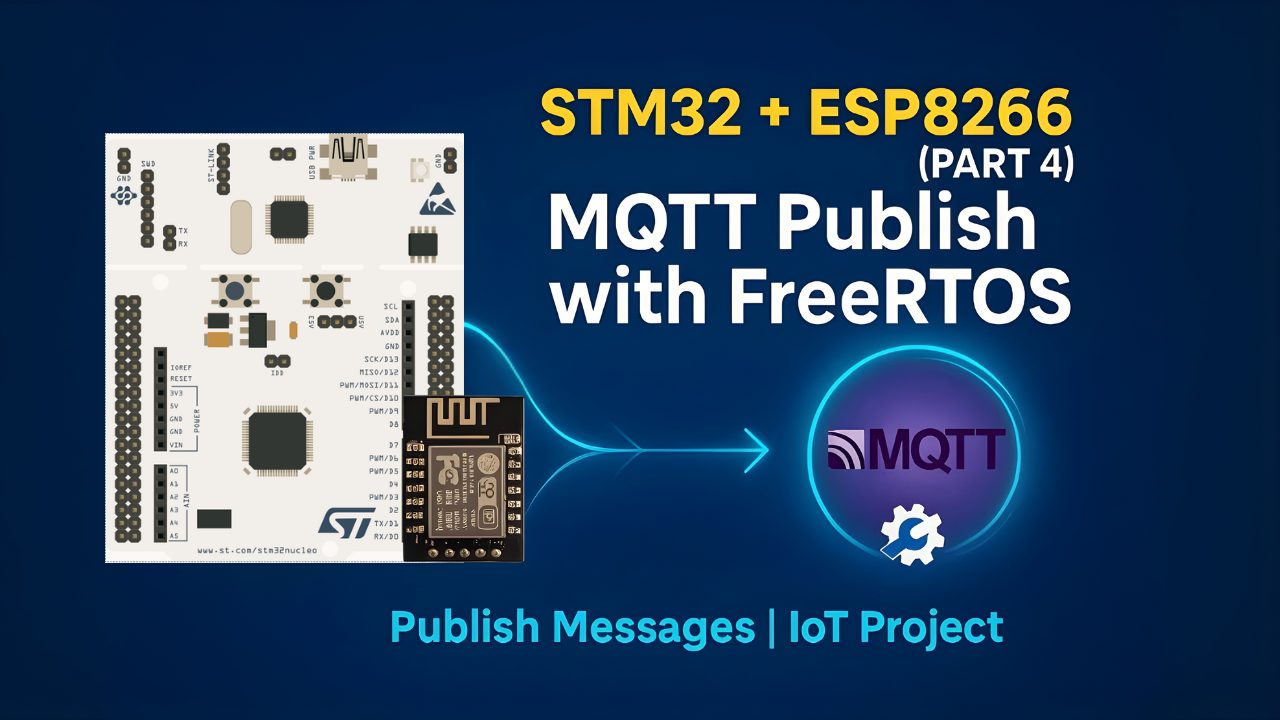
STM32 IoT with ESP8266 (Part 4): Publish MQTT messages with RTOS
STM32 IoT Tutorial (Part 5): MQTT Subscribe with ESP8266, DMA & FreeRTOS
PROJECT DOWNLOAD
STM32 ESP8266 Thingspeak Project FAQs

Subscribe
Login
0 Comments
Newest
