Connect ESP32 to WiFi and Send Data to ThingSpeak Using Espressif IDE
The ESP32 is a powerful microcontroller with built-in Wi-Fi, making it ideal for IoT applications. One of the most common use cases is using the ESP32 in STA mode to connect to a Wi-Fi access point and send data to the cloud. Platforms like ThingSpeak make it easy to log and visualize sensor data remotely. Whether you’re building a Wi-Fi data logging project, working on ESP32 cloud integration, or exploring ESP32 ThingSpeak examples, this setup forms the foundation of many real-world IoT solutions.
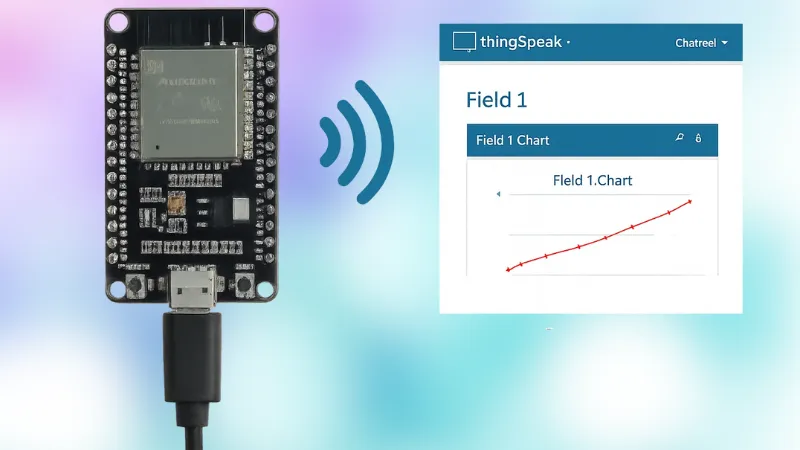
In this ESP32 ThingSpeak tutorial, you’ll learn how to connect your ESP32 to a Wi-Fi network using Station Mode and send data to the cloud using ThingSpeak. It’s a great starting point if you’re exploring ESP32 with cloud IoT platforms.
Here’s what you’ll learn:
- How to configure ESP32 WiFi Station Mode to connect ESP32 to WiFi using Espressif IDE
- How to Configure ESP32 as http Client and send sensor data to ThingSpeak with ESP32
- Basic setup for an ESP32 IoT project with ThingSpeak
VIDEO TUTORIAL
You can check the video to see the complete explanation and working of this project.
Intorducing the ESP32 Wifi Station Mode
ESP32 WiFi Station Mode (STA mode) is where the ESP32 connects to an existing Wi-Fi network, such as a home router or mobile hotspot. It’s one of the most commonly used features when building ESP32 IoT projects with cloud platforms like ThingSpeak.
Difference Between Station Mode and Access Point Mode
- Station Mode (STA):
The ESP32 acts as a Wi-Fi client and connects to a WiFi access point like your router. - Access Point Mode (AP):
The ESP32 creates its own Wi-Fi hotspot, allowing other devices to connect directly to it.
When to Use ESP32 in Station Mode
You should use ESP32 Station Mode with Espressif when:
- You want to connect the ESP32 to WiFi using Espressif IDE
- Your project needs internet access or local network communication
- You’re sending or receiving data from a server or cloud
Typical IoT Use Case: ESP32 + ThingSpeak
One of the most common use cases is:
- The ESP32 connects to a WiFi network in STA mode
- It collects data from sensors (like temperature or humidity)
- It sends sensor data to ThingSpeak with ESP32 using HTTP requests
- The data is logged, stored, and visualized on the ThingSpeak cloud platform
This setup is ideal for building a reliable and simple ESP32 WiFi data logging project with cloud integration.
Project Requirements
Before we begin building our ESP32 WiFi data logging project with ThingSpeak, let’s take a quick look at the tools and components you’ll need. This includes both hardware and software required for the project.
- Hardware:
- ESP32 development board
- USB cable
- Sensor (optional, e.g., DHT11, or simulated data)
- Software:
- Espressif IDE (ESP-IDF setup)
- ThingSpeak account with an active channel
- Internet access
Configure ThingSpeak Channel for ESP32 Data Logging
In this section, you’ll learn how to create and configure a ThingSpeak channel to receive data from your ESP32. We’ll walk through setting up the necessary fields, adjusting the channel settings, and retrieving the Write API Key required to send data from the ESP32 using HTTP requests.
Logging in
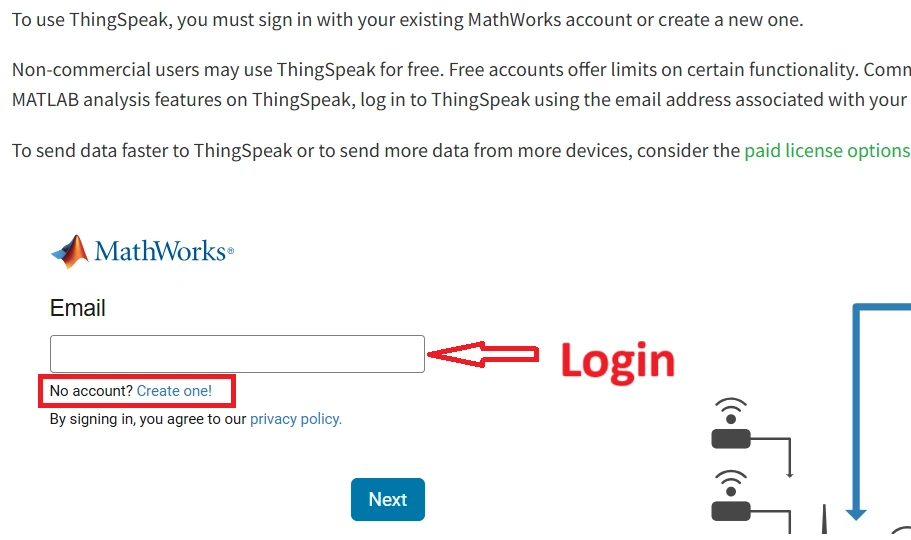
Open the page https://thingspeak.mathworks.com/login?skipSSOCheck=true. If you do not have an account with mathworks you need to create one here. Otherwise Login using the email and password.
Create a Channel
We will create a new channel to log the data into. Below is the image showing how to create the channel.
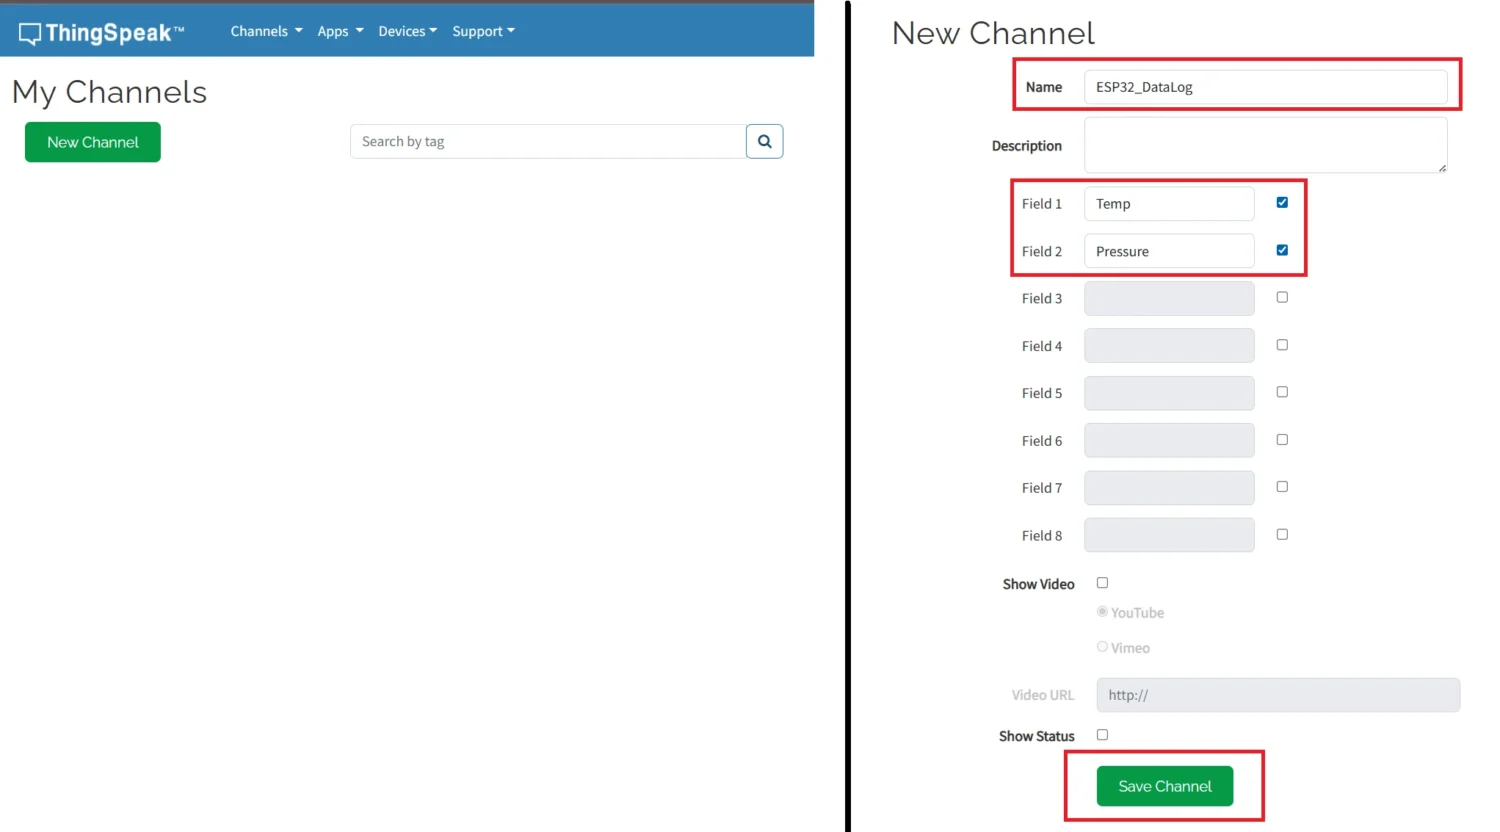
Go to https://thingspeak.mathworks.com/channels and click on “New Channel” to create one.
- Enter a channel name:
- In the “Name” field, type something meaningful like
ESP32_DataLog. - This helps you identify the channel when you have multiple projects.
- In the “Name” field, type something meaningful like
- Set up your data fields:
- Enable Field 1 and name it
Tempfor temperature data. - Enable Field 2 and name it
Pressure(or any other sensor you’re using). - You can add more fields if needed for additional data. One channel supports up to 8 Fields.
- Enable Field 1 and name it
- (Optional): Leave the rest of the configuration to default.
- Click “Save Channel” to complete the setup.
Channel Sharing
You can choose to keep the channel private for personal use or configure it for public access. ThingSpeak provides flexible sharing options, allowing you to control who can view or interact with your channel data.

API Keys
The API Keys section provides secure access credentials that allow you to interact with your channel programmatically. The Write API Key is used to send data to the channel, typically from devices like the ESP32, while the Read API Key allows external applications or devices to retrieve stored data.
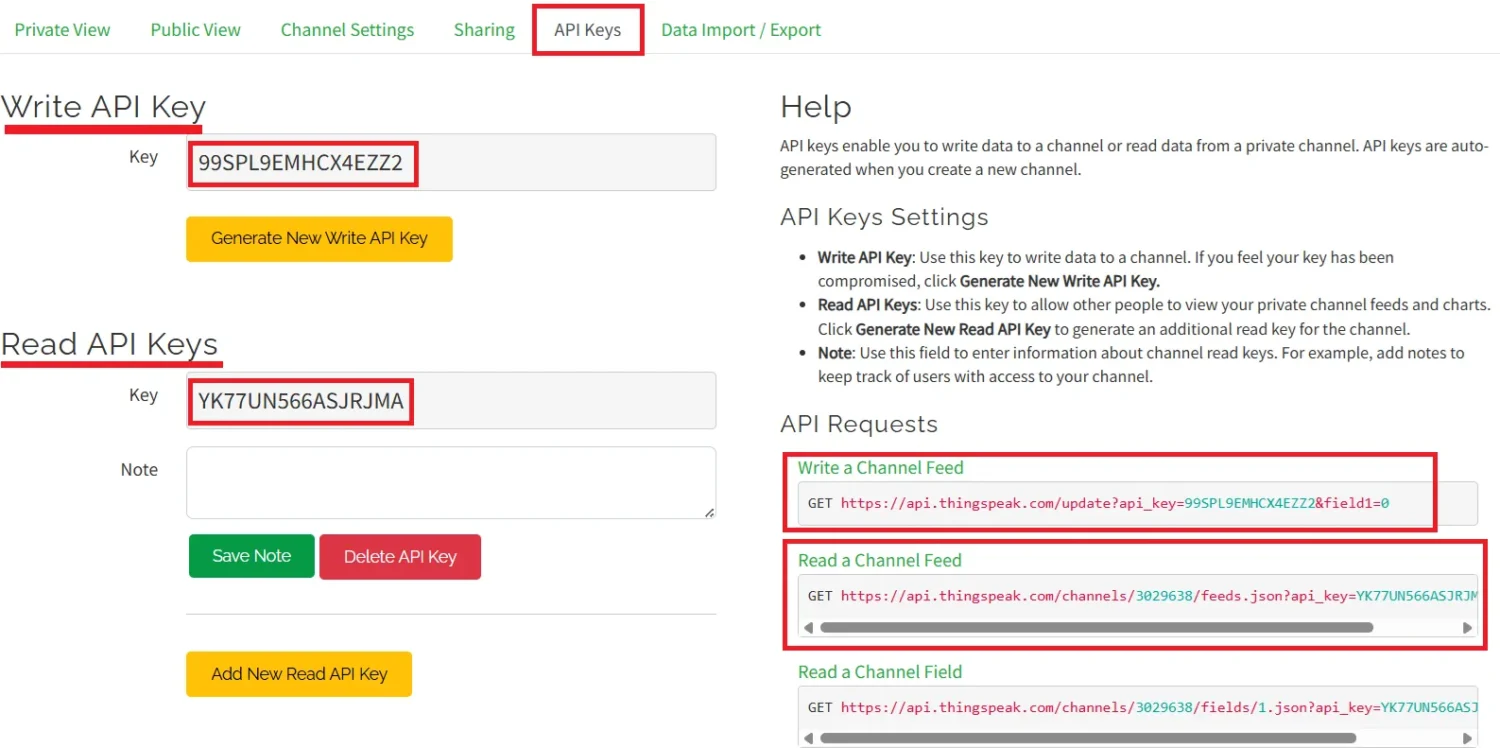
The API Keys section also provides us with the url (in red box on the right) to write or read the feed from this channel. We are going to use the Write url to write the data into the channel Field.
In today’s tutorial we will focus on writing the data to this channel, so copy the Write API Key from here. We are going to use this key in our code.
ESP32 in STA Mode : Connect to a Wifi Network
We’ll begin by setting up the ESP32 in WiFi Station Mode, which allows it to connect to a known Wi-Fi network with internet access. For this, we’ll use the station mode template project available within the Espressif IDE, making it easier to get started with a pre-configured setup.
Create the project
Let’s start by creating a new project in the Espressif-IDE. Below is the image showing the necessary steps to create the project from the template.
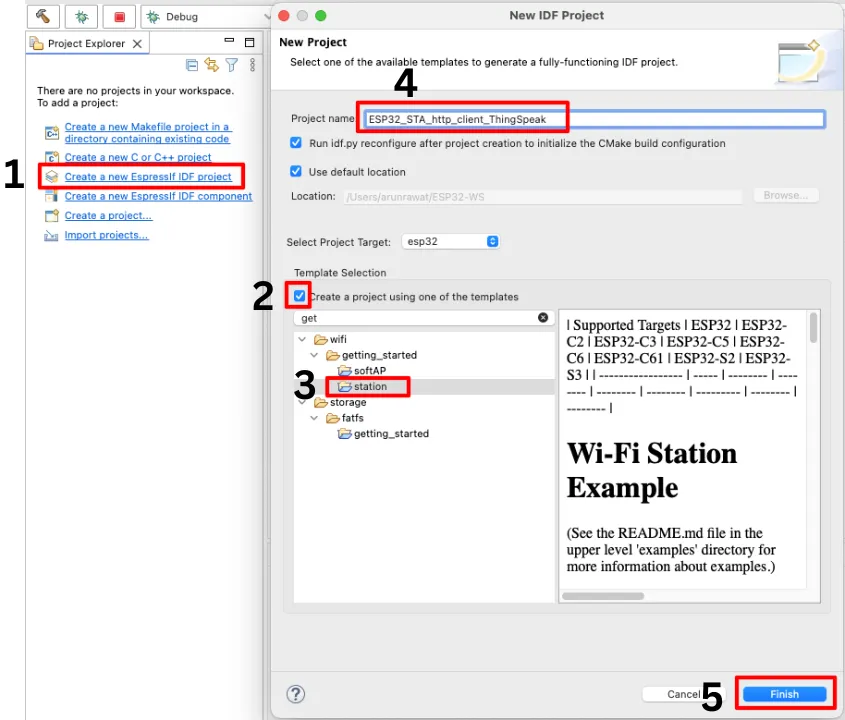
Below are the steps explained as per the numbers mentioned on the image above.
- Create a new Espressif_IDF project.
- Check the box to create the project using predefined templates.
- Under the getting-started folder, select the station template.
- Give some name to this project.
- Click Finish to generate the project.
Modify the Template Project
We will begin by defining the Wi-Fi credentials of the access point that the ESP32 will connect to. Additionally, we will specify the maximum number of retry attempts the device should make in case the connection fails, ensuring a more robust and reliable connection process.
#define ESP_WIFI_SSID      "Arun's S23"
#define ESP_WIFI_PASS      "9876543210"
#define ESP_MAXIMUM_RETRY  5
#define THINGSPEAK_KEY "99SPL9EMHCX4EZZ2"I am creating a hotspot on my phone and above are the Wi-Fi credentials for it. The maximum retries are set to 5 and the ThingSpeak Key is also defined to be used later in the code.
Since this is a template project, it comes preconfigured to use Wi-Fi credentials set through the project configuration menu. However, in this case, we will not be using the configuration menu. Instead, we’ve manually defined the ESP_WIFI_SSID and ESP_WIFI_PASS directly in the main source file for simplicity and better control.
To ensure the Wi-Fi driver uses our custom-defined credentials, rather than those set in the configuration menu, we need to update the following definitions accordingly.
- EXAMPLE_ESP_WIFI_SSID -> ESP_WIFI_SSID
- EXAMPLE_ESP_WIFI_PASS -> ESP_WIFI_PASS
- EXAMPLE_ESP_MAXIMUM_RETRY -> ESP_MAXIMUM_RETRY
That’s all the modification needed in this template project. You can now proceed to flash the firmware to your ESP32. Once the upload is complete, you should see a success message in the console logs, indicating that the ESP32 has connected to the specified Wi-Fi network successfully.
The Code Explained
Wifi Event Handler
Below is the function to handle the Wifi and IP Events.
int isConnected = 0;
static void event_handler(void* arg, esp_event_base_t event_base,
                                int32_t event_id, void* event_data)
{
    if (event_base == WIFI_EVENT && event_id == WIFI_EVENT_STA_START) {
        esp_wifi_connect();
    } else if (event_base == WIFI_EVENT && event_id == WIFI_EVENT_STA_DISCONNECTED) {
        if (s_retry_num < ESP_MAXIMUM_RETRY) {
            esp_wifi_connect();
            s_retry_num++;
            ESP_LOGI(TAG, "retry to connect to the AP");
        } else {
            xEventGroupSetBits(s_wifi_event_group, WIFI_FAIL_BIT);
        }
        ESP_LOGI(TAG,"connect to the AP fail");
        isConnected = 0;
    } else if (event_base == IP_EVENT && event_id == IP_EVENT_STA_GOT_IP) {
        ip_event_got_ip_t* event = (ip_event_got_ip_t*) event_data;
        ESP_LOGI(TAG, "got ip:" IPSTR, IP2STR(&event->ip_info.ip));
        s_retry_num = 0;
        isConnected = 1;
        xEventGroupSetBits(s_wifi_event_group, WIFI_CONNECTED_BIT);
    }
}The event_handler() function is a callback used to handle Wi-Fi and IP-related events in ESP32 Station Mode.
Here’s what it does:
- When the station starts, it attempts to connect to the configured Wi-Fi access point.
- If the connection fails, it retries until the maximum retry limit is reached. If all retries fail, it sets a failure flag.
- When the ESP32 successfully gets an IP address, it logs the assigned IP and sets a flag to indicate a successful connection.
The isConnected variable will act as a flag later for the http client. This flag Sets when the ESP32 is connected to the Wifi network and it Resets when the connection is terminated.
Wifi Station Initialization
The main function will call the wifi_init_sta to initialize the Wifi in Station mode. Below is what this function does.
void wifi_init_sta(void)
{
    s_wifi_event_group = xEventGroupCreate();

    ESP_ERROR_CHECK(esp_netif_init());

    ESP_ERROR_CHECK(esp_event_loop_create_default());
    esp_netif_create_default_wifi_sta();

    wifi_init_config_t cfg = WIFI_INIT_CONFIG_DEFAULT();
    ESP_ERROR_CHECK(esp_wifi_init(&cfg));

    esp_event_handler_instance_t instance_any_id;
    esp_event_handler_instance_t instance_got_ip;
    ESP_ERROR_CHECK(esp_event_handler_instance_register(WIFI_EVENT,
                                                        ESP_EVENT_ANY_ID,
                                                        &event_handler,
                                                        NULL,
                                                        &instance_any_id));
    ESP_ERROR_CHECK(esp_event_handler_instance_register(IP_EVENT,
                                                        IP_EVENT_STA_GOT_IP,
                                                        &event_handler,
                                                        NULL,
                                                        &instance_got_ip));

    wifi_config_t wifi_config = {
        .sta = {
            .ssid = ESP_WIFI_SSID,
            .password = ESP_WIFI_PASS,
            /* Authmode threshold resets to WPA2 as default if password matches WPA2 standards (password len => 8).
             * If you want to connect the device to deprecated WEP/WPA networks, Please set the threshold value
             * to WIFI_AUTH_WEP/WIFI_AUTH_WPA_PSK and set the password with length and format matching to
             * WIFI_AUTH_WEP/WIFI_AUTH_WPA_PSK standards.
             */
            .threshold.authmode = ESP_WIFI_SCAN_AUTH_MODE_THRESHOLD,
            .sae_pwe_h2e = ESP_WIFI_SAE_MODE,
            .sae_h2e_identifier = EXAMPLE_H2E_IDENTIFIER,
        },
    };
    ESP_ERROR_CHECK(esp_wifi_set_mode(WIFI_MODE_STA) );
    ESP_ERROR_CHECK(esp_wifi_set_config(WIFI_IF_STA, &wifi_config) );
    ESP_ERROR_CHECK(esp_wifi_start() );

    ESP_LOGI(TAG, "wifi_init_sta finished.");

    /* Waiting until either the connection is established (WIFI_CONNECTED_BIT) or connection failed for the maximum
     * number of re-tries (WIFI_FAIL_BIT). The bits are set by event_handler() (see above) */
    EventBits_t bits = xEventGroupWaitBits(s_wifi_event_group,
            WIFI_CONNECTED_BIT | WIFI_FAIL_BIT,
            pdFALSE,
            pdFALSE,
            portMAX_DELAY);

    /* xEventGroupWaitBits() returns the bits before the call returned, hence we can test which event actually
     * happened. */
    if (bits & WIFI_CONNECTED_BIT) {
        ESP_LOGI(TAG, "connected to ap SSID:%s password:%s",
                 ESP_WIFI_SSID, ESP_WIFI_PASS);
    } else if (bits & WIFI_FAIL_BIT) {
        ESP_LOGI(TAG, "Failed to connect to SSID:%s, password:%s",
                 ESP_WIFI_SSID, ESP_WIFI_PASS);
    } else {
        ESP_LOGE(TAG, "UNEXPECTED EVENT");
    }
}
The wifi_init_sta() function is responsible for configuring the ESP32 in WiFi Station Mode, allowing it to connect to a specified Wi-Fi network. This is a crucial step when building an ESP32 WiFi data logging project or integrating with cloud platforms like ThingSpeak.
Here’s what the function does, step by step:
- Creates an event group to manage Wi-Fi connection status flags.
xEventGroupCreate(); - Initializes the TCP/IP stack and creates the default event loop.
esp_netif_init();andesp_event_loop_create_default(); - Sets up the default network interface for Station Mode.
esp_netif_create_default_wifi_sta(); - Initializes the Wi-Fi driver using default configuration settings.
esp_wifi_init(&cfg); - Registers event handlers for Wi-Fi events and IP address acquisition.
esp_event_handler_instance_register - Configures the Wi-Fi credentials by setting the SSID, password, and authentication settings manually in the code.
esp_wifi_set_config(WIFI_IF_STA, &wifi_config); - Sets the Wi-Fi mode to Station (STA) and applies the configuration.
esp_wifi_set_mode(WIFI_MODE_STA); - Starts the Wi-Fi driver, initiating the connection process.
esp_wifi_start(); - Waits for the connection result using an event group:
xEventGroupWaitBits- If connected successfully, it logs a confirmation message.
- If the connection fails after the maximum number of retries, it logs a failure message.
This function ensures that the ESP32 is properly configured to connect to a WiFi access point, which is essential for sending data to the cloud in any ESP32 ThingSpeak integration project.
Result of the Station Mode
The image below displays the console output generated when the project was executed successfully on the ESP32.
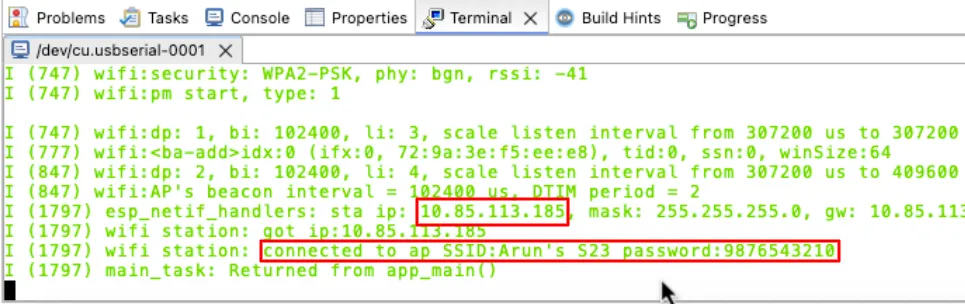
As highlighted in the red boxes, the ESP32 successfully connected to the mobile hotspot. It also obtained an IP address from the network, although the IP itself is not required for the scope of this project.
Configuring ESP32 as a http client & Sending data to ThingSpeak
We will now configure the ESP32 as an HTTP client so it can send data to ThingSpeak using HTTP requests. Since ThingSpeak accepts data via HTTP, this setup is essential for enabling ESP32 data logging to ThingSpeak and completing the cloud integration.
You can refer to another template project to configure the ESP32 as http client.
Function to Send the Data
We will define a new function named send_to_thingspeak(int value1, int value2) to send data to the ThingSpeak channel. This function takes two parameters:
- @value1 – Represents the data to be sent to Field 1 of the ThingSpeak channel.
- @value2 – Represents the data to be sent to Field 2 of the channel.
This function will handle the construction of the HTTP request and ensure both values are properly uploaded for logging and visualization.
void send_to_thingspeak (int value1, int value2)
{
	char url[256];
	sprintf (url, "http://api.thingspeak.com/update?api_key=%s&field1=%d&field2=%d",
				THINGSPEAK_KEY, value1, value2);

	esp_http_client_config_t config = {
		.url = url,
		.method = HTTP_METHOD_GET,
    };
    esp_http_client_handle_t client = esp_http_client_init(&config);

     // GET
    esp_err_t err = esp_http_client_perform(client);
    if (err == ESP_OK) {
        ESP_LOGI(TAG, "HTTP GET Status = %d, content_length = %"PRId64,
                esp_http_client_get_status_code(client),
                esp_http_client_get_content_length(client));
    } else {
        ESP_LOGE(TAG, "HTTP GET request failed: %s", esp_err_to_name(err));
    }

    esp_http_client_cleanup(client);
}The function is responsible for sending two integer values to the configured ThingSpeak channel using an HTTP GET request. Here’s what the function does:
- It formats the ThingSpeak update URL using the provided API key and field values.
- It initializes the HTTP client with the generated URL and sets the request method to
GET. - The request is then sent using
esp_http_client_perform(). - If successful, it logs the response status and content length; otherwise, it logs an error.
- Finally, it cleans up the HTTP client to free resources.
The main Function
Below is the implementation of the main function.
void app_main(void)
{
    //Initialize NVS
    esp_err_t ret = nvs_flash_init();
    if (ret == ESP_ERR_NVS_NO_FREE_PAGES || ret == ESP_ERR_NVS_NEW_VERSION_FOUND) {
      ESP_ERROR_CHECK(nvs_flash_erase());
      ret = nvs_flash_init();
    }
    ESP_ERROR_CHECK(ret);

    ESP_LOGI(TAG, "ESP_WIFI_MODE_STA");
    wifi_init_sta();
    while (1)
    {
		if (isConnected == 1)
		{
			int dummy1 = esp_random() %100;
			int dummy2 = esp_random() %100;
			ESP_LOGI(TAG, "Sending Values %d\t%d", dummy1, dummy2);
			send_to_thingspeak(dummy1, dummy2);
			vTaskDelay(pdMS_TO_TICKS(15000));
		}
	}
}The app_main() function is the main starting point of the program. Here’s what it does:
- It first initializes the NVS (Non-Volatile Storage), which is needed by the system to store Wi-Fi settings and other data. If there’s an issue, it erases and re-initializes it.
- Then it calls the
wifi_init_sta()function to connect the ESP32 to a Wi-Fi network in Station Mode. - After a successful connection, the program enters a loop that runs forever:
- It will check for the
isConnectedflag, which is only Set when the ESP32 is connected to the Network. - It creates two random numbers (used as sample data). This is a test data, you can read the sensor at this point to retrieve the results.
- These values are sent to the ThingSpeak cloud using the
send_to_thingspeak()function. - The program then waits 15 seconds before repeating the process. This is the minimum wait time set by the Thingspeak for Free users.
- It will check for the
Final Result
The image below shows the console logs generated when the project was executed.

You can see a set of random values are generated, which are also printed on the console. These values are generated and sent to thingspeak channel every 15 seconds.
The image below shows the data accusation on the Thingspeak channel.
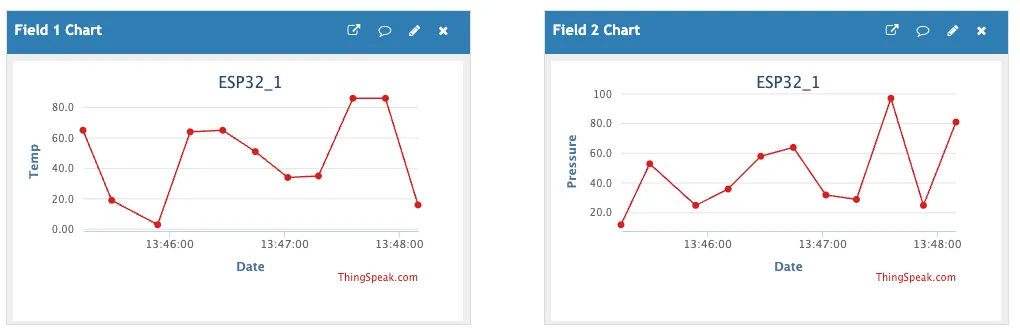
The charts above show the live data uploaded by the ESP32 to ThingSpeak. Field 1 (left) logs dummy temperature values, while Field 2 (right) logs dummy pressure readings.
The successful and timely updates confirm that the ESP32 is working correctly in WiFi Station mode and is able to send HTTP GET requests to the ThingSpeak Channel.
In this tutorial we covered how to connect the ESP32 to Wi-Fi in Station Mode and send data to ThingSpeak using HTTP requests, all within the Espressif IDE. Two dummy values are sent to the cloud at regular intervals, simulating real sensor data. This forms the foundation for real-world IoT applications like weather stations or smart meters. You can expand this by adding sensors and logging multiple fields. The next tutorial will focus on sending data using the MQTT protocol for more efficient and scalable IoT communication.
PROJECT DOWNLOAD
Project FAQs

