How to Interface passive Buzzer with STM32
In this tutorial we will see how to interface a passive buzzer with STM32. We will create a function to change the sound frequency during runtime and we will also see how to play a melody using the buzzer.
Buzzers can be categorised into two different types – active buzzers and passive buzzers.
An active buzzer has a built-in oscillator and it can only produce a single Tone. Controlling an Active buzzer is same as controlling a LED. To play the tone, just set the respective pin HIGH, and to stop playing it set the pin LOW.
A passive buzzer does not have a built-in oscillator, so it needs an AC audio signal to produce sound. We can use the PWM (Pulse Width Modulation) in the MCU instead of the AC signal. The sound Frequencies changes based on the input signal frequency to the buzzer.
In this tutorial we will focus on the Passive Buzzers.
VIDEO TUTORIAL
You can check the video to see the complete explanation and working of this project.
Connection
There are 2 types of passive buzzer modules which you can generally find in the stores.
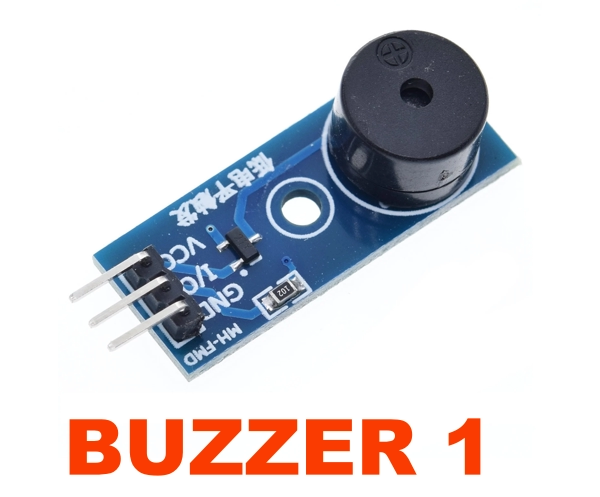
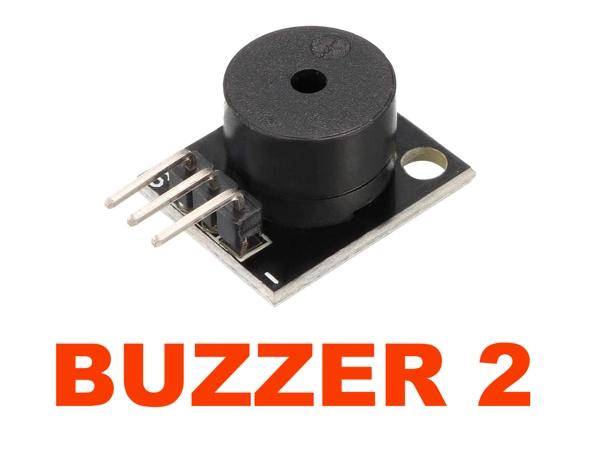
Both these modules has 3 pins for the connection, but in the BUZZER 2 the middle pin is not connected. So we only have 2 pins, one for the signal and another is ground.
The connection diagrams for both buzzers are shown below.
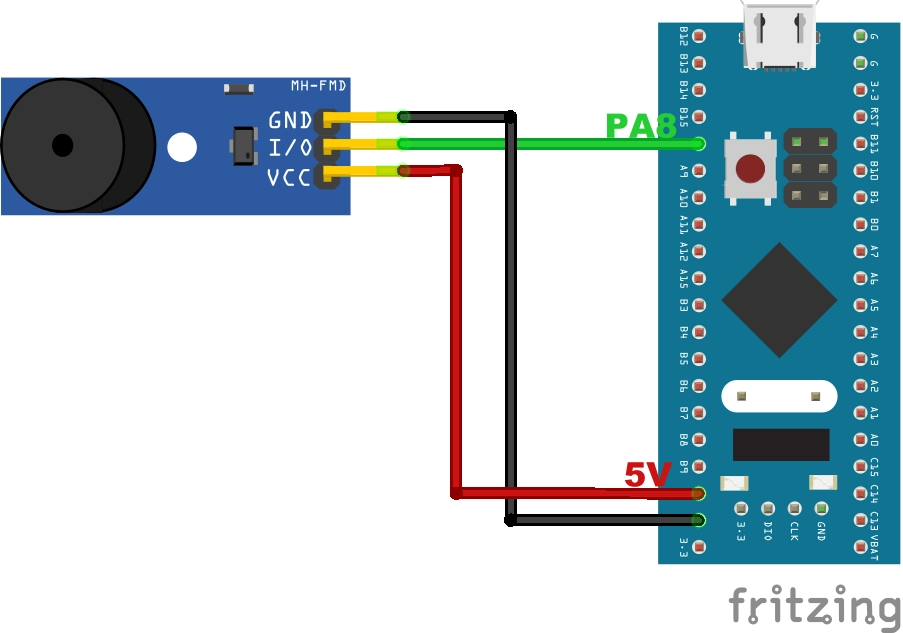
Foe the BUZZER1, we need to connect the 5V supply to the VCC pin and Gnd to Gnd. The signal pin (I/O) is connected to the pin PA8 of the MCU. This is the TIM1 CHANNEL1 pin where we will output the PWM signal.
If you are using BUZZER 2 or just a simple Buzzer (Not a Module), the connection is as shown below.

The signal pin (or + in case of buzzer alone) is connected to the pin PA8 of the MCU. This is the TIM1 CHANNEL1 pin where we will output the PWM signal. The Gnd pin (or -) is connected to the Ground.
CubMX Configuration
Clock Configuration
The clock configuration for the STM32F103C8T6 is shown below.
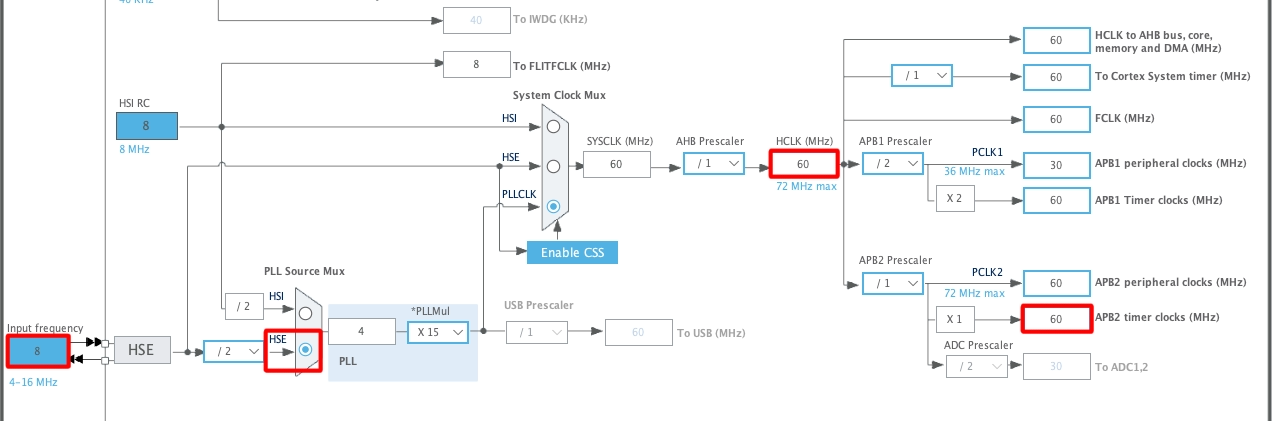
- External Crystal (8MHz) is used to provide the clock via the PLL.
- The system is running at 60MHz.
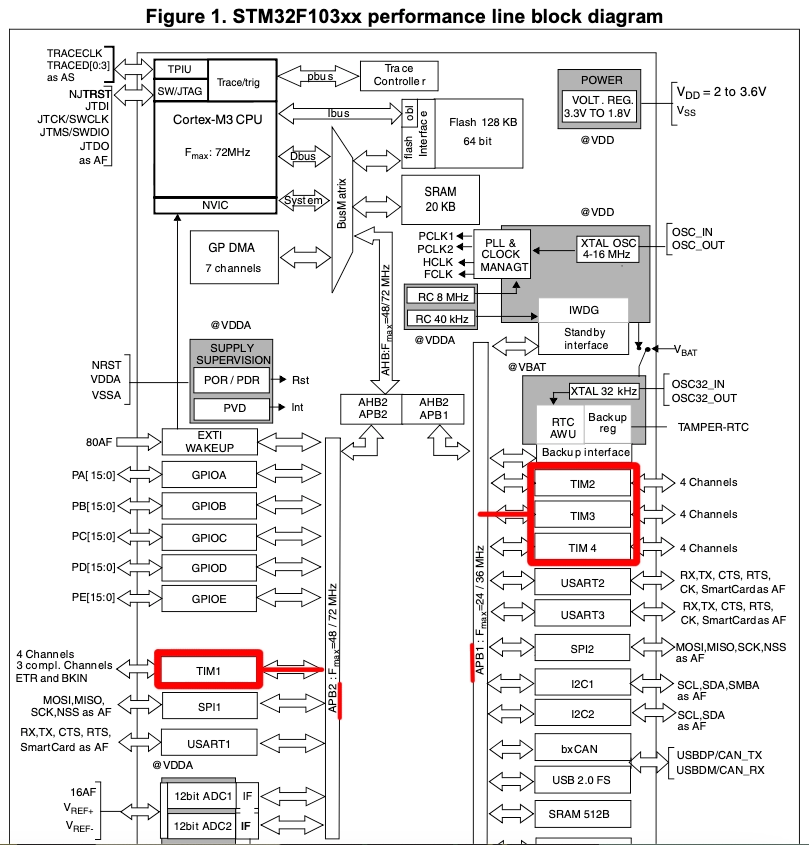
- I am going to use the TIM1 for the PWM, which is connected to the APB2 Bus (Check this Image).
- The APB2 Timer clock is at 60MHz right now.
Timer Configuration
The TIM1 configuration is shown below.
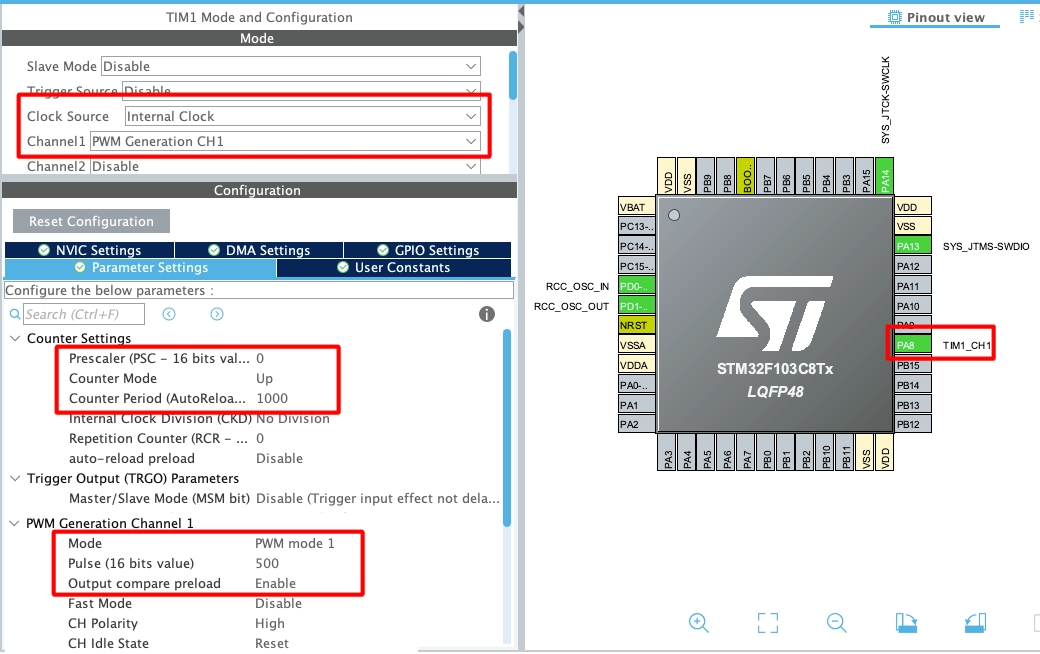
- Select the PWM channel for the Timer, I am using Channel 1.
- Set the Clock source as internal clock, which is at 60 MHz.
- Pin PA8 is set as the PWM output Pin and we have connected it to the Buzzer Signal pin.
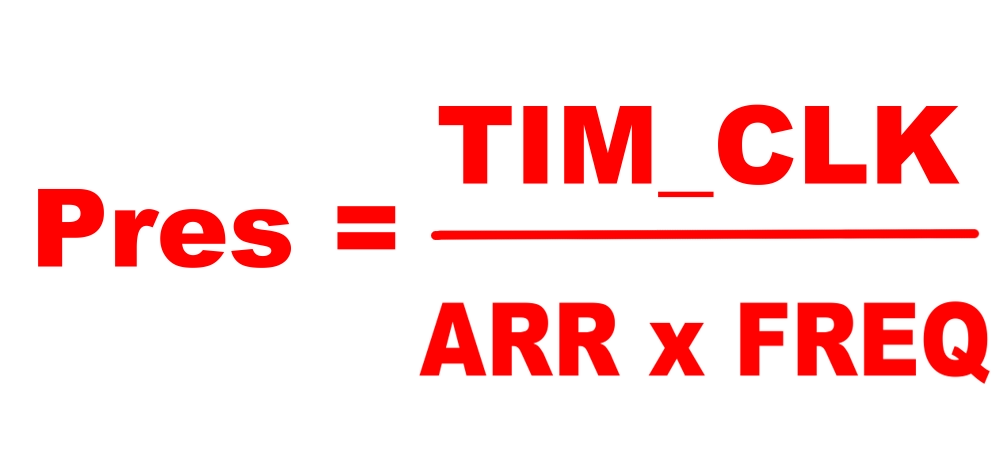
The output Frequency of the PWM signal depends on 3 parameters, Timer Clock, ARR and Prescaler.
Out of these parameters, the Timer Clock will remain constant throughout the project. Since we want to change the frequency of the output signal in the runtime, we must keep the ARR constant and change the prescaler. The reason for this is that the duty cycle of the signal also depends on ARR and hence if we vary the ARR, we also need to change the CCR (Capture Compare Register) value so to keep the duty cycle in the limits.
In the configuration above, I have set the ARR value to 1000. The prescaler is kept at 0 as we will change it in the runtime. Also note that the Pulse value is set to 500, which is half of the ARR and hence the duty cycle will be 50%.
The Code
We will first define a function to get the prescaler value for the required Frequency.
#define TIM_FREQ 60000000

int presForFrequency (int frequency)
{
	if (frequency == 0) return 0;
	return ((TIM_FREQ/(1000*frequency))-1);  // 1 is added in the register
}Here the Timer Clock is same as the APB2 Timer Clock, i.e 60MHz. Note that here we are using the same formula which was defined above. The calculated prescaler value will be returned.
Note that the value returned must be 1 less than the actual value. This is because the library add a 1 to this value at the register level, so we must keep it 1 less than the value we want to pass.
We also need to take care of the case when the value 0 is being passed. Here we don’t want to pass the 0 to the calculation to avoid the math error. In this case we will simply return 0.
Inside the main function we will start the Timer in the PWM mode. Then play the tones of different frequencies in the while loop.
int main()
{
  .....
  HAL_TIM_PWM_Start(&htim1, TIM_CHANNEL_1);
  while (1)
  {
    __HAL_TIM_SET_PRESCALER(&htim1, presForFrequency(1000));
    HAL_Delay(250);
    __HAL_TIM_SET_PRESCALER(&htim1, presForFrequency(3000));
    HAL_Delay(250);
    __HAL_TIM_SET_PRESCALER(&htim1, presForFrequency(6000));
    HAL_Delay(250);
    __HAL_TIM_SET_PRESCALER(&htim1, presForFrequency(9000));
    HAL_Delay(250);
    __HAL_TIM_SET_PRESCALER(&htim1, presForFrequency(12000));
    HAL_Delay(250);
  }
}Here we will start the TIM1 in the PWM mode. The PWM channel is set to CHANNEL 1 as this is what we configured in the cubeMX. Inside the while loop we will generate the signal of different frequencies by setting the prescaler value calculated for the respective frequency.
This will generate the tone of respective frequency, and the tone will continue to play for 250ms before it changes.
Below is the output of the above code.
You can clearly hear the sound of 5 different frequencies with increasing pitch.
Playing the Melody
The code above works fine. Now we will write a function which can play the melody.
A Melody data consists of the frequencies and the duration for which each frequency tone will be played. While searching for the frequency data for the Melody, I found this github repo. This is actually written for the Arduino, but here we are only interested in the data, rather than how it is being played.
Below is the frequency and the timing tables for the melody from the famous Stranger Things from the same repo.
int STmelody[] = {
131, 165, 196, 247, 262, 247, 196, 165, 131, 165, 196, 247, 262, 247, 196, 165, 131, 165, 196, 247, 262, 247, 196, 165, 131, 165, 196, 247, 262, 247, 196, 165, 131, 165, 196, 247, 262, 247, 196, 165, 131, 165, 196, 247, 262, 247, 196, 165
};
int STnoteDurations[] = {
188, 188, 188, 188, 188, 188, 188, 188, 188, 188, 188, 188, 188, 188, 188, 188, 188, 188, 188, 188, 188, 188, 188, 188, 188, 188, 188, 188, 188, 188, 188, 188, 188, 188, 188, 188, 188, 188, 188, 188, 188, 188, 188, 188, 188, 188, 188, 188
};
Here the STmelody array contain the frequency data in hertz and the STnoteDurations array contains the timing data in ms for the respective frequency.
Below is the playTone function which will play this melody. The parameters of the function are
- @tone is the pointer to the frequency array.
- @duration is the pointer to the timing array.
- @pause is the pointer to the pause between tones array.
- @size is the size of the arrays.
void playTone (int *tone, int *duration, int *pause, int size)
{
	for (int i=0; i<size; i++)
	{
		int pres = presForFrequency(tone[i]);  // calculate prescaler
		int dur = duration[i];  // calculate duration
		int pauseBetweenTones = 0;
		if (pause != NULL) pauseBetweenTones = pause[i] - duration[i];

		__HAL_TIM_SET_PRESCALER(&htim1, pres);
		HAL_Delay(dur);   // how long the tone will play
		noTone();  // pause
		HAL_Delay(pauseBetweenTones);  // no tone for this duration
	}
}Inside this function we will first calculate the prescaler and the duration value for each element of the array.
The pauseBetweenTones is the period when the no tone plays and as per the Arduino reference, this time also considers the duration of the tone. Therefore we need to subtract the duration from the pause data.
After calculating all the required variables, we will set the prescaler and then give the delay so that the tone plays for the required amount of time.
The noTone function is used to play no tone and the period for this no tone function is as per the value calculated for the pauseBetweenTones variable.
Below is the implementation of the noTone function.
void noTone (void)
{
	__HAL_TIM_SET_PRESCALER(&htim1, 0);
}Here we will set the prescaler to 0 (It will be passed as 1 to the register). This will result in the frequency of 60KHz (60MHz/(1000*1)) and even if the buzzer produces a wave of this frequency, we won’t be able to hear it.
Below is the main function to play the melody.
int main ()
{
  ......
  playTone(STmelody, STnoteDurations, NULL, (sizeof(STmelody)/sizeof(STmelody[0])));
  noTone();
  while (1)
  {
  }
}In the main function we will call the playTone function, and pass the frequency (STmelody) and timing (STnoteDurations) arrays to it. There is no pause data for this melody, so pass the NULL. And the last parameter is the size of the arrays.
After playing the melody, call the function noTone to pause the tone.
Below is the output of the above code.
Adding the pause
Since we don’t have a separate pause array to pass to the parameter, I will modify the playTone function itself. This is just to demonstrate how the pause between the tones sounds like.
void playTone (int *tone, int *duration, int *pause, int size)
{
	for (int i=0; i<size; i++)
	{
		int pres = presForFrequency(tone[i]);  // calculate prescaler
		int dur = duration[i];  // calculate duration
		int pauseBetweenTones = 0;
		if (pause != NULL) pauseBetweenTones = pause[i] - duration[i];

		__HAL_TIM_SET_PRESCALER(&htim1, pres);
		HAL_Delay(dur);   // how long the tone will play
		noTone();  // pause
		HAL_Delay(30);  // no tone for 30ms
	}
}Here check the last line of the code. I have added a pause delay of 30ms, so there will be no tone for this period. This pause will occur after each tone.
Below is the output of the code.
You can clearly hear the pause between each tone. This pause can be modified in certain cases to play a specific note.


Hi, Is any way to not using HAL_Delay() function in this code?